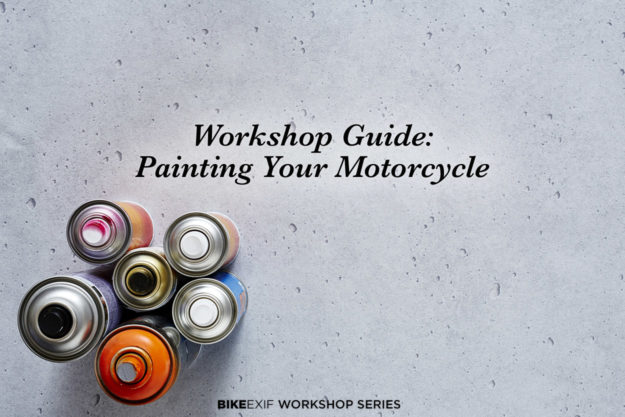
Ready to tackle your first motorcycle paint project? In Part One of this guide, we outlined the first three steps: theory, planning and the all-important prepping procedures, ending with a final coat of smooth spray putty.
This week, we’re laying down the paint itself, using aerosol cans. So grab those tins and let’s get cracking.
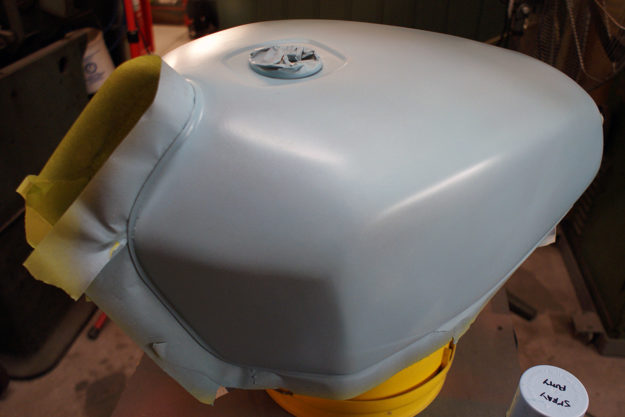
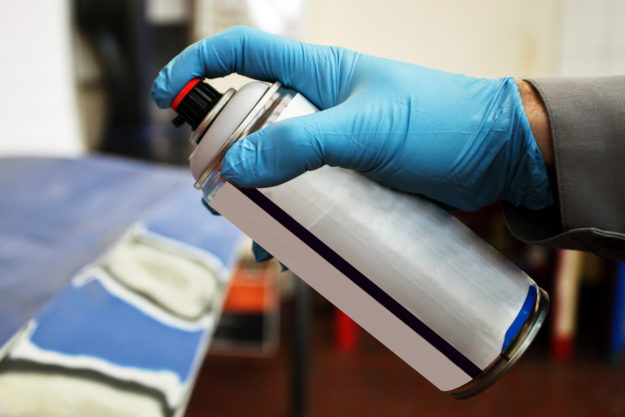
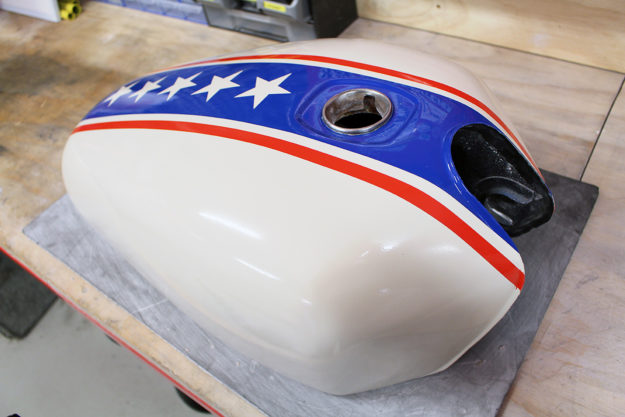
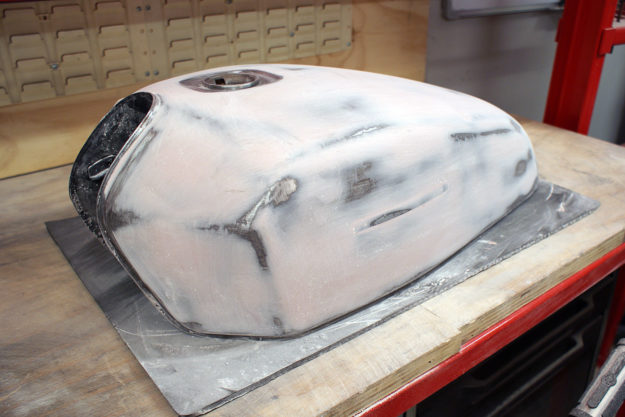
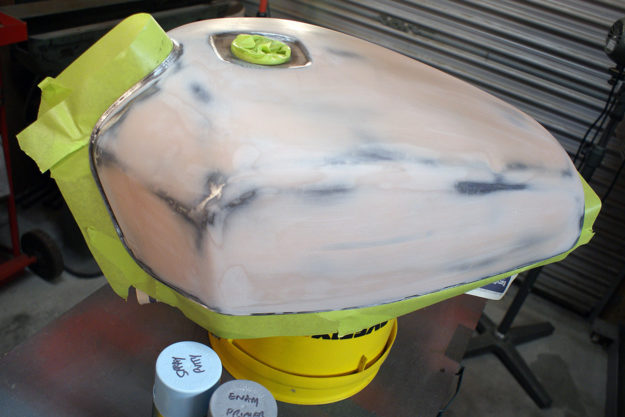
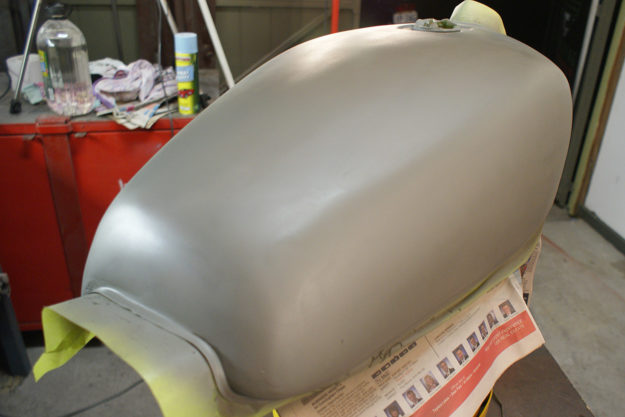
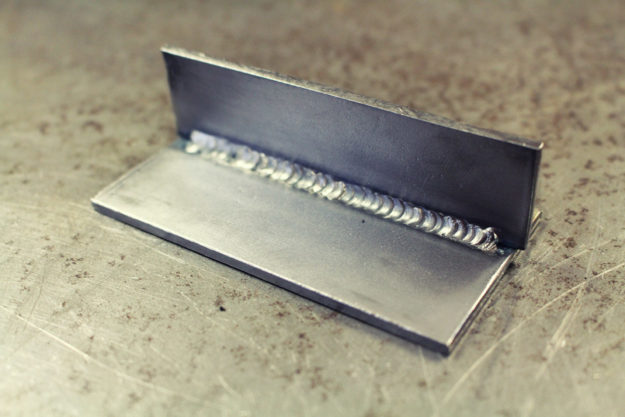
Step 4: Painting Let’s get into the spraying technique in detail. This will apply to primer, spray putty, paint and pretty much any other aerosol product. We’re picking up from where we left off last time, with a smooth coat of spray putty, and will finish with the classic Stars and Stripes design shown below.
Your objective is to apply a consistent thickness of product over the surface. On a high-end spray rig, you can set the air pressure and fluid flow to achieve the ideal spray pattern. But with an aerosol, you don’t have this luxury—you have to work with whatever spray pattern comes out the can.
What you can control is the angle of the can, how far away you hold it, and how fast you move it. These three factors combined will determine the paint coverage on the surface you’re painting.
To achieve consistency, the spray needs to be kept perpendicular to the surface, a constant distance away from it, and moved at a constant speed. If the can is too far away, or you’re moving too fast, the paint will disperse more and result in a thinner coat. Closer or too slow, and you’ll end up with a thicker coat. And if you’re painting a curved surface—like a fuel tank—you need to keep these factors constant as you move around it.
Each aerosol brand and product will deliver a slightly different spray pattern, so spray a test pattern on some cardboard first. More expensive automotive aerosols might be fitted with a nozzle that delivers a fan, much like a spray gun, while cheaper aerosols will deliver a conical spray pattern. (I find the fan pattern helps to deliver a consistent surface covering.)
A spray test will also help you figure out how far away and how fast you’ll need to move, to coat the surface. On a vertical surface, too much paint will run and require more color sanding to repair—but light coats can easily be built up further. If you’re building up a solid color, who cares if it takes four coats to get it right?
Check the paint can instructions too. There might be a specific spray distance suggested, and wait times for re-coating, sanding and final cure. Your local weather conditions (both temperature and humidity) will of course also play a part in how your finish cures—so ask your paint retailer for advice if you are working during extreme weather.
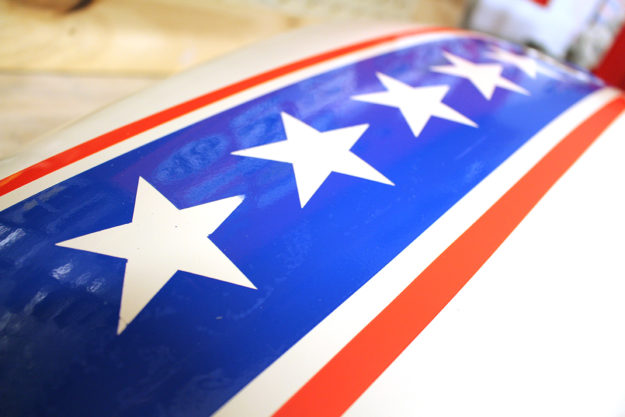
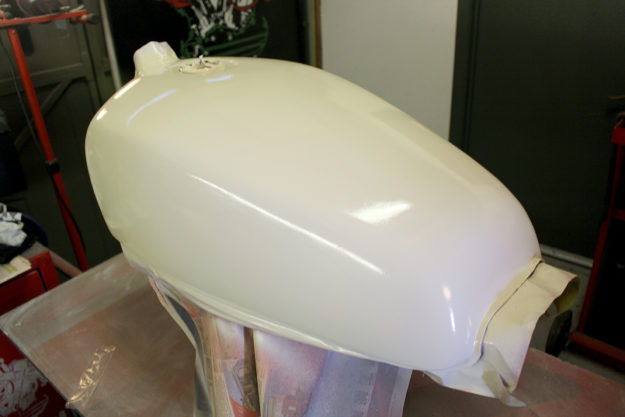
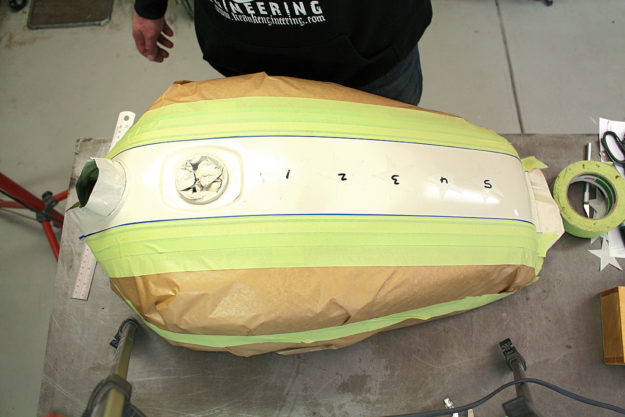
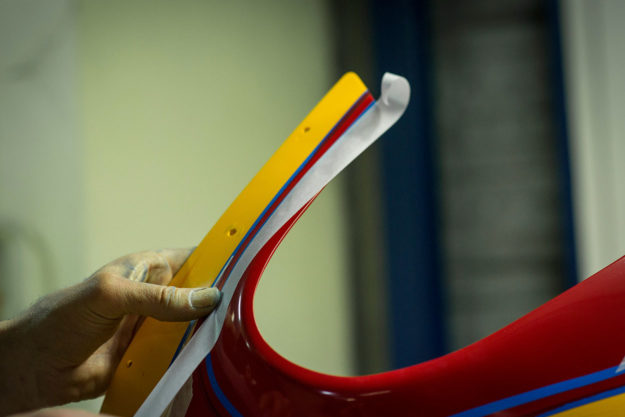
The design for my ‘sample’ motorcycle tank included a base cream color, a central blue stripe with cream stars down the center, and red accent stripes. So I needed to plan my steps in advance to achieve this finish.
I kicked things off with three coats of the base cream color. Then I printed out some star shapes, and used them as a template to cut five identical stars out of masking film, which I pressed onto the cream surface.
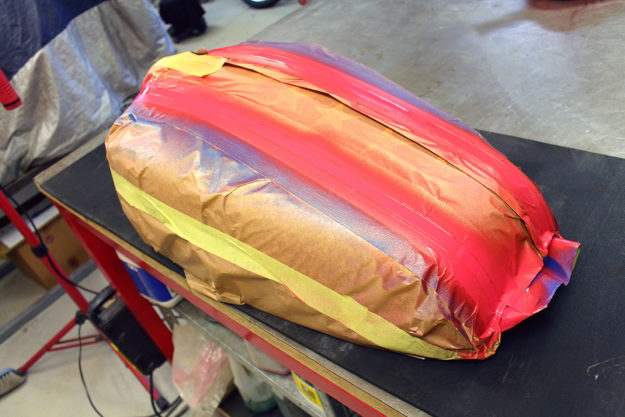
Using a good quality vinyl tape, I then laid down the edges of the blue stripe. This tape is specifically designed for painting and should prevent any bleed, leaving a crisp line on your surface. The rest of the tank I protected with masking paper.
Now it was time to shoot the blue stripe down the center. Once the paint had dried, I masked everything off again, leaving two stripes ‘open’ before hitting them with red paint.
It was pretty nerve-wracking peeling all the masks and vinyl tape off! The finish isn’t show-class, but I’d be happy to paint something like this on my own project bikes.
Step 5: Color sanding and polishing Once the paint finish is completely cured, you might want to consider color sanding. There are a couple of reasons for this:
1. You might have minor blemishes in the finish that you want to remove.
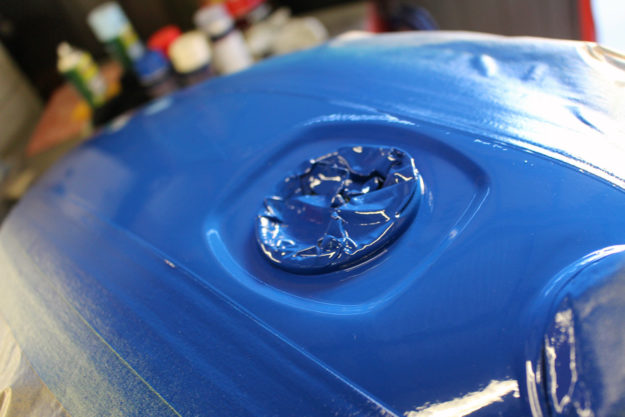
2. You might have an ‘orange peel’ finish that you want to smooth out, which is what happened on this project. ‘Orange peel’ is a mottling of the paint surface that literally looks like the peel of an orange under the right light. If you ask the internet, you’ll find a hundred explanations—mostly involving application technique, paint viscosity and spray rig preparation. Since we aren’t working with a proper spray rig, we have limited control.
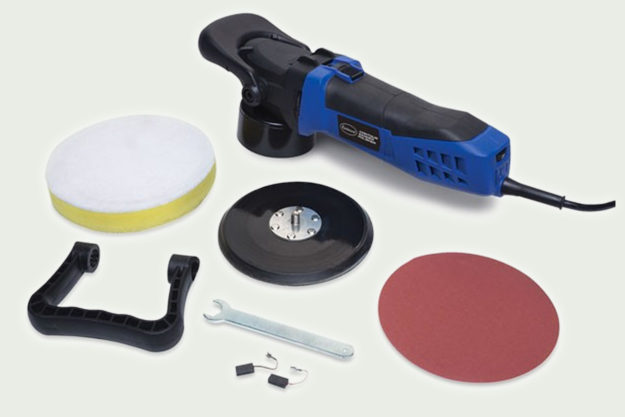
Before you consider color sanding, check with your paint supplier to confirm it’s compatible with the paint you are using. You’re also going to need rotary and random-orbital polishing machines, if you want to do a proper job.
To achieve a glassy, super-smooth finish, you need to use finer and finer grades of abrasives, to smooth the surface to the point where any scratches and defects are too small for the human eye to distinguish.
This is the color sanding process I was taught by an auto manufacturer, for correcting defects and orange peel on new cars:
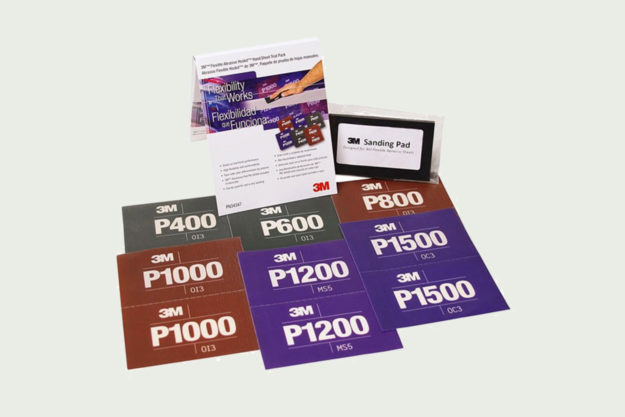
1. Wet sand with 1500 grit paper 2. Wet sand with 2000 grit paper 3. Rotary machine buff with cutting compound 4. Random-orbital machine buff with polishing compound 5. Apply protective wax
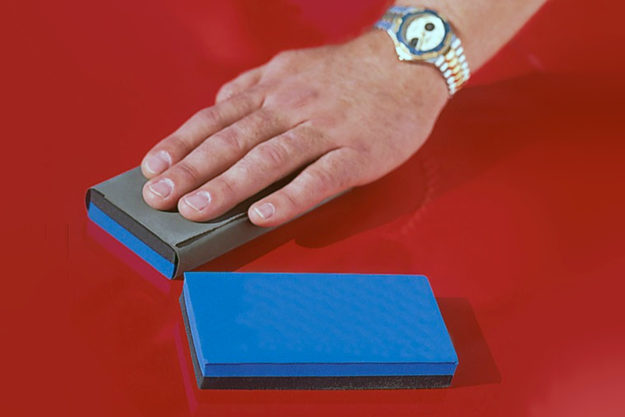
Wet sand with 1500 grit paper ‘Wet sanding’ literally means that the surface and abrasive paper are wet. This way the paint dust from sanding is carried off by the water, which reduces scratches on the painted surface.
To apply water, you can use a spray bottle, continually trickle water over the surface with a garden hose, hold the part under a trickle of water from a tap, or grab a bucket of water and continually dip the paper into it.
The color-sanding block we used in Part One is returned to service for this step, as you need the paper to conform to the shape of the surface you’re sanding. Using the 1500 grit paper on the block will take the ‘high spots’ off the paint, and you’ll see all the shine removed from the surface in the process.
Wet sand with 2000 grit paper Progressing to 2000 grit paper will smooth the 1500 grit sanded surface even further, making the scratches from the previous step finer.
Rotary machine buff with cutting compound Once you’ve sanded the surface with 2000 grit paper, it’s time to move to a liquid cutting compound (preferably a product designed for machine compounding). Your auto body supply store can recommend a system of products that will work well. I was taught with 3M products, so I’ll happily recommend their rubbing compound.
A rotary machine buff looks like a large angle grinder, but the spindle speed is much slower, and higher spec machines have variable speed controls. A slower speed reduces the chance of burning the paint from excessive heat. The machine buff might be fitted with a wool or foam buff, but the cutting compound is applied to the painted surface.
The rotary action and polish reduces the 2000 grit scratches even further, but the spinning action leaves swirl marks (light circular scratches) in the surface.
Random-orbital machine buff with polishing compound To remove the swirl marks left by the rotary buff, use a random-orbital machine with a foam pad and a liquid polishing compound.
The random-orbital polishing machine rotates and oscillates the pad at the same time. This ‘random’ motion, combined with a very fine abrasive in the polish, works to remove the circular scratches left by the previous step.
Apply protective wax Finally, you can protect the finely polish surface you have prepared with a wax. This can be applied and buffed off by either machine or hand.
Step 6: Enjoy! If you’ve followed along and painted your own garage art, test part or project bike, congratulations! Like me, you’ll probably have found that laying the paint was pretty straightforward—but getting the finish smooth and straight was a big task.
My aim here is to give you the confidence to start tackling a simple motorcycle painting project—so get out there and have a go! You might find that you have a knack for it.
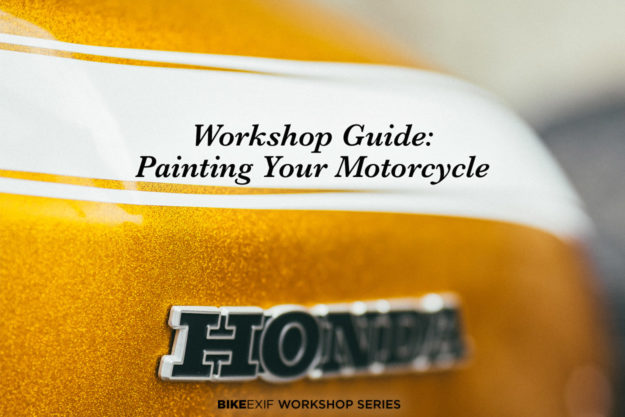
Ready to start painting? Click here to get Matt’s painting supplies and consumables shopping list. Cover shot: Rawhide’s ‘Golden Goose,’ painted by Jack ‘Pacman’ McCann.
Whether you’re trying to save a few bucks, or you just like the challenge of doing everything yourself, at some point you’ll probably consider painting your own bike. But not everyone has their own air compressor at home, or a spray booth and a decent spray gun.
But who says you can’t paint some of your motorcycle in your home shop with aerosol paint? Okay, you might not get the same result as a professional painter with a spray booth. It won’t be as durable as modern, two-part automotive paint. And you’ll probably spend time and money stripping it off and sending it to a professional after you change your mind.
But if you want to learn some new skills, have some fun, and get the satisfaction of doing it yourself, stick with me and speed up your learning curve.
You can get an acceptable result painting in your home shop, if you learn, practice and follow a process. So I’ve broken my process down into six steps: we’ll cover the first three this week, and the rest next time.
Before you start, be sure to talk to your local auto body supplier for detailed product information and recommendations. After you’ve read this article, you should be able to ask intelligent questions.
Step 1: Think about the final finish What color scheme does your project have? Will it have lettering, decals, patterns or lines? Flake or flat color? Gloss or matte?
Once you have a final finish in mind, it will help determine the painting process and products needed. A rough design of your paint scheme will help you plan the painting steps, so don’t be afraid to make a sketch with your design drawn in.
Step 2: Choose a paint system Assuming you don’t have an air compressor for this process, your paint selection is a little limited. So let’s cover some terminology that you might hear around paint technology.
Single stage paint is a paint where the color and the gloss are achieved with a single paint coating. Two-stage paints require one paint layer for the color, and another for the protective clear coat (which could be gloss or matte). These two-stage products are commonly called base coat/clear coat systems.
1K coatings are coatings that do not require a hardener, activator or other product to cure. House paint is a basic example of such a product; one-shot pinstriping enamel is another. (Most aerosol paint falls into this category too.)
2K coatings are products mixed with a hardener just prior to spraying, so as to activate a chemical reaction during drying. This provides a durable finished surface much less susceptible to damage from weather, UV rays, fuel or chemicals. Your average body shop will be spraying a 2K finish on modern cars in their spray booth.
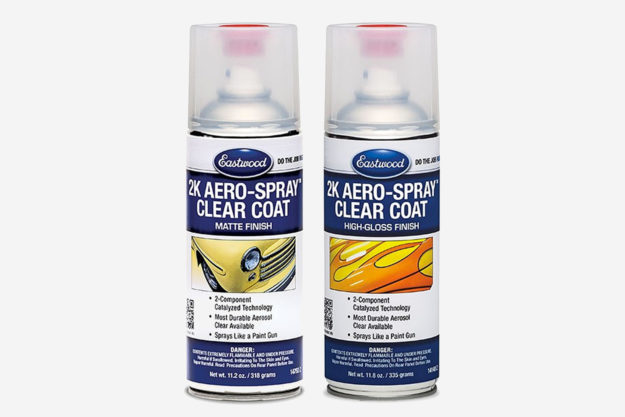
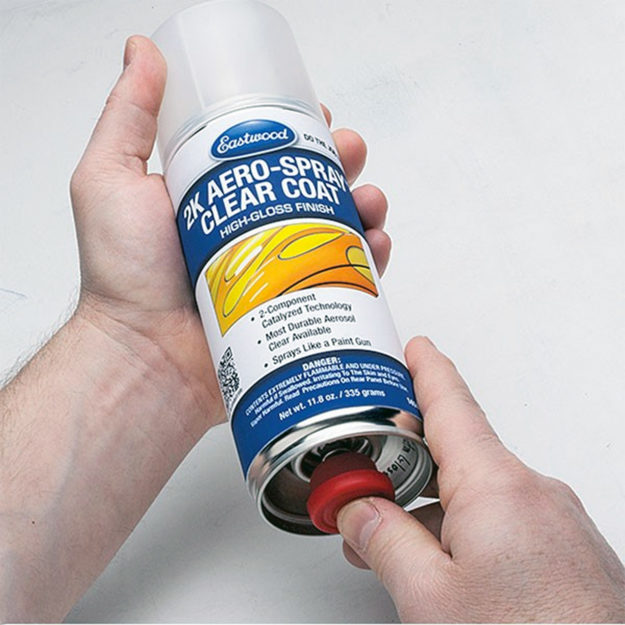
As with everything, there are exceptions. Some vendors can supply an aerosol can that delivers a 2K clear coat. They manage this with a separate chamber in the can that contains the hardener. Right before spraying, you activate the hardener supply and it mixes with the clear coat. You then have a limited window to spray the clear coat before the paint in the can ‘goes off.’
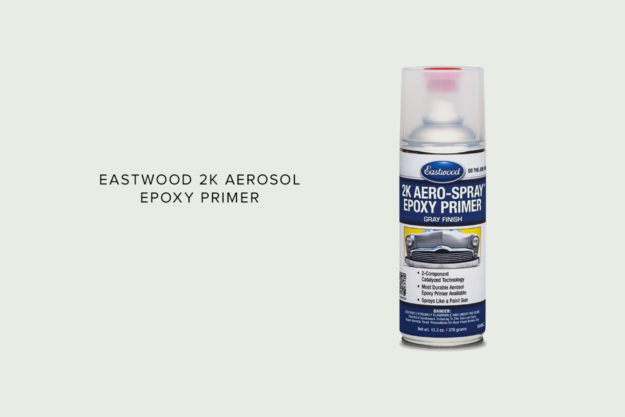
And, of course, you could have a two-stage paint system with a 1K base coat (color) and a 2k clear coat. Online sources like Eastwood are a great place to start investigating your options.
For a personal project, I resprayed my Kawasaki Ninja ZX-9R commuter bike in black and gold, with a 1K base coat, and a 2K matte clear coat over an eBay sticker kit.
The fuel tank you see above I painted especially for this article. I used a high-quality (read: relatively expensive) enamel aerosol paint from the hardware store, for a couple of reasons:
1. The re-coating time was fast—about 20 minutes. I had lots of paint to lay down, and a deadline!
2. This tank was full of rust holes, so would never go back on a bike, and would only ever be garage art.
3. It was far cheaper than a proper automotive paint.
If you want to tackle a project like this, I’d encourage you to do something similar. Find a surplus tank or fender and practice some of these techniques before you aim the aerosol can at your project bike. At worst, if it doesn’t work out, or you don’t like it, you can strip it off and start again.
Is there better paint for the final finish on your bike than hardware-shop enamel? Yes! Paint product availability will vary depending on where you are in the world, so go ask your local suppliers for advice, or check out the Eastwood site and their resources.
Step 3: Preparation Prep is crucial to a quality finish. My general process is: remove paint, fill, sand, prime, spray putty/filler, sand, and prime again.
Remove Paint You can repaint over an existing coat, whether it’s on a frame or a tank. If the paint is in good condition, you can simply scuff it up with 400 grit wet-and-dry paper and paint over it. You might be taking a risk with compatibility with the original paint, so test the existing paint first. Hold a rag soaked in general purpose thinners on the paint—if the thinners dissolves the existing paint, consider stripping it off.
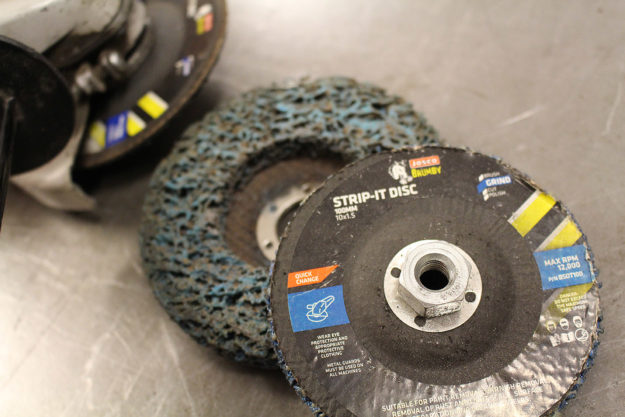
I much prefer to strip to bare metal regardless. I like to know what I am working with. You can see my favorite methods of removing paint in this article, but paint stripper is available in aerosol cans which might be suitable for a smaller motorcycle project.
On our project gas tank, I had previously sanded the paint off. The downside of sanding is that it leaves deep scratches in the metal—strip-and-clean discs are a clear winner here.
You may have heard advice about preventing or neutralizing rust on your bare metal. I normally don’t bother, as I go straight to the next step within hours of stripping the paint.
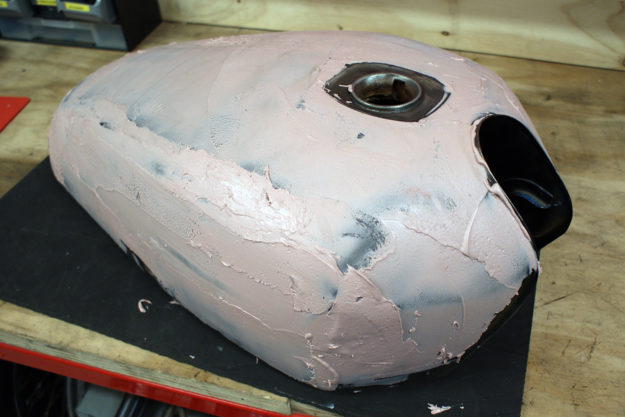
Fill On a new or reproduction tank, or on a frame, you might be able to skip this step. Otherwise, line up some automotive body filler. This is normally a two-part product—you need to mix a hardener with the filler to start a reaction that cures the product.
Before mixing up the filler, put on some disposable gloves to protect your skin. Use wax and grease remover with a clean rag, and wipe over the tank to ensure it is spotless and ready for the next step.
You’ll need a surface to mix the filler. Some sources suggest cardboard will absorb resins from the filler, so I use a $2 plastic chopping board from that big Swedish furniture store. Pick up some plastic body filler spreaders; these are a buck or so. (You can use any stiff plastic card if you’re really on a budget.)
Follow the instructions on the product packaging. Mine said something like “mix one part hardener to 50 parts filler by weight.” I have no idea how you’d actually do this, so I scoop out some filler with the spreader and squeeze out a thin line of hardener across it. Use the plastic spreader to continually fold the mixture into itself until it has a consistent color and texture.
You need to keep moving now, as the filler is starting to cure. Use the plastic spreader to drag filler over the surface. I hold the spreader with my thumb on one side and three fingers on the back—I can then curve it to match the surface better. With a few attempts, you’ll soon determine the best angle and pressure to leave a smooth coat on the surface.
Apply a coat no more than 3mm or 1/8” thick at a time. If you have a deeper dent to build up, apply 3mm then let it dry before applying further coats to build it up.
You’ll find the filler getting harder to work as the minutes pass and it cures. Mix up small quantities so you don’t waste any. Aim to smooth out the filler as much as possible; leaving mounds and humps will add a lot of sanding work in the next step.
Sand Once the filler has cured (around 30 minutes if all goes well), you can start sanding. I aim to remove filler as quickly as possible, without leaving massive scratches that I’ll have to fill again later. My hardware store stocks 80 grit aluminum oxide paper in bulk rolls, so I start with this. The 80 grit doesn’t leave significant scratches, and the aluminum oxide paper resists clogging.
While working on this project, I found a 5lb box of assorted grit paper, which would be a good option if you wanted to order online. I also use a color sanding block, which is a firm foam pad that you wrap your abrasive paper around. Rather than a hard, straight block—which is fine for straight, flat surfaces—the color sanding block conforms to a curved surface.
With some reasonably coarse paper wrapped around a color sanding block, start smoothing out the filler. This is dusty work, so wear a disposable dust mask. Keep working though your supply of abrasive paper until the filler is only left in the low spots, such as dents.
Run your hand, palm down, over the surface. You’ll feel any low spots—the filler in these areas isn’t high enough to match the existing surface. Mix up some more and repeat the filling and sanding process.
This step will likely take the longest, but is the foundation for your paint finish. In the tank I painted for this article, I spent around four hours filling and sanding. Mostly sanding. Be aware that while it might look great at the filler stage, the first coat of primer will really help highlight any flaws in this step. If you can see the flaw now, you can guarantee it will be visible under paint. Now is the time to patch it with filler and smooth it out.
Before your progress to the next step, I would recommend progressively finer sanding with 120, 240, and 400 grit papers. I’ve found I sometimes have trouble covering 80 grit sanding scratches in the priming and painting stages if I don’t smooth the filler coat further.
Prime A primer is used to provide a key between the surface and paint, or in this case, between the filler and paint. Your paint supplier will recommend the best primer to suit your final paint finish product. The packaging will suggest how thick to lay it on, and how long you need to wait between coats.
Before you shoot any primer, you’ll need to use tape to mask off any parts that don’t need paint, like the fuel filler. I also mask from behind the tank seam to prevent any paint blowing onto the underside of the tank. I use a reasonable quality painter’s tape, not cheap domestic masking tape.
At the absolute last second before applying primer, or any coat for that matter, use a tack cloth and wipe the surface you’re about to paint. The tack cloth will pick up any dust or dirt that has settled and minimize how much ends up in your paint finish.
The primer you use might contain some filler product to help smooth the surface. If so, you can sand the primer. You might use a 240 grit at this stage, then a 400 grit before the next step. Taking the high spots off will level out the surface further. If you sand back to the body filler, prime it again before moving to the next step.
If the primer doesn’t contain any filler (or enough to cover any marks) you might add the next step.
Spray putty If you find some minor scratches in the primer, a spray putty can help fill these. Follow the product instructions—the spray putty I use suggests three to four coats, then sanding. Again, you might end up sanding the majority of the putty off, with only the putty in the low spots remaining.
Check your spray putty coverage and sand any marks out. Spot patch with more body filler if the spray putty didn’t cover up your earlier sins. Give it a final sand and check with your hand again. Hopefully you can’t feel any more marks in the surface. If you’ve sanded back to bare metal, or the product recommends more primer over the putty, spray it on before moving to paint. And that’s what we’ll cover in Part II in a couple of weeks.
Download a free Amazon shopping list of supplies and consumables needed for a paint job exactly like that described in this article here.
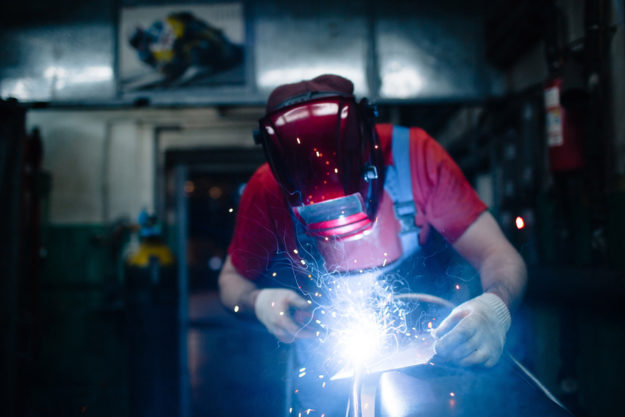
Whether you’re customizing a bike or building your own work stand, welding is a great skill to have. In Part One of this guide, we covered some theory, and looked at the various welding processes and machines you might want to consider.
This week, we’re diving right in with the basics of how to get started. And first up is safety: welding is an activity that carries specific risks, so read carefully before you get started.
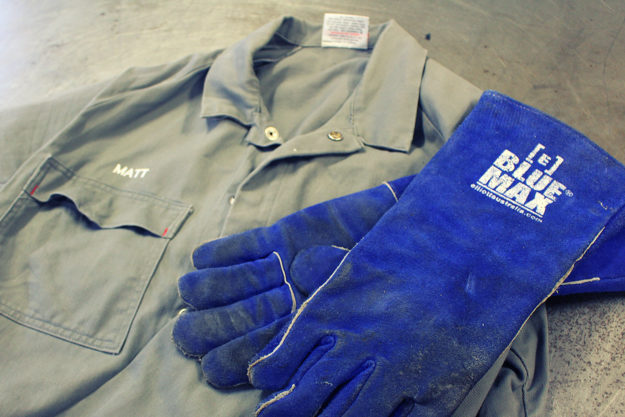
Protective clothing Melting metal generates a lot of heat. When you’re arc or MIG welding, sparks and slag will be flying all around you—so the first step is to protect yourself from burns with appropriate clothing. Cover up from head to toe in natural fibers like wool or cotton, as synthetics melt when exposed to high temperatures, and will leave a nasty burn on your skin.
Even when fully covered, sparks have a mind of their own, so watch out for folded cuffs or pockets that might catch them. When the first spark goes over your head and down the back of your shirt, you’ll know what I mean! Leather boots are a good idea—flying particles always end up on the ground, and your feet will appreciate the protection.
Gloves When arc or MIG welding, you’ll also need heavy, flame-resistant gloves to withstand the heat of the arc and the heat transferred to the work piece. TIG and oxy-acetylene welding require more dexterity, so thinner gloves are used. Welded metal can get seriously hot—when it’s red or orange, it’s pretty easy to recognize the temperature, but it can still burn even when the glow has faded.
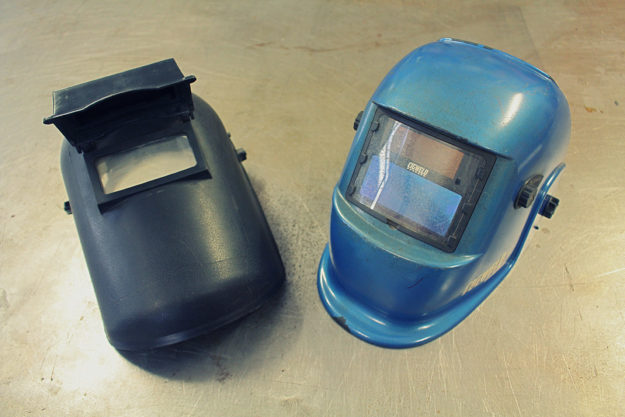
Eye protection An electric arc generates radiation, so you need to protect your skin and eyes. Clothing will protect your skin from welding sunburn, but your eyes need special protection.
You can only watch the arc through a tinted shade, so you need a plastic welding helmet. The helmet will protect your face from burns, while the tinted shade will protect your eyes. Cheaper models have a flip-down, fixed shade, that you can’t see anything through in normal lighting conditions. When preparing to weld, you flip the shade out of the way to get yourself into position, then flip it down once you’re ready.
Higher priced models have the ability to electronically change the tint in the shade, and automatically darken when their sensors detect an arc starting. I have this style, and it’s especially useful for TIG welding while both your hands are busy with equipment. They’re a worthwhile investment if you get serious with your welding.
Maintenance To prevent injuring yourself, you need to keep your equipment in safe working order. Check the manual supplied with your welding machine, or locate an inspection checklist for your particular machine online.
At the very least, start here:
1. Do you fully understand how to operate your welding machine? Download the operation manual if you haven’t got one handy. 2. Are all the connections tight? 3. Are all the cables in good condition, including the main power supply cable?
Housekeeping In addition to equipment maintenance, you need to consider the environment where you are welding.
1. Have you cleared away any flammable materials? 2. Are any bystanders likely to suffer injury from sparks or radiation? 3. Is you mains power supply rated to supply the current needed for the welding machine?
Gas cylinders
1. Have you checked that the fittings are tight? 2. Are the cylinders secured in the upright position? 3. Are they clear of flames and sparks from welding? 4. Is there any obvious damage to the cylinders?
Electric and magnetic fields Electricity flowing through a cable generates a magnetic field around the cable. If you have a pacemaker fitted you should check with a doctor before taking up welding.
Electric shock Electric shock is a very serious risk when welding. The current flowing during welding is certainly enough to stop your heart if electricity flows through your body, rather than back through the grounding cable.
The primary shock hazard is related to the mains power supply to your welding machine (110V or higher). While good quality machines will have safety features to prevent shock, don’t take the cover off your machine while it is connected to the mains supply. If you have a problem with the machine, consult a qualified person for assistance.
The secondary shock hazard is related to the electrode circuit. The electrode tip might be at 20-100 volts, and your work piece will be at zero volts (since it is connected via the grounding cable to the welding machine). If your body completes the circuit between the electrode and the work piece, you’ll receive a shock—so you need to develop safe working habits to ‘insulate’ yourself.
Treat the electrode as live at all times, and always reach for the electrode holder, not the electrode itself. Wear dry gloves to separate your skin from the electrode, and long sleeves to insulate you from the work table, if you happen to lean against it.
Water conducts electricity, so keep yourself and your clothes dry, even if it means wearing rubber-soled boots if the ground is wet. Sweat is also a conductor, so hot weather is a risk too.
Modern welding machines often contain a voltage reduction device, which reduces the electrode voltage to less than 5 volts. This is an added safety feature that may be missing on an older machine, so treat all electrodes as ‘live’ and act accordingly.
Fire hazards Flying sparks, slag and molten metal can travel quite a distance from your welding activities. Before welding, stop and have a look around for anything flammable, such as paper and cardboard, fabric, paint, and gasoline. If you weld on a painted surface, the heat will likely ignite the paint.
Using water to extinguish a fire near electrical equipment is not a good idea. Keep a dry-powder fire extinguisher handy.
Fumes Both the welding process and the metals being welded can generate fumes. Flux from arc welding electrodes forms a gas shield, and the molten metal workpiece may be releasing compounds—these form a ‘fume plume.’ Ideally, you don’t want to be inhaling it.
Ensure there is sufficient airflow in your welding area to move the fumes away from you. Sometimes being in a large space is sufficient; other times, you might need a fan to blow the fumes away. Industrial workplaces will have extraction fans to suck up the fumes (below), but this is unlikely in a small shop. So use common sense, and at the very least open a door to ventilate the space.
Learning to weld If you can, attend a community college to learn welding. This is what I did—I took one year of weekly night classes to learn how to TIG weld. I highly recommend this route—you’ll get structured lessons and exercises, plus, most importantly, immediate feedback and the fastest possible improvement in your skills.
Failing that, you’ll have to resort to YouTube and the big welding suppliers for information to get started. Learning welding is way outside the scope of this article, but here are a few things to consider:
1. Collect or purchase some metal for practice. While it is possible to recycle steel from other sources, it needs to be paint, dirt, rust and oil free if you are to have any success when learning. Visit a scrapyard or a local fab shop and see if you can purchase some offcuts of new, clean metal. 2. My favorite on-line resource is Welding Tips and Tricks, and the associated YouTube channel. 3. Another great source of information for newbies is MIG welding—the DIY guide. 4. You all know how to use Google, so go and do some more research.
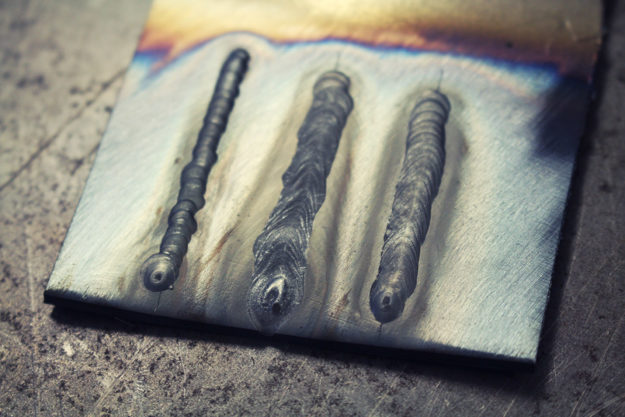
The basics A typical first beginner exercise is running weld beads on a piece of scrap metal. The idea is to practice the motion, and develop the fundamental hand-eye co-ordination needed. Just repeat this over, and over again, until you can start and stop the weld wherever you want, and it doesn’t look like molten vomit.
Once you can cover plates with tidy weld beads, then you can start practicing the basic joints:
1. Butt joints—want to weld some tubing together to form an exhaust system? You’ll need to master butt joints. 2. Corner joints—building your welding bench or shop equipment will involve some corner joints. 3. Tee joints—need to add a tank mounting bracket to your frame? Practice your tee joints. 4. Lap joints—perhaps not that common on motorcycles, but always used as a training exercise.
There are many others, but just start slowly and practice, practice, practice, before you point the torch at your project bike.
Weld finishing If you’re installing a frame hoop, you’ll probably want to sand the welds to make the joint invisible. You can do this with files, or with an angle grinder. Be careful with power tools though—if you sand a flat spot into a round tube it’s very obvious when painted.
Weld quality The general theory is to create an assembly of welded parts that are as strong as a single piece would be. In practice, this doesn’t happen. The immense heat from either a flame or an electric arc affects the microscopic structure of the metal in the ‘heat affected zone’ of the weld. In a production environment, many samples are welded and tested before production ever starts to ensure a high quality weld, every time. We don’t have this luxury on our project motorcycles, so we have to develop the confidence that our welds will be sound.
A bigger problem with our custom bike modifications is simply the quality of the weld itself. To fuse two (or more) pieces of metal together, the welding machine needs to be configured to deliver enough heat. If there isn’t enough heat, then the weld will not ‘penetrate’ into the parent materials enough, and the welded joint will be weak.
The novice welder won’t know what a good weld looks like compared to a bad weld (which is another good reason to get some formal training). If you are unsure about your ability to weld on a motorcycle frame or other structural part, have a qualified welder provide some instruction, or simply hand the job over to them. You could be risking your own life, and those around you, on a motorcycle with poor quality welds.
Practice It’s not overly difficult to learn the skills to run weld beads, regardless of the welding process you choose. It is more difficult to get an important weld right the first time. The real skill I appreciate in professional welders is the ability to look at a job, determine how to do it (in their head), configure their machine and equipment, then execute the weld perfectly.
When you’re learning, you have to practice enough to be able to look at your job, and visualize the welding method you will apply. My only suggestion is to weld…a lot. Make all your shop equipment, or help your friends with welding projects. Every new project you tackle will teach you new skills. Even if you mess up a project, you’ll learn something, so don’t give up.
Basic projects Almost always, you can purchase any of the following items for cheaper than you can make them. But that’s not the point, is it? It’s much more fun making it yourself, to your own design and specifications. Google ‘welding projects’ and see what images come up, or run a similar search on Pinterest for some inspiration. Or take a crack at these…
1. Purchase some brand new tubing—square or rectangular. Design and build a work bench. 2. Build a rack to store your lengths of steel. 3. Weld a piece of heavy tubing to an old steel car rim, then mount a vice on top. Now you have a portable workstation. 4. Design and build a cart to store your welding machine. Fix some castors underneath so you can move it around your shop. 5. While you’re welding at your new bench, you’ll need to sit if you are running long TIG beads. Build a stool to sit on.
There is tons to learn about welding, but if you are curious, patient and have some co-ordination, you’ll be successful.
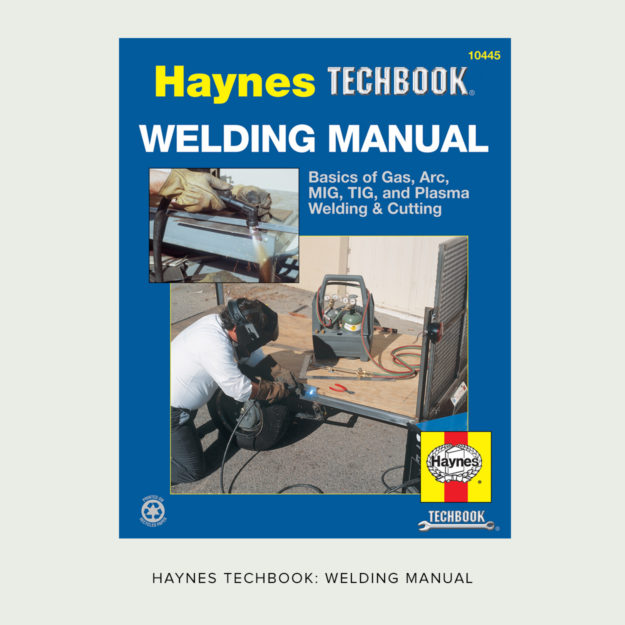
Haynes welding manual I can’t remember where or why I bought this book, but it is extremely well written, explains all of the welding techniques described in this article, and I referred to it constantly while I was teaching myself to arc weld. Again, if you can go to a school to learn how to weld, don’t buy this book. Otherwise, check it out—it’s available from Amazon.
Most of the bikes that grace these pages that have had some welding done on them, somewhere. If you’re building your own custom bike—or even if you just like fiddling in your garage—welding is an invaluable skill to have.
It’s also a slightly intimidating prospect for the initiated, so this is a two-part guide. This week, we’ll dig into the theory, explain the different types of welding, and help you figure out which machine to get.
What is welding? In a nutshell, welding can be defined as the fusion of two pieces of material. I say ‘material’ because we can weld plastic as well as metal (for this article, we’ll focus on metal).
Welding technology has progressed to the point where high quality welding machines are now affordable for small shops, farmers, artists and hobbyists. Creating items from a pile of metal with the aid of welding is surprisingly satisfying. But don’t expect to pick up a welding torch and lay down a perfect bead first time—like any new skill, it takes practice to create joints as strong and attractive as you’d find on a factory frame.
Benefits of welding Welding is obviously a permanent process, compared to bolting parts together. If two parts are made of the same material, they can be welded. It allows you to make a complex shape, like a motorcycle frame—a whole bunch of tubes and plates, assembled into a strong and durable structure.
We can split welding into two categories: Fusion welding is common on our motorcycles, and requires the melting of the metals being joined; Non-fusion welding also requires heat to work, but we need to add a filler material that melts at a lower temperature than the parent material (such as soldering).
Manual Metal Arc Welding One of the earliest welding processes developed, arc-welding uses an electric arc to generate the heat required to melt the metals involved. The welding machine generates voltage at the end of a consumable electrode, and an arc is struck on the work piece, which is connected back to the welding machine via a grounding cable.
The electric arc melts both the work piece and the end of the electrode, and carries molten metal from the end of the electrode to the work piece. This ‘filler’ metal builds up the size of the weld. The electrode is covered with a ‘flux,’ which melts and forms a protective gas shield around the weld, preventing contamination. This then solidifies on the weld deposit to form a protective ‘slag,’ which has to be chipped off to reveal the weld beneath.
The welding machine will have controls to adjust how much current flows through the circuit, and different electrodes are available to suit different metal types and thicknesses. As metal is deposited from the electrode onto the work piece, the electrode gets shorter, and must eventually be replaced.
The cheapest hobby welding machines you will find at your hardware store will probably use this process. I wouldn’t consider it a contender for your motorcycle project, as other processes (covered below) allow you to focus the arc and the filler metal much more precisely.
Gas Metal Arc (‘MIG’) Welding An advancement of arc welding, MIG (Metal Inert Gas) welding uses an arc, struck between the workpiece and a continuously fed consumable wire electrode, fed through a torch. The wire is the ‘filler,’ and is melted and deposited into the weld to build up its size. The torch is also connected to a supply of shielding gas to protect the molten weld pool.
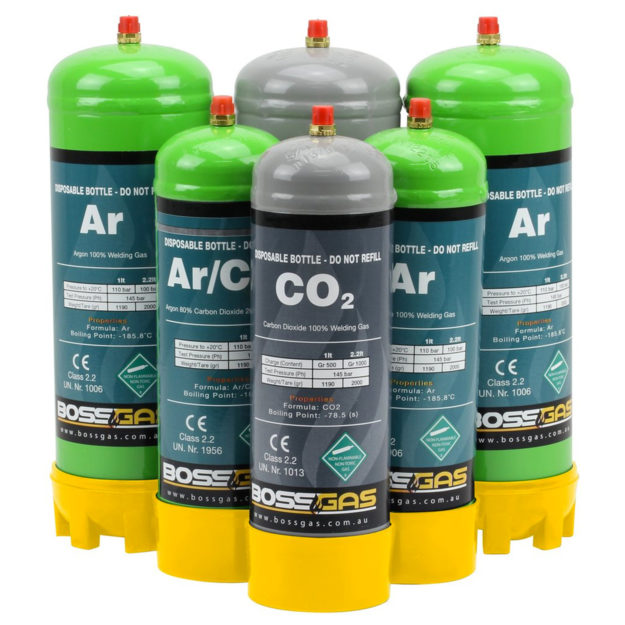
The consumable wire and type of shielding gas can be changed to suit different metals. With the right gas and wire, you can weld a range of ferrous (iron-based) and non-ferrous metals, such as aluminum. A mixture of carbon dioxide and Argon is a common shielding gas used when welding steel, while straight Argon is more common when welding aluminum. (These are normally supplied in portable cylinders for shop use.)
Controls on the welding machine will usually let you adjust the welding voltage and the wire speed—both need to be increased for thicker materials, and reduced for thinner materials. Shielding gas flow is controlled via a regulator.
MIG welding machines are very popular, more so in the auto customizing scene. They are relatively cost effective, easy to operate, relatively easy to learn, and once set up, great for one particular metal, such as steel. On an auto project, this might be perfect—you can use a MIG welding machine to repair your chassis and panels, fabricate new parts and even weld up a steel exhaust system. But on your motorcycle project, you might want the option of easily configuring the welding machine to suit other metals, such as stainless steel and aluminum.
Gas Tungsten Arc (‘TIG’) Welding TIG (Tungsten Inert Gas) welding is another arc welding process. However, instead of using a consumable electrode as in arc or MIG welding, TIG welding uses an electrode made of a tungsten alloy, that is not consumed during welding. A supply of shielding gas—commonly Argon—is used to protect the weld.
Since the electrode deposits no extra metal, the operator adds filler metal to the weld. Usually one hand holds the torch directing the arc and shielding gas, and the other hand feeds in filler metal. Some models have a foot pedal to modulate the arc—so you could have both hands and one foot working together. This coordination requires more effort to learn, and practice to master. But if you can operate a motorcycle with a throttle, clutch and gearshift, you can learn how to TIG weld.
Control panels on more sophisticated TIG welding machines look complex, but the ability to adjust the machine to suit the weld is one reason I prefer TIG welding for motorcycle projects. With minor (and relatively cheap) changes to the tungsten electrode and the filler material, TIG welding can be used to weld steel, stainless steel and aluminum—the most common metals you will use on custom motorcycle projects. As a result, TIG welding is my personal choice.
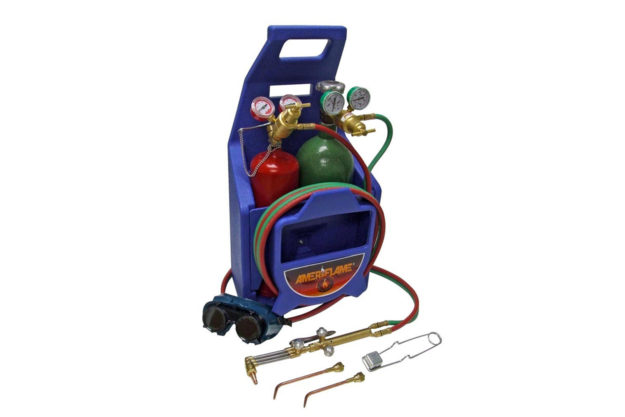
Oxy-Acetylene Welding Acetylene is a highly flammable gas, that, when mixed with oxygen, generates a 6,000 degree flame that is great for welding, cutting and heating of all sorts of metals.
Although modern welding machines are getting cheaper, oxy-acetylene is so versatile that it’s worth a look. Apart from using the flame to weld metals, you can use the cutting attachment to chop up steel plate, and the torch to heat rusted bolts, parts that are stuck, and metal, prior to bending. It needs no electrical connections and is only limited by where you can position the gas bottles and the length of the hoses.
Additionally, an oxy-acetylene welding and heating kit will be much cheaper than a quality welding machine; factor in the cost of gas and it might be the most economical solution for your home shop.
With different filler rods, you are able to weld a variety of different materials, however, the heat transferred to the parts can sometimes cause distortion. This is a bigger problem on thin sheet metal. As a result, oxy-acetylene welding might not be your first choice for a motorcycle project.
There are also some particular safety concerns. As well as being explosive, acetylene is poisonous, causing nausea and headaches. Oxygen is required for combustion, and if you direct a stream of pure oxygen at something flammable, a fire can start easily, so anything flammable must be cleared away when using oxy-acetylene equipment. There are a lot more safety issues to be aware of, so don’t start using this process based on this article alone—go and research the risks before you light the torch.
Choosing a welding process The reasons for choosing arc, MIG, TIG or oxy-acetylene welding will vary depending on your needs, but here is my summary of the pros and cons of each from my own experience—specifically related to custom motorcycle projects. (One is the lowest rating, and five is the best.)
Choosing a welding machine I’ve had the opportunity to use machines at both the cheap and expensive ends of the market. It’s always tempting to assume a cheap machine can do the job of an expensive one, but in my experience, you get what you pay for. I have used a few low-end machines; the construction is lighter-duty, and they were harder to ‘dial-in’ to the best settings for the job.
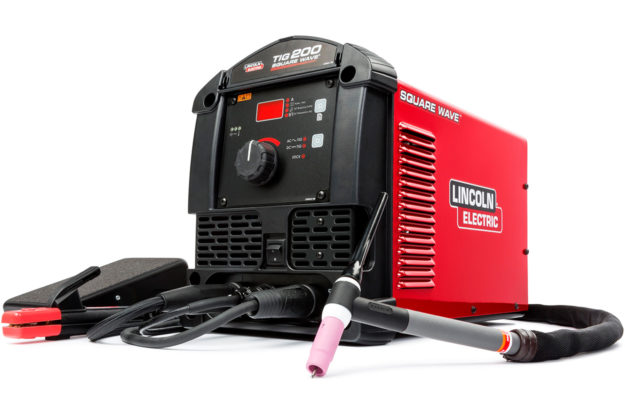
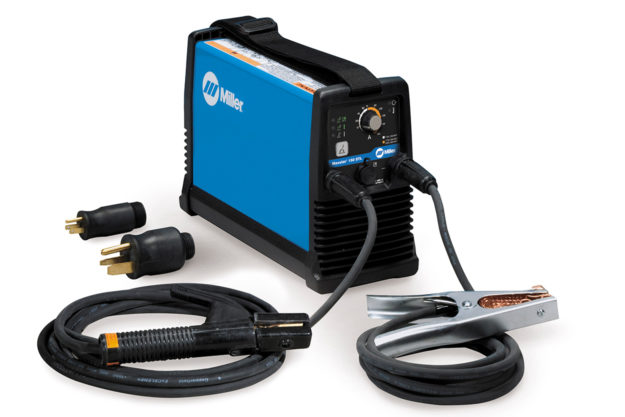
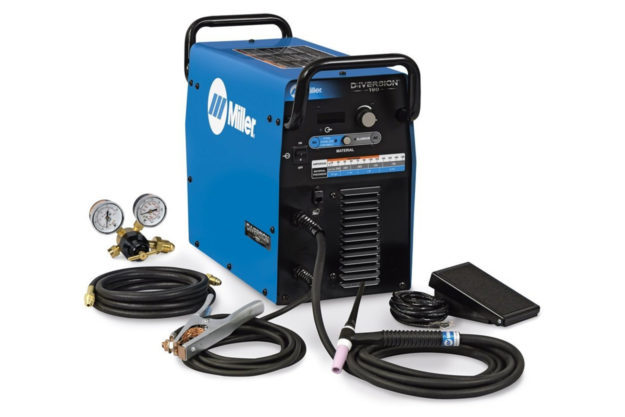
If I could only purchase one welding machine, it would be a good quality inverter AC/DC TIG welding machine, with around 160-200A output that also has arc welding capability. A machine with these specifications should have high frequency starting—technology that gets the arc started easily. For US readers, I’m talking about a machine like the Miller Diversion 180 TIG Welder (image below). Here in Australia, I use the previous model of this machine, which I purchased a few years back.
While a TIG welding machine has the longest learning curve and a high initial cost, I think it provides the highest flexibility for customizing motorcycles. You can weld thinner steels and aluminum alloys with the TIG function, then switch to the arc function if you want to quickly weld up some heavier steel plates. You can build your shop benches and tool boxes, and—with the right know-how—weld repair almost anything. And you’ll never buy another welding machine again, as this investment should last a lifetime.
TIG versus MIG I would choose TIG over MIG because MIG requires different spools of wire and different torch cable liners if you are welding different metals. This is more expensive and takes more time to set up. If you think you’ll only ever weld steel, go for MIG. But if you want the option to weld stainless steel and aluminum alloys, TIG is your choice.
TIG versus arc welding I would choose TIG over arc welding as the weld control is much better. You can very precisely control where the heat and filler metal are placed. Arc welding is great for heavier fabrication, but TIG wins every time for motorcycle projects.
If you can attend a community college to learn welding, wait until you’ve completed your classes before worrying about purchasing a machine. You’ll get to use their machines and learn not just welding, but features of the machine you might want to consider.
Check back in two weeks, when we’ll tackle safety, and how to get started.
If you’re working on your bike, even if just doing mild maintenance, you need to be aware of torque. It isn’t only the thrill you get when you open the throttle and your bike surges forward—it’s also the rotating force you apply when you’re tightening a bolt, whether it’s an oil drain plug or an axle nut.
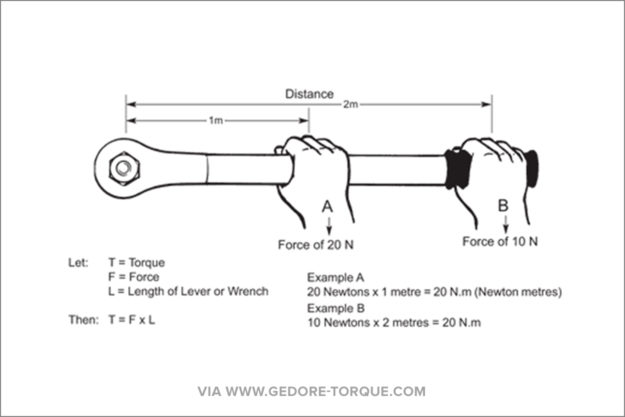
What is torque? Loosely speaking, torque is simply the application of a force, some distance from an axis, to create a twisting action. As the diagram below shows, if I double the length of the wrench, I can get the same torque at the bolt by halving the force.
It’s measured in units that relate to the lever arm length and the force applied at a particular distance. On the imperial scale, torque is measured in pounds-force-feet (lbf ft)—but often listed as ‘ft.-lb.’—and on the metric scale, it’s measured in newton meters.
This is an important concept, for not just bolts and nuts and other fasteners on your motorcycle, but also concepts like acceleration. To start with, we just need to understand the relationship between this lever arm length and the force that you apply at the end of it.
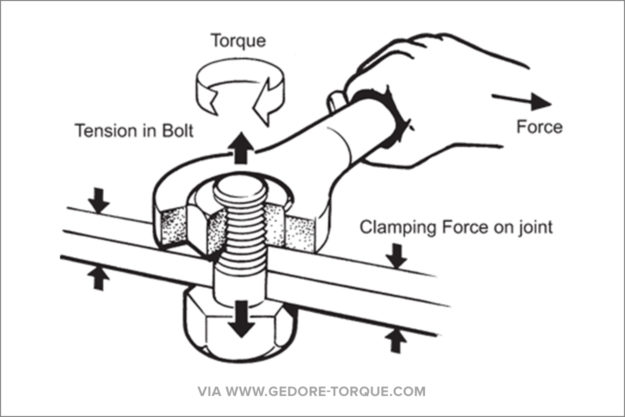
Why is torque important? Well, we need to go back a few steps. Bolts are used to clamp parts together. The size and type of bolts on a bike depend on the expected stress they’ll see in service: Engineers have determined through calculation, testing or simulation what sort of forces might act on the joint.
For example, the bolts that hold your cylinder head onto the cylinders have to withstand the pressure from the controlled explosions happening in the cylinder.
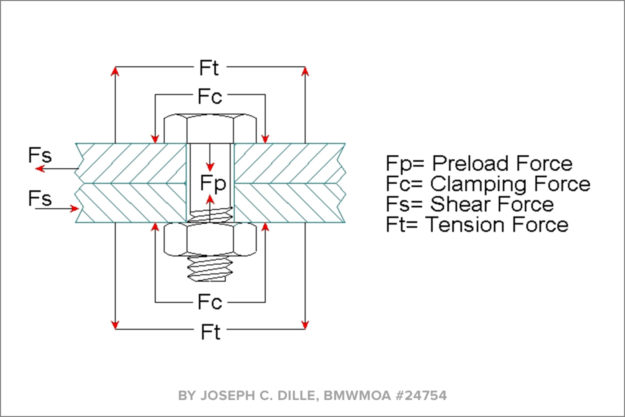
Bolted joints work by clamping the parts together very tightly. Once they’re clamped together, friction between the parts makes them difficult to slide apart and the bolt acts like a spring. If we bolt two parts together, the bolt will stretch as the nut is tightened. As the bolt is stretched, an equal and opposite clamping force acts on the parts.
On the small bolts found on your motorcycle, it’s not difficult to ‘overtighten’ or even break bolts. If you pull on a spring, you can pull it so far that eventually it will deform, and not return to its original shape. Bolts are no different.
When you tighten a nut, or a bolt that goes into a threaded hole, you are stretching the bolt. If you continue to tighten, the bolt stretches and stretches, and eventually goes past its ‘elastic limit.’ It won’t spring back to its original shape.
In some specific applications, bolts are tightened into this range. Often the service manual will instruct you to replace bolts that have been tightened in this manner, but this is more commonly seen in heavy duty applications, like trucking and mining equipment.
Once the bolt passes the elastic limit it will break if it continues to be tightened. If the bolt is too loose, the joint will be loose, and it will move when it is used. This is a bad outcome, as you can imagine.
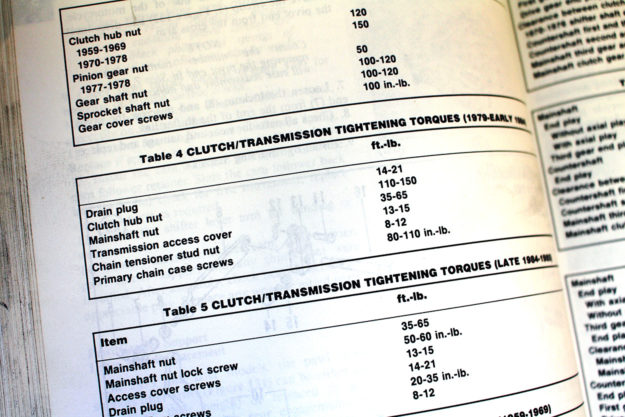
In practice, there’ll be a recommendation in your bike’s service manual that specifies the torque to use on that bolt in that particular assembly, and it’s been determined by an engineer through the design and testing of that assembly.
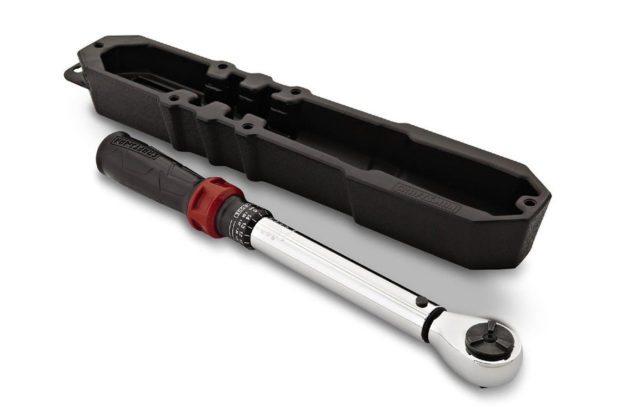
What is a torque Wrench? To tighten the bolt to the specified torque, you need a tool called a torque wrench. There are a variety of torque wrenches available, but we’ll just focus on the commonly available ‘click-type’ wrench (like the Craftsman model shown above) that you’ll find in retail automotive shops, or via online tool vendors.
Similar to your first wrenches, I would suggest a 3/8″ drive torque wrench. That should be fine for motorcycle work, and will be compatible with the socket wrench set you might buy.
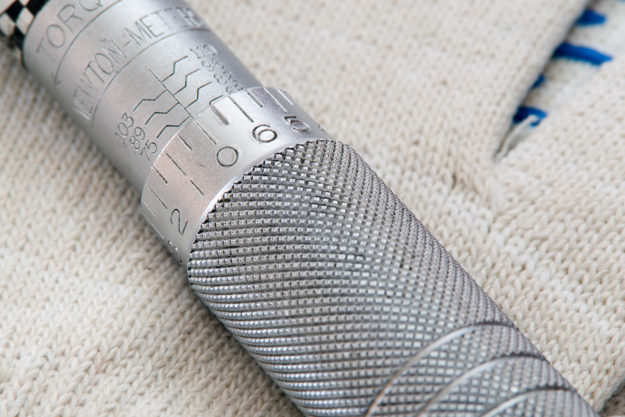
Torque scale Modern click-type torque wrenches are adjustable for a range of torque values. You can adjust the scale for the torque you wish to achieve at the socket end. Once you reach that value, it will make a loud click to tell you that you’ve reached the desired torque.
If you are reusing a bolt, clean old dirt, grease and paint off the threads first. A bench grinder with a wire wheel is ideal for this. Alternatively, clamp the bolt head in a vice with the threads pointing up, and use an angle grinder with a wire wheel. At worst, use some kerosene, or WD-40 to loosen deposits, and brush off any deposits with a wire hand brush.
Find your service manual Get the correct torque value from the service manual. If the units differ between your wrench and the service manual, use the Norbar app to convert the units.
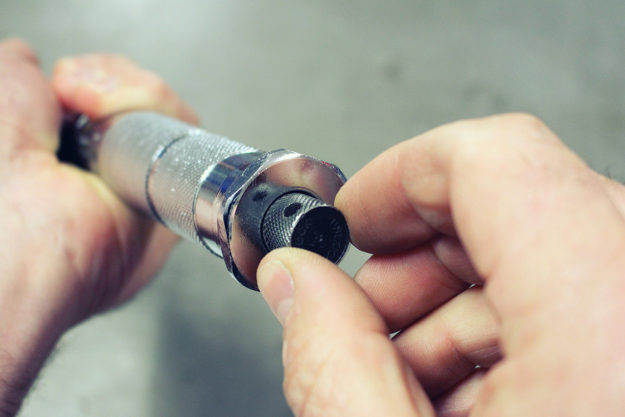
Check the instructions in the service manual. Is the bolt supposed to be dry, or lubricated? Lubrication will allow the bolt to stretch further before reaching the torque wrench setting. Install the bolt and tighten it down by hand or with another wrench until it is ‘snug.’ Select the correct-sized socket to suit the bolt or nut and install it onto your torque wrench.
Then loosen the small locking nut at the bottom of the wrench handle. Inspect the scale on the side of the wrench to determine where your desired torque value is located.
To adjust the torque value, twist the handle and screw the graduated edge of the collar up to your desired value. Hand-tighten the small locking nut at the bottom of the wrench handle.
Then use the torque wrench to tighten the bolt to the desired torque. Apply smooth movement to the wrench until you hear a loud ‘click.’ Stop pulling on the wrench immediately: You have reached the desired torque.
Loosen the small locking nut at the bottom of the wrench handle. Unscrew the handle and re-set at the lowest value.
Care and storage of your torque wrench Click-type wrenches contain a spring in the handle to operate the mechanism. When you turn the handle to increase the setting of the wrench, you are putting a pre-load on the spring. So it’s good practice to loosen off the adjusting mechanism, as mentioned above. This reduces the chance the spring will take a set while under tension as it sits in your toolbox for six months. A torque wrench is generally considered to be a precision instrument, so don’t drop it, or use it as a socket wrench for everyday repairs.
If you are working in a quality-approved organization, wrenches would be calibrated on a regular schedule to ensure they are accurate. While researching some details for this article, I found a couple of useful articles showing how to calibrate a torque wrench in your own shop. One is listed below. This might not pass muster if you were repairing a Boeing 787, but would be adequate for most custom bike repairs.
Finally, letting your torque wrench roll around loose in your tool box is probably not going to help it. Most wrenches are supplied in a plastic case, and I keep mine in the case supplied. Worst case, just keep them somewhere where they’ll avoid knocks.
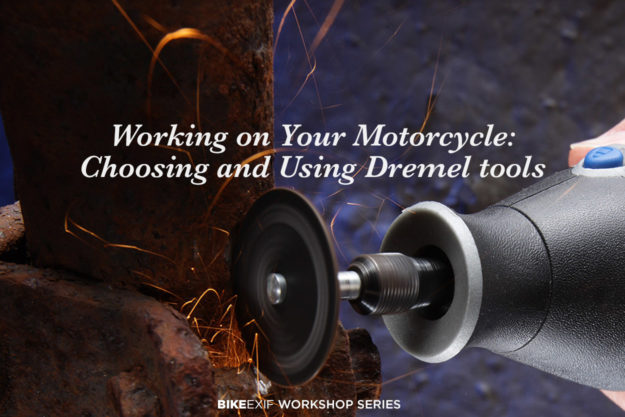
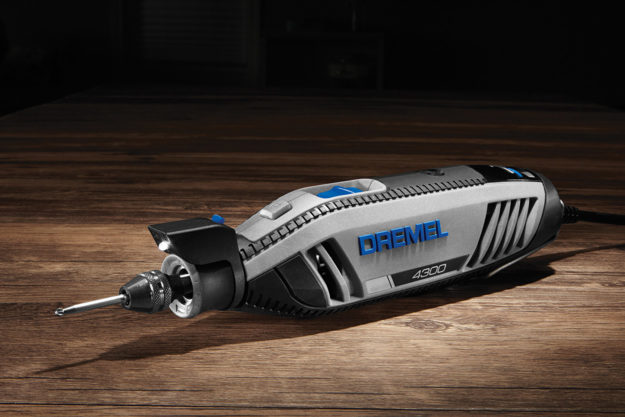
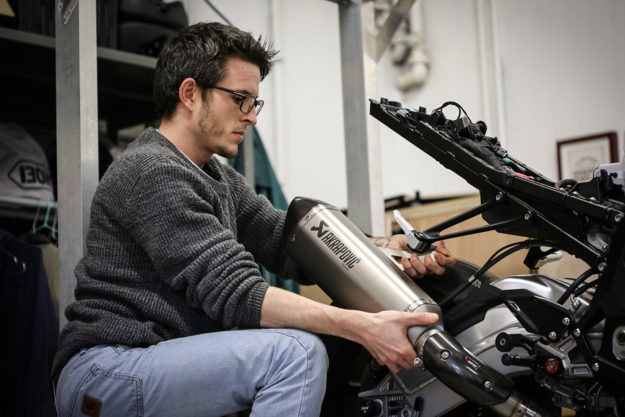
This week, I want to talk about one of the most indispensable tools in my shop: the Dremel rotary tool. I love Dremels. I don’t get paid to write that—I buy all my own Dremel tools, and whether it’s the Dremel brand or not probably doesn’t matter.
This rotary tool is simply a high-speed motor with a small chuck at the end to grip the shanks of various accessories. The combination of high-speed and specific accessories to cut, grind, sand, carve, brush and polish (have I missed any?) makes the multi tool incredibly useful for motorcycle work.
As with any cutting tool, the general concept is simple: a harder material can be used to cut (or grind) a softer material.
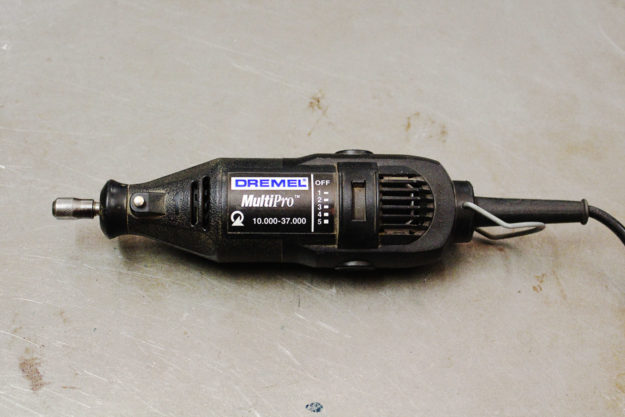
My current Dremel MultiPro This is the third one I’ve owned in around 15 years. The earlier two eventually quit working, but they lasted me a long time, and, honestly, they were probably abused. I keep buying the Dremel brand, because I know they will take a beating. I haven’t used a battery-powered Dremel: I use it in my shop, so I stick with a mains-powered version.
This particular model has a variable speed motor, with a spindle and a small chuck at the end. Frankly, I have never run my Dremel at anything less than full speed, so a single speed model would probably be adequate. Dremel’s website does however advise slower speeds for cutting and grinding metals, and slower again for plastics.
Most cutting or grinding tools work best at a particular speed range (measured in meters per minute, or some similar velocity measurement). At the tiny scale of Dremel accessories, the tool needs to be spinning very fast to achieve the optimum cutting velocity.
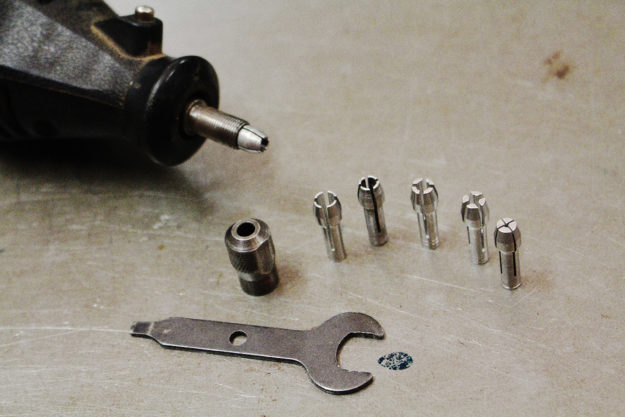
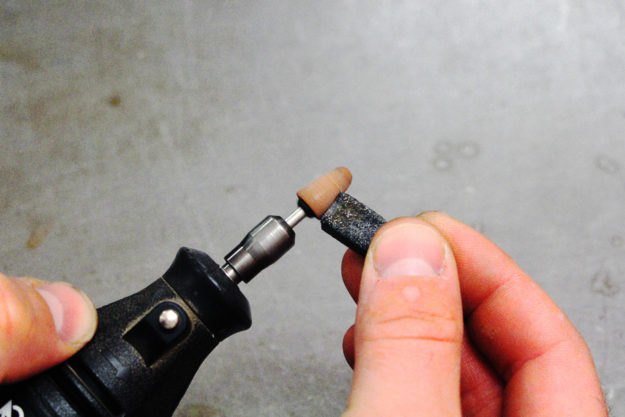
When you screw the collet nut down it squeezes the collet, which grips the tool shank. Different size collets are available. This allows you to use tools with various shank sizes. My version of the tool has a shaft lock (the silver button on the side of the black body), and an included wrench that tightens the collet nut.
Most of the accessories are nominally 1/8” diameter, however I have a smaller collet and some accessories in 3/32 ” diameter. If you screw down the collet nut and the cutting bit shank is loose, then you need a smaller collet. You can buy the smaller collets separately.
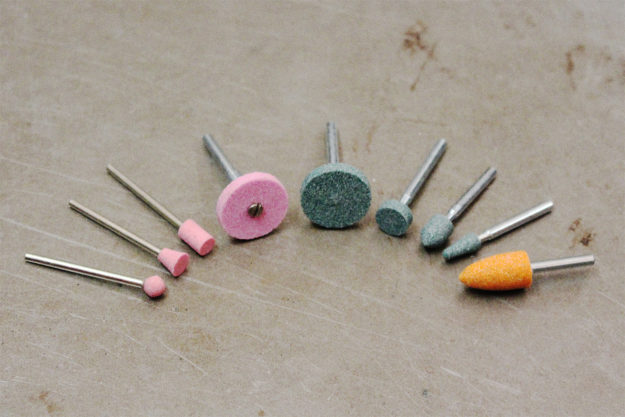
Accessories The benefit of a Dremel multi tool is similar to an angle grinder—there are dozens of accessories to extend its use. I would suggest it is far cheaper to buy a kit with an assortment of accessories than purchase them individually.
Here are some of the accessories I use.
Cut-off wheels The cutting wheels are almost always the reason I take my Dremel out of the case. Use them for cutting small metal stock or parts. Much more finesse than an angle grinder, and a lot faster than a hacksaw. Need to cut down a steel rod? Shorten a small bolt or screw? Trim a couple of millimeters off some metal? Need to get into a tight space? Need to cut a slot in a mangled screw to fit a screwdriver?
You could compare a Dremel with a cut-off wheel to an angle grinder with a cut-off wheel – just on a mini-scale, for mini-scale jobs. Like an angle grinder, the wheels need to be treated carefully. If you bend the discs significantly while they are cutting, they’ll shatter.
The shank that carries the replaceable cut-off wheels is also used for other accessories, such as sanding discs. Buy bulk packs of the cut-off wheels if you can find them on sale.
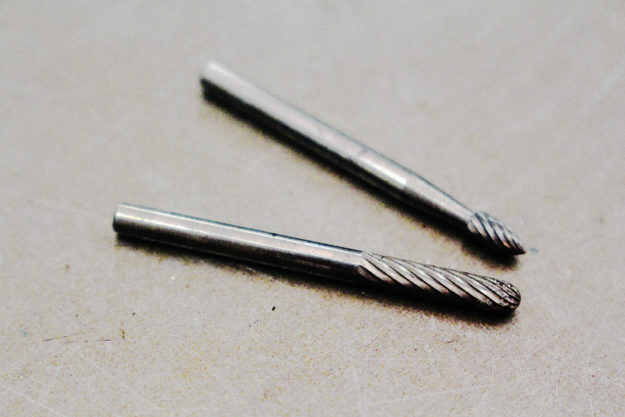
Grinding stones or mounting points I know the article on angle grinders didn’t recommend grinding wheels due to their aggressive nature. But on a micro-scale, Dremel grinding stones are really useful on motorcycle tasks—because after you’ve cut something, there is a good chance you’ll need to smooth it.
These tiny stones come in a variety of sizes, shapes and materials. In the Dremel brand, stones are provided in two material types:
1. Aluminum oxide (tan color) – generally used for steel and stainless steel
2. Silicon carbide (blue/gray color) – suitable for glass, stone and aluminum
The large variety of sizes simply gives you more options when you have a specific task at hand.
Silicon carbide is more expensive than aluminum oxide, but if you only work with steels then you don’t really need silicon carbide. However if you use aluminum oxide on aluminum, you’ll find the stone clogs up with aluminum quickly and becomes unusable.
Dressing stones The only way to address this problem is to use the dressing stone accessory. This stone essentially tears the surface grit from the mounted point and reveals a new, clean surface. To use the dressing stone, carefully bring it to the spinning mounted point and let it “grind” the mounted point.
Obviously this action reduces the size of the mounted point. Eventually you’ll wear the mounted point down—to the point it becomes unusable and needs to be replaced.
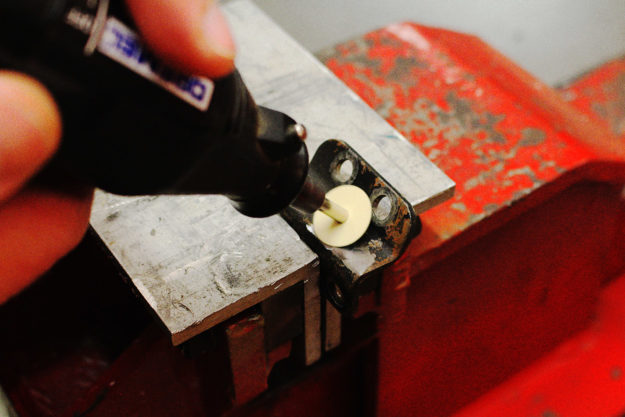
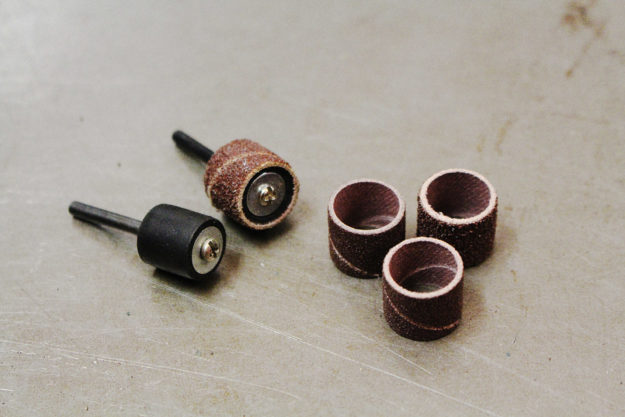
Sanding disc These tiny sanding discs are simply clamped to the cutting shank by the mounting screw. For stripping paint off inaccessible areas, to smoothing small areas, the sanding disc is a great accessory. The sanding grit itself is very fine, so it’s most effective when used after other, rougher smoothing tools—such as files, flap discs on an angle grinder, or hand sanding.
The discs don’t last long if you press too hard: they’ll wear the edges quickly, and eventually break off around the clamp screw. Use a light touch and let the speed of the spindle do the hard work for you.
Sanding drum The sanding drum spindle consists of a rubber cylinder and a clamp screw. When you tighten the screw, the rubber cylinder is compressed and bulges out to hold the sanding drum.
I’ve found these most useful when I need to slightly enlarge a hole. With very careful motion of the sanding drum inside a drilled hole, you can increase the size a little. It’s also useful for cleaning off the rough edges of a hole generated by drilling or using a hole saw. You might also use them for sharpening an edge tool, like an axe.
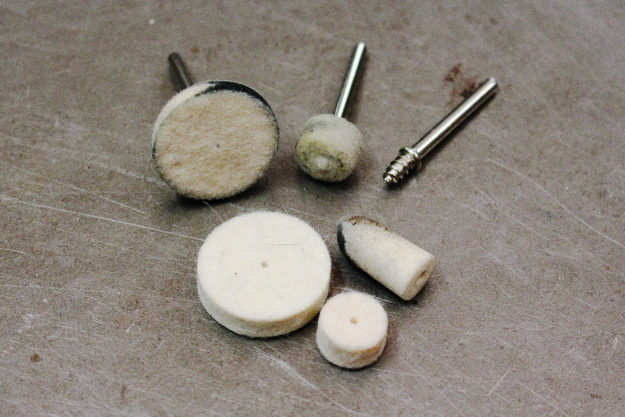
Polishing wheels Many accessory kits come with a threaded spindle and tiny polishing wheels. I haven’t found much use for these outside of polishing jewelry. You’ll need a metal polishing compound if you want to use this accessory (California Custom Purple is my favorite all-round metal polish).
I’m not sure where you’d use these on a motorcycle, but let us know in the comments if you’ve had any success.
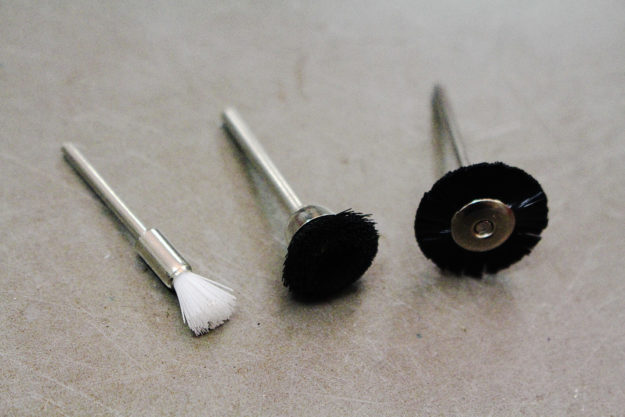
Wire wheels I’ve picked up genuine and ‘no-name’ accessory wire wheels in both brass and nylon. The brass ones are useful for paint removal around irregular shapes like welds—especially if your angle grinder won’t fit in the smaller spaces on the bike.
Like the sanding discs, they don’t last long with heavy-handed use. Useful, but if you rely on these to remove a lot of paint it’ll cost a fortune in replacement wheels.
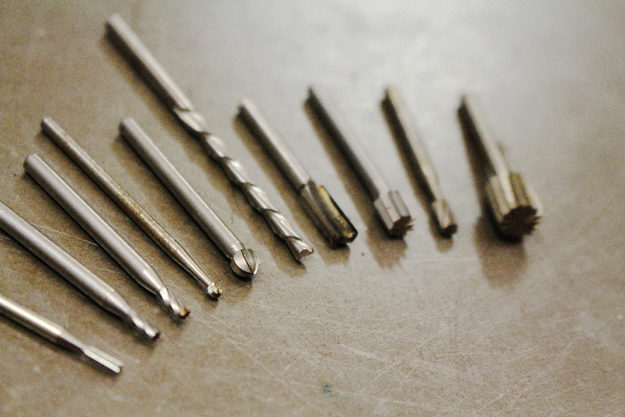
Cutting bits These bits are made of ‘high speed steel,’ which is a tool alloy. They cut very aggressively and are suited to softer materials like wood and plastics. While I haven’t done this, they could be used for careful freehand carving in wood, or soft metals such as aluminum.
Carbide bits I bought these expensive bits for a particular job and they paid off. Strictly speaking, these bits are Tungsten Carbide. This material is very hard, strong, stiff and dense. When used in cutting tools, it withstands very high temperatures and can be used to machine through many different steels. This is where they shine.
When working on a 1970s Kawasaki engine that had been in storage for years, I found the intake manifold screws (steel) were corroded into the aluminum cylinder head. When I tried to remove them, they snapped off. When I attempted to use a screw extractor, it also snapped off in the manifold screw. Many expletives were audible in my shop at this time.
I needed to grind away the screw extractor, and the steel screw without damaging the cylinder head. A carbide bit in the Dremel eventually saved the engine. I used it to carefully eat away at the steel screw. I had to use a helical insert to repair the cylinder head, but it was successful. I can’t think of any other way I could have done that repair in my shop.
Carbide bits are not easily identifiable—compared to the many other cutting bits available—so make sure you store them carefully so they don’t get mixed up.
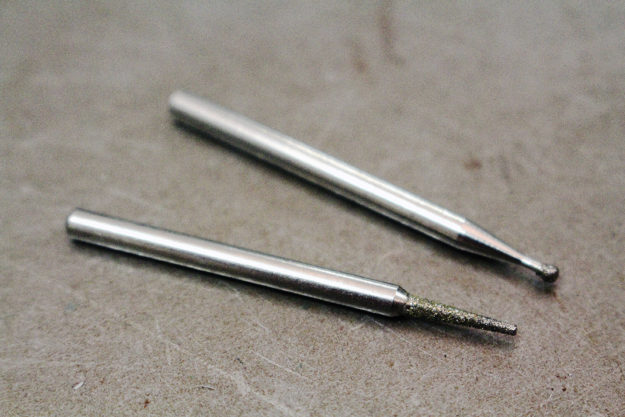
Diamond points I’ve used diamond-coated bits to engrave very hard materials like alloy steels, stainless steel and even glass. Eventually the diamond grit is stripped from the carrying material, and they need to be replaced. If you are grinding or engraving very hard materials, then a diamond bit might be the right tool.
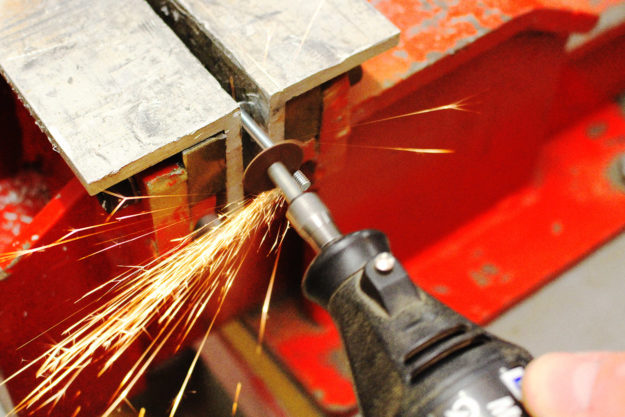
Dremel safety How could such a small tool cause any harm? Well, they spin very fast—over 30,000 rpm—and many of the accessories will make short work of your skin.
Firstly, the workpiece should be firmly secured. If it’s a small part, put it in a vice. If you have the Dremel in one hand, keep the other hand clear of the spinning tool.
Secondly, consider your eyes and lungs. If the Dremel is shooting particles into the air, you should wear some glasses and even a dust mask.
There are lots of additional resources on the internet related to rotary tools. But if you’re experimenting, I’d advise you to test your accessories on scrap materials before attacking your motorcycle. Once you’ve cut or ground the material away, it’s tough to put it back…
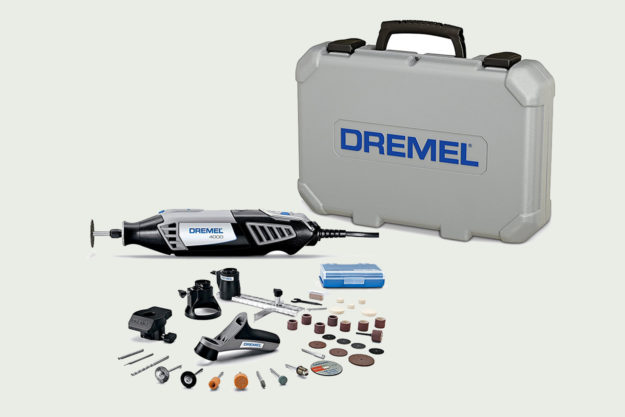
If you’re in the market for a Dremel, check out our buying guide.
Our resident expert mechanic Matt McLeod reveals what he looks for when buying an angle grinder.
Where would we be without the grinder? It lops off subframes, removes tabs and brackets in seconds, and provides pretty showers of sparks for what seems like every short film about a bike builder.
Joking aside, power tools like grinders are great for speeding up your tasks. Can you cut steel with a hacksaw? Can you remove metal with a file? Sure, but it’s a lot quicker if you use an angle grinder.
I’ve collected a few different angle grinders over the last few years. Let’s look at each one of them and why they’re useful—and what accessories I’ve set them up with.
Angle grinders are generally classified by the nominal diameter of the accessories they use. The typical cutting and grinding accessories are described as ‘abrasive,’ with particles bonded onto a wheel or disk. The materials used, and the construction of the wheel or disk, will depend on the application. Discs used for cutting steel will be different to discs used for grinding stone, for example.
The abrasive particles ‘scrape’ away material as they spin. Eventually they dull and break away from the bond, exposing new, sharp particles. This means the diameter of the wheel or disk decreases in use, until it is too small to be useful.
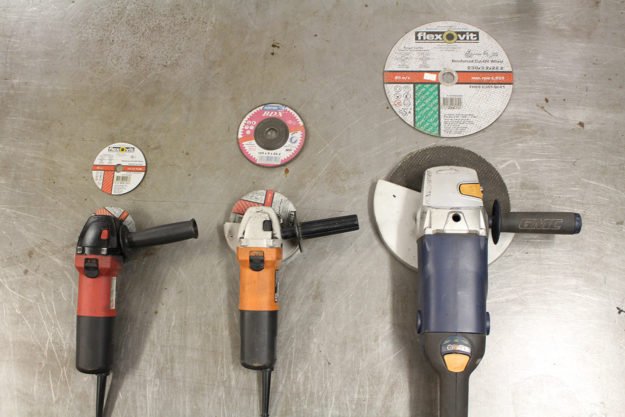
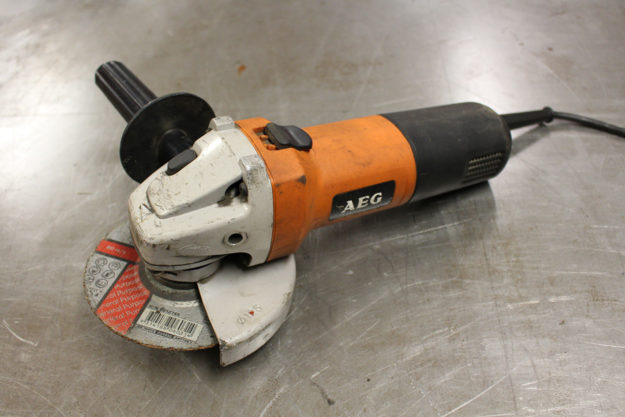
The Four-Inch Grinder These three grinders are all 4-inch diameter tools, and are the cheapest ones you’ll generally find on the market for mass consumption. This is the first size I bought and it’s well suited to motorcycle tasks.
When you’re using grinders on a regular basis it can be tedious changing accessories all the time. When these red Milwaukee grinders were on sale, I bought two. I can set up a cutting disk in one grinder and a grinding wheel or a sanding disk in another one. This speeds up my workflow.
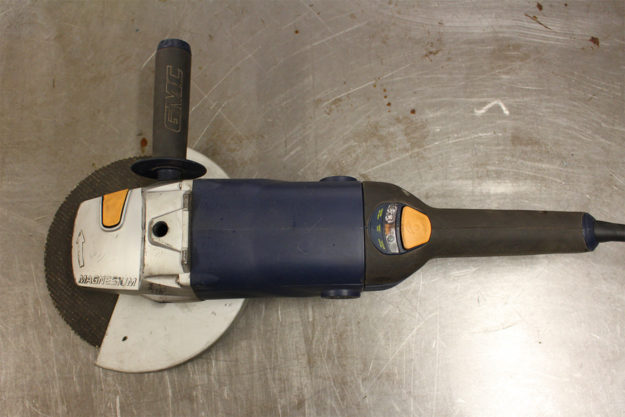
The Nine-Inch Grinder When I was remodeling our house, I needed to cut up some concrete, so I purchased the cheapest 9-inch grinder I could find, since I didn’t want to hire a demolition saw. This was great for big heavy jobs like concrete and roughly cutting up large steel sections.
There is no ‘finesse’ with a 9-inch grinder, so it’s not suitable for motorcycle work. Don’t waste your money unless you have other needs for it. Bigger is not better in this case.
The Five-Inch Grinder Some time later, I bought this 5-inch angle grinder. This size has turned out to be very useful for one reason: it will cut through 1-inch/25mm tubing from one side in a single cut. This is a common size used on older motorcycles, along with 3/4″ and 7/8″, or 19mm and 22mm for the metric world.
If you’re cutting this tubing using a 4-inch grinder, you might only get three-quarters of the way through and then you have to turn around and cut from the other side. This makes a clean, straight cut more difficult. The accessories are a little bit more expensive, obviously, but they do last a longer than the 4-inch ones. I almost always leave a cutting disc in my 5-inch grinder and leave the 4-inch grinders for other duties.
Purchase a cheap 4-inch grinder first. If you choose to purchase a second grinder, consider a 5-inch grinder if cutting tube is a common task.
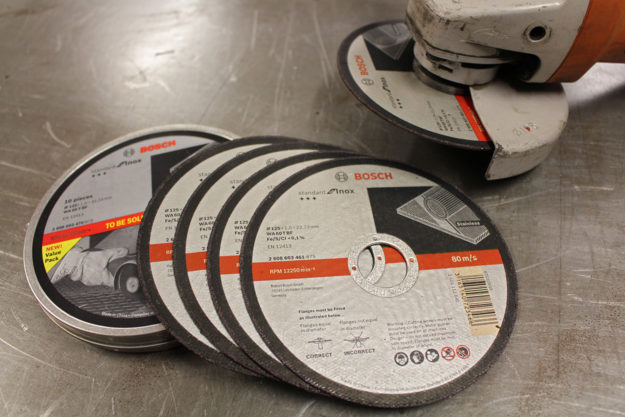
Grinder Accessories: Cutting discs Let’s talk a bit about the accessories that I’m using. This particular grinder’s set up with the cutting wheel, or a cutting blade. The one-millimeters are my favorite: They allow you to cut through tube cleanly, quickly and with a thin ‘kerf’ (which is the thickness of the cut).
Bosch makes these particular ones, and I just buy another box of ten when they’re on sale at my local hardware store. You don’t have to use this brand, but I can certainly endorse the quality.
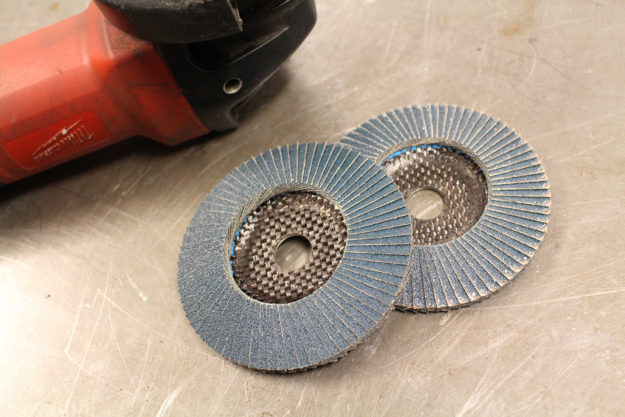
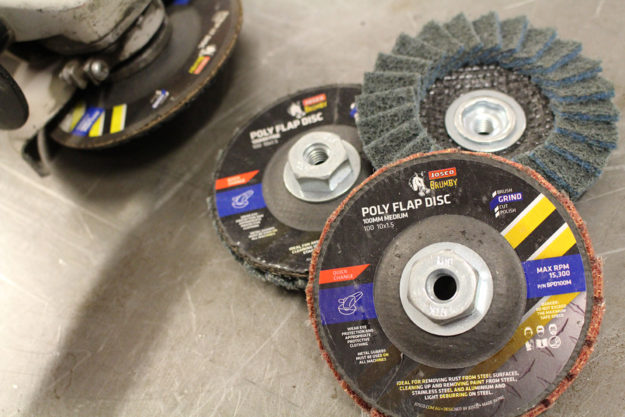
Sanding discs (flap wheels) The other accessory that I find very useful is a ‘flap disk’ or a sanding disk. A flap disk is an array of sanding pads bonded to a backing plate, available in a range of abrasive grits. As they are used, the edge of the pad wears away to expose more abrasive. While they are relatively expensive, I think the better quality discs last quite a while.
Again, this particular one’s Bosch, but only because it’s the brand my local store stocks. They aren’t cheap—in Australia they cost around about $7 to $8 each, but they do last quite a while. And they are very useful when working on a motorcycle.
I prefer to purchase 100 grit or 120 grit. The really coarse grits (40, 60 or even 80 grit) are very aggressive and remove a lot of metal very quickly. One of my 4-inch grinders is always set up with a flap disc.
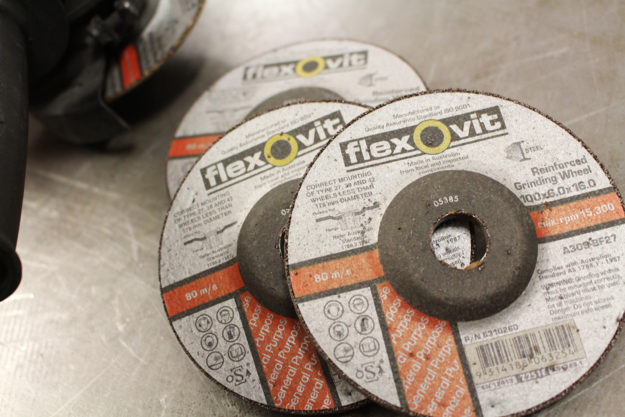
Grinding discs I don’t generally use grinding disks on motorcycle jobs. Similar to the coarse grit flap wheels, I think a grinding disc is a very aggressive method of removing metal. I tend to select a finer-grit flap disk before I would use a grinding disk. They are very cheap, but use them carefully on your motorcycle.
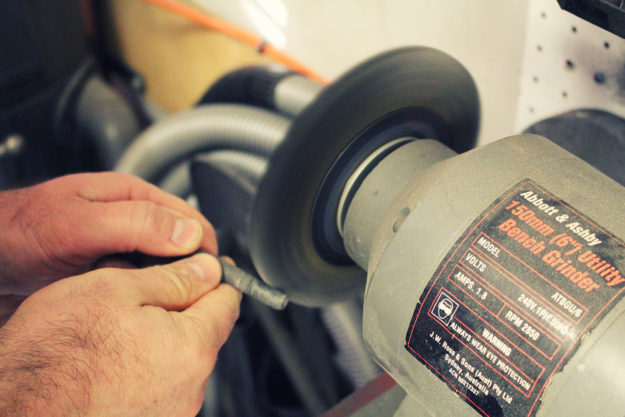
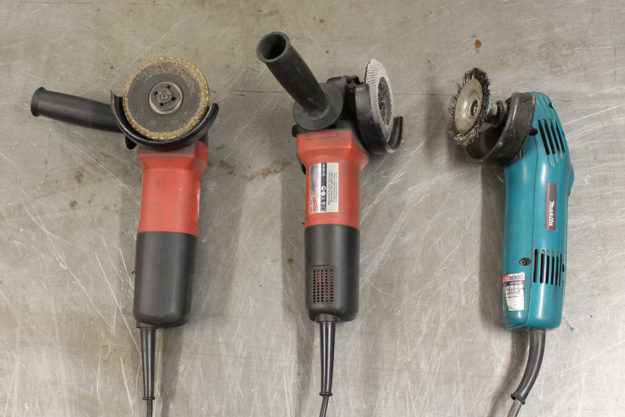
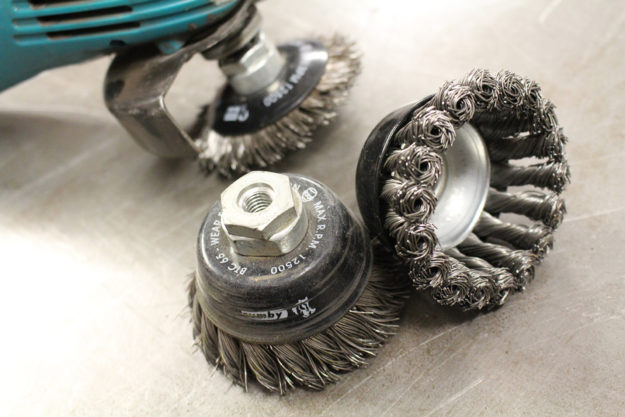
Wire brush On my old Makita grinder, I’ve permanently installed a wire wheel. This is one of my go-to tools for stripping paint or cleaning rust off surfaces. As the wire bristles spin, they smash paint and rust off a steel surface without significant damage. Steel bristles are harder than aluminum, so they will damage an aluminum surface. The bristles will remove paint and rust from irregular surfaces: I have stripped a complete motorcycle frame back to bare metal with a wire wheel on a grinder.
This grinder is used exclusively with a wire wheel. Since the wire wheel is much heavier than a cutting disc, it puts a more load on the electric motor and will probably quicken the grinder’s eventual demise!
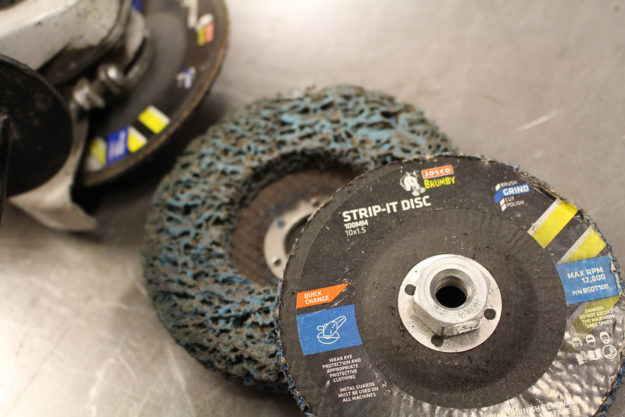
Paint-stripping discs Alongside the wire wheel, my other favorite paint-removal accessory is the paint-stripping disc. These have proprietary names depending on the manufacturer. The ones I purchase locally are described as ‘silicon impregnated abrasive nylon.’
These are great for motorcycle work, especially for larger, flatter surfaces, such as fenders and gas tanks. With an angle grinder, a paint stripping disc and a wire wheel, you can remove paint from a whole motorcycle.
Would it be quicker to send it for sand blasting or dipping? Sure, but you can do it at home at low-cost with these tools. You can see me demonstrate both wire wheels and paint stripping discs on a gas tank in this video.
I have stripped a number of tanks and fenders with these wheels, and in my non-scientific tests, I find the 5-inch version lasts a lot longer than the 4-inch version. This would suggest its more economical to buy these in 5-inch if you have a 5-inch grinder.
Synthetic non-woven flap discs Similar in construction to a flap wheel, synthetic non-woven flap discs contain a polymer abrasive rather than an abrasive particle pad. Different colors indicate different grades, and these are great for final sanding and surface smoothing. They are much less aggressive than a sanding flap disc, so they’re relatively safe to use on aluminum surfaces.
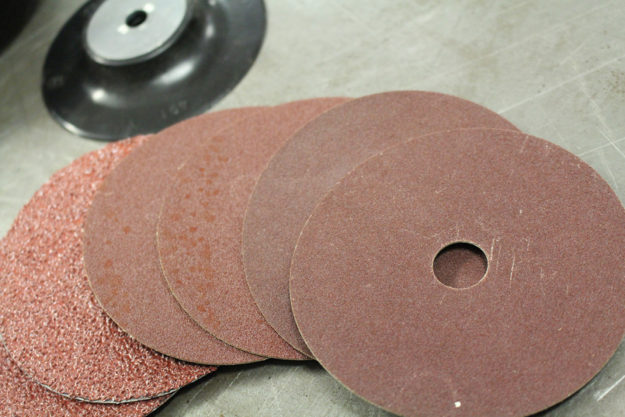
Alternate sanding discs I’ve been experimenting with sanding disks which need backing plate. I was wondering whether it would be cheaper to use something like this than to pay for a sanding flap disk. But as far as I can tell, a flap disc still wins. You seem to get far more material removed with a flap disc. I think this is due to the flap disc revealing new abrasive as it wears. Once these sanding discs are worn, they go in the trash. It was just an experiment to see what would happen. Stick with flap wheels if you can.
Want more suggestions on which grinder to purchase? Click here to download the Angle Grinder shopping list.
Grinder use and safety There’s obviously a big potential for accidents with grinders. But if you take a few basic precautions, you can minimize that potential.
Match your accessories to the spindle on the angle grinder. The packaging or instructions will specify the bore (the hole in the center of the disc) that fits your grinder. Wire wheels are sometimes supplied with a threaded fitting, which screws directly onto the spindle. All my 4-inch grinders have a metric threaded spindle; their size is an M10 x 1.5 thread.
Make sure you center the disc on the spindle, and clamp the disc snugly between the inner and outer flanges. The tools provided with the grinder are needed to secure the outer flange nut.
Bonded cutting and grinding discs are susceptible to impact. If you drop one, you should not use it. If it cracked when dropped, there is a risk it will explode when the angle grinder spins it up to full speed. (Don’t believe me? Google images for ‘angle grinder accidents’ if you dare.)
Grinders drive the spindle very quickly, and this speed combined with the abrasive material does the work. But don’t press the disk into the work heavily: If you hear the motor slowing down, you’re overloading it, and risk the tool kicking back if the disk gets jammed. Let the disk and the grinder do the work.
I see lots of YouTube videos showing angle grinders with the disk guard removed. I’m not really sure why people remove these guards. Your fingers are wrapped around the body of the angle grinder less than two inches away from a disc spinning at 10,000 rpm. With no guard, you are risking a visit to the Emergency Department if the grinder kicks back.
While you are merrily cutting or grinding, you’re sending showers of sparks (which are burning carbon) and small shards of metal flying through the air. It’s a great idea to protect your eyes from this airborne metal and sparks.
If you’re spending a couple of hours paint stripping a motorcycle frame or tank, a disposable dust mask will reduce how much ends up in your nasal passages and lungs. And when I’m using an angle grinder, I’ll generally wear hearing protection.
All that airborne metal and carbon will coat any surrounding surfaces, so protect items such as disassembled engines, transmissions and carburetors from ingesting this nasty stuff. Move those parts, or cover them while you’re working.
Wire wheels will start ejecting wires after heavy use. They can be found embedded in your clothing in unusual locations, at inopportune times. Cover your arms and legs with heavy workwear to provide maximum protection.
Finally, it’s wise to look around before you start cutting or grinding, and check for fire hazards. It’s easy to accidentally divert sparks onto your clothes and burn yourself. Don’t ask me how I know this!
Nearly every time you’re working on your bike, there are three types of tools that you’ll need: Wrenches, screwdrivers and pliers.
Let’s start with wrenches, or spanners as they’re usually called in Britain. Since your motorcycle is mostly bolted together, you’ll need different types of wrenches to take it apart. So I’m going to focus on the wrenches that give you the most ability at the lowest cost.
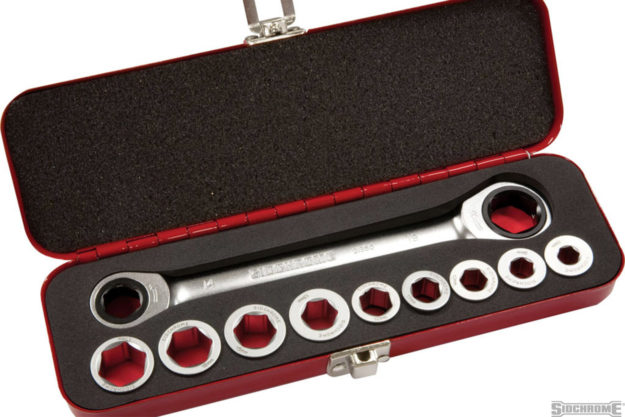
The Ring-and-Open-End Wrench This is probably the most used tool in my kit. Let’s look at it in more detail.
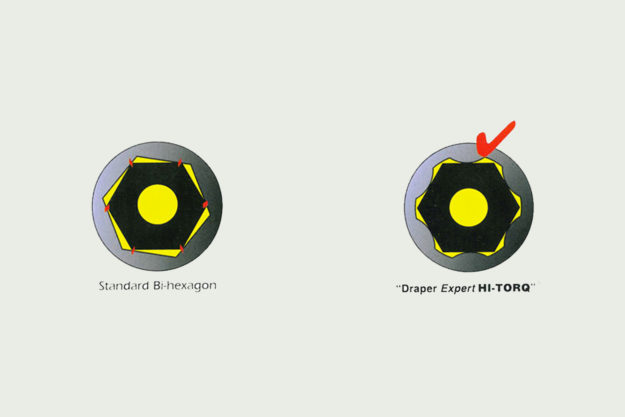
Not surprisingly, there’s a ‘ring’ end and an ‘open’ end, and you need to select the size that fits over the bolt or nut snugly. Nut and bolt sizes are all standardized, so you will find there is one wrench that fits best. Let’s look at how the wrench drives a nut or bolt head:
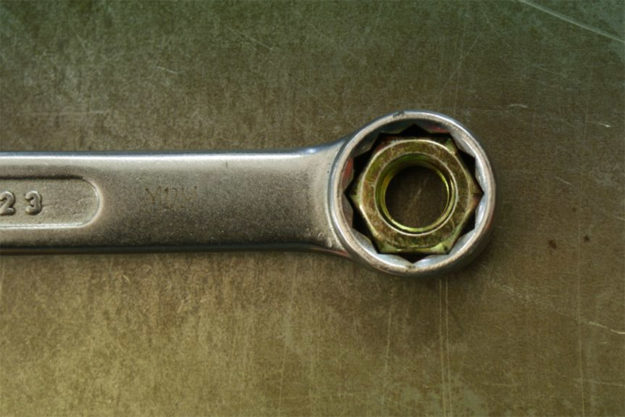
The ring end should be your first choice. The ring fits over the nut and contacts all six corners. This gives you the safest way of loosening or tightening the nut.
The flat jaws of the open end make contact with only two corners of the nut. The head is offset by a small amount. This allows you to use the open end in a restricted space where the ring end won’t fit, turn the nut a small amount, then flip the wrench over, put it back on the nut and turn it a small amount, and so on.
If you are working on European, British or Japanese bikes, you will generally find the nuts and bolts are metric sizes. If you are working on American bikes, you will generally find the nuts and bolts are imperial sizes. Often you can purchase a combined set of metric and imperial wrenches. Having both gives you the most flexibility.
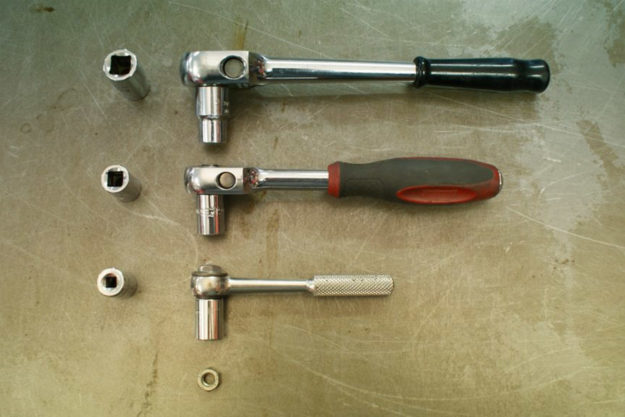
Socket Wrenches A socket wrench works just like the ring end of a wrench, but the ratchet handle makes the operation much faster. The obvious question might be, “Can’t I just buy socket wrenches?”
Well, yes, but if you can’t fit the socket into the space where the nut is located, you still need an open end wrench. My suggestion is ring-and-open-end wrenches should be first priority. After you have the basic screwdrivers and pliers, then worry about socket wrenches.
This photo shows 12mm sockets on three different size ratchet handles: 1/4” drive (bottom), 3/8” drive (middle) and 1/2” drive (top). These drive sizes refer to the size of the square drive plug fixed to the ratchet handle.
You can see the physical size difference. For motorcycles, I would recommend purchasing a socket wrench kit with 3/8” drive. I find this to be most useful. The 12mm socket (shown fitted to each handle) is the biggest socket I have for my 1/4” socket handle, and one of the smallest on my 1/2” socket handle.
Sometimes the 1/2” drive sockets are too large to fit around the restricted spaces on motorcycles. They are great for working on cars, but too large for motorcycles. If you want to purchase a socket wrench kit, have a look for a 3/8” drive set that has both metric and imperial sockets.
Ratcheting ring end wrenches A relatively recent innovation, this type of wrench (below) blends the size benefits of the ring wrench with the speed advantages of a ratchet handle. The size of the ring end increases slightly to accommodate the ratcheting mechanism, but the speed of installing or removing fasteners is greatly enhanced.
Flank-drive wrenches and sockets Flank-drive technology is worth a mention, and this design has gotten me out of trouble more than once. Flank-drive refers to a socket or wrench design that drives off the side (or flats) of a bolt or nut, not off the corners as done traditionally.
A few manufacturers produce a flank drive, such as Snap-on and Draper. The commonly available product in hardware stores in Australia is by Metrinch.
For those of us working on older motorcycles, which have usually been taken apart sveral times, you’ll occasionally find a bolt or nut that is ‘rounded off.’ This can occur when the socket or wrench selected is slightly large—such as using a ¾” wrench on a 19mm bolt head, or using a loose adjustable wrench.
As the fit is loose, there is a very high stress on the corners of the bolt head. If the bolt is very tight, corroded or jammed, the corners of the bolt head can yield and essentially get ‘wiped off.’ Now we don’t have any corners for a traditional wrench or socket to drive against. And when you put a wrench on the rounded bolt and pull hard, you just make the rounded head worse.
Flank-drive wrenches give you a way out, as they don’t drive off the bolt head corners. It is possible to remove a well-rounded bolt with this technology. I’ve purchased a set of these sockets in ½” drive impact version—so I can use them with both a ratchet handle and an impact driver.
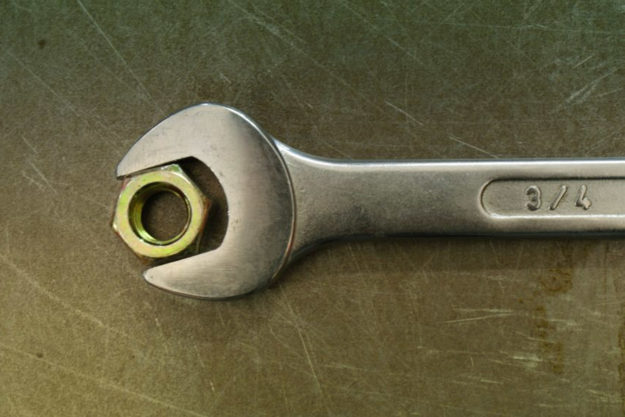
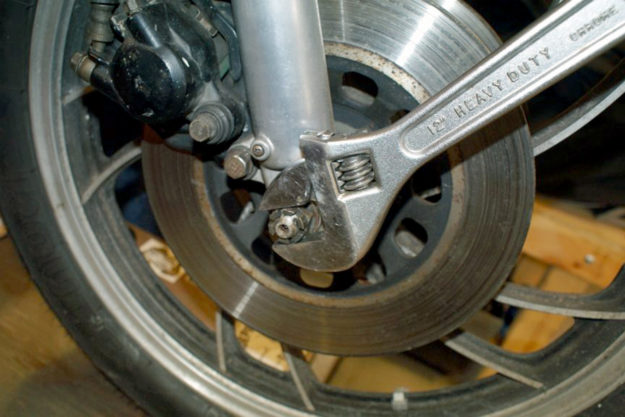
Adjustable wrenches An adjustable wrench is not a tool I would recommend for maintenance, but it has one specific use when you are building your tool kit. Generally speaking, ring and open end wrenches, and socket wrenches in 3/8” drive, will not be large enough for axle nuts on a motorcycle.
Adjustable wrenches have to be used carefully to avoid damaging the nuts. The jaws must be done up as tight as possible on the nut to prevent the wrench from slipping and ’rounding’ over the corners of the nut.
Adjustable wrenches are normally sized based on their nominal length: 6”, 10” 12” and so on. I find the 12” the best compromise. Axle nuts are normally very tight and the longer handle on the 12” wrench has enough leverage to loosen the nuts. After purchasing ring-and-open-end wrenches, add an adjustable wrench to your kit. You will probably use this very infrequently, so just purchase a low-to-middle cost adjustable wrench.
If you have absolutely zero tools and want to get started at the lowest cost, have a look at the tool kit I recommend here. If you are considering spending more, then you can visit your local tool store and look for a specific set of ring & open end wrenches, then a set of 3/8″ drive sockets.
Taking care of wrenches Wrenches are made of metal. Both wrenches and sockets are usually chrome-plated to prevent rust, but screwdrivers and pliers may not have this protection.
WD40 is an excellent cleaner and protective agent. If you are maintaining and modifying motorcycles, you might find you use a lot of WD40. It is cheaper to purchase it in a bulk pack and decant it into a spray bottle. Put your oily tools on a rag, spray them with WD40 and wipe them clean. If they happen to be wet from outdoor maintenance or a breakdown by the side of the road, wipe them down with WD40 as soon as you can.
If you start with some wrenches, screwdrivers and pliers, you will have the basis for motorcycle maintenance and customising.
In addition, you’ll have that sense of satisfaction that you ‘did it yourself,’ learnt something about your motorcycle, and are on the journey to your own custom ride!
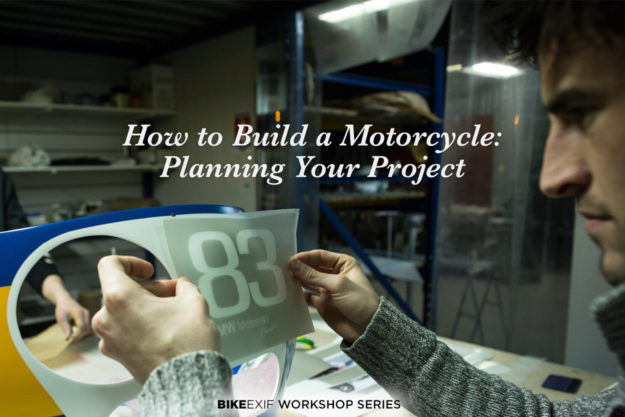
Our resident expert mechanic Matt McLeod reveals how he plans a custom motorcycle build.
I’m not sure about you, but I hate wasting time and money. So I’ve learnt that planning is one way to minimize the waste, and good project management will help you to stay on track with your custom motorcycle build.
We’ve already covered the books you need, the skills you need, and how to buy a donor bike. Now it’s time to plan and execute your build. There are plenty of ways to do it, and this is one example. Take this “template” and modify it to suit your situation.
I have a few other thoughts that might be best said at the start. Firstly, you might find it helpful to set a deadline for your build. Make it something significant, like a ride or a show that you want to attend. Nothing will focus you like a deadline.
Secondly, plans are just that: plans. They always change. They are never right. They are not set in stone. They are just a tool. As the situation changes with your build, the plan may also have to change.
Thirdly, you can compress the time frame to build your bike if you apply more resources. Let’s say you were building a house. If you doubled the number of construction workers on the job, you would be able to reduce the time taken to complete the house. Your custom bike is no different.
However, most of us work on our custom bike projects alone. Adding resources to speed up the build might mean “outsourcing” some of the work. Perhaps the engine needs rebuilding and you don’t want to attempt this step yourself. Or maybe you want a metal flake paint scheme that you can’t do in your own shop.
If you outsourced these jobs to a specialist, you could be working on other tasks in parallel. You could convince three friends to pull an all-nighter with you. These options would speed up the time frame but possibly increase other costs.
Working through a project is all about cost, time and quality. If you add “cost,” you might reduce “time” and increase “quality.” You can adjust the balance to suit.
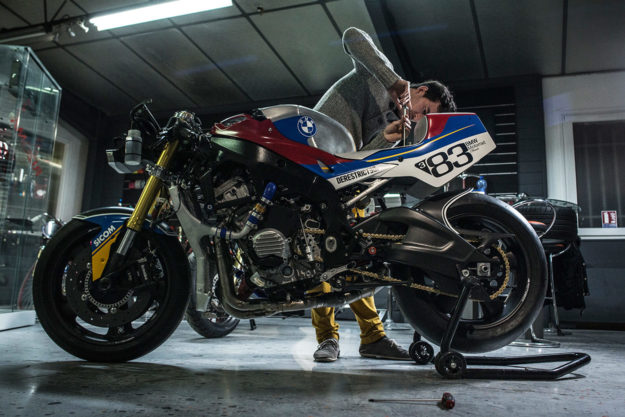
Concept and the overall style
What style of bike are you building? This is probably the easy question: you probably have a collection of photos on your phone, or in an online album. There should be elements of the bike you want already in your head.
If you happen to be artistic, or have a career as a designer, then get sketching! Building out your bike on paper (or on the screen) is part of the planning process. This virtual construction will help guide your decisions during the build.
If, like me, you are more skilled with a hammer than a 2B pencil, there are other options. I generally prefer to find a drawing or photo of the frame of my project bike, and then sketch over it in a drawing app.
I use a really cheap Wacom One tablet with my Mac. I can add a tank, seat, tail section and wheels—even if they are just block shapes on the profile shot of the frame. This will help to confirm the proportions and lines of the project before cutting steel.
When you’ve got the shapes right, stick this picture on the wall above your build table. It will probably influence your choice of donor motorcycle, if you haven’t already decided what to buy.
Purchase the project bike
A couple of weeks ago, we covered what to look for when buying a bike. Download the checklist from my site to take along to the inspection. If you’re about to buy, let’s also recap two key points from the skills article:
1. Older bikes are generally less complicated and easier to work on—both mechanically and electrically. If you bought a current model bike, you’d have to consider all the “electrickery” that is needed to run the engine management system. Not to mention the ABS, traction control, wheelie control, electronic suspension and so on.
2. More common older bikes have more information and more parts available. If you want to build a Honda or Triumph cafe racer, or a Harley-Davidson chopper, these platforms have plenty of reproduction, second hand, “will-fit” and custom parts available.
Purchase parts
If you are after specific secondhand parts, you might have to buy them whenever they become available. Otherwise, there are online and “bricks and mortar” stores that can supply every known part you might want.
Depending on the condition of your donor bike, you might choose to reuse some items. And, on the flip side, there are some parts I would suggest putting straight into the trash.
These are some parts I might throw away and replace with brand new:
The wiring harness, Especially if it’s already been modified. Will likely lead to reliability problems in the future.
Roller bearings (such as wheel bearings, in the headstock, swingarm and so on). You don’t know what condition they’re in, so spend a few dollars and buy some more peace of mind.
Filters (oil, air, fuel). Again, you have no idea what condition they’re in, or whether they are actually providing any protection to your engine.
Rubber parts (cable and hose boots, grips, footpeg rubber, possibly tires). Age and sunlight are the enemy of rubber compounds. Some of these parts are likely to be recently replaced anyway, but inspect them all.
Once you start mocking-up your project bike, the parts shopping list should become more obvious. I like to keep new parts in their protective packaging for as long as possible—even until the final assembly. This minimises handling damage during the build process.
Teardown and sorting
Teardown can start immediately after buying the donor bike. But there are a few precautionary points to make.
If your project stretches out over many months, or even years, I bet you won’t remember how and where all the parts fit. Especially when you have a box of different bolts off the bike. So you need a system to catalog your parts and disassembly process.
A factory service manual and a parts manual are very helpful references to have. These will always be useful during the time you own the bike. Buy your manuals, new or used, on Amazon or eBay as soon as you have your bike.
The trusty camera in your phone is another very useful tool. Take LOTS of photos. Before you remove a part, take a photo of it in its location, then take another when it is removed.
Ziploc® bags are a great help. Take the parts off the bike (with their mounting bolts or screws), take the photos, drop the parts into a bag, and write a description on the bag with a marker. If the mounting bolts are not identical, arrange them on your bench around the part and take a photo. This will help get it assembled correctly, months down the track.
Sorting, for me, means separating those parts that are reusable from those you will discard. This can be happening during the teardown. Some parts might be obviously junked; make a note of them, and add them to the shopping list. If you aren’t sure, just save it, and make a decision after cleaning and mocking up.
Cleaning
I’ve worked on a bunch of bikes, and those that are stripped, cleaned and repainted look amazing. Most of this work you can do at home.
You have to remove years of accumulated dirt, oil and grease. The resources you have available in your home shop will dictate how you go about the cleaning.
You need lots of rags. Hopefully you’re stockpiling old t-shirts that can be cut up and reused. Of course you can buy shop rags, but this is another cost you can avoid with some planning.
It’s possible to purchase aerosol cans of degreasing fluid, carburettor cleaner or brake cleaner to loosen the deposits on your bike. However, I think this could be the more expensive option.
A parts washing tub is really useful. A cheap parts washing machine with a small pump that circulates cleaning fluid to a stiff brush is part of my shop. You can substitute any large container that will hold the large parts on your bike. The pump is a luxury; nice but not essential.
You need to choose a cleaning fluid that you can purchase in quantity (say 5 gallons/20 litres) at a reasonable price. One option is concentrated degreasing fluid which can be mixed with water. I’ve had limited success with this approach. After a few months I had a nasty sludge in my parts washing machine.
So at the moment I use kerosene in my parts washer. This is not really cheap, but it is very effective. Gasoline is another cleaning fluid which works very well and is very cheap, but it’s also EXTREMELY hazardous, considering the other activities you might be doing at the same time. It’s obviously a very bad idea to leave a container of gasoline open in your shop.
My parts washer has a cover which keeps fluid in, and contaminants out. I also keep sparks from my angle grinder to a separate part of my shop. If you were cleaning small parts in a couple of cups of gasoline in the bottom of a bucket, you might be relatively safe. Just don’t, under any circumstances, put the dirty contaminated gasoline into ANY engine.
For extra safety, you probably want to get some chemical resistant gloves, and eye protection for splashes. And make sure you comply with any local regulations regarding use, storage and disposal of chemicals such as these.
Apart from a container and cleaning solvent, use plastic or metal scrapers to remove built up grease, and stiff bristle brushes for working fluid into oil and dirt. Once you’ve got all the contamination off, use rags to remove any residue, and dry off the parts. A final wipe with acetone, or a wax and grease remover, will really finish them off. Don’t forget to catalog them after cleaning.
I want the parts to be clean enough to keep my hands clean while I’m mocking up the build. I hate transferring oil and dirt from a partially cleaned part onto properly cleaned parts. It means you end up cleaning some parts twice!
If you have parts that are missing paint and are bare metal, you might see surface rust after a while. I don’t normally worry about this: I’ll clean it off just prior to painting. You could coat the parts in a protective oil, but I think this just adds more cleaning and extra work later.
Frame modification
Let’s say you are building a ‘bratstyle’ bike or a cafe racer. More than likely you’ll want to add a hoop to the rear frame. I have a couple of detailed videos showing this on a Yamaha SR400 (Part 1 and Part 2).
I much prefer to do this while the frame is completely bare and able to be positioned in any orientation. This avoids welding upside down under the frame, which means the weld quality should be better, and easier to clean up if needed. (If you are hardtailing a frame to build a chopper, the same process would apply.)
To decide where to cut the frame, it might be necessary to partially mock it up with the engine, suspension and wheels. Remember, “measure twice and cut once”!
All jokes aside, modifying a frame is serious business. If you do this wrong, you will compromise the structural integrity of your bike, putting yourself and other road users at risk. Certainly in my home state, the local constabulary take a dim view of frame modifications unless they see a certificate from a consulting engineer.
If you aren’t sure how to proceed, seek some advice from a local motorcycle shop or an automotive engineering professional—someone who can look after your safety and your wallet. There are many builders featured on Bike EXIF in cities all over the world; find one to help you progress your build, without taking shortcuts on safety.
Test fit/mock up
At some point you’ll be ready to assemble the clean parts you have prepared, plus any new parts you’ve bought. The idea is to build your bike almost completely before final painting.
Why? Because you’ll know that everything fits as expected. If you’ve forgotten some parts, you can go buy them. And you might find unnecessary parts that you can remove—such as frame tabs and brackets. You might assemble (and disassemble) the bike twice, five times, or even ten times before you are happy.
If you’ve painted the bike before this point, you’ll invariably damage your paint finish. This will mean more rework and wasted time.
A word of warning. I would advise always screwing or bolting parts up tight. In the industrial environments where I have worked, we marked bolt heads with a paint pen to show they had been torqued properly. If you have to move the bike, or choose to ride it before the final painting, you want to be confident everything is done up tight.
Wiring
I prefer to do the wiring after (or parallel to) the mock up. At this point, I’ve likely decided on and installed the lighting and other electrical accessories I need. I prefer to install, make or modify harnesses to the exact length needed. This reduces any joints in the harness which could be a future cause of electrical faults.
Depending on the model of bike and the modifications you have done, you might want to install a reproduction harness. If the modifications are extensive, making or buying a custom harness might be quicker and easier than modifying a new one designed for a stock bike.
Wiring need not be “scary.” With some learning and new skills, there’s no reason you can’t sort the wiring on an older bike yourself. Skill up with this series of videos in my electrical basics playlist.
The Final Teardown
Once you’ve got all the parts together on the bike, and the wiring is finished, you could theoretically ride the motorcycle. If you can’t wait any longer, then make sure all the bolts are tight and get out there!
This isn’t a terrible idea, except for chain lubricant flicking all over the rear of your bike. If you get all the fluids circulating, you might find a minor oil leak, for example. It would be preferable to find and fix that before it spoils your new paint work.
The final teardown also means separating out parts that need painting or more finishing. If you’re sending out your parts for painting, I would suggest packing them into boxes with bubble wrap or something similar. Your painter is more likely to repack the painted goods into the same packaging when they are finished. Then you’ll get them home in pristine condition.
Prep, Paint, Powdercoat, Polish
You can complete a lot of your preparation and painting in your shop. Will a professional painter get a better result? Yes, of course. But it’s definitely possible to achieve very acceptable results on your own.
If you are sending parts out for paint or powdercoating, make sure you discuss the preparation with your supplier. They might give you some instructions for completing some preparation yourself, which may save you some money.
If you are interested in doing some paint yourself, you can get an acceptable finish with aerosol cans. I normally paint frames in my own shop. I do use a compressor and spray gun, but the epoxy paint I use is also available in aerosol spray packs. I use these same aerosol cans of epoxy paint on small parts when I can’t justify setting up the spray gun (and then having to clean it).
Regardless of the paint used, the following are the typical steps you might follow:
Choose a paint system: head to your local paint supplier and ask for advice. Or check out the Eastwood site for information and videos. When I say “system,” I’m referring to a set of products that work together to achieve your desired finish. This might be a specific primer, filler, base coat, and top coat of paint. Generally I prefer to purchase the “system” from the same brand. I can safely assume they’ve been tested together by the manufacturer and should provide good results.
Cleaning/Stripping: if you haven’t already cleaned the part thoroughly, you’ll have to do it now. The main reason I want the part clean is so I can assess the state of the existing paint. Theoretically you can paint over an existing coat, however I’ve learnt I can get a better finish by completely stripping the paint.
You can use a chemical stripper for this step, so follow the instructions on the product you purchase. But I believe I get a better result in less time if I use mechanical stripping. (You can see an example of me using angle grinder accessories to strip paint in this video.) If you don’t strip all the paint, you’ll need to fill any paint chips and sand them smooth if you are planning on a high quality finish. I can skip this step by stripping back to bare metal.
Masking: paint doesn’t need to go everywhere. You can use simple painter’s masking tape for protecting areas that don’t need paint, such as bearing surfaces, or screw and bolt threads.
Priming: follow the instructions on the product you have selected. Primer is needed to provide the link between the bare metal and the top coat of paint. If you have a surface that needs smoothing out, then you might use a number of coats of primer-filler which can be sanded smooth.
Paint: again, follow the instructions on the product packaging. With some care you can achieve a great finish. Here’s an example of me painting a motorcycle engine.
Powdercoat: I haven’t done much powdercoating. The main reason is I can’t repair a powdercoated surface with paint—without it being obvious. I personally prefer to paint in my shop. However, don’t let this discourage you. Ask around your local area for a powdercoater who provides a good service to motorcyclists.
Polishing: If you have parts to be polished, you might be surprised what you can achieve at home. In a nutshell, polishing is simply smoothing a surface with progressively finer grades of abrasives until the reflected light doesn’t show any surface imperfections. I’ve described my system for bringing metal surfaces to a mirror finish in this video.
Re-assembly
By now, you’re probably very skilled at assembling your bike…again. This is now the home straight. Get it together and get it finished!
Check that all the screws and bolts are tight. Fill the fork oil, fuel, engine oil, brake fluid, and coolant. Check the drive chain tension. Inflate the tyres to the manufacturer’s specifications. Check the engine tune, or have your mechanic finish it for you.
Make sure all the rider’s controls work properly. Check the throttle returns to the closed position when released. Ensure the clutch disengages the transmission completely.
Check that the brakes work before you start riding, and take that first test ride carefully. This is a brand new—and modified—bike, and you have no idea how it will handle yet.
Finally, don’t forget to find a photographer who can get those killer shots, and get your submission into Bike EXIF!
Tools for project management: my workflow
As a dedicated Google Apps user, I tend to keep all my project files in my Google Drive. This makes it easy to access them from my phone when I am shopping for parts.
I back up all my photos from my phone (including screen captures) to Google Photo albums. I use albums to sort photos depending on the project. I can also share specific albums to collaborate on projects.
Google Sheets are my favourite tool. I tend to plan and organise my builds (and everything else) with a Google Sheet. Here is a parts sourcing sheet for one of my projects. You can make a copy of it, and edit it to suit your build.
More recently, I have been experimenting with Asana. This is promoted as a project management app, but I think that might be optimistic. I would call it a “comprehensive task manager.” It does have better ways of displaying tasks than a list in a Google Sheet, but it is not a full blown project management application. Asana is free for single users (at the time of writing), so there’s nothing to stop you evaluating its features.
I hope you’ve picked up some tips to help plan your next build. What have I missed? What steps work better for you? Let us know in the comments below!
Our resident expert mechanic Matt McLeod reveals what he looks for when buying a used motorcycle.
I take a checklist with me when I look at a used bike. I’m never expecting a secondhand bike to be flawless, but I’m looking for problems—and assessing ‘how much’ it will take me to correct these problems, either with time or money.
Generally nothing is a ‘show stopper,’ but it should determine the price you are prepared to pay for the bike. I use this list to document the problems I find, so I have a basis to negotiate with the owner. Remember, value is perceived: As an old hot rodder once told me, “A project is worth scrap value until it is registered.”
If you think the seller is asking too much, and you can’t agree on the price, then let it go. Another project bike will come along. And remember, you’ll find about half the problems with this inspection. A few months living with the bike will reveal the rest of the problems.
In my own shop, I prefer to do as much as I can in-house, without paying for outside vendors. Firstly, I like to learn how to do-it-myself. This can be a method to save money, with a trade off in the time invested. Secondly, if you have to use an outside vendor, you are reliant on them for schedule, cost and quality.
So you should assess the motorcycle against the skills you currently have (or plan to learn), and the tools and equipment you have. All the points in the list below are based on my personal approach. If you’ve got some thoughts on something I’ve missed, or tips of your own, share them in the comments section.
Preparation: Before the Inspection
Check model-specific forums. Has anyone posted a checklist for this specific model? Have they pointed out any problems with this model? Do they have any noises or characteristics that are considered ‘normal’? If you can’t find this information, post on the forum and ask for help. The guys who know this model will probably be happy to help.
Research prices—at what prices are these bikes selling on Craigslist or eBay? What is the top price you can find, and what condition is this bike? How does this compare to the listing you are researching, and values in local guides like NADA? What about obvious parts like tires, chains and sprockets? If it needs tires immediately, you need these costs to negotiate with the seller.
Check out the photos in the listing—can you see any obvious problems? If possible, price up replacement parts before you get to the bike. These costs can also be used to negotiate with the seller. On the flip side, if the seller can only provide second-rate grainy photos shot in a dark shed, alarm bells should be ringing.
Ask the seller via messages what the bike needs to be finished/running/registered (or whatever is relevant in this case). Price up the parts that the seller identifies.
Generally, it is less risky, but more expensive, to purchase a bike that is complete and runs well. If the bike is presented to you in crates, there is obviously more risk. This might be okay if you have the patience, skills and budget to build a bike from a box of parts, but you have to make that decision yourself.
After going through this process, I’ll form my own opinion on the value of a bike. For the inspection, I’ll take a certain amount in cash, so I can do an immediate deal if the bike is suitable.
Get some equipment together for the inspection: a decent flashlight is a must, and some hand tools like wrenches and screwdrivers. Get old rags to clean oil off the bike and your hands, and maybe a tire pressure gauge if you plan to ride the bike. Have some of your research printed out—which is great for negotiating with the seller. And of course take this checklist and a pen to write up any problems.
If the bike is in running condition, ask the seller to make sure the bike is not started or warmed up before you arrive. You want to check how it starts from cold.
The First Test is Look
Does the bike look okay? Stand back and walk around the bike. Does anything stand out? Obviously missing? Different from left side to right?
Does the bike look straight? Look from rear, front and side on. Are the forks straight and parallel? Frame tubes not obviously damaged from impact?
Check the front and rear wheels—are they in line and parallel? This is most obvious when the bike is on the center stand, or a race stand.
If the rear wheel doesn’t appear to be parallel to the front wheel, is it square in the swing arm? Check the markings on the chain adjusters on the swing arm. Are they in the same position left and right? Look along the drive chain. Do the links look straight?
If the bike is on a center or race stand, spin the rear wheel. It should spin freely and smoothly and stop immediately when the rear brake pedal is pressed. Also watch the spinning wheel from behind—does it have a ‘wobble’ (or ‘run out’) while it spins? This can probably be corrected on a spoked wheel, but on an alloy wheel might indicate it is bent, and this is harder to correct.
Does bike have all the controls intact? Brake & clutch levers? Throttle? Rear brake pedal? Gear shift pedal? Mirrors?
Does bike have lights and indicators (if applicable)? Lenses not cracked or broken?
Does the bike have a switch block on both left and right handlebars? With horn switch, engine stop switch, indicator switch?
Do the tires look okay? Check the sidewalls for cracks, check the tread depth. Is the tread depth uneven across the width of the tire (e.g. worn out in the center)? Can you see tire belts?
Are the wheels complete? No broken spokes or if alloy, no significant scrapes or damage?
Are the rider amenities complete? Seats, fenders, hugger, both pillion pegs?
How does the fairing look? Does it appear to be fitted properly to the frame? Does it have all its fasteners—are there any empty retainer holes?
What is the condition of the bike cosmetically? How does the frame look? Plastics? And the fuel tank? Check for rust, check tank for dents. Surface rust is generally repairable. Holes in fuel tanks due to rust are a bigger problem. Open the filler cap and shine the flashlight inside the tank—how bad is the rust? Will it even hold fuel or has it all leaked out?
How does it appear mechanically? Can you see any obvious oil leaks? Does it look like it has been looked after? Can you even see the engine under accumulated oil and dust?
Are there oily black dirt rings around the front forks indicating leaking seals?
Is there oil dripping under the engine? Is there a fresh shiny wet oil puddle under the bike? If it has been moved out for your inspection, get down and have a look under the engine cases. Is the bottom of the engine “wet” with leaking oil?
Can you see any oil on the rear suspension?
Check for gasoline leaks from the tank, fuel lines, overflow lines (fuel on ground under bike) or carburetors. If you can smell gasoline, there is probably a leak somewhere. Don’t attempt to start the bike until you locate and fix the leak.
Check levels of coolant, brake fluid, engine oil (all should have indication for the correct levels). Some bikes might not have a sight glass on the front brake reservoir (1970s stock Harley-Davidsons, for example). Use the tools you bought to take the reservoir cap off and check levels. If the contents of the reservoir look like gunky gel, it needs stripping and cleaning.
Look at the chain. Is it covered in oil and dirt? Is it clean and lightly lubricated? Or is it dry and rusty?
What about the sprockets? The rear sprocket might be the easiest to check. Are the teeth very pointy, indicating they need to be changed?
Do electrical harnesses appear properly retained and clipped in place, with no loose wires running anywhere?
If the bike is a ‘project’ there are some further warning signs. Can you see lots of extra electrical tape covering the wiring? Are there any red, blue or yellow commercial crimp connectors visible—as opposed to proper sealed automotive connectors? Aged, damaged, chopped and modified harnesses can lead to lots of reliability problems.
Remove the seat and have a look. Does it have tools and an owner’s manual?
Have a look at the battery. Is it clean, or is the positive terminal covered in white powder (terminal corrosion)?
Does bike have a side stand? A center stand?
Is bike registered? Check the dates. Is a current registration or safety inspection sticker displayed?
Do the frame and engine numbers match the paperwork?
Does the owner’s handbook have service stickers on it? Is a service history available? Even just receipts for work undertaken, or parts purchased?
The Second Test is Touch and Listen
With the back of your hand, touch the engine. It should be cold. If the owner has started and warmed up the bike contrary to your request, they could be hiding any multitude of problems. Either leave, or make your assessment, and halve the price you think the bike is worth.
Grab the exhaust (while COLD) and give it a shake. It should be securely retained.
Grab the gearshift lever. There should be a small amount of looseness (‘free play’) before you can feel resistance as it shifts gears. Does it only move up and down (without any appreciable sideways movement)?
Do the same check on the brake pedal.
Move the rider and pillion pegs. Do they rotate freely on their joints?
The Third Test is Sit
Sit on the bike and hold the front brake. Bounce on the seat to compress the rear suspension. Then stand up and lean over the headstock. Push down hard to compress the front suspension. Any squeaks or groans? Is damping evident, or does the suspension ‘pogo’ up and down?
Turn the handlebars left and right, as if you are steering the bike. Do the bars move freely, or are they stiff during motion?
Grab the front brake and push forward, then pull back on the handlebars. Can you feel any movement from the steering neck bearings?
Check the handlebars and controls. Do the bars rotate in the clamps? Do switch blocks seem tight? Are mirrors attached firmly?
Does the seat move when you sit on it and wiggle your butt? It should not be loose.
Is the chain adjusted correctly? Reach down while you are sitting on the bike. Check for 12-25 mm (½” to 1”) sag in the bottom chain halfway between the front and rear sprocket.
Operate the front brake lever. Does it move freely with progressive resistance as you squeeze and the brake engages? Rock the bike back and forth to confirm the brake operates.
Operate the clutch lever. Is it stiff, or does it move freely?
Check that all the lights work. Turn them on—headlight, high beam, stop light, and instrument lights. Step on the rear brake pedal and grab the front brake lever. Confirm the brake light works separately on both front and rear brake actuation.
Finally: The Road Test
These steps assume the bike will run, and has gasoline in the tank.
Is the engine easy to start, or does the owner demonstrate a special start routine?
Is the engine noisy on start up? Can you hear chain or gear noises? Any ticking noises?
Does it blow smoke? If it makes any noises, do they get faster as the engine revs up?
Does the noise level from the exhaust seem excessive? Can you find any exhaust leaks?
If the bike is fitted with a choke, push it in when the engine has warmed up (put your hand on the cylinder head and see it is warm). Will the bike idle without the choke?
Put the bike in first gear. Does it shift easily into gear? Can you get it back into neutral at a standstill without a lot of effort?
Assuming there is nothing that scares you at this point, perhaps it is time to go for a ride. If you are not sure, have a qualified technician go over the bike and test it for you. Go easy until you are sure the brakes work well. Listen for any noises. Again, do the noises increase or disappear with increasing road speed? Does everything work the way you expect?
Can you imagine spending two hours riding it? Did you come back with a smile on your face? If yes, congratulations! It looks like you have found a good project bike, it’s now time to negotiate with the seller.
Buyer’s tips
Here is the process I normally employ to negotiate with the seller. Having done my research, I’ll inspect the bike and have a good idea of what I think it’s worth (obviously the seller will probably disagree!) The bike will always be in worse condition than the listing photographs suggest.
I’ll be making notes on my checklist every problem I find.
Once I’ve finished the inspection (and test ride, if applicable) and I’ve decided what price I am prepared to pay (in my head), I’ll say to the seller, “Okay, what is your best price?”
Option 1 is the seller will throw out a price, which will probably be way above the price you have decided upon. At this point I’ll reply with, “No, I can’t pay that.”
Option 2 is the seller will respond with “I’m not sure, what do you think its worth?”
At this point, I’ll politely step through the list of problems I found, and starting putting some dollar values against the repairs or parts that will be needed.
Once I’m finished, I’ll then say, “The bike is worth ———— to me.” Immediately I’ll pull the envelope of cash from my back pocket and say “I’ve got that in cash, and I’d like to take the bike right now.” At this point I will stop talking.
This puts the seller in a position where they have to make a quick decision between cash OR no cash. The seller might respond in a couple of ways. The first response is to counter with a higher price. My reply will be “No. I’ll pay.” Stop talking and wait for their answer.
The seller might then say, “I’ve got someone else looking at it tomorrow, I’ll let you know”. Then I simply say “If I have to come back I won’t make the same offer. This offer is for me to take this bike right now.”
In the best case, the seller will want the cash now, so you have a deal.
In the worst case, the seller will hold out. In this case, their price is above the value you put on the bike, so let it go. There will be other bikes to choose from. Perhaps they’ll call you back in a week and agree to your offer, which is still a win for you!
Got any tips to add to these? Sound off in the comments below.
Want to see Matt do an inspection on his own bike? Watch the video here.