How time flies; it seems like it was only yesterday since we published our first look at the INNOVV Power Hub 1 product – I’ll blame it on cabin fever generated largely due to our lousy and continuing winter…
But like the original Power Hub 1 reviewed in December 2016 to be exact, the newest iteration, now called the Power Hub 2 still provides five switched in-line fused outputs, but in a much smaller form factor – taking up about half the space needed for the original Power Hub 1.
And it is this ‘downsizing’ that is, at least for me, the biggest change to what is one of the most versatile and economical power output products on the market.
The INNOVV Power Hub 2
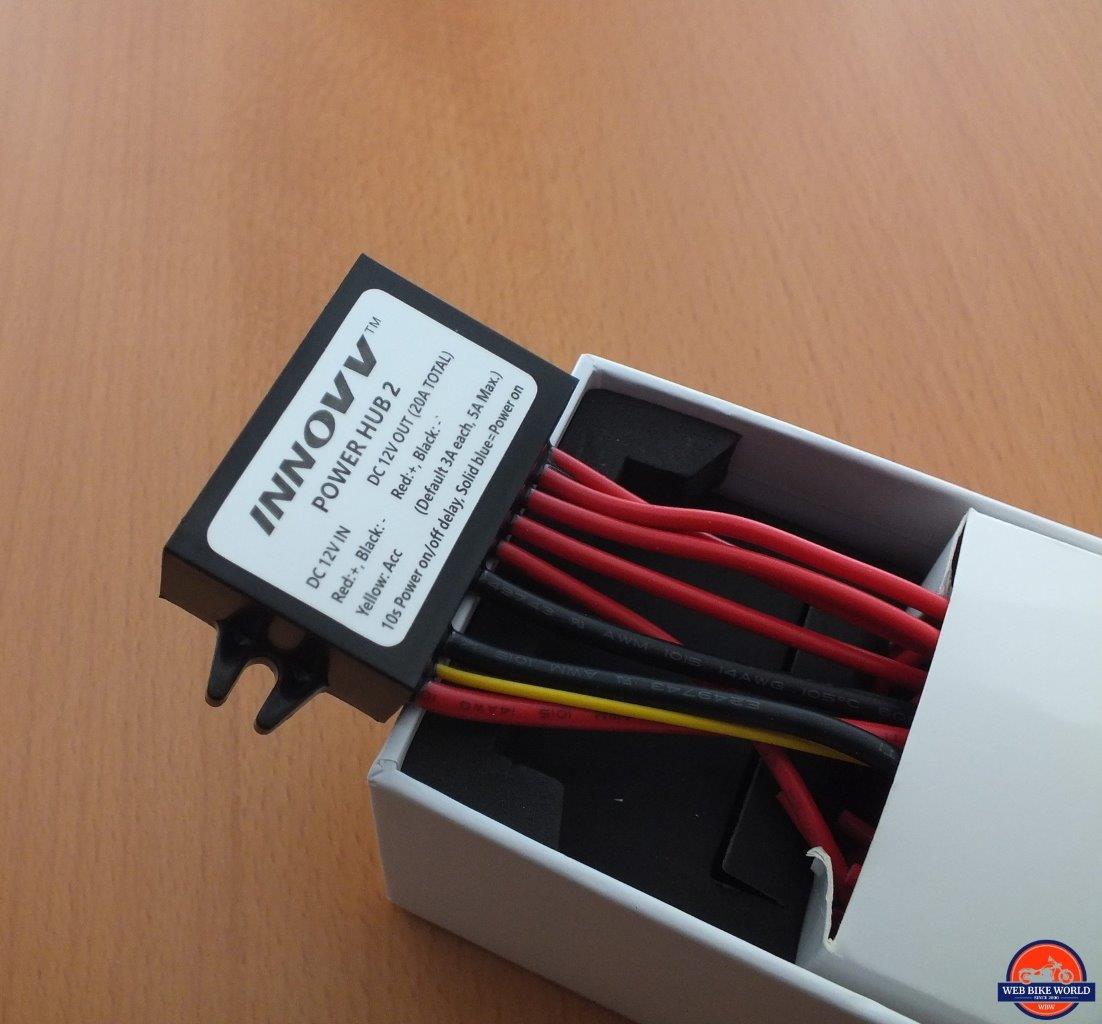
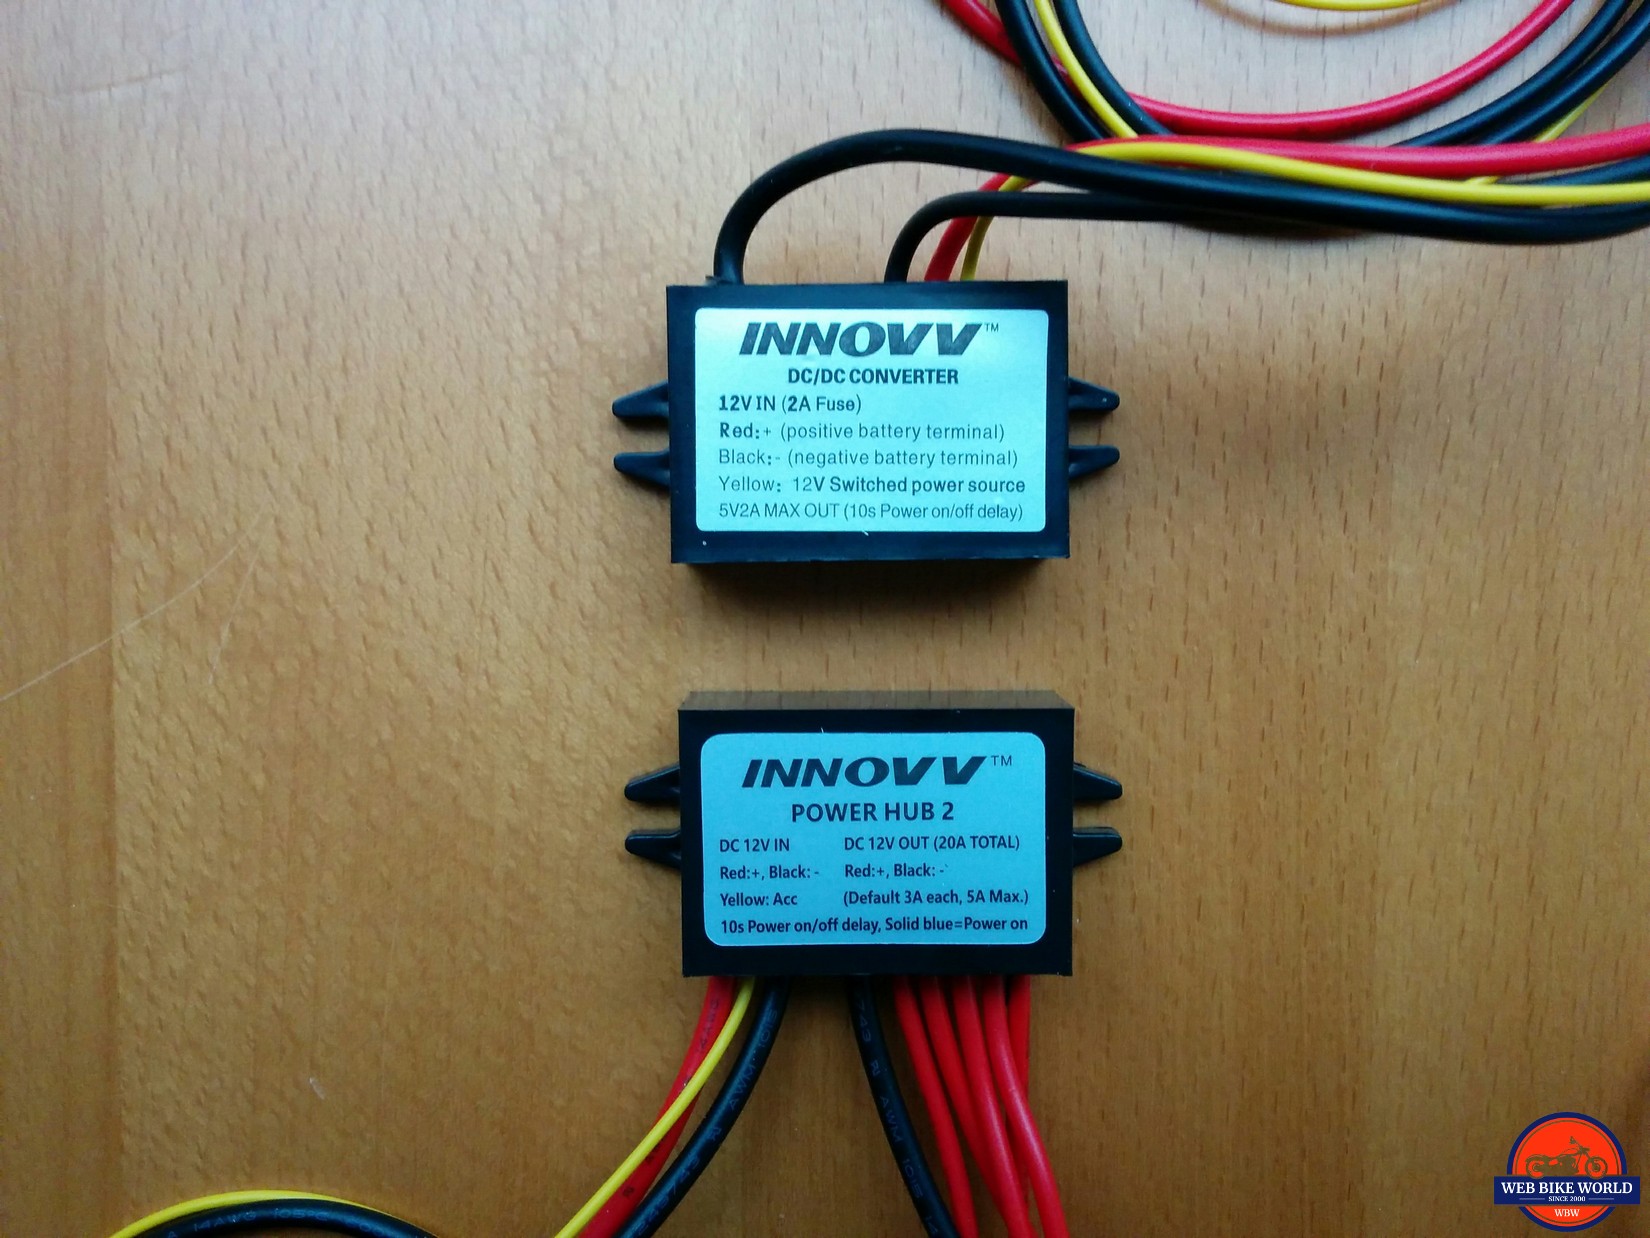
Welcome to 2019 and the INNOVV Power Hub 2. Unlike the Power Hub 1 that is a more 3-dimensional shape (think The Borg Cube), the Power Hub 2 is packaged in a smaller ‘brick’ form factor with identical dimensions to that of the INNOVV smart power supply module supplied with the C5 single and K2 dual channel camera systems.
Comparatively, both Hub variants are totally sealed, including the flying lead cables used for input and outputs – features allowing the modules to be mounted and used externally or in a more protected or hidden unused spot on the host platform.
But the newer smaller Power Hub 2 is far more likely to fit into a wider variety of spaces, especially when footprint and clearance are paramount; the five output leads with ATM fuse modules occupy more space than the module itself…
wBW has tested, installed and used virtually everything power distribution and management system on the market over the years, be they large, small, switched or unswitched, wired or wireless managed; and, the INNOVV Power Hub products remain great representatives for their genre.
We truly are well served regarding power distribution products for motorcycles. However, in comparing many competitive products, the INNOVV pieces still stand out, not only for their simplicity and flexibility but also pricing.
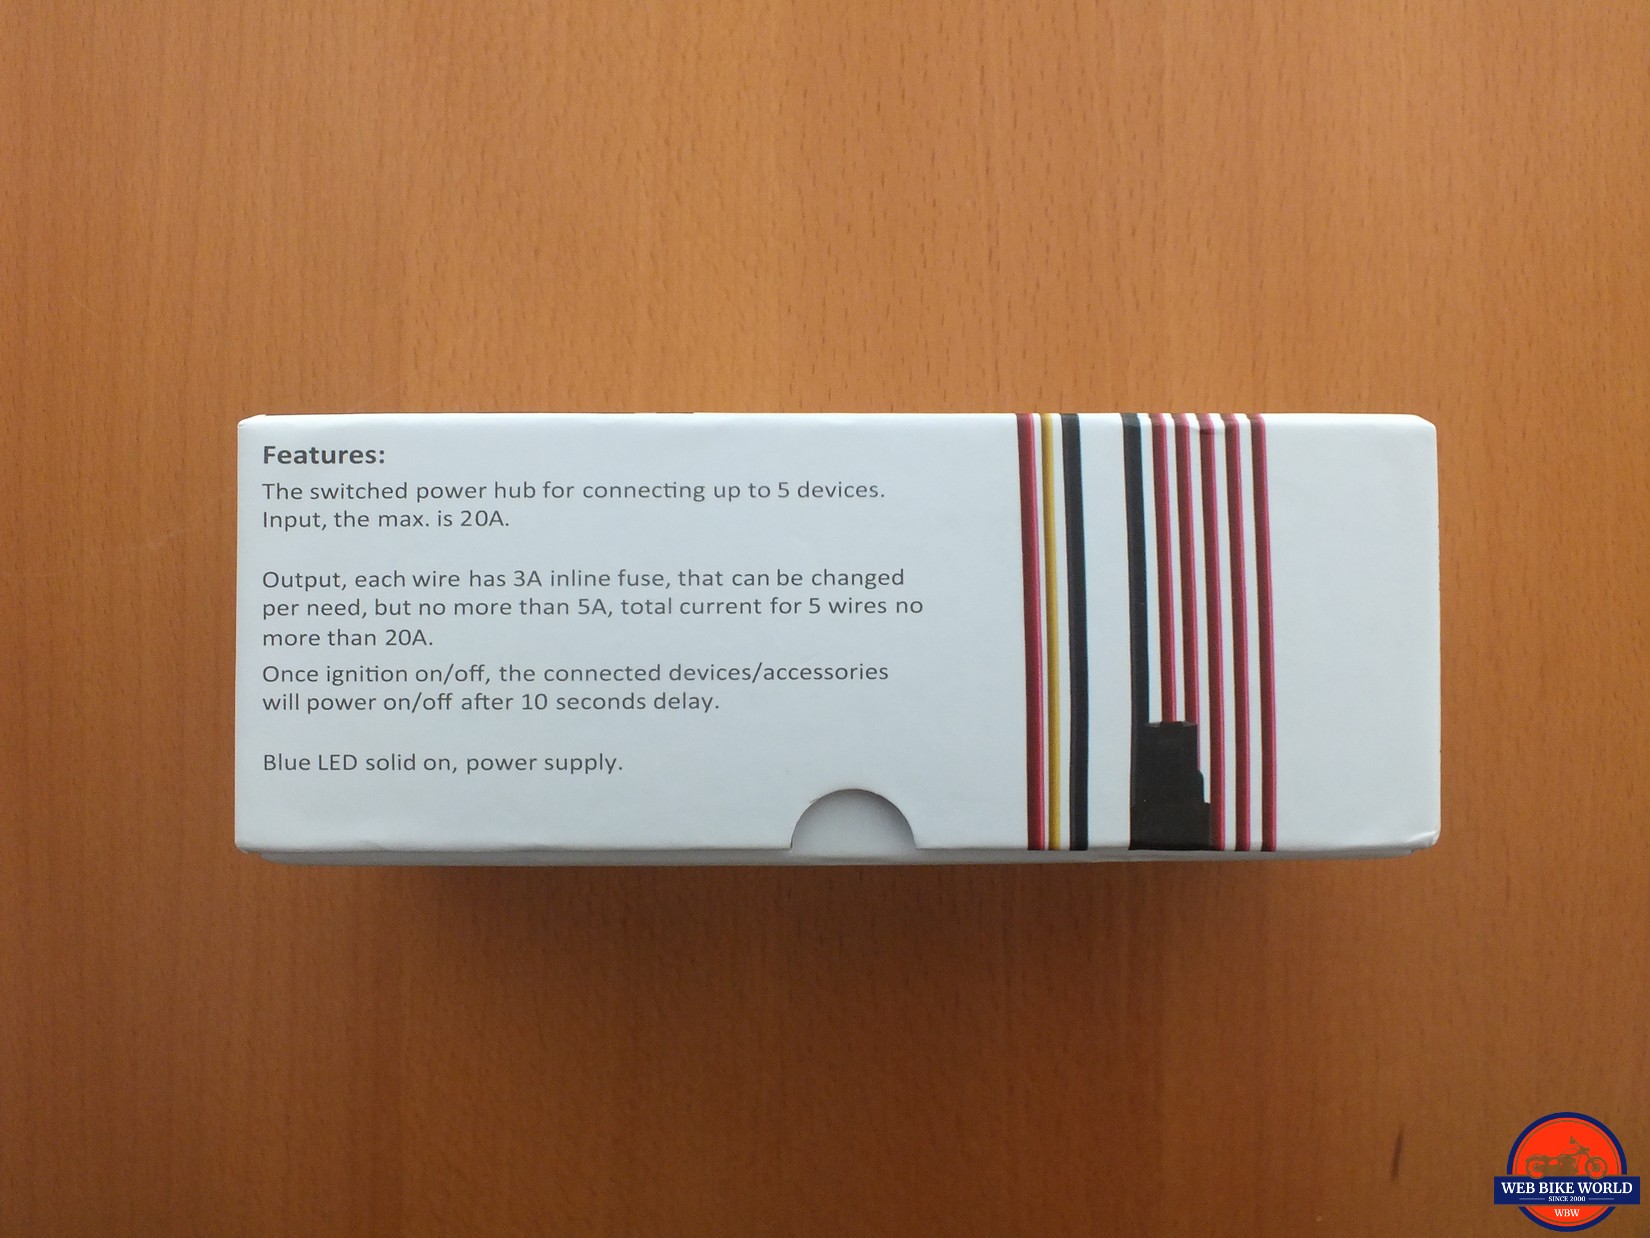
Power Hub 2 Features
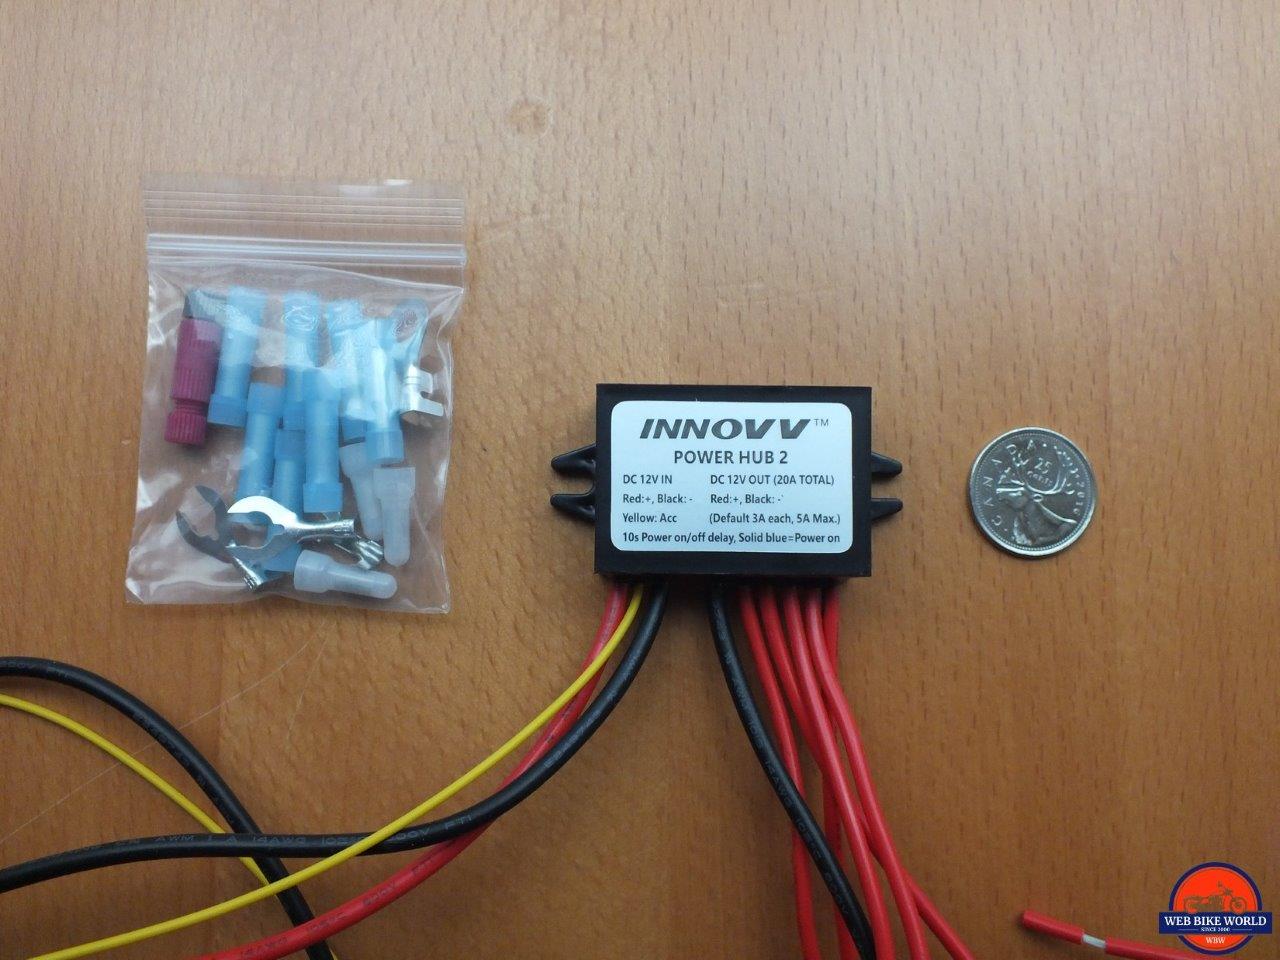
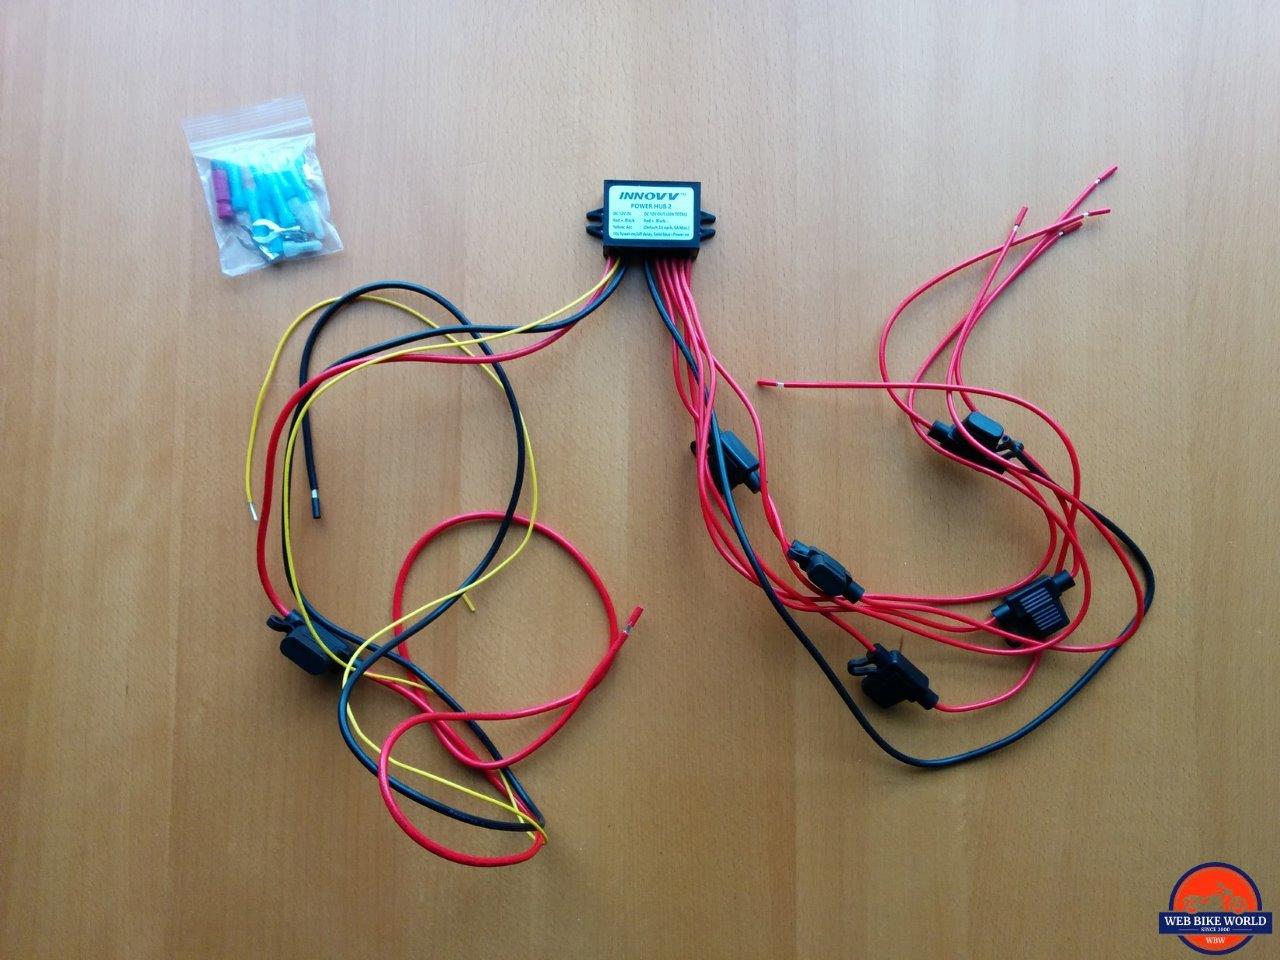
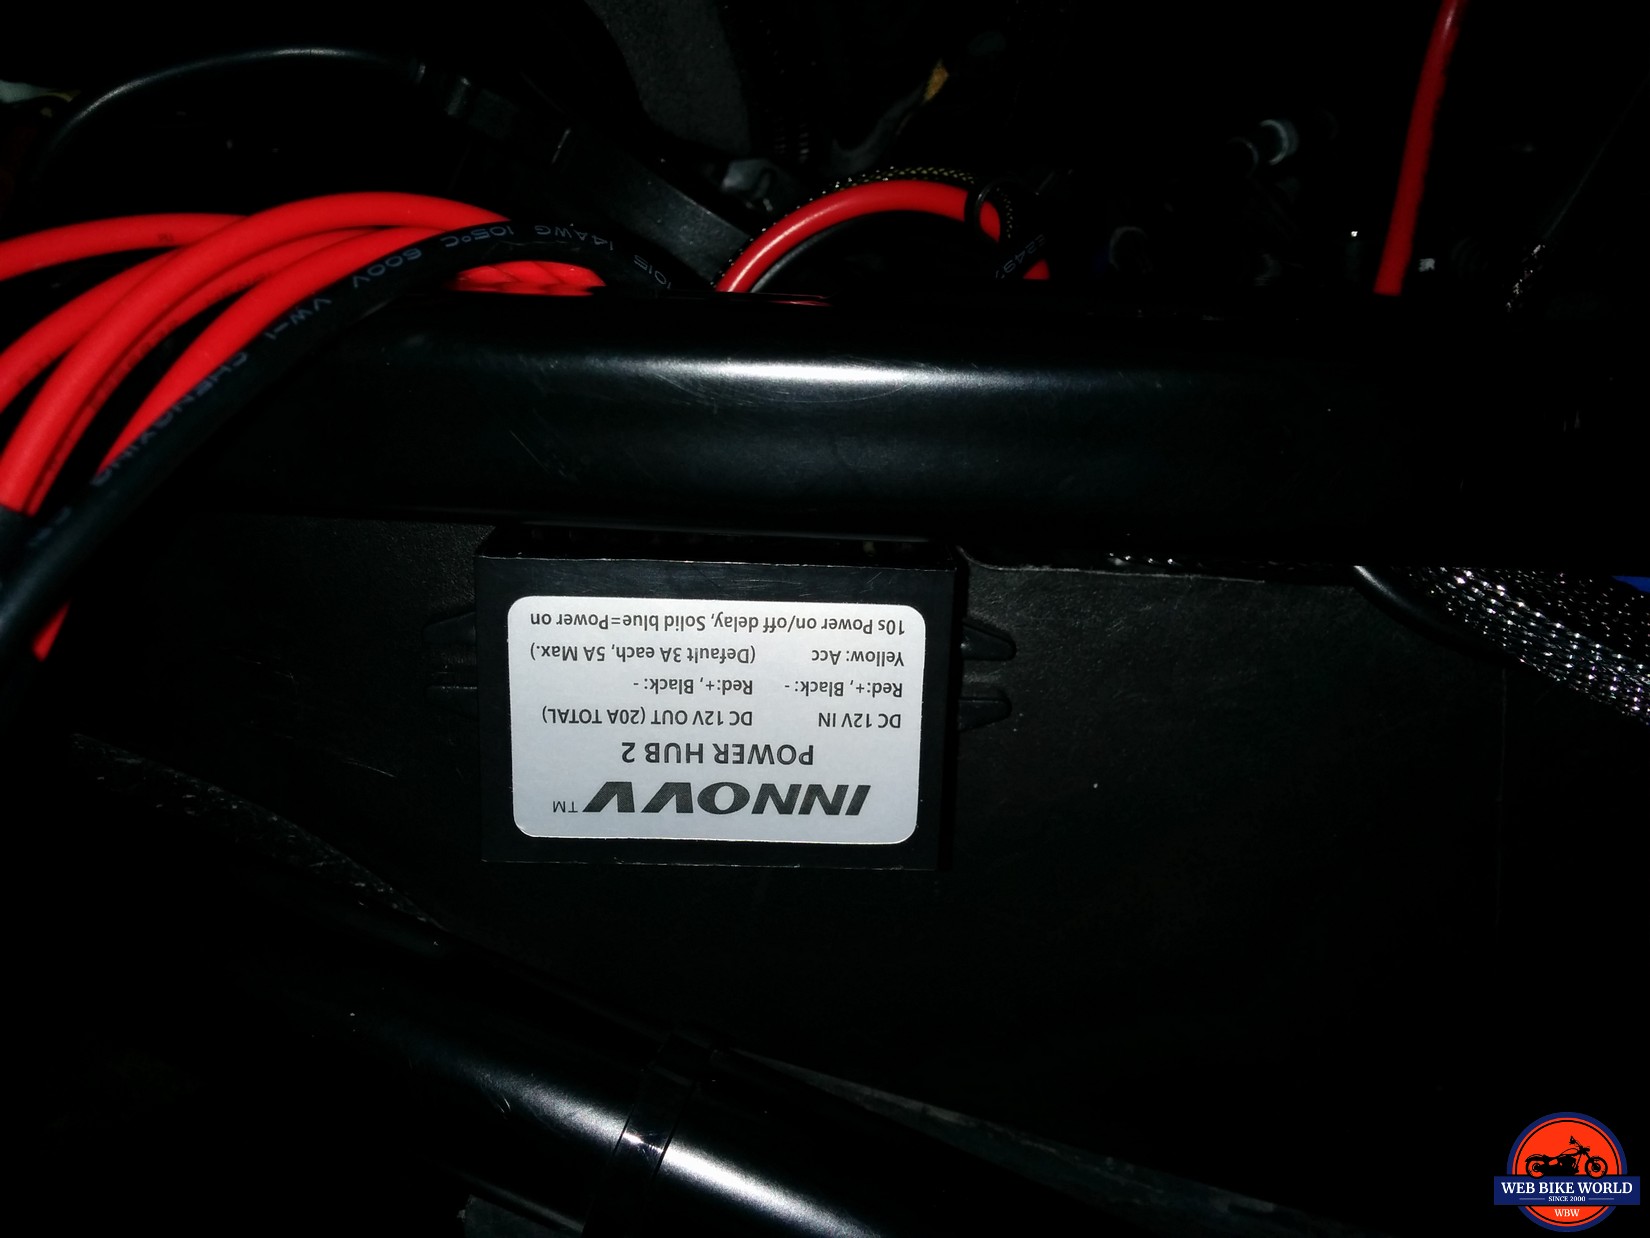
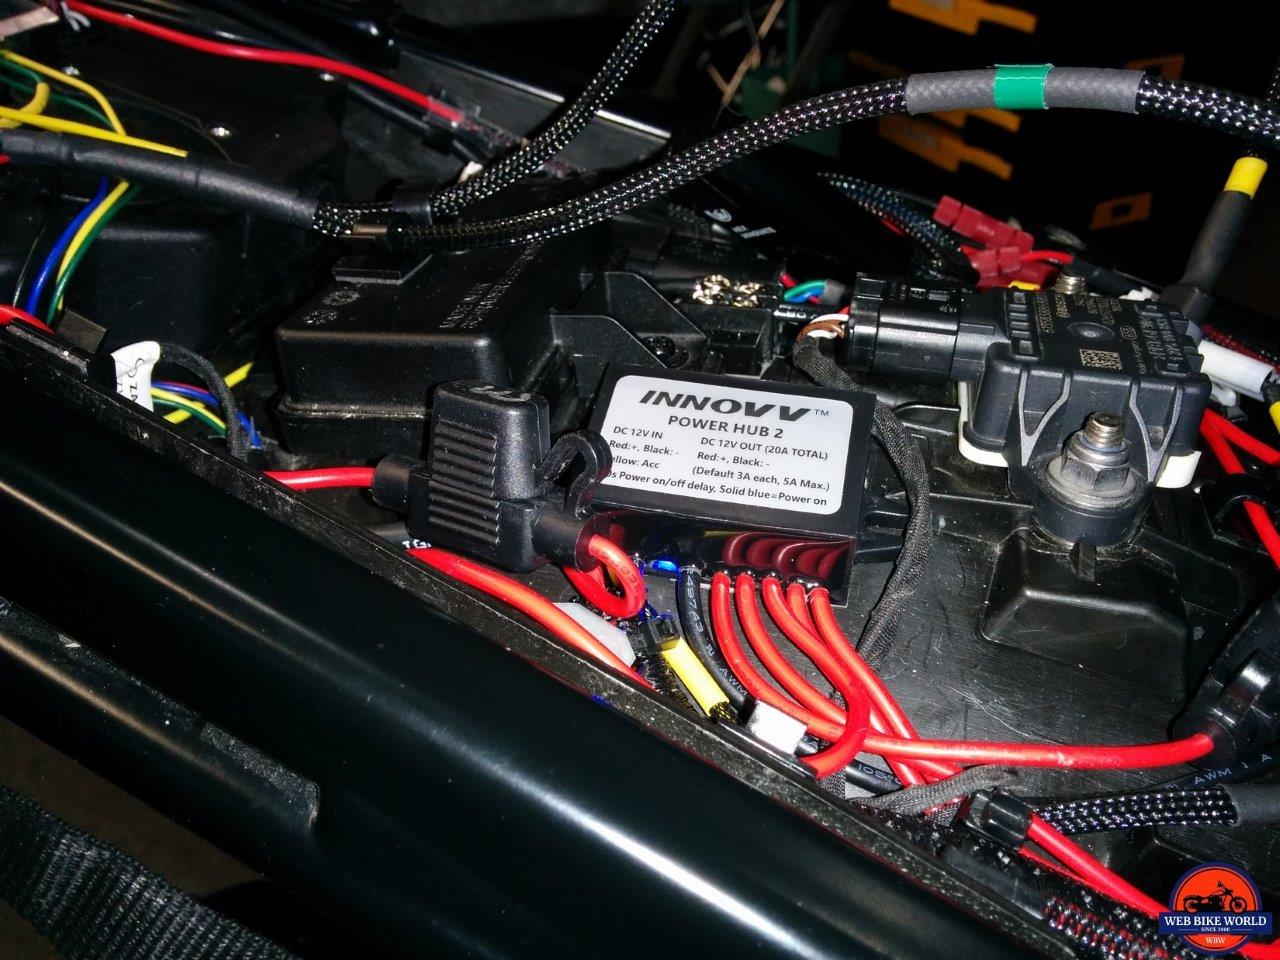
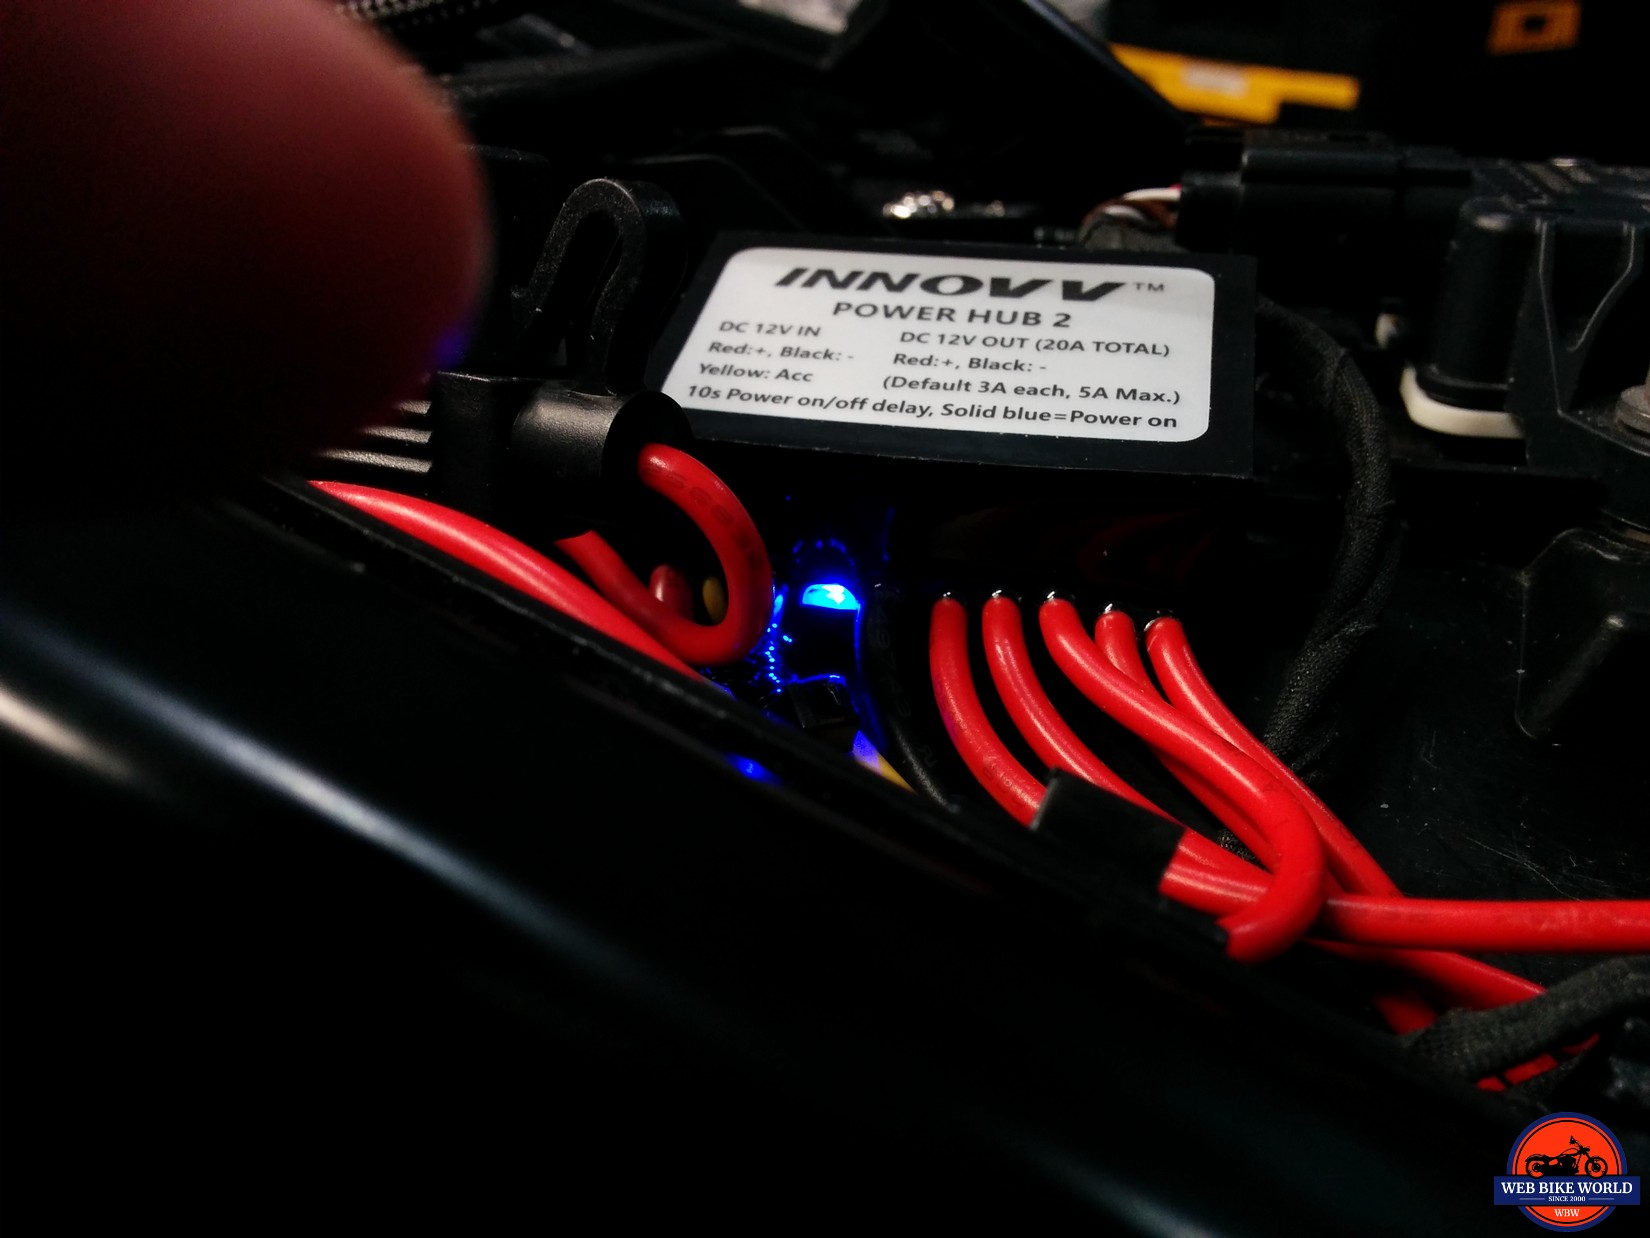
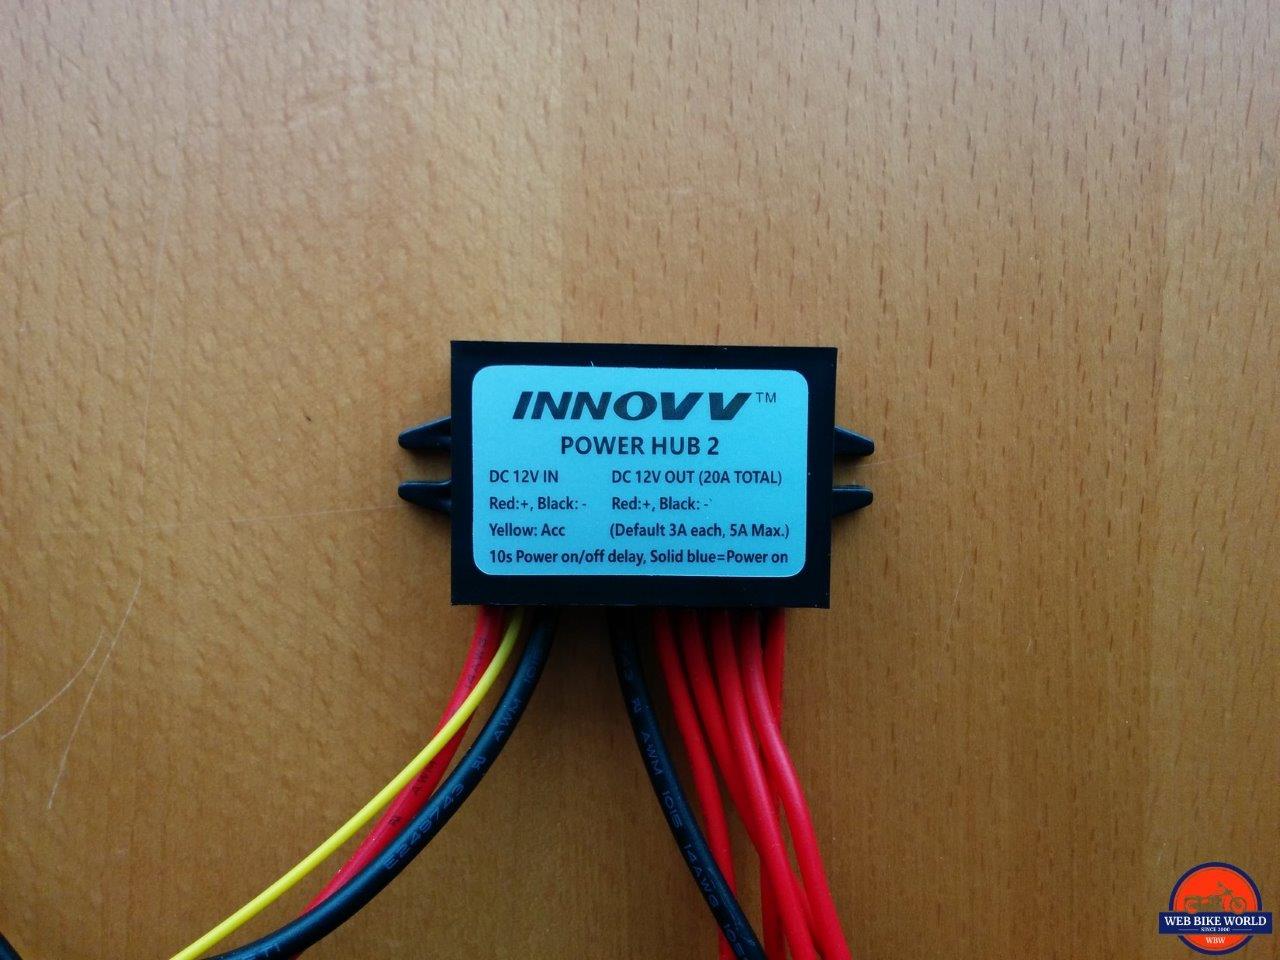
At almost half the size of the original, the down-sized Power Hub 2 still features three input leads and five output leads – all with individual in-line ATM fuse modules. The two LED display found on the Power Hub 1 is now represented by a single small Blue status LED on the Power Hub 2.
Power Hub Comparison Table
Feature
Power Hub 1
Power Hub 2
Dimensions
64.2 x 39 x 40mm (2.5 x 1.5 x 1.6in)
46.2 x 31 x 18mm (1.8 x 1.2 x 0.7in)
Input Leads
Pos (fused), Neg, Ignition trigger
Pos (fused), Neg, Ignition trigger
Rated
40A maximum
20A maximum
Output Leads
5 x 5A fused flying leads (15A max)
5 x 3A fused flying leads (5A max)
Boot Delay
10 second On and Off
10 second On and Off
LEDs
Red = Fault, Blue = Flashing on/off and Steady for power good
Blue = Flashing on/off, Steady for power good
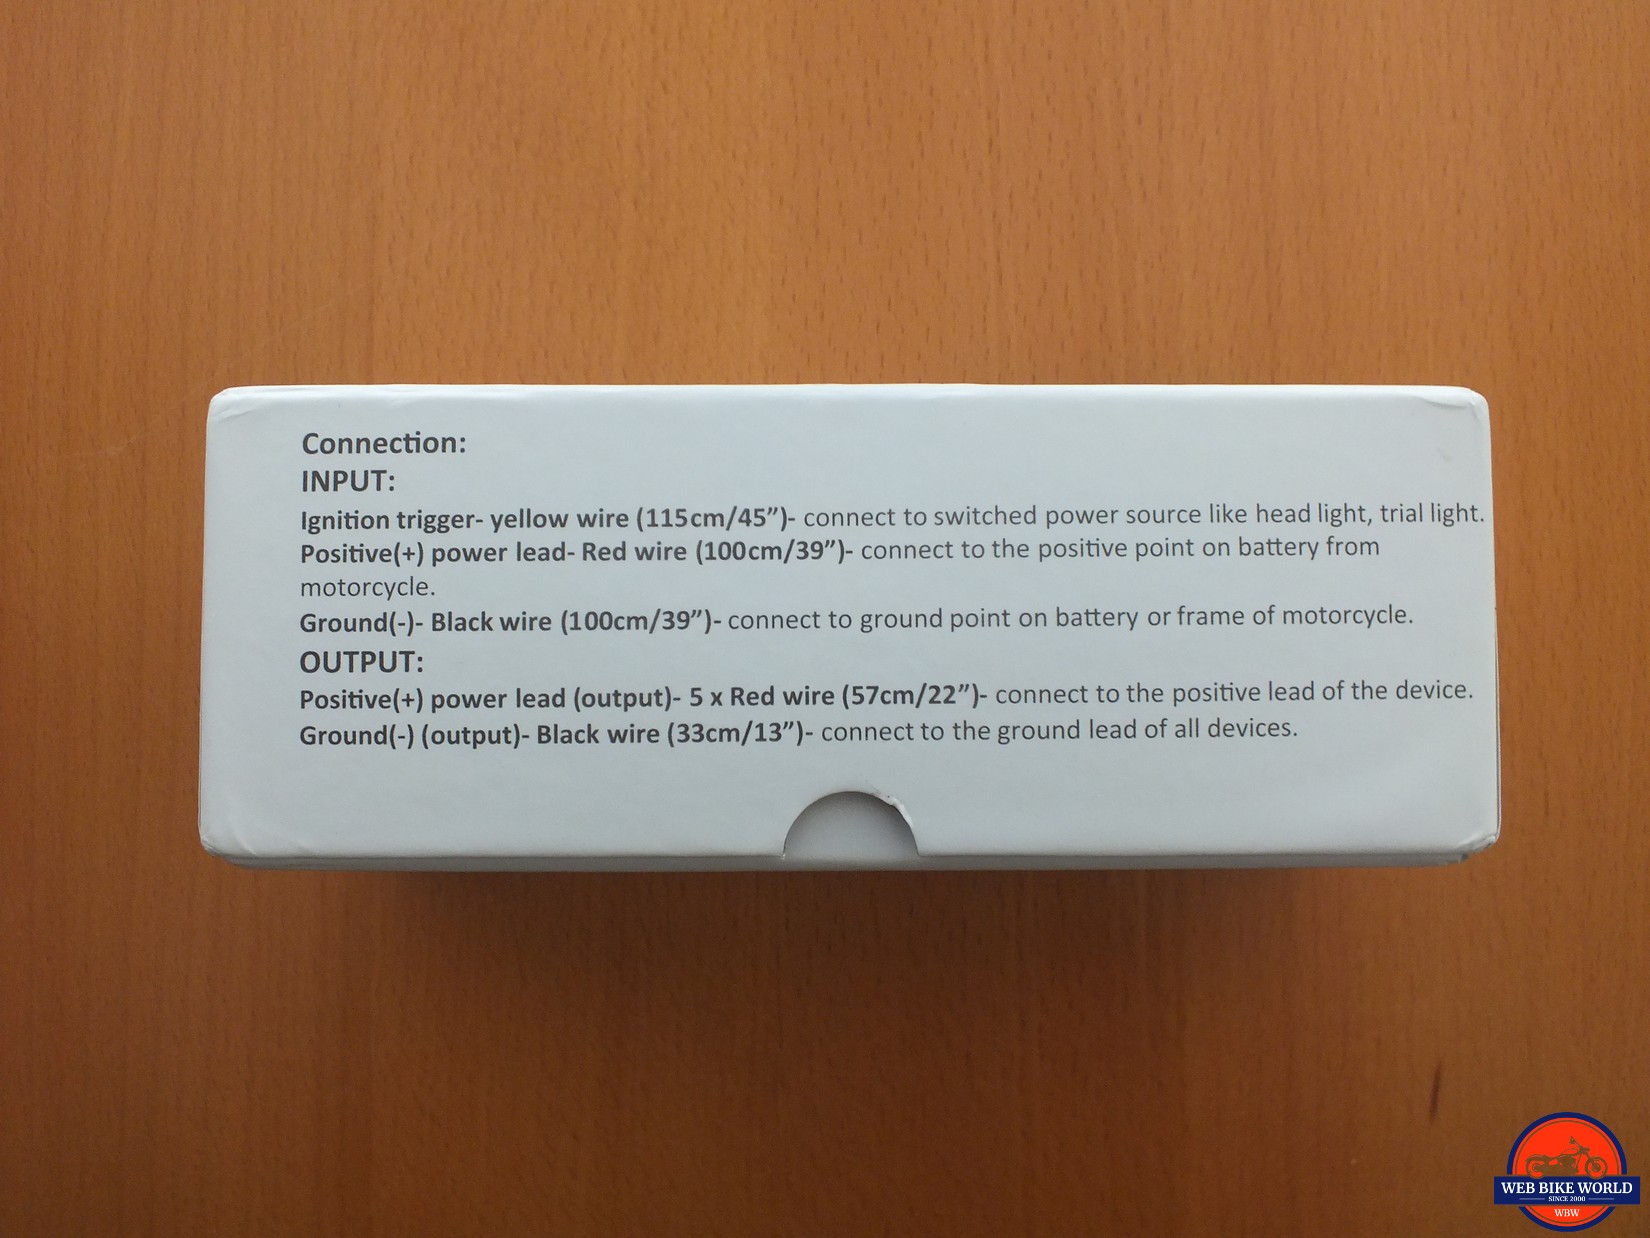
Power Hub 2 Leads & Lengths
Yellow = ignition (trigger) – connected to ignition switched power source, sends electrical signal to trigger the Power Hub to turn on and activate the five output circuits (115cm/45in)
Red = positive power lead input connected to positive terminal of battery, ATM fused (100cm/39in)
Black = ground lead input connected to negative terminal of battery (100cm/39in)
5 x Red power output leads, with ATM in-line fuses (57cm/22in)
1 x Black common ground for connected accessories (33cm/13in)
Installation
As the Power Hub 2 is so small and totally sealed with input and output connections done using the flying leads the module is mountable almost anywhere, making it such a simple solution for virtually any powersports platform, especially motorcycles.
Since its release, I have installed many Power Hub 1 modules in a variety of motorcycles (sports, touring, adventure and scooters) with a suitable spot always found, although sometimes it took a bit of scoping and creative mounting to get it installed in the best location.
Not so for the Power Hub 2 – it is proving to be much easier to find a good spot or spots on the exterior or interior in which to mount it and with its long input and output leads routed, there aren’t a lot of limits to just where and how the system can be installed.
Being in the middle of cabin fever mitigation activities – otherwise known as winter period accessorizing, the arrival of the Power Hub 2 was timely as some additional unswitched power was needed for some additional USB outlets, handguard LEDs and rear-facing auxiliary lighting.
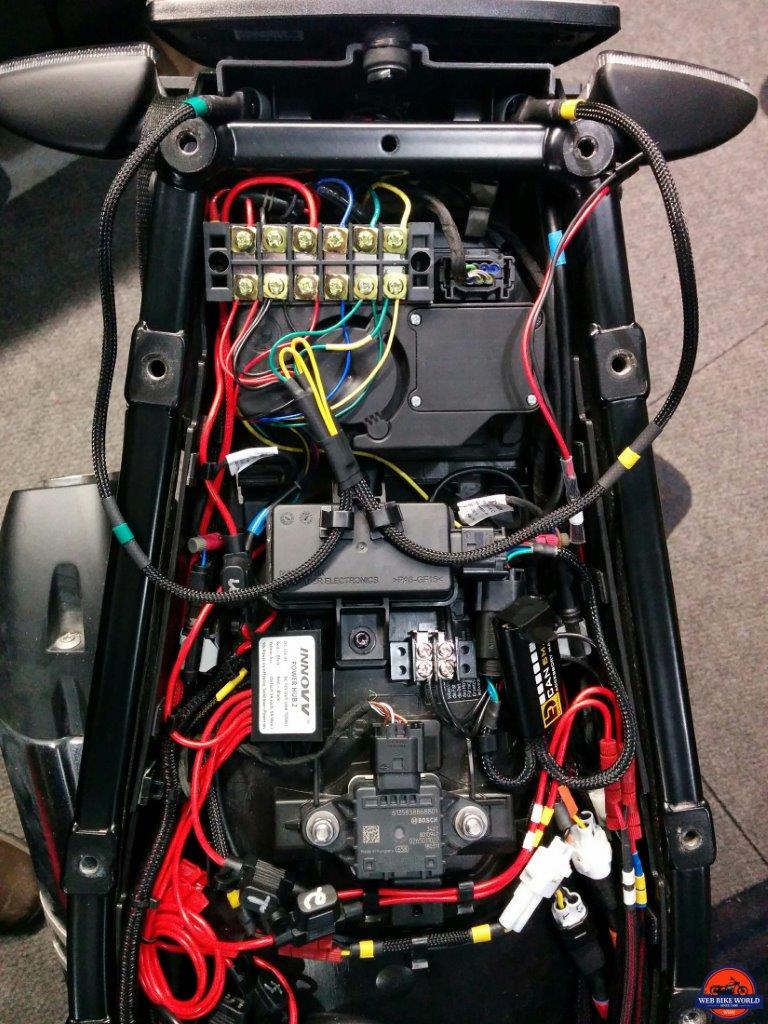
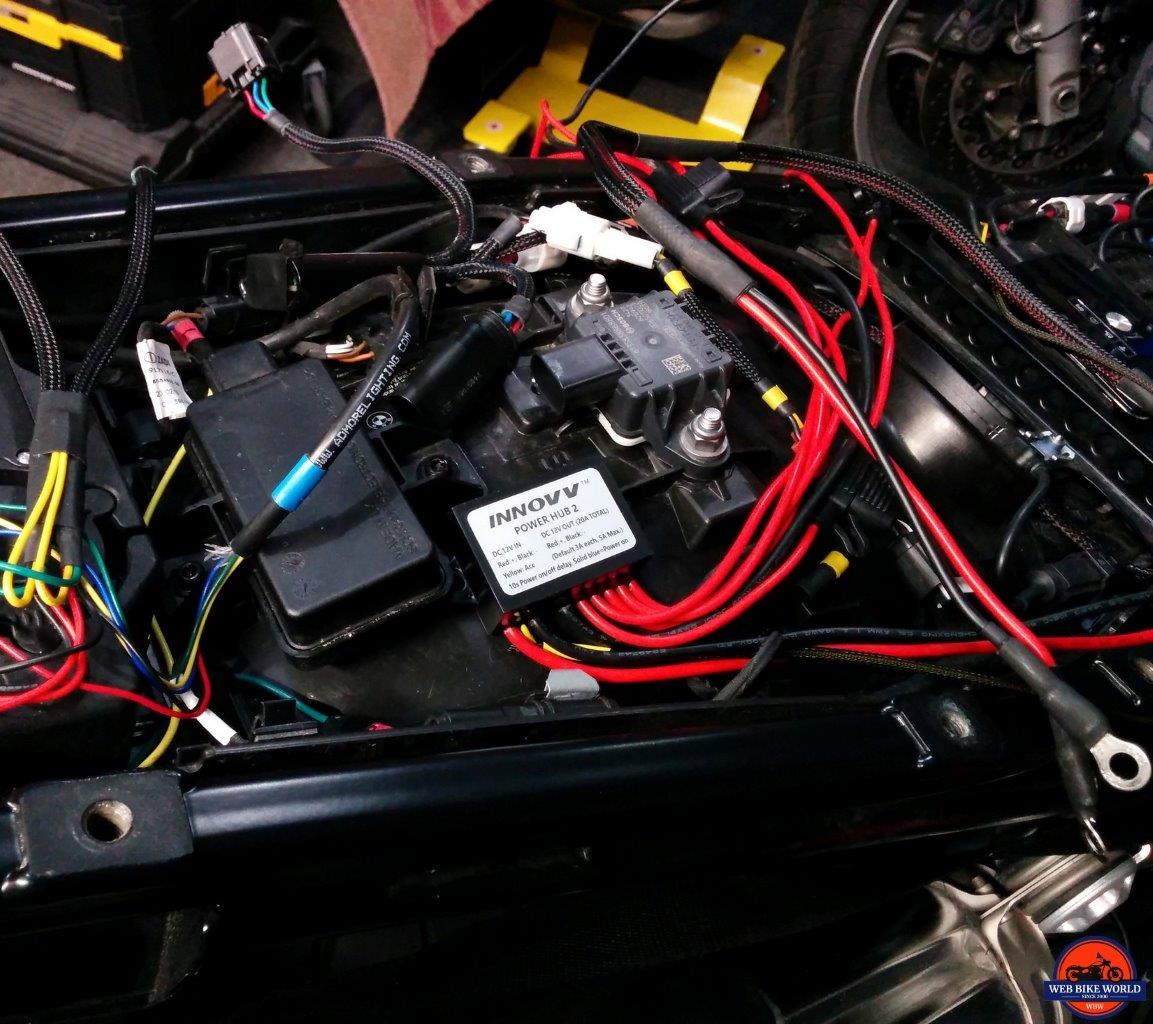
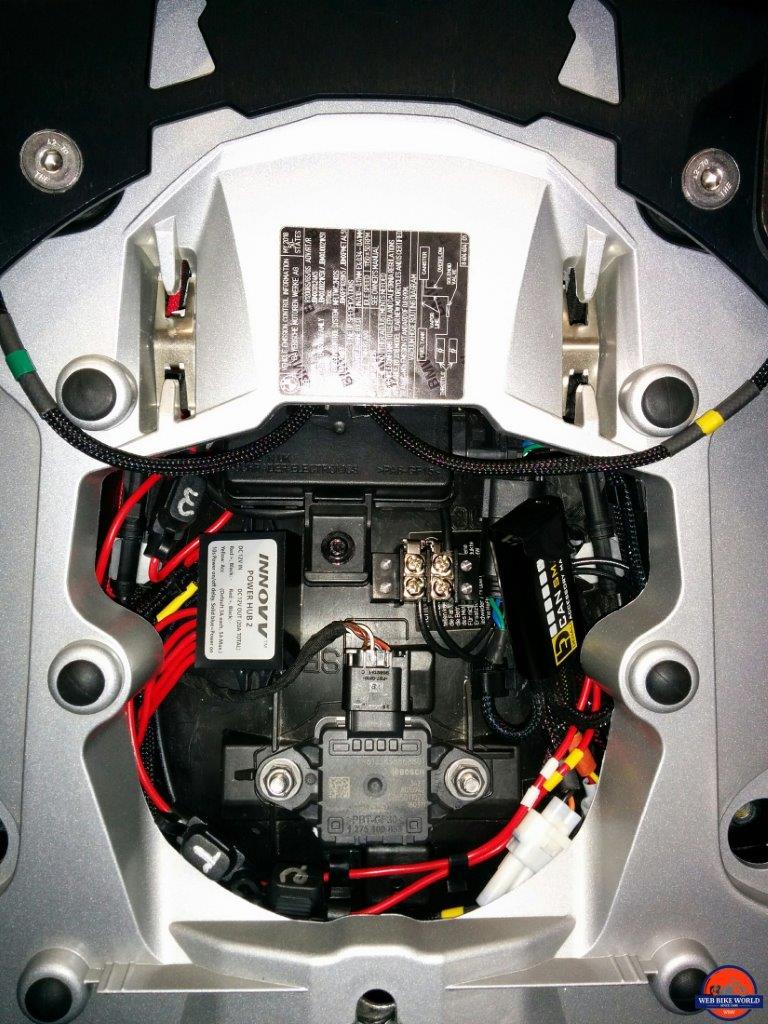
An initial outer side wall installation of the module was done on the 2019 F850GSAdv for assessment but was then moved over to the 2018 R1200GS Rallye where it had a temporary home and now a (permanent) location.
On both the F850GSA and the R1200GS, the module was initially mounted on the right outer sidewall of the under-seat housing before being moved to its permanent home under the back deck and just to the right of OE DWA (Alarm) module.
All the locations work fine, although with different fastener material used for fixing the lightweight module in place. The external mountings use 3M VHB adhesive strips while the under-deck placement is more than adequate using low profile 3M Dual-Lock pieces, so the module can be lifted out of the way easily – the deck area is crowded…
While the Red and Black power leads, housed in a length of Flexo F6, run up to or forward (depending on the motorcycle) to the battery box, the Yellow trigger wire has a couple of connection options.
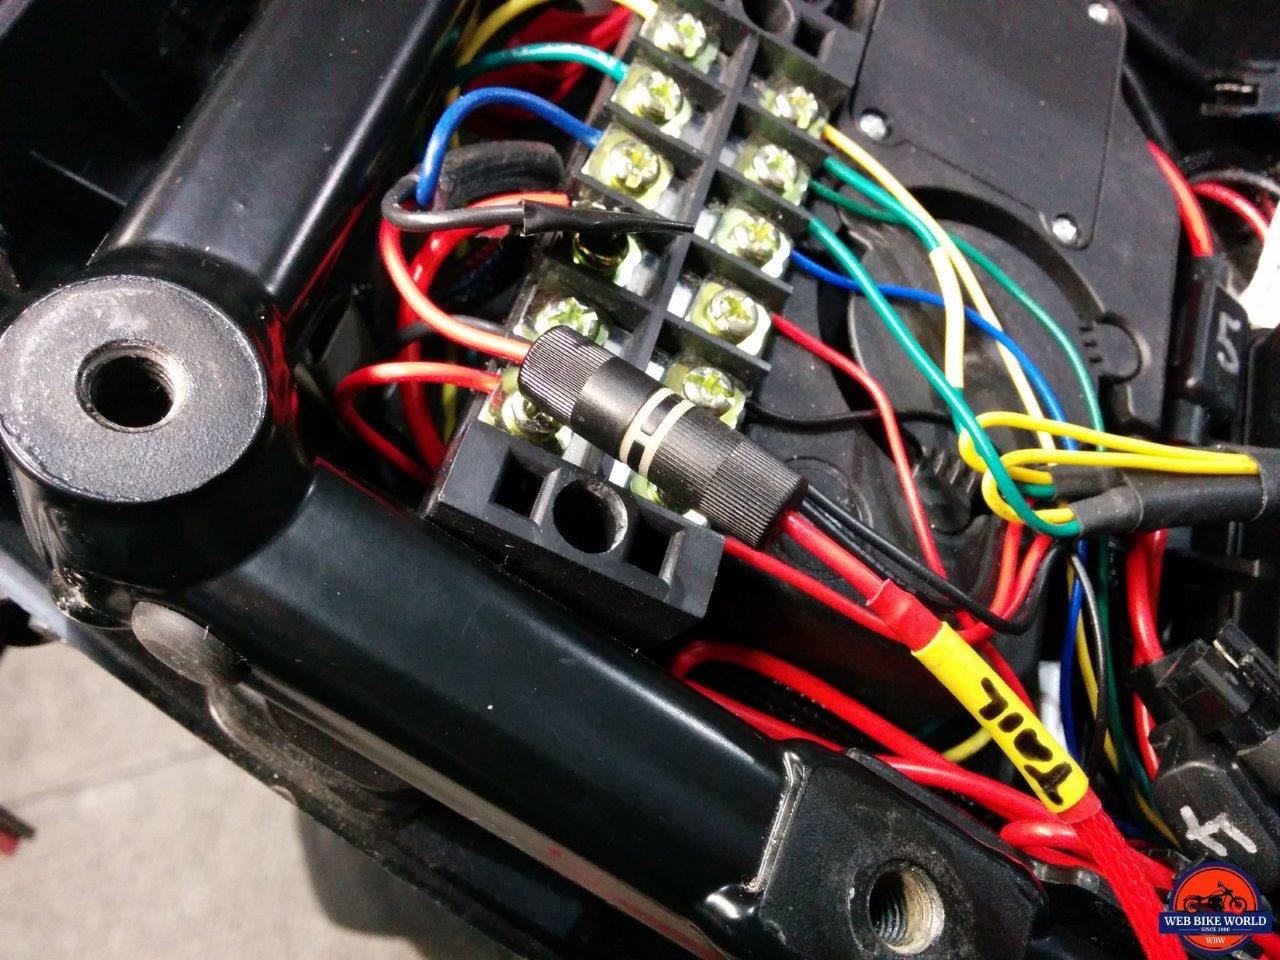
All the home fleet motorcycles see a lot of accessory ‘test mule’ activity, so extension leads via Posi-Tap pieces from the Brake, Left and Right Turn Signal and License Plate Light leads are installed and run to a six terminal common connection (barrier) strip to facilitate ongoing access and eliminate repeated access to the thin OE wiring.
The remaining two terminals are used for 12V switched power sources with a separately dedicated ground block mounted under the deck as well.
So, the ignition switched yellow trigger wire can go to the nearby Posi-Tap on the 7.5A 12V switched lead of the 10A/7.5A dual accessory circuit module located to the right under the rider’s seat section or to the terminal block hosting the license plate extension lead.
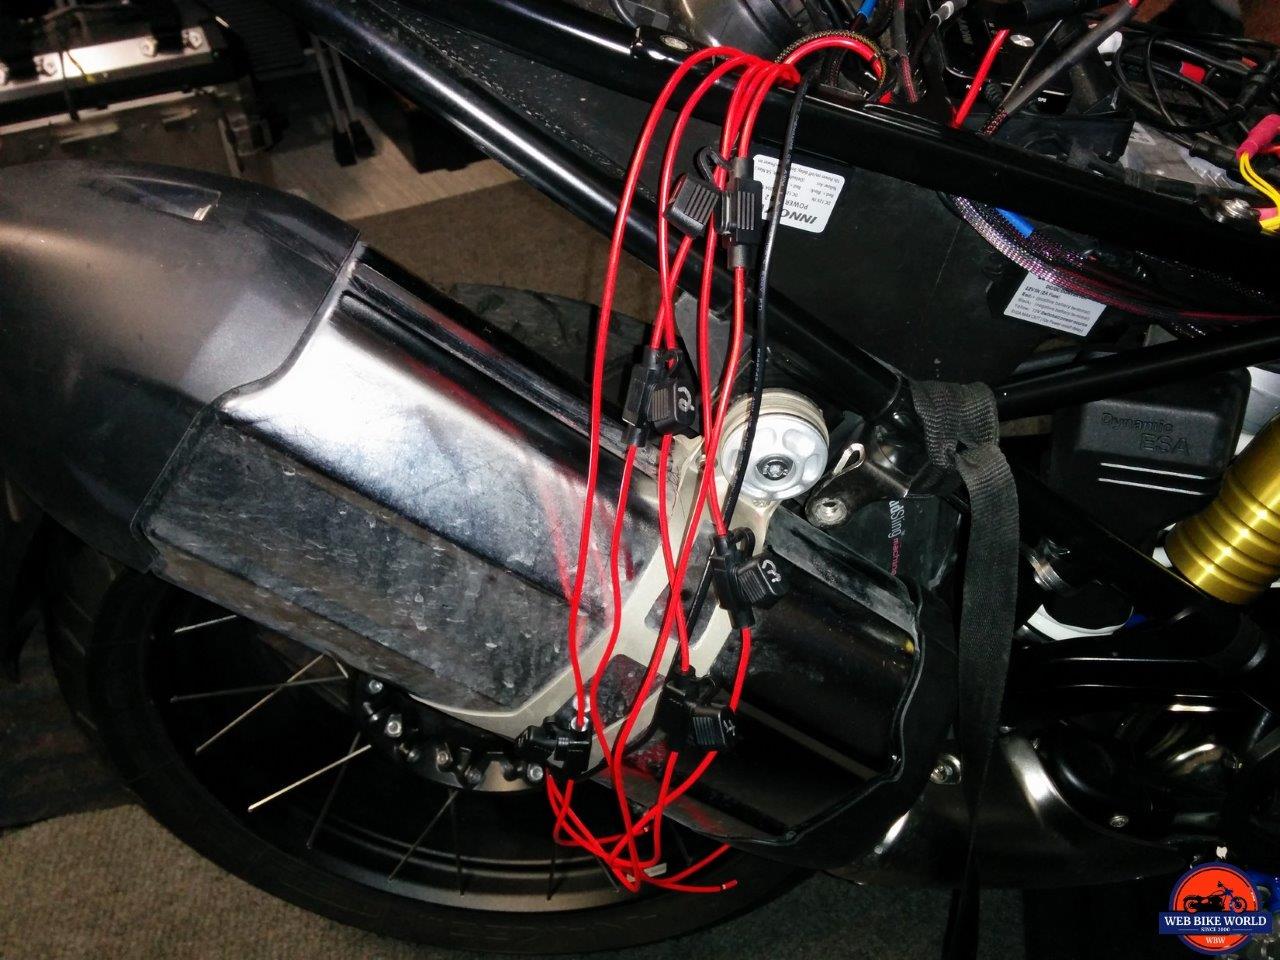
With the ‘input’ side of things taken care of, the one, it is time to utilize the five output leads with their ATM in-line fuse pieces to get things wired up. I typically mark the circuits one through five for documented use identification.
Two of the output leads run forward along the right wall, joining up to their respective accessory leads using waterproof Posi-Locks. A third output, also with a waterproof connector, routes behind the OE alarm module as 12V switched power to the Admore Lighting ADMSB Smart-Brake light bar (these are among the first accessories installed on all home fleet motorcycles).
The remaining two output circuits, with fuses removed (bagged, with spares and secured in an accessible spot) are sealed off, wrapped up and tucked away between the DWA and RDC modules – but fishable from the deck cutout.
Function & Performance
Turn on the ignition and wait 10 seconds – when the (visible or not) Blue LED lights up the Power Hub 2 is up and running along with connected accessories. Turning the ignition off sees another 10-second delay (along with any onboard system delay), then the PH2 shuts down.
Performance, including reliability, is easy to assess…none of the (many) original Power Hub 1 units I have installed nor either of the two newer Power Hub 2 systems has ever shown any sign of weakness or failure.
Conclusion
INNOVV has stayed the course regarding general features of both the original Power Hub 1 and now the new Power Hub 2; the biggest visual takeaway regards the difference in overall size between the two.
Capacity and output are downsized – from 40A to 20A, with the expected reduction in recommended individual circuit maximums, from 15A to 5A (Hub 1 and Hub 2 respectively).
This could raise concerns over limitations, but as (most) of the accessories in use between four different motorcycles typically draw 0.5A to 4A tops (another benefit of using LED lighting) this reduction isn’t a major concern, although it needs to be considered.
And multiple circuits could be ‘ganged’ together for heavier duty demands, like the previously mentioned heated gear.
A small nit – there is (still) no choice between switched and unswitched output as many other products offer; once the 10-second bootup step is completed, all the circuits, properly fused, are available for use.
An observation made in the Power Hub 1 review over the 10-second boot and shut down delay is possibly still applicable here, although it doesn’t seem to have arisen as a major issue for users.
But it would still be great to see a time-delay shutdown provided if the motor is not actually started within a specific time…
Our bottom line from the original Power Hub 1 review bears reuse, although updated to reflect the new product; “the INNOVV Power Hub 2 is cost-effective with a list price of $69.00 and is a near perfect small form factor solution for adding multiple accessories where a rugged hands-off operating environment is key.”
Pros
Very small simple module
Simple battery and trigger lead connections
Five fused switched output circuits (3A nominal, 5A maximum)
Totally sealed module and leads
Long leads facilitate installation
Installable almost anywhere desired
Price
Cons
Hard plastic ATM fuse modules are (very) hard to open
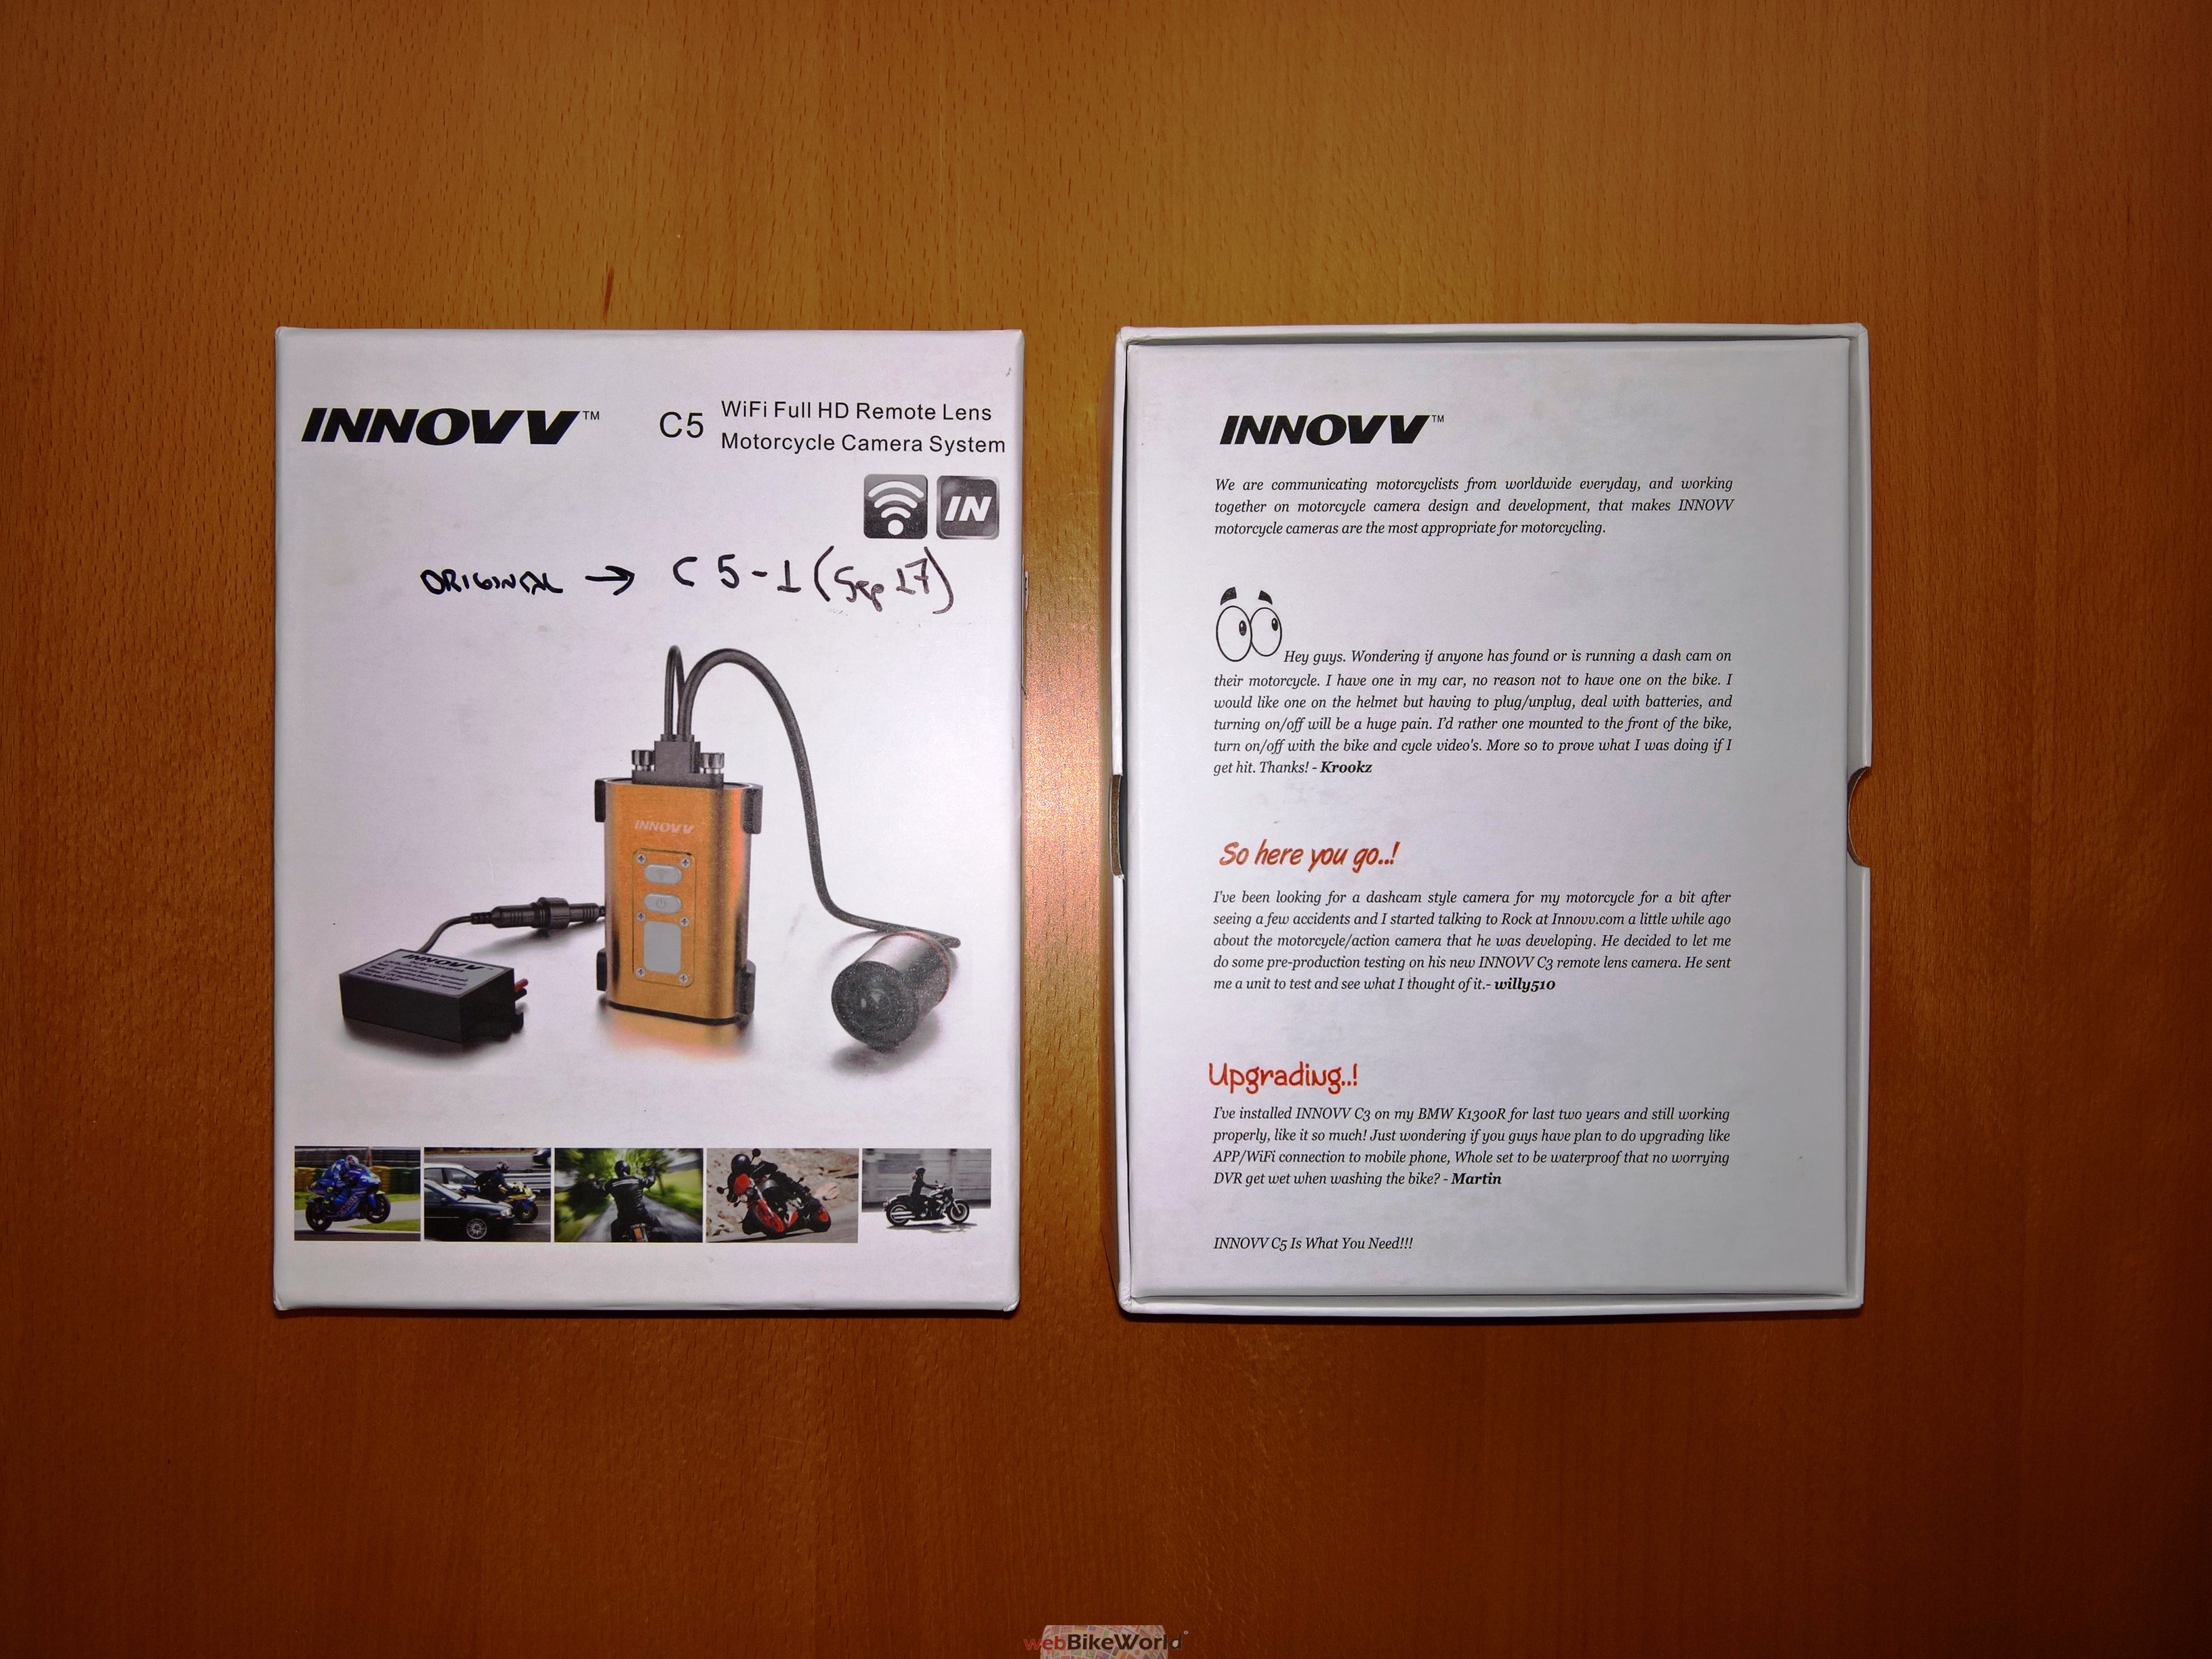
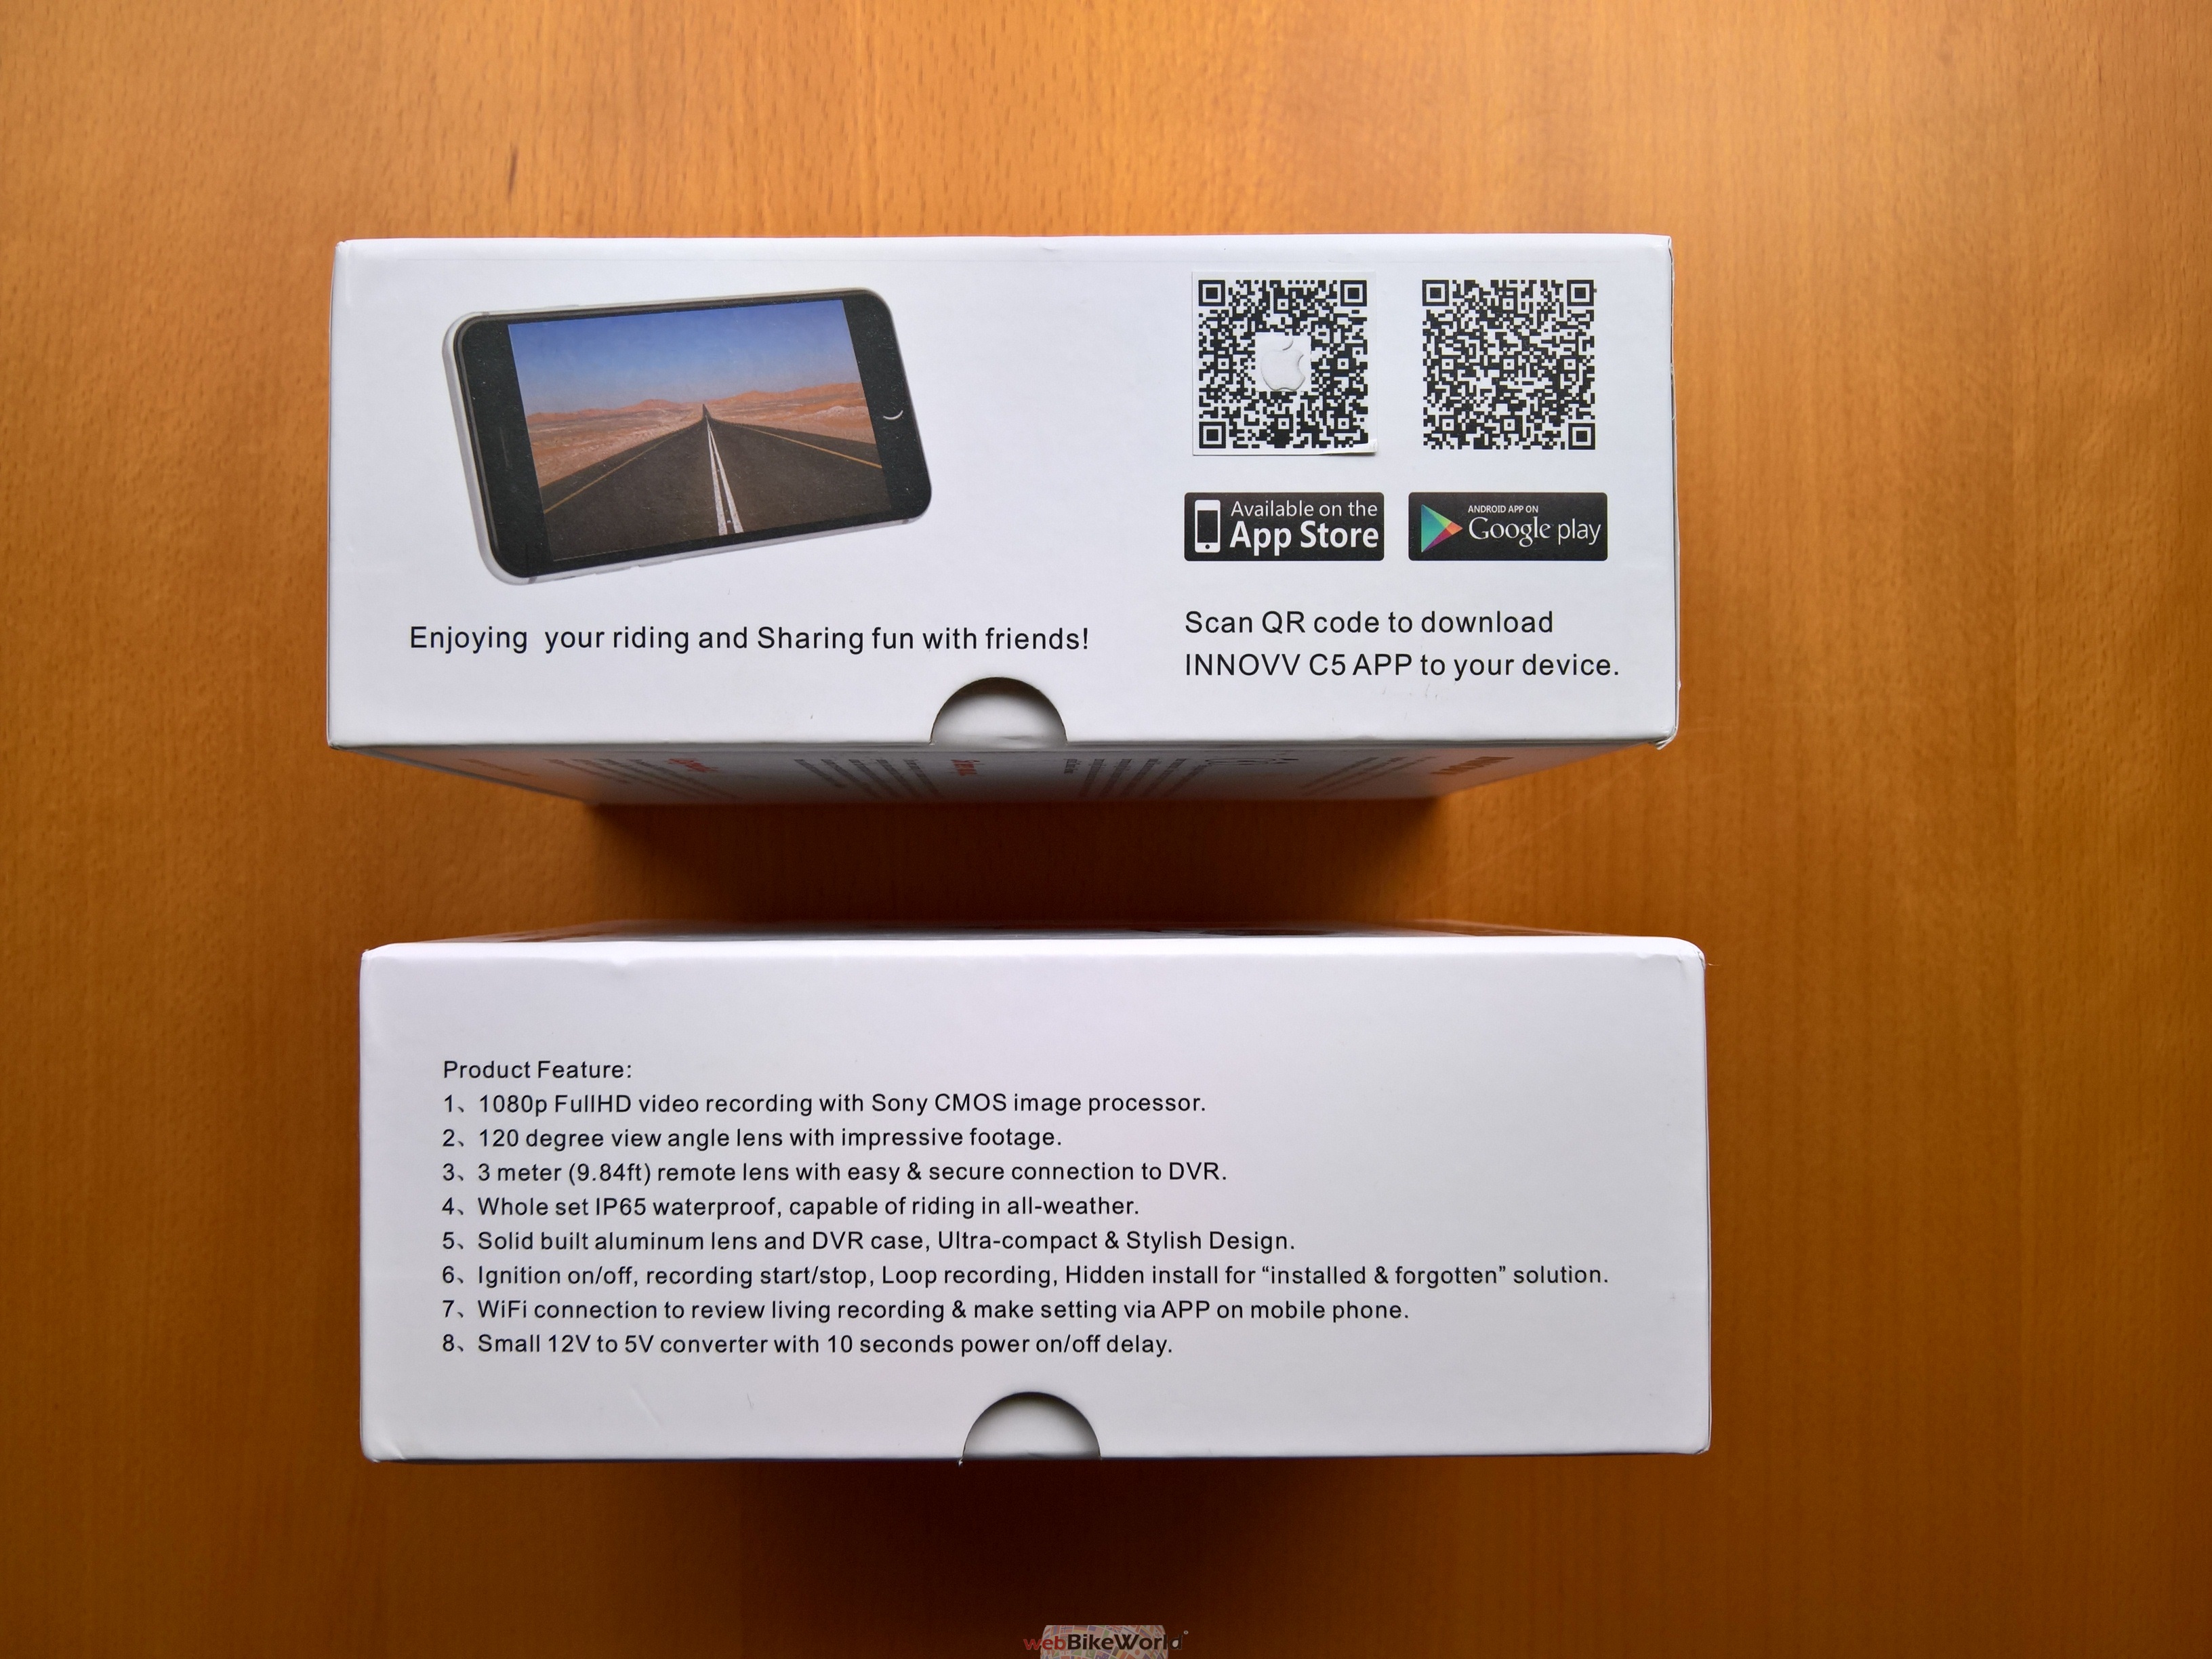
The C5 single channel camera system is a newer offering from INNOVV providing a lot of desirable features for powersports activities, particularly motorcycling enthusiasts, at a very reasonable price.
Compact and ruggedized, the modular-based Innovv C5 provides a sealed waterproof lens, an aluminum DVR module, USB 3 integrated heavy-duty cable and a dedicated protective power supply in the form of a weatherproof 12-5V DC converter.
The Innovv C5 also provides WiFi, a popular and extremely useful feature not found on the single channel l C3 and dual-channel K1 products.
When networked to a compatible smart device running the iOS or Android INNOVV app, users can configure the system for set-once use or interact dynamically to preview/live-view, review video and manage the system.
Thanks in large part to the C5’s modularity and long lens cables (1.8m, 3m and 5m options) the system is easy to install and use on virtually any motorcycle.
Designed to have broad base appeal it is likely to have a special attraction for adventure touring riders who typically need a more ruggedized weatherproof system; for those of us who are just as happy getting wet and muddy the C5 is a great option.
And speaking of wet and muddy, the camera lens has an IP68 (waterproof) rating while the DVR module a somewhat lesser IP65 (dust/water protection) rating.
The pressure-fitted thumb-screw sealed USB-C connector on top is more than up to the task of coping with the elements, users need to be aware that integrity of the system can be compromised by the silicone seal flap used on the bottom – used to provide quick port access.
Where the solid sealed lens is more than up to its function, the original lightweight (thin) lens holder showed signs of weakness; it has now been redesigned for greater strength, more resiliency and better grip of the lens.
Some initial concerns about video quality were largely mitigated in making sure the lens and holder were solidly mounted. Depending on the motorcycle, using some form of isolation mount to better cope with the ultra-low-weight of the lens, motorcycle suspension and of course, the terrain being travelled pays big dividends.
The Innovv C5 is a welcome and well-priced product that bears a close look. While not ‘bug-free’, the C5 team has already completed some updates and continues to provide outstanding support.
Background
In not having used the INNOVV C3 single channel system but in being very familiar with the K1 dual channel system (along with most of the other INNOVV products) the C5 raised my interest when it was released.
For those who have looked at or use the C3 and/or the K1 systems, some of the components found with the C5 system will be familiar, although virtually everything packaged for the C5 is upgraded or new.
We have two K1 systems installed and in constant use since the original wBW review published in December 2015.
And outside of the sporadic ‘freeze-up’ issue, only exhibited by one of the DVR modules, they just keep recording front and back ride video – some of which has proven extremely valuable at times.
And in looking at the specs and features of the C3 and the K1 systems the C5 seems to be ideally positioned, especially with WiFi and its ruggedized weather resistant approach, to move the INNOVV product yardstick forward.
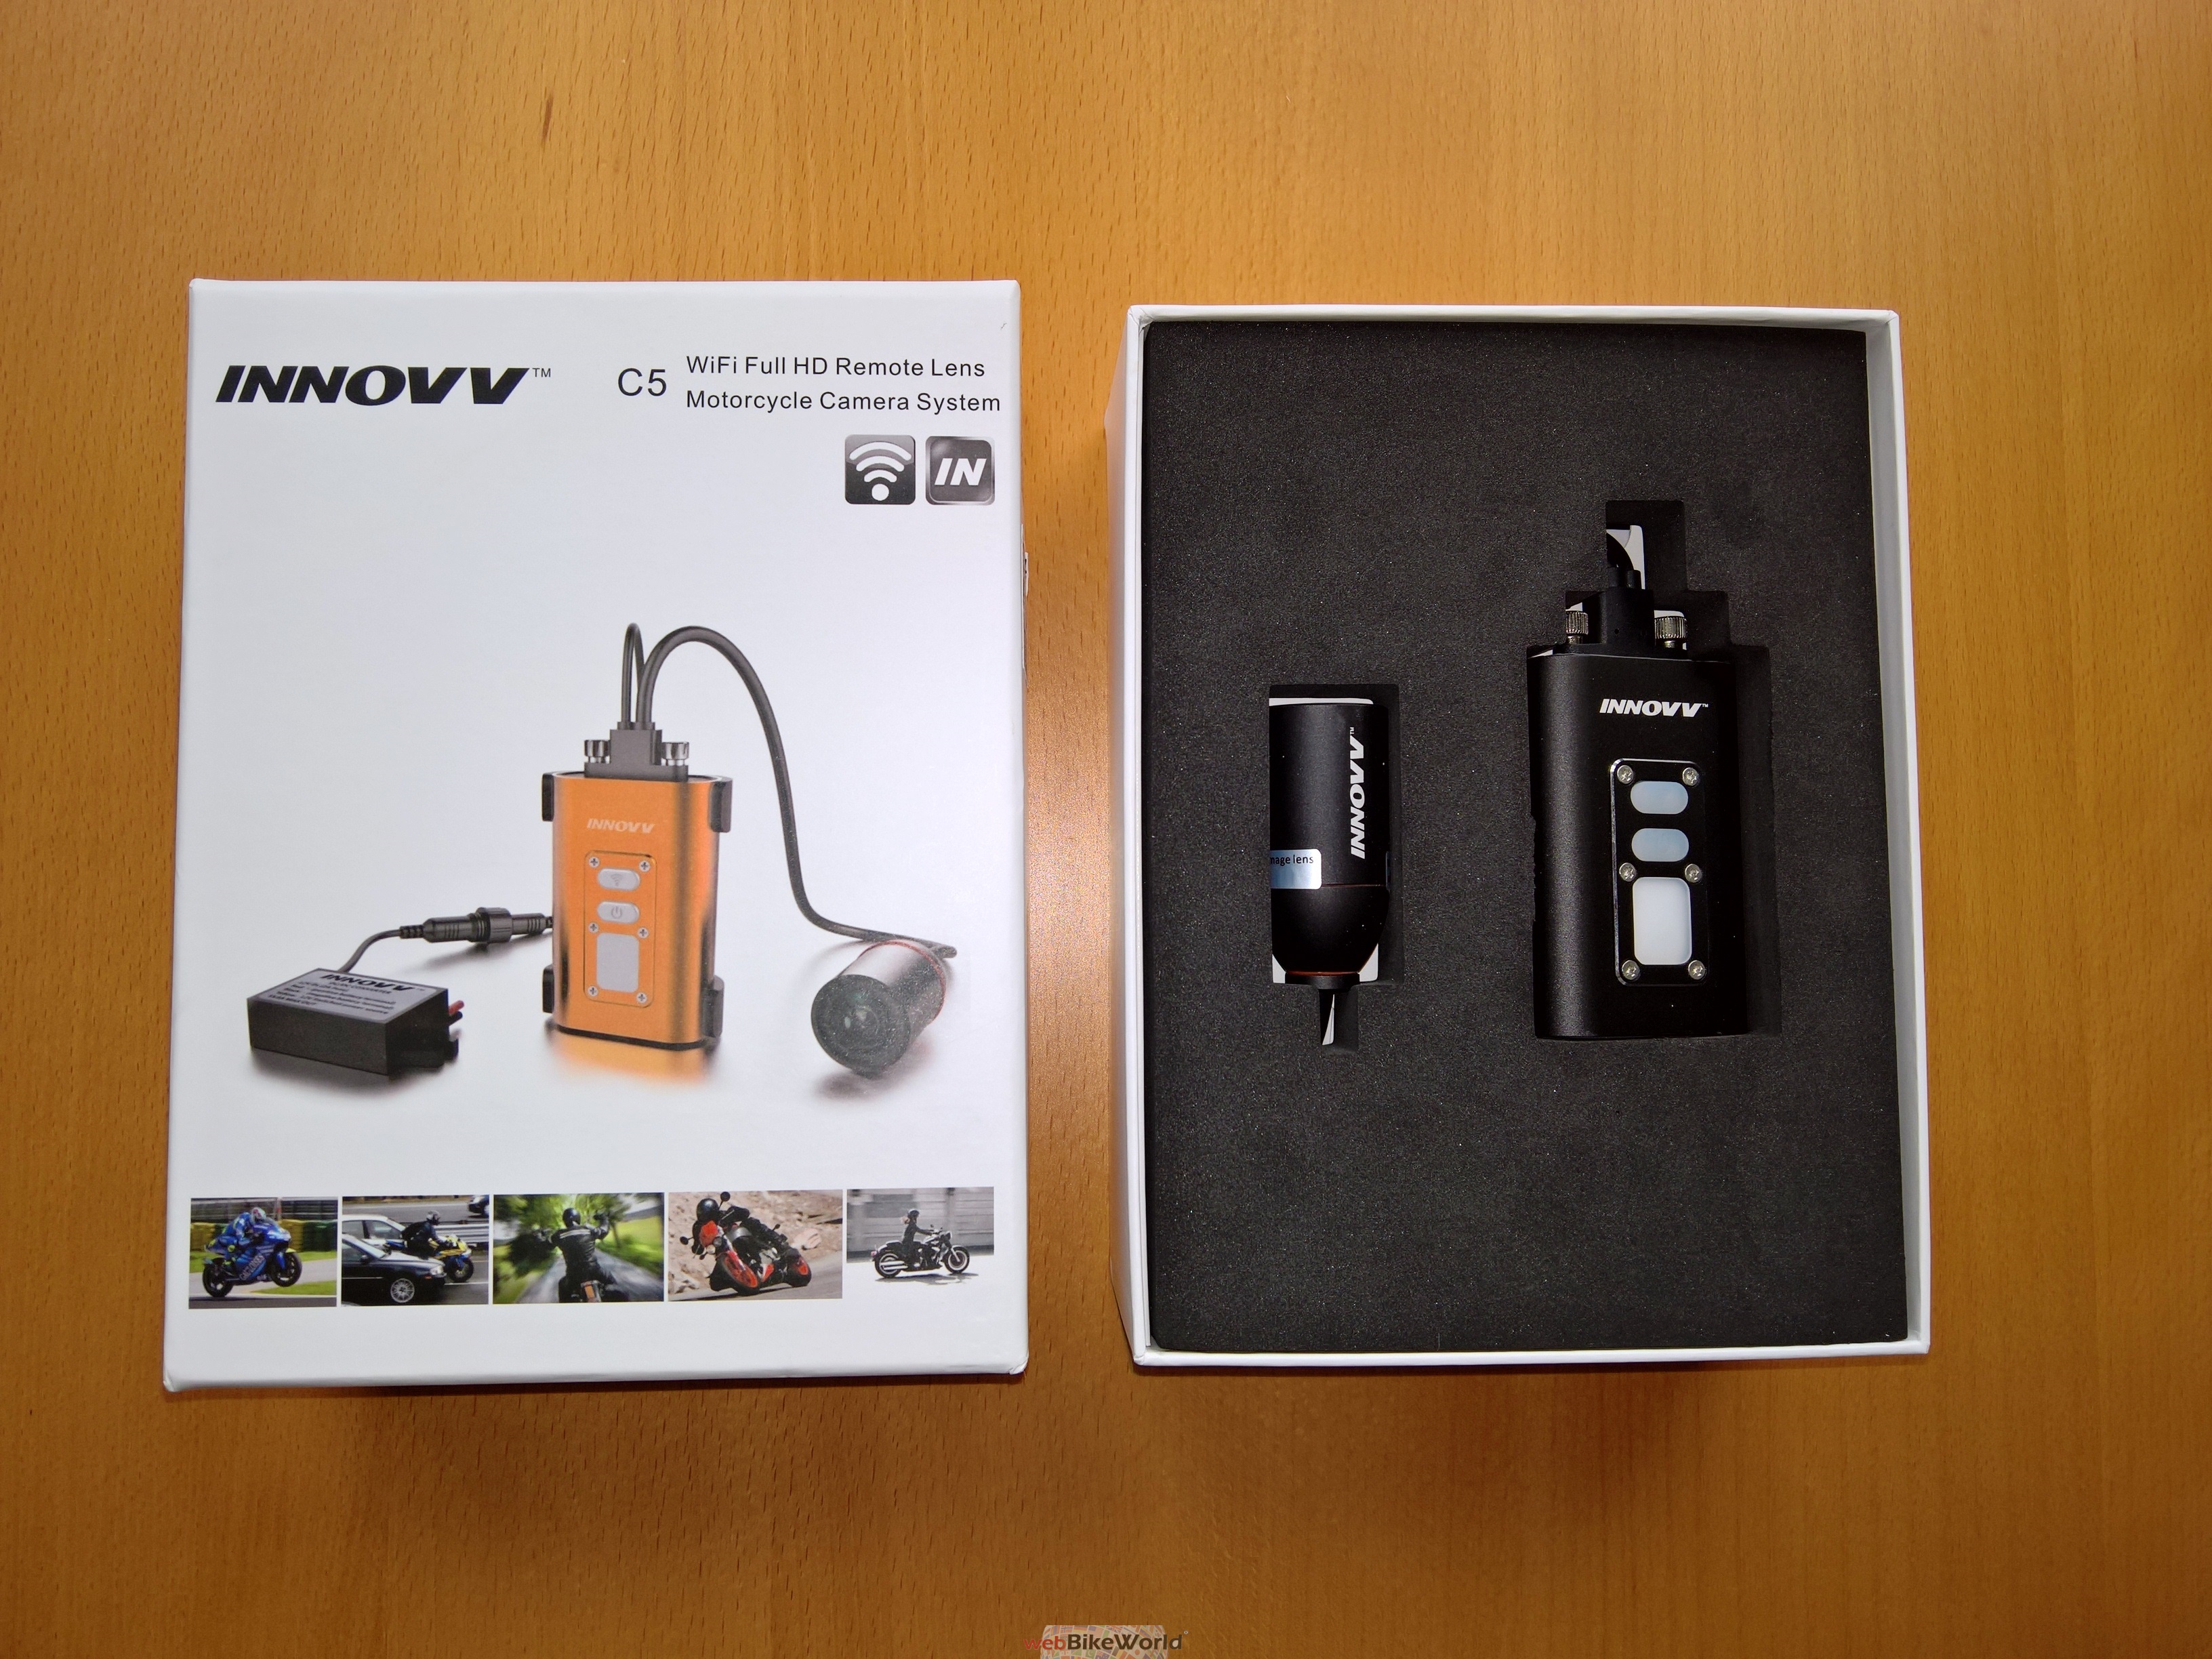
Innovv C5 Overview
The Innovv C5 single channel camera is a modular system with small form-factor components, heavy duty cables and weatherproof connectors, all of which facilitate installation on virtually any powersport vehicle; especially moto-machines.
While the main components – DVR module and lens (camera) are similar to those used for the Innovv C3 product, the Innovv C5 system is designed to be more rugged, provide a wireless link for smart device connectivity and, provide a wide range of settings.
Dust and water protected (IP65) level components along with the even higher rated (IP68) sealed lens or camera module should withstand heavy duty use – on and off-road in a mix of elements, as being experienced with our sometimes dry, sometimes wet, sometimes snowy fall.
Users can either undertake basic interaction with the system via front end (module) controls or have more detailed interaction with the system by using the onboard WiFi capability and a compatible smart device running either the iOS or Android app to provide finer-grain configuration and on the fly control.
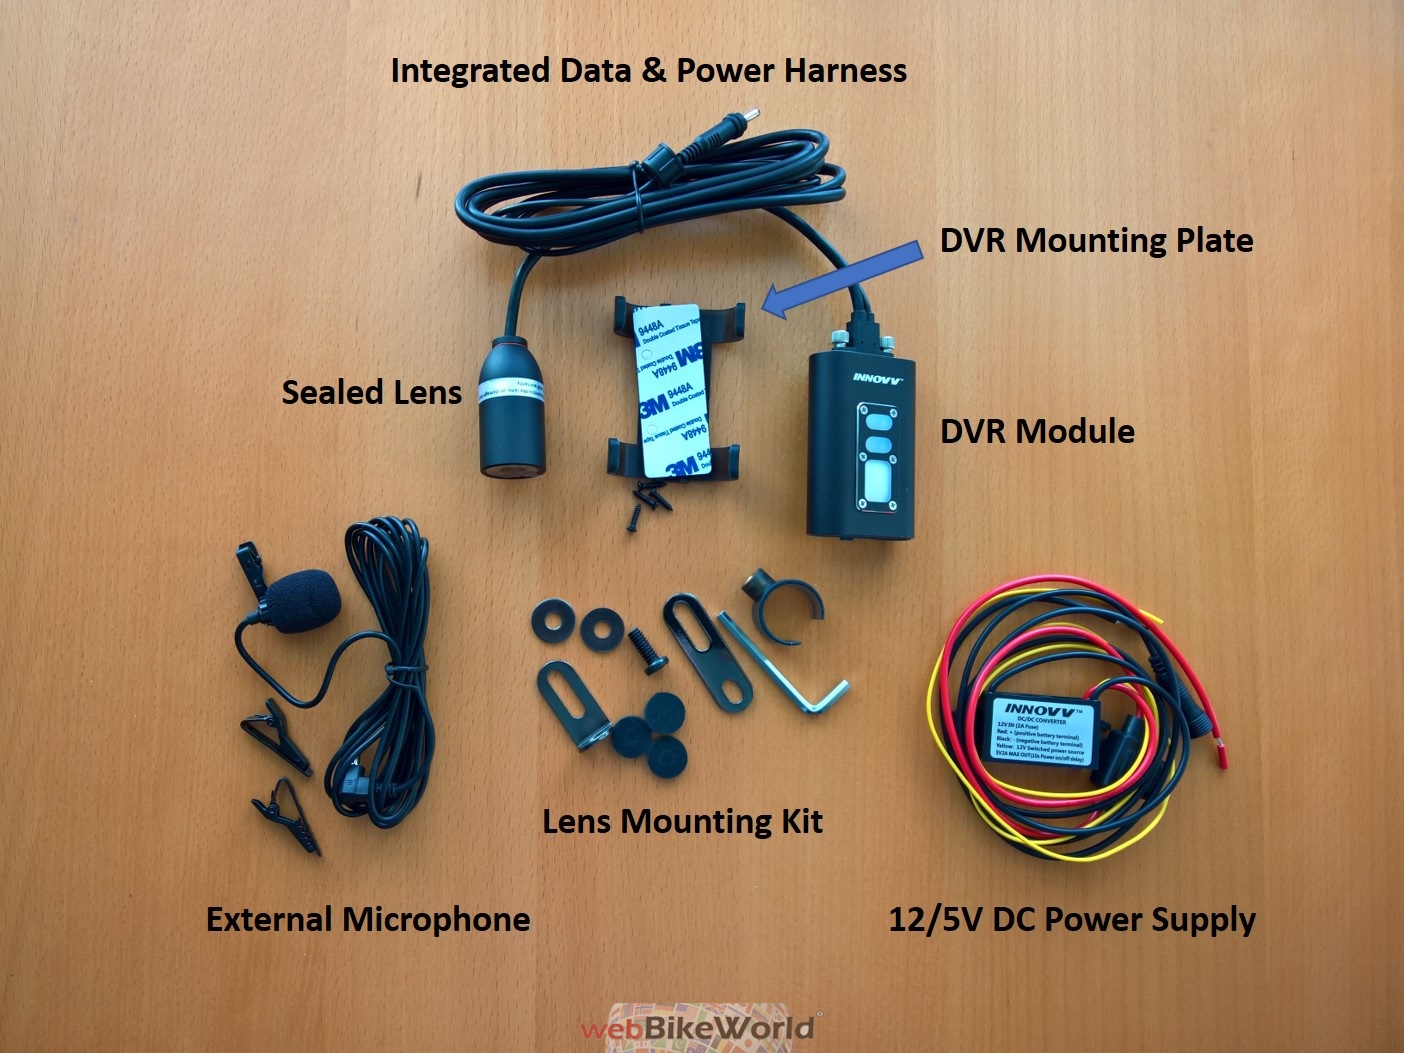
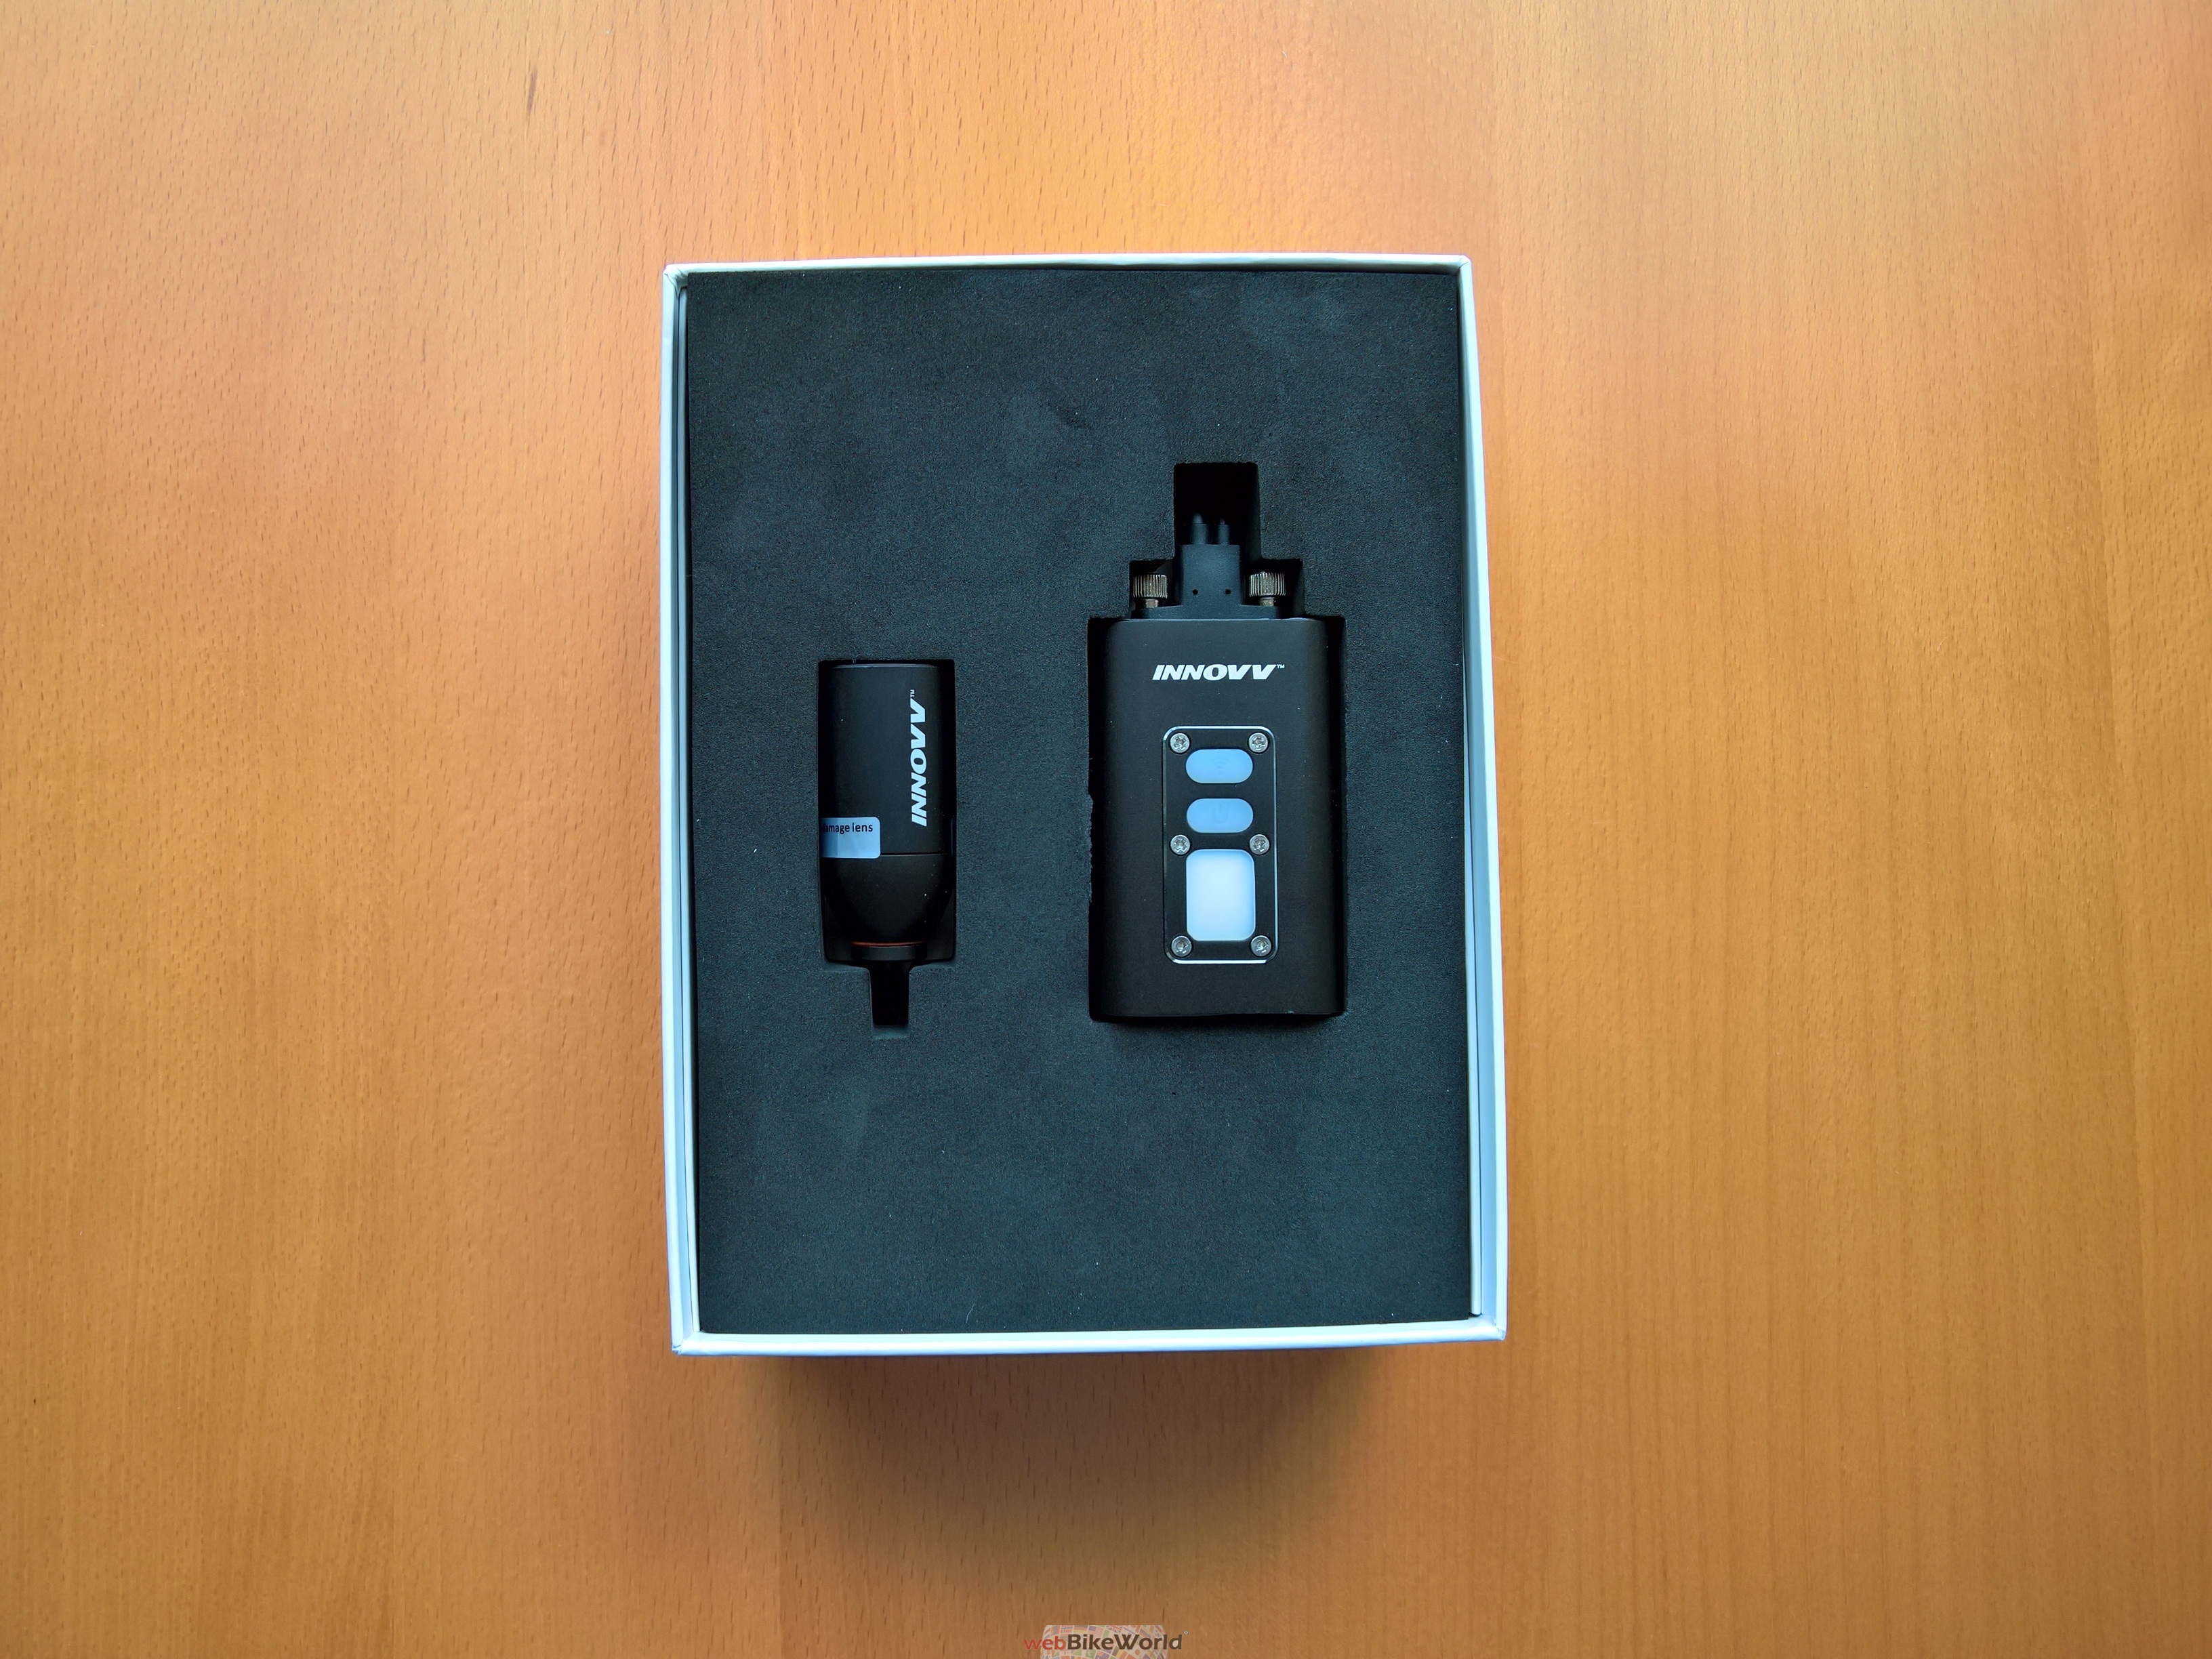
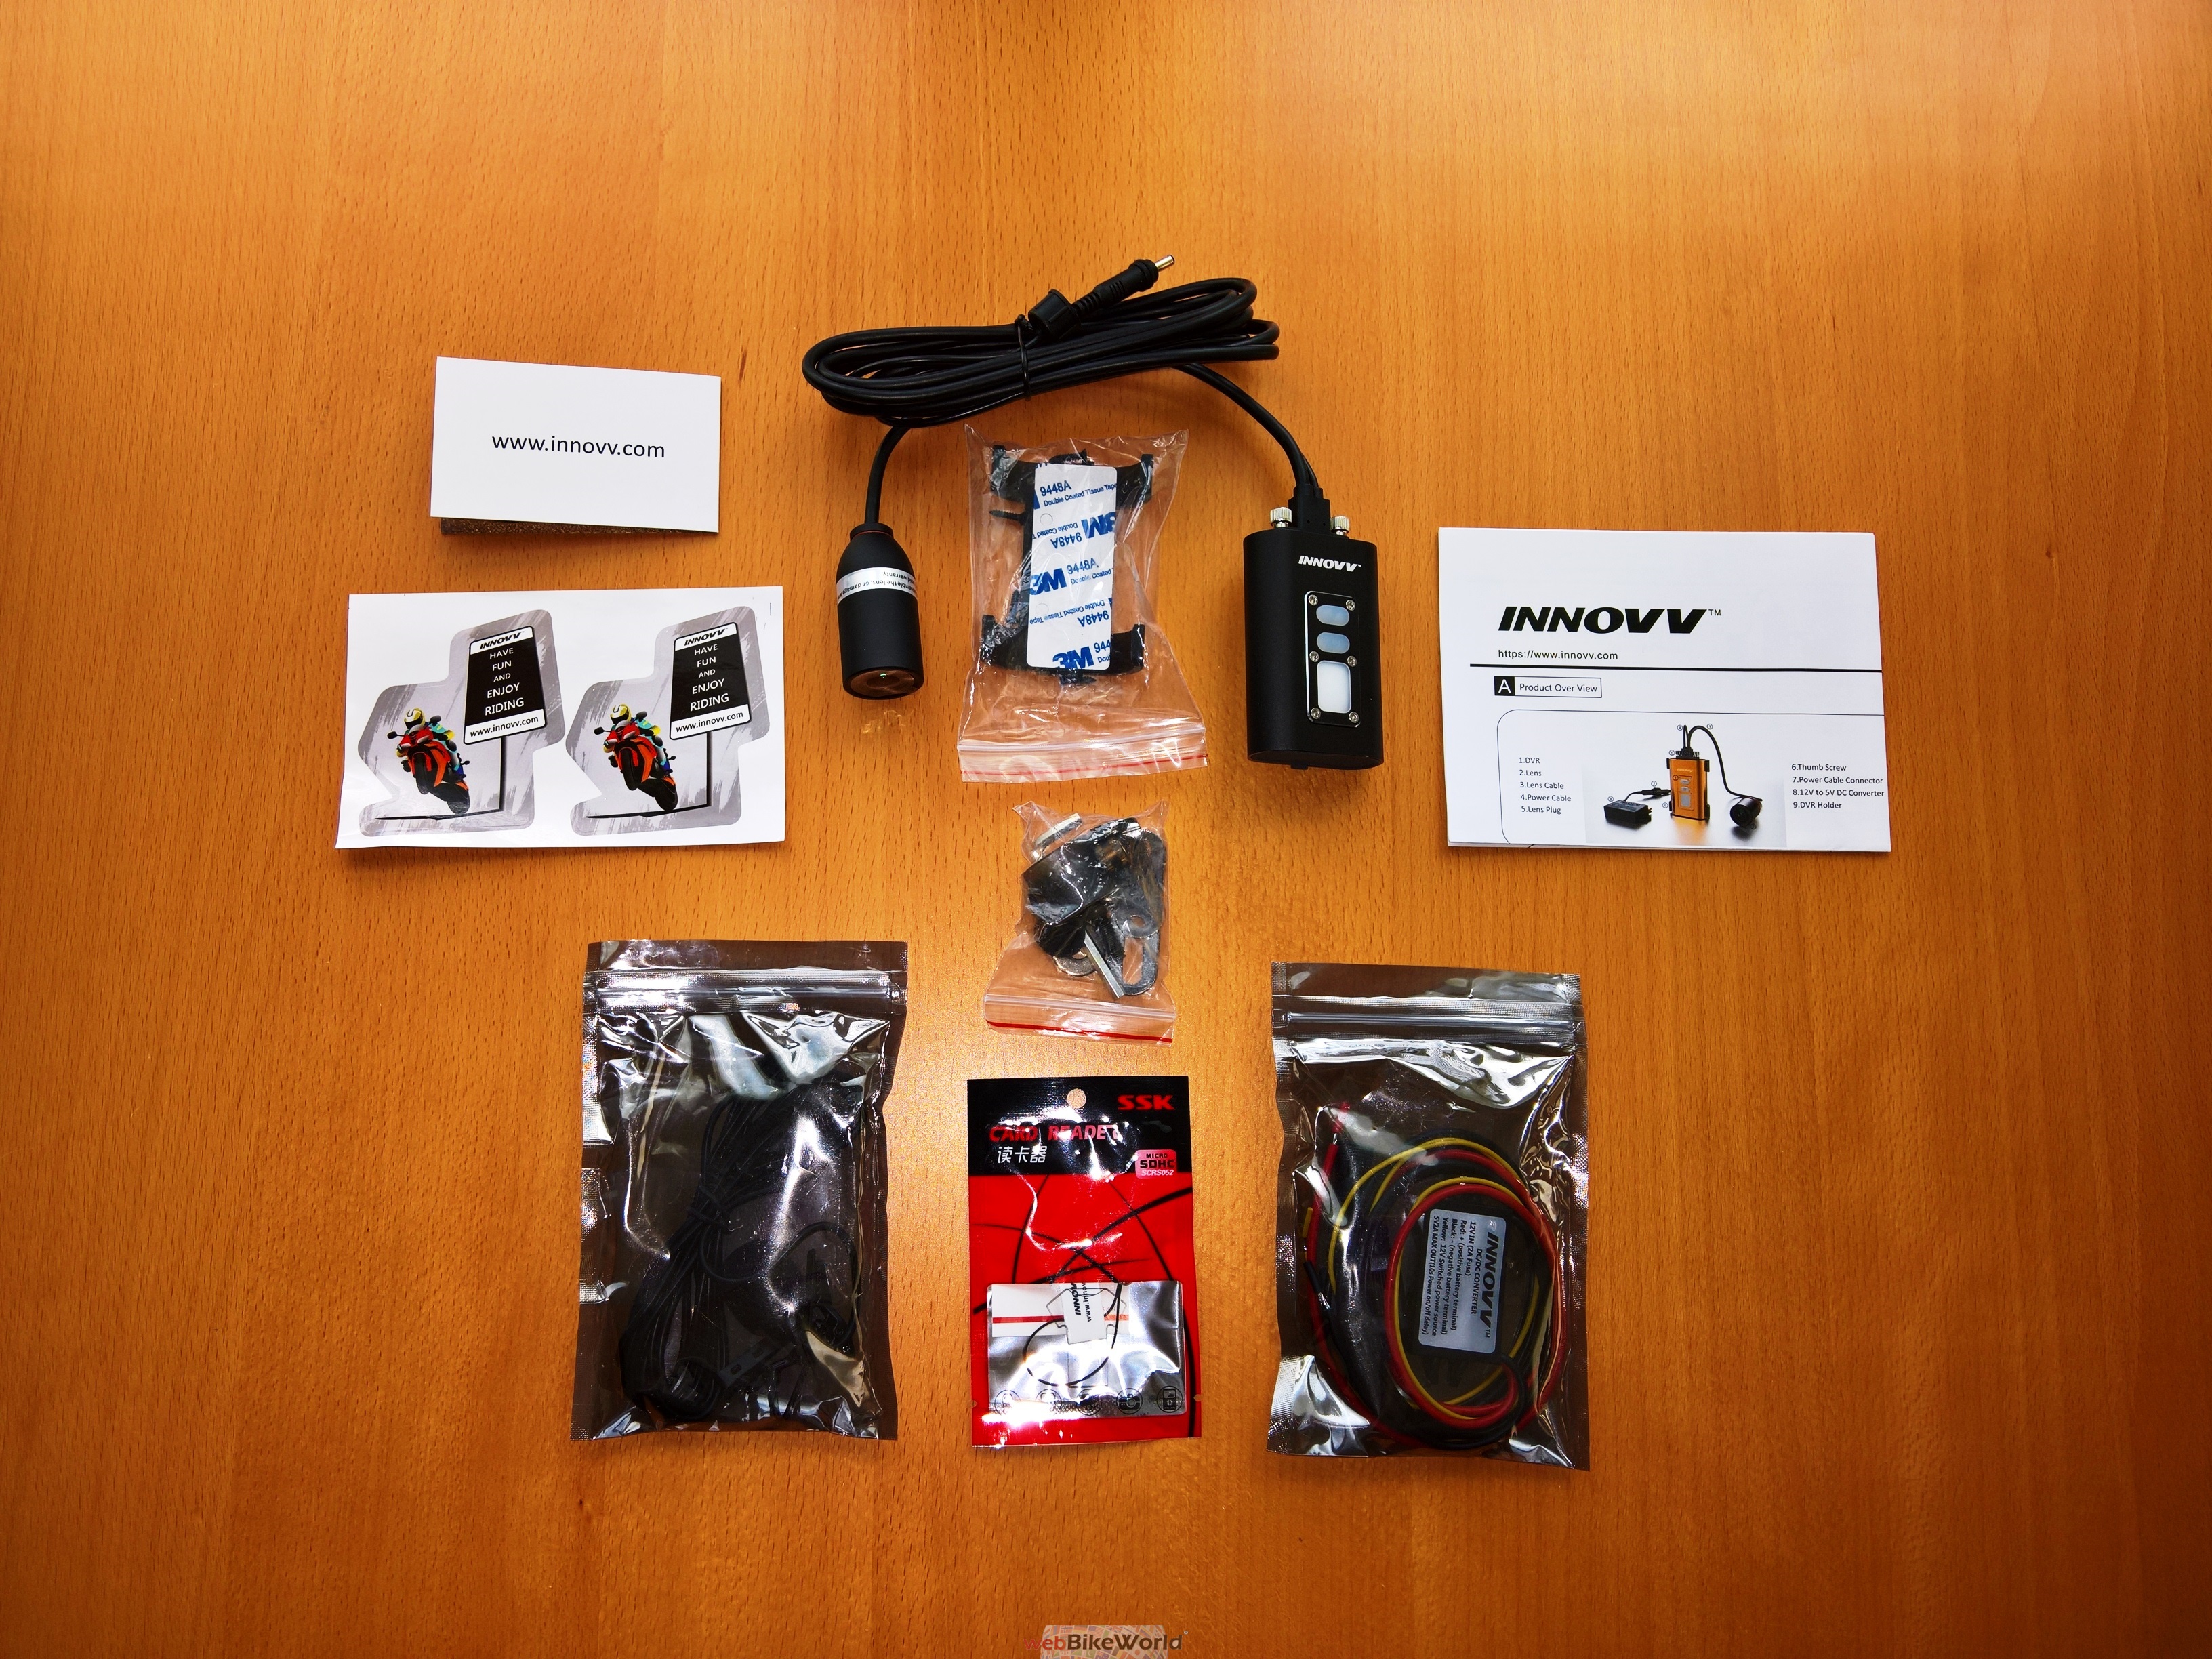
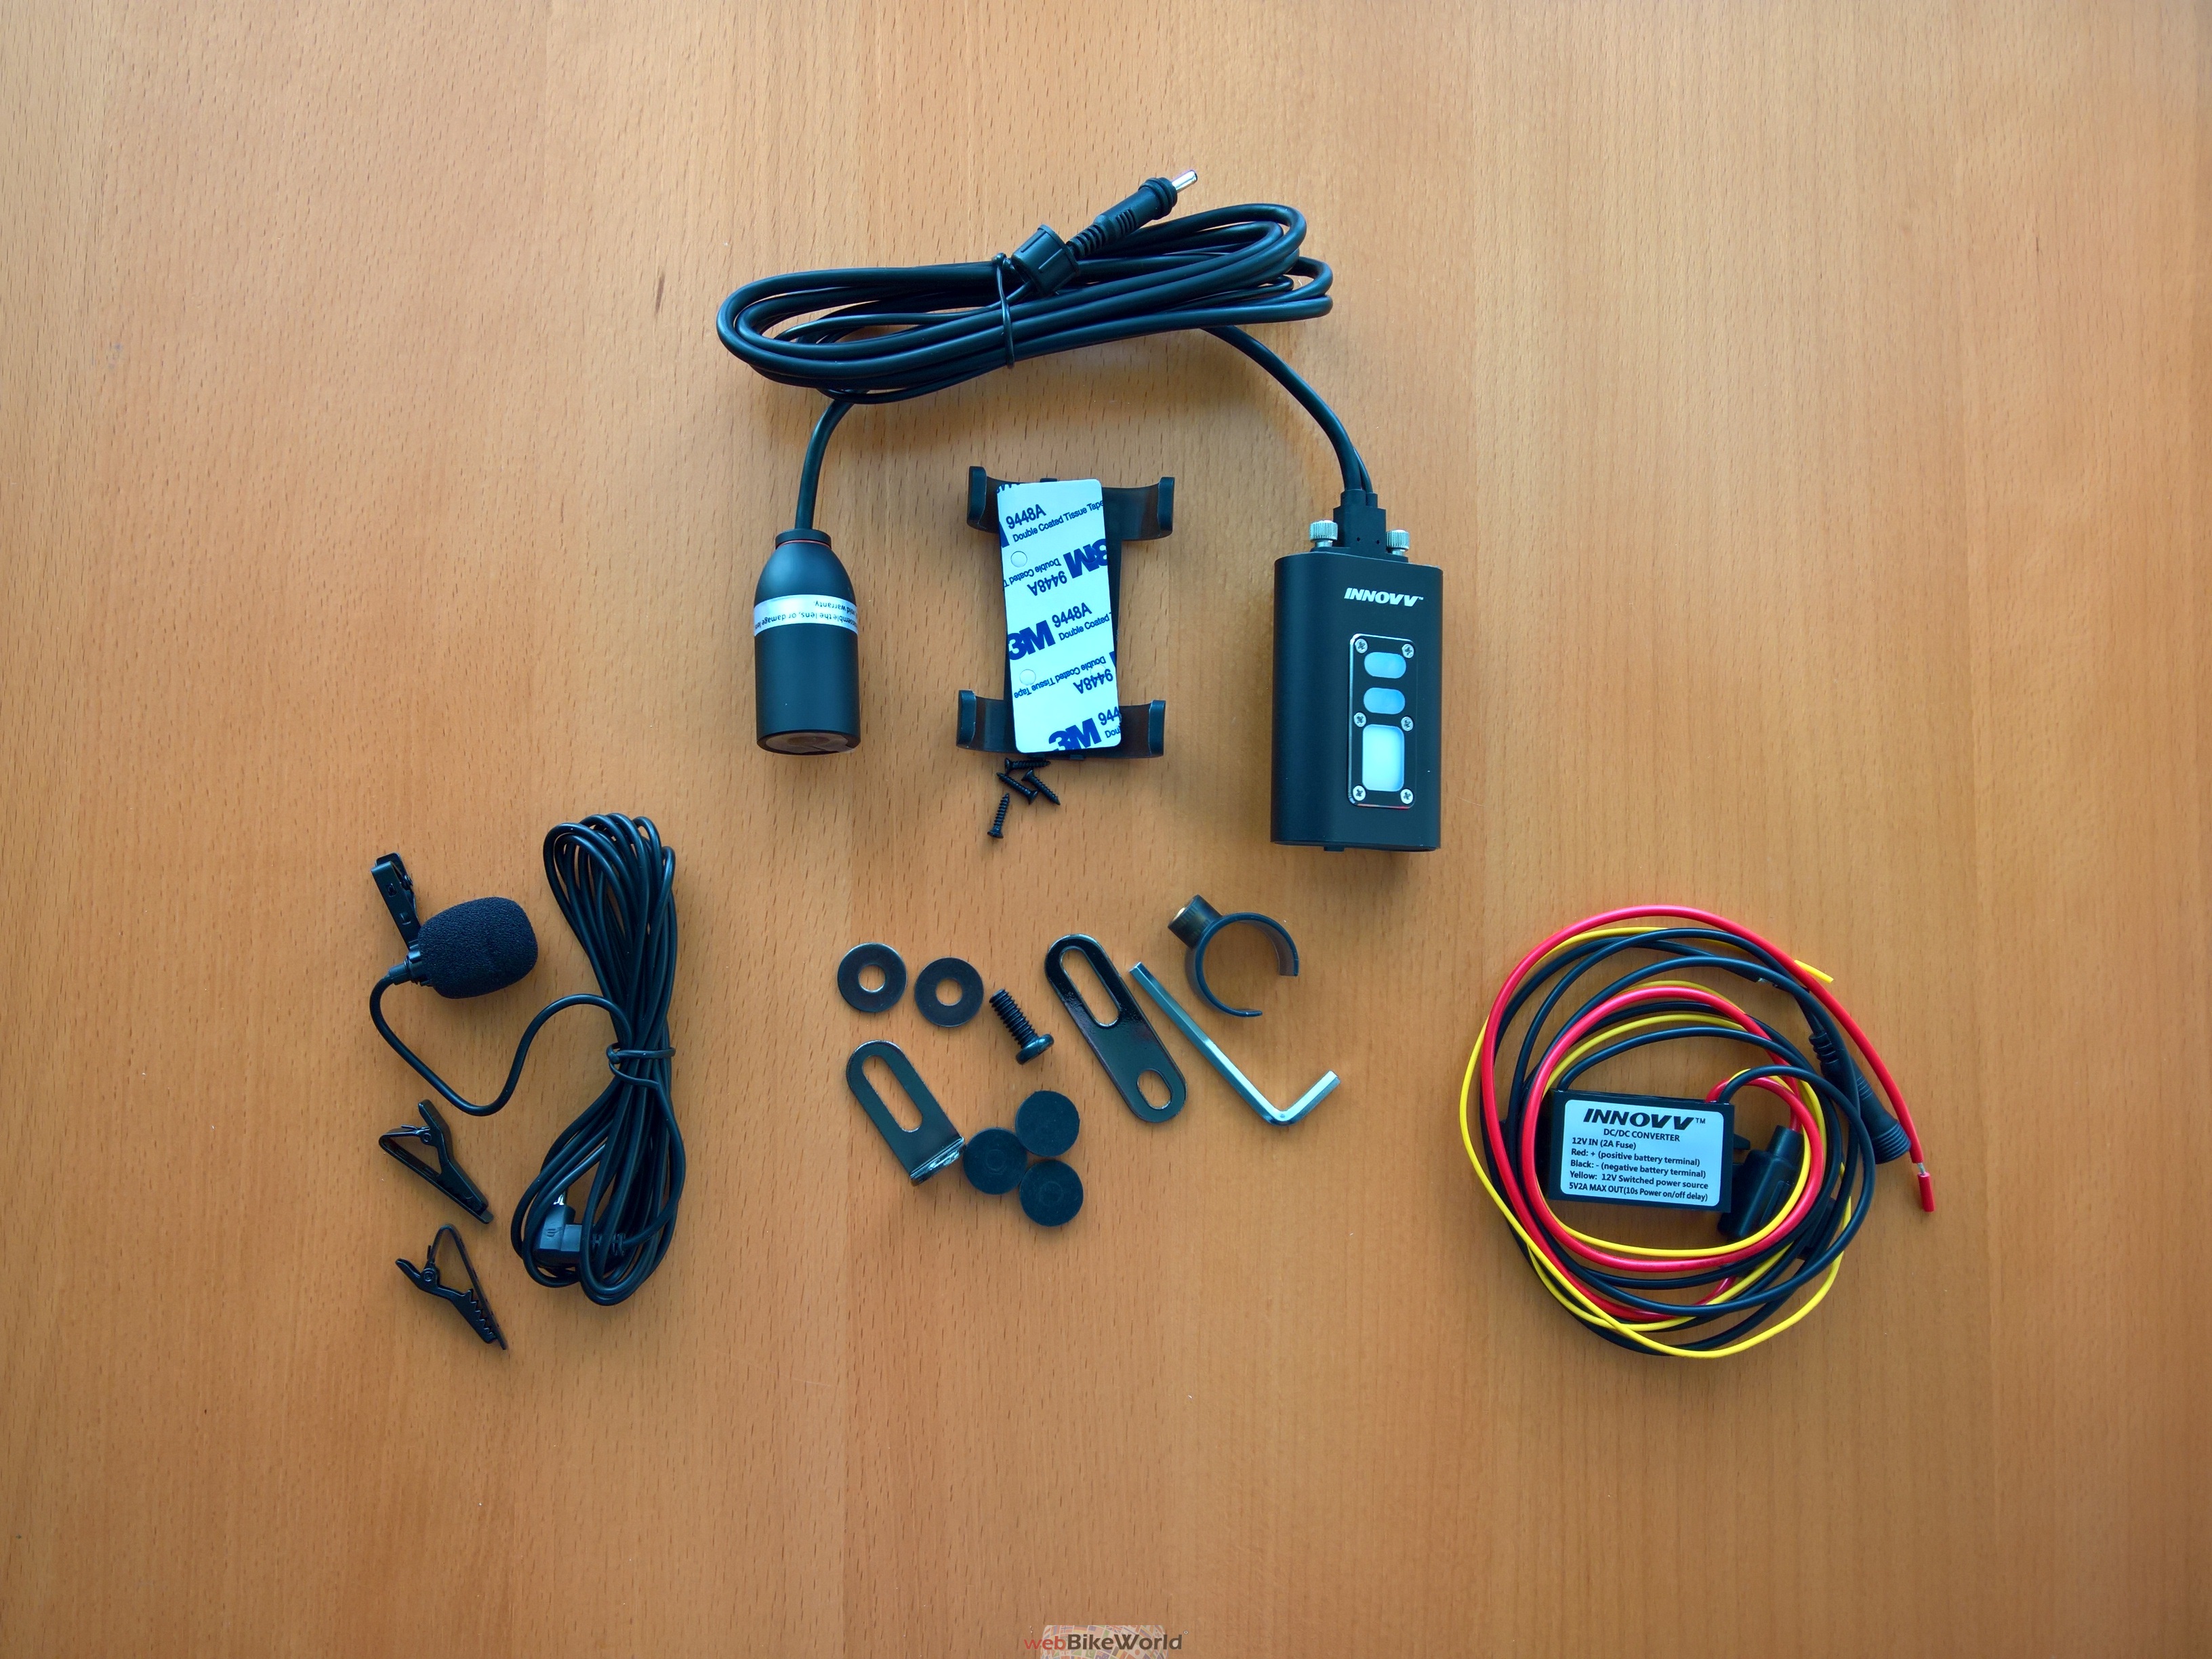
Kit Components
DVR module
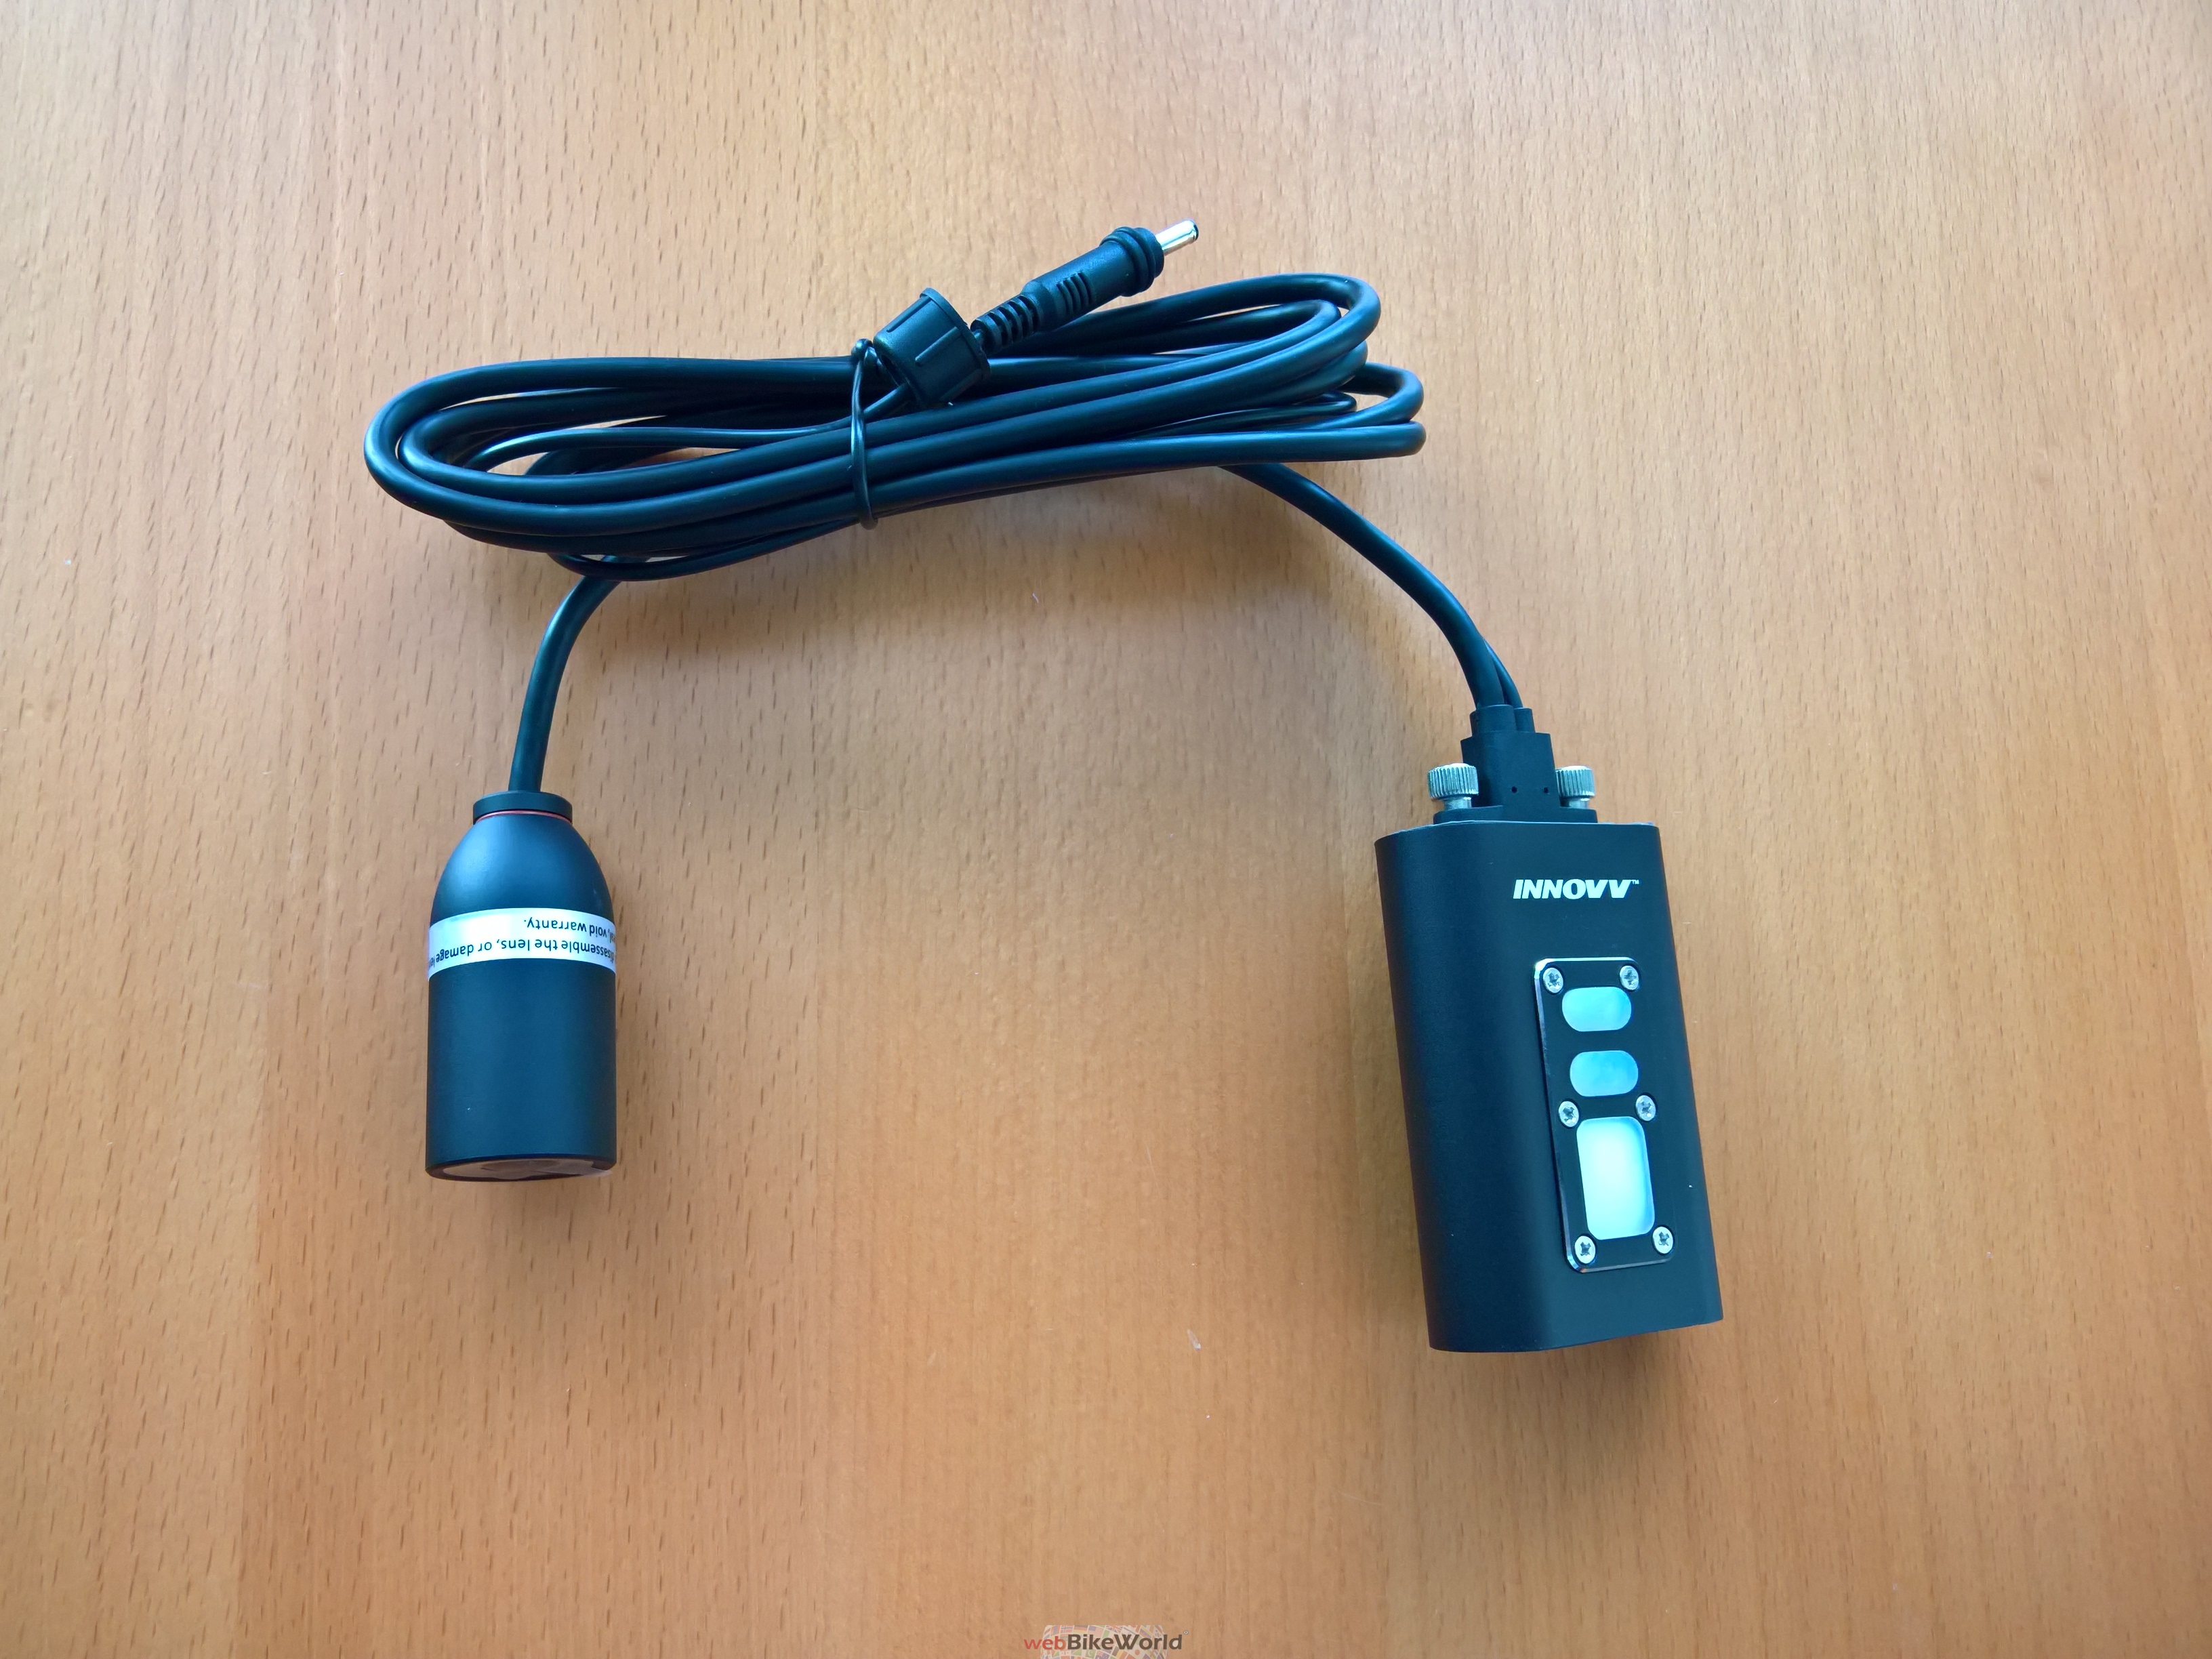
Camera with 120-degree field of view lens
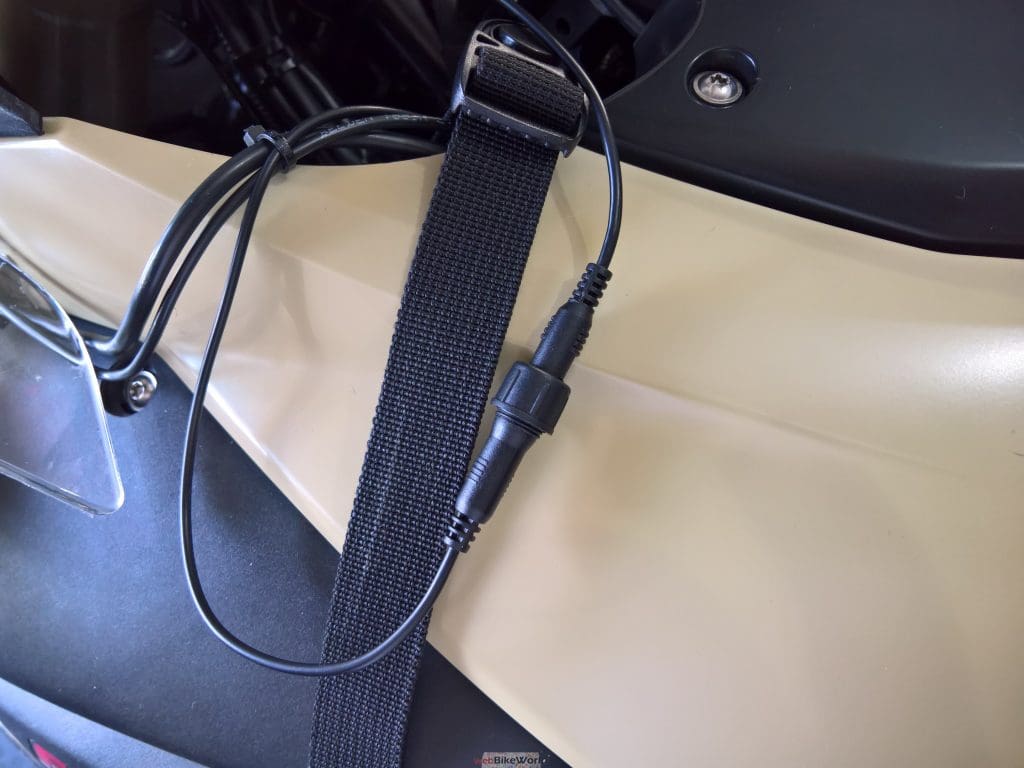
Integrated Lens cable with waterproof USB-C thumb screw-type plug connector
Integrated Power cable with small waterproof coaxial pin connector
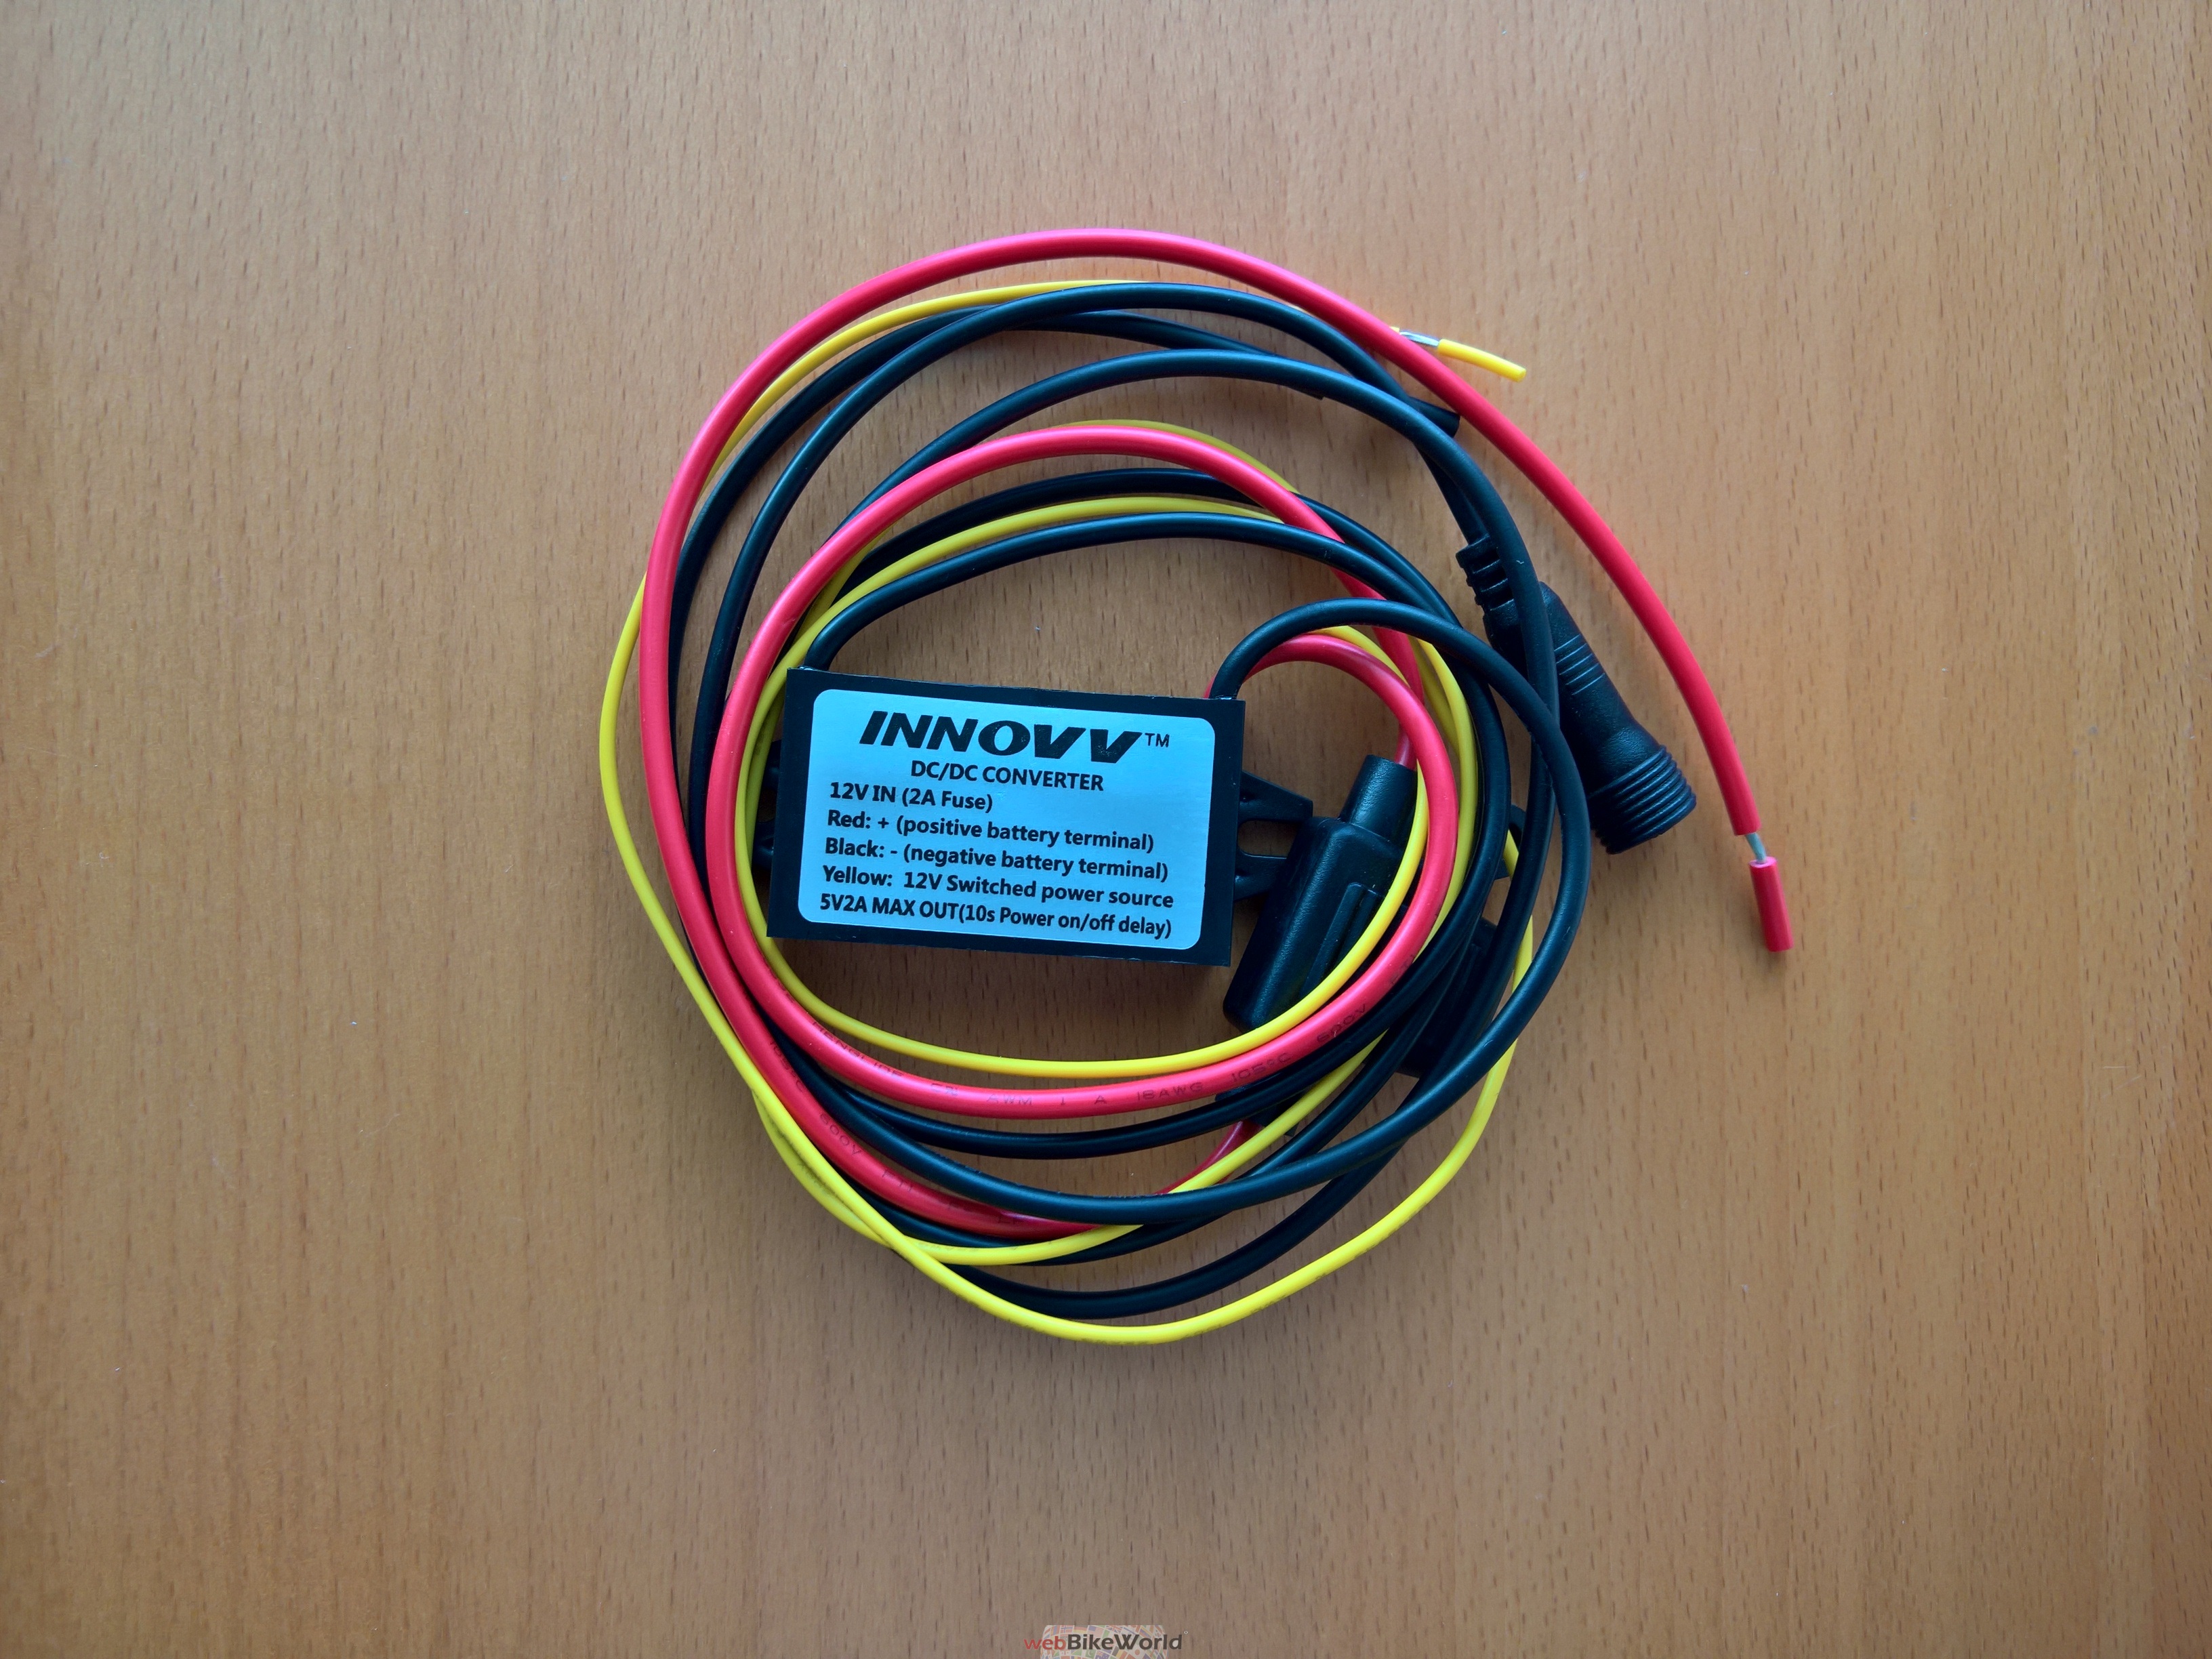
Innovv 12V to 5V DC Converter
DVR and Camera Holder components
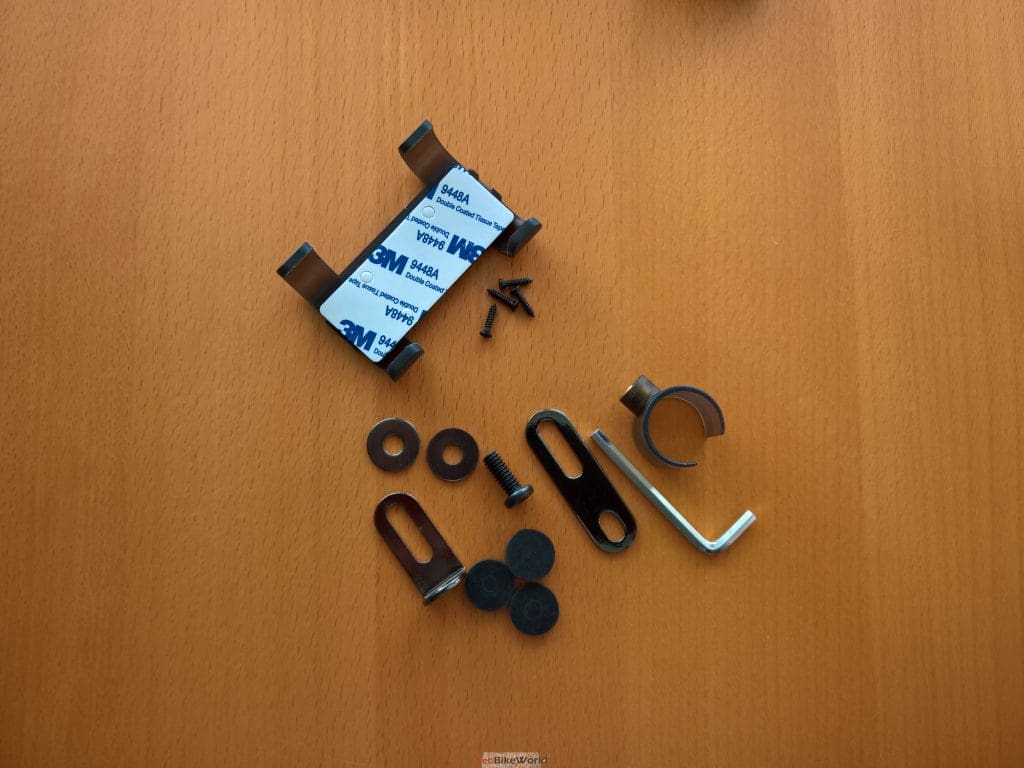
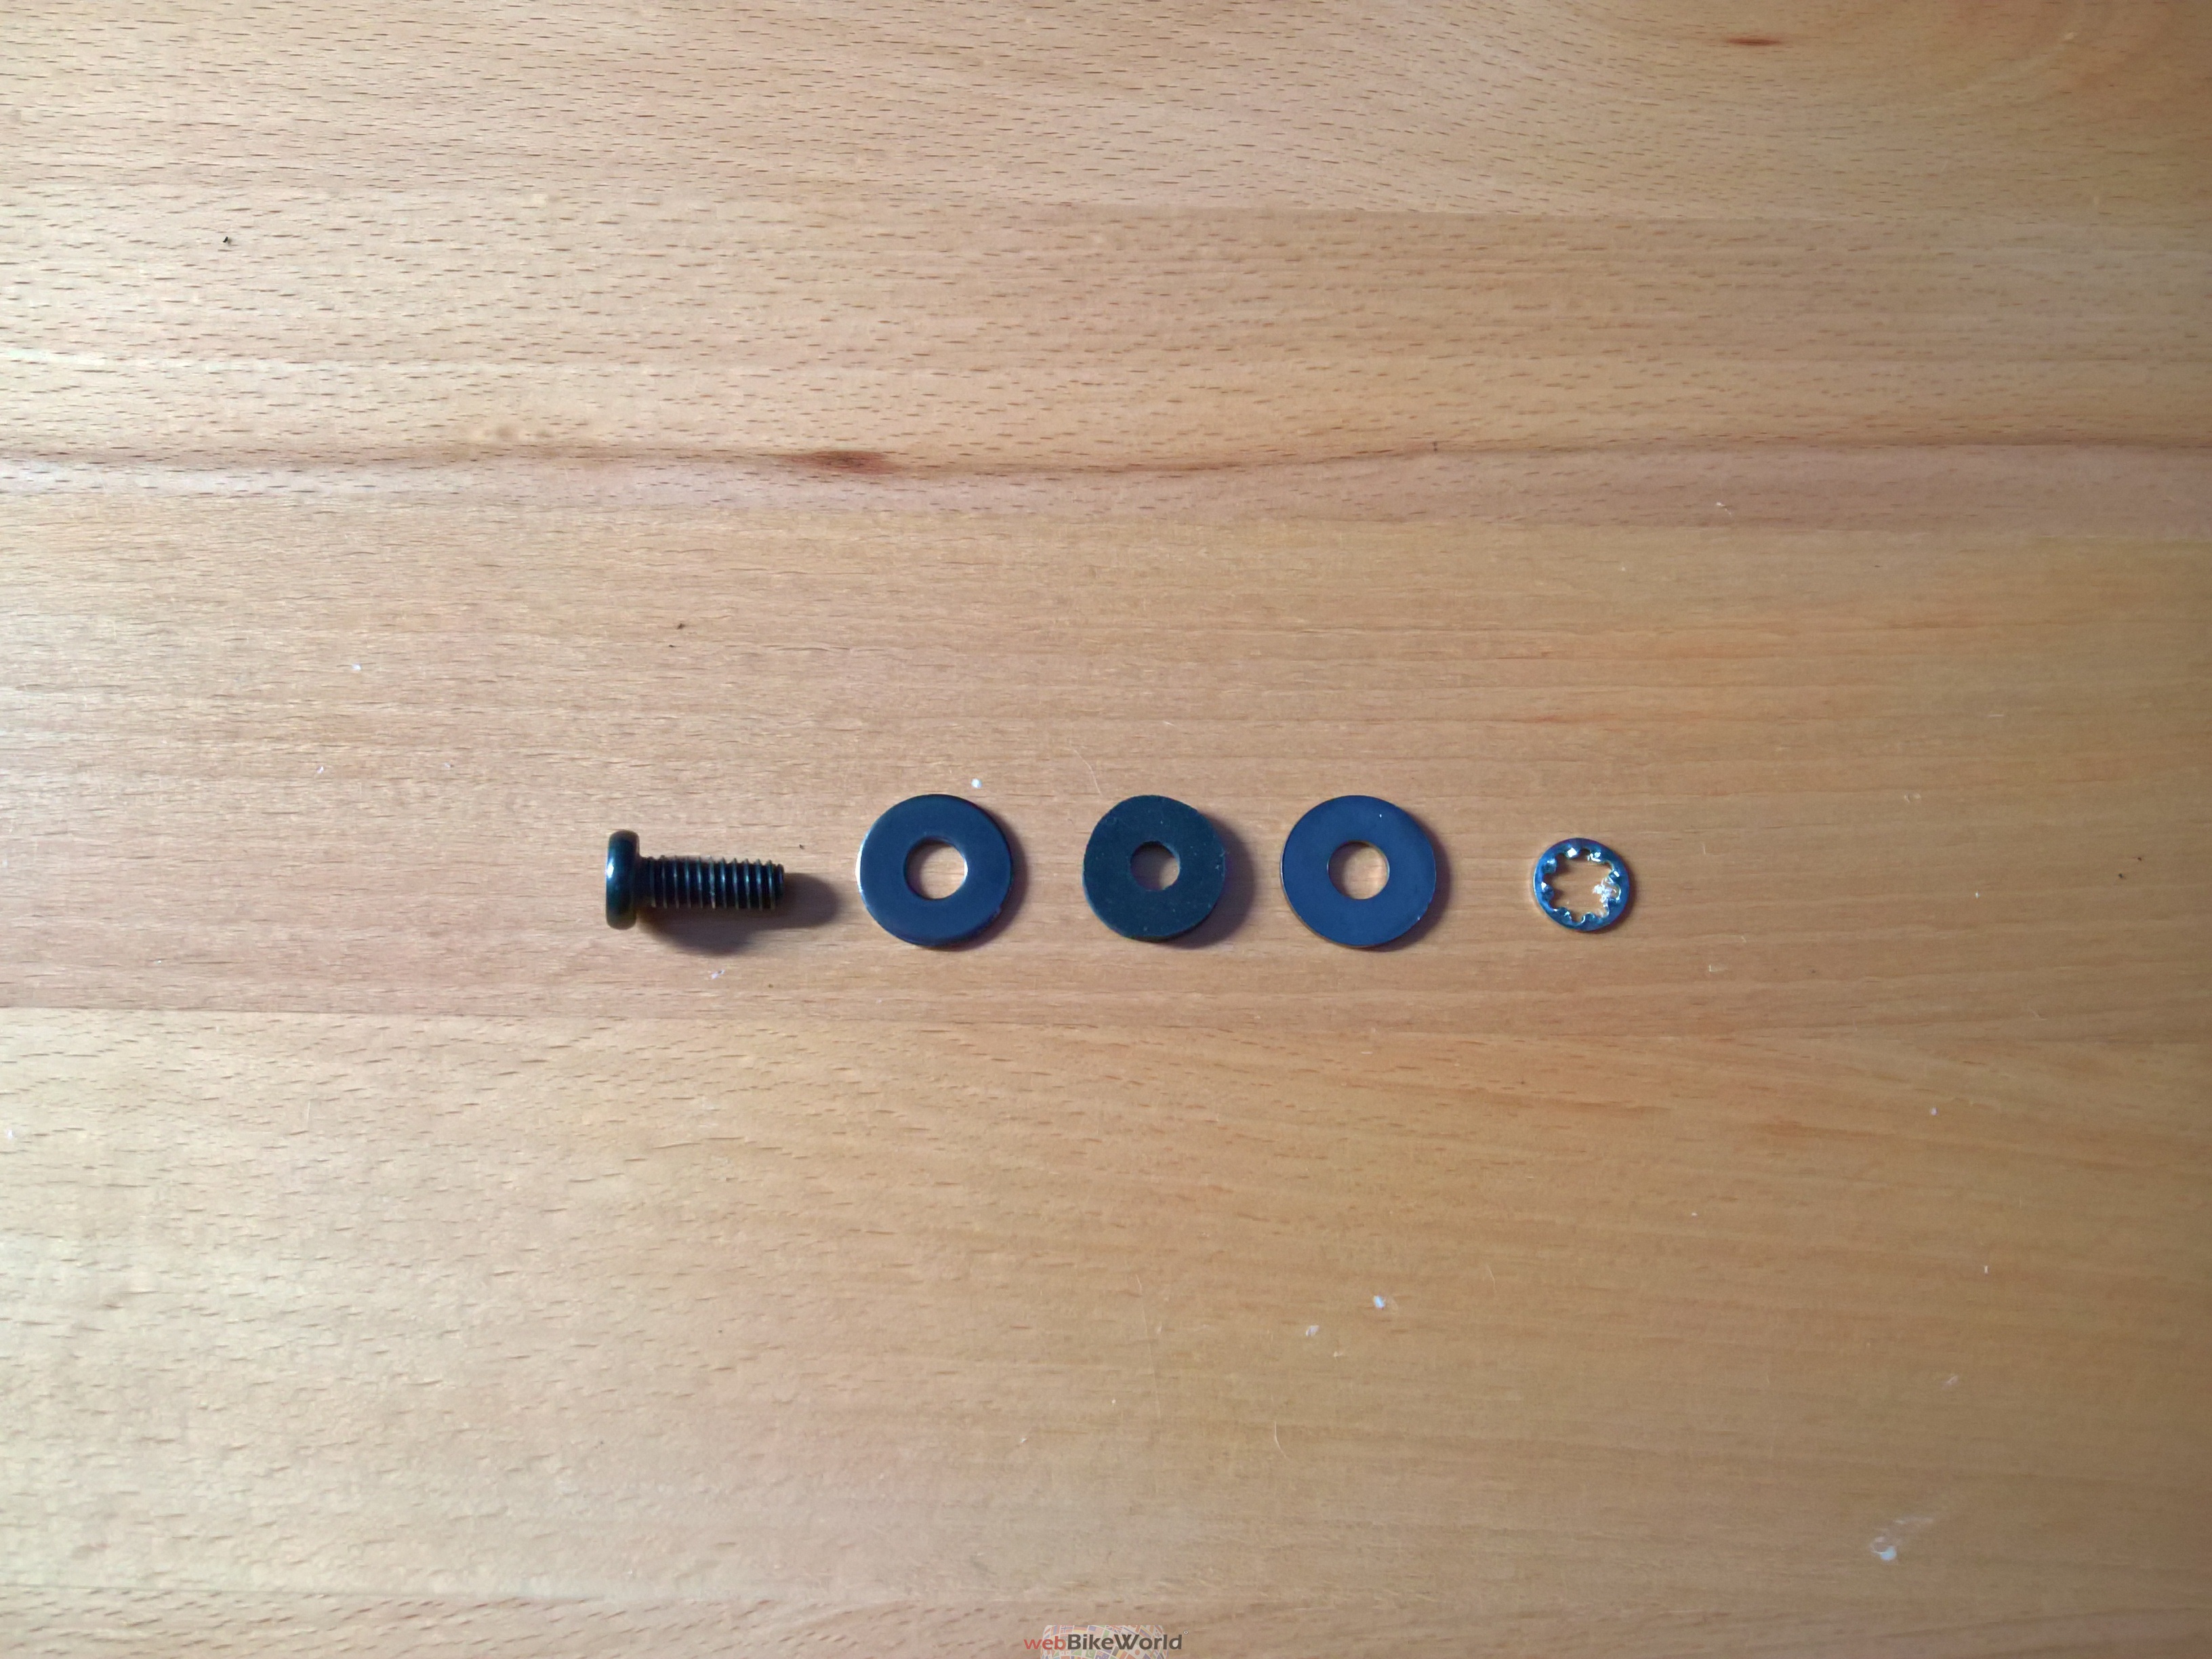
Mounting kit with: 2 x lens brackets (one flat, one L-shape); 3 x silicone washers; 2 x flat metal washers; a 5/8ths in long screw (0.25in and 28P thread); and, a 4mm Allen-head ‘L’ wrench
External microphone lead with 3.5mm connector and three clothing clips, and
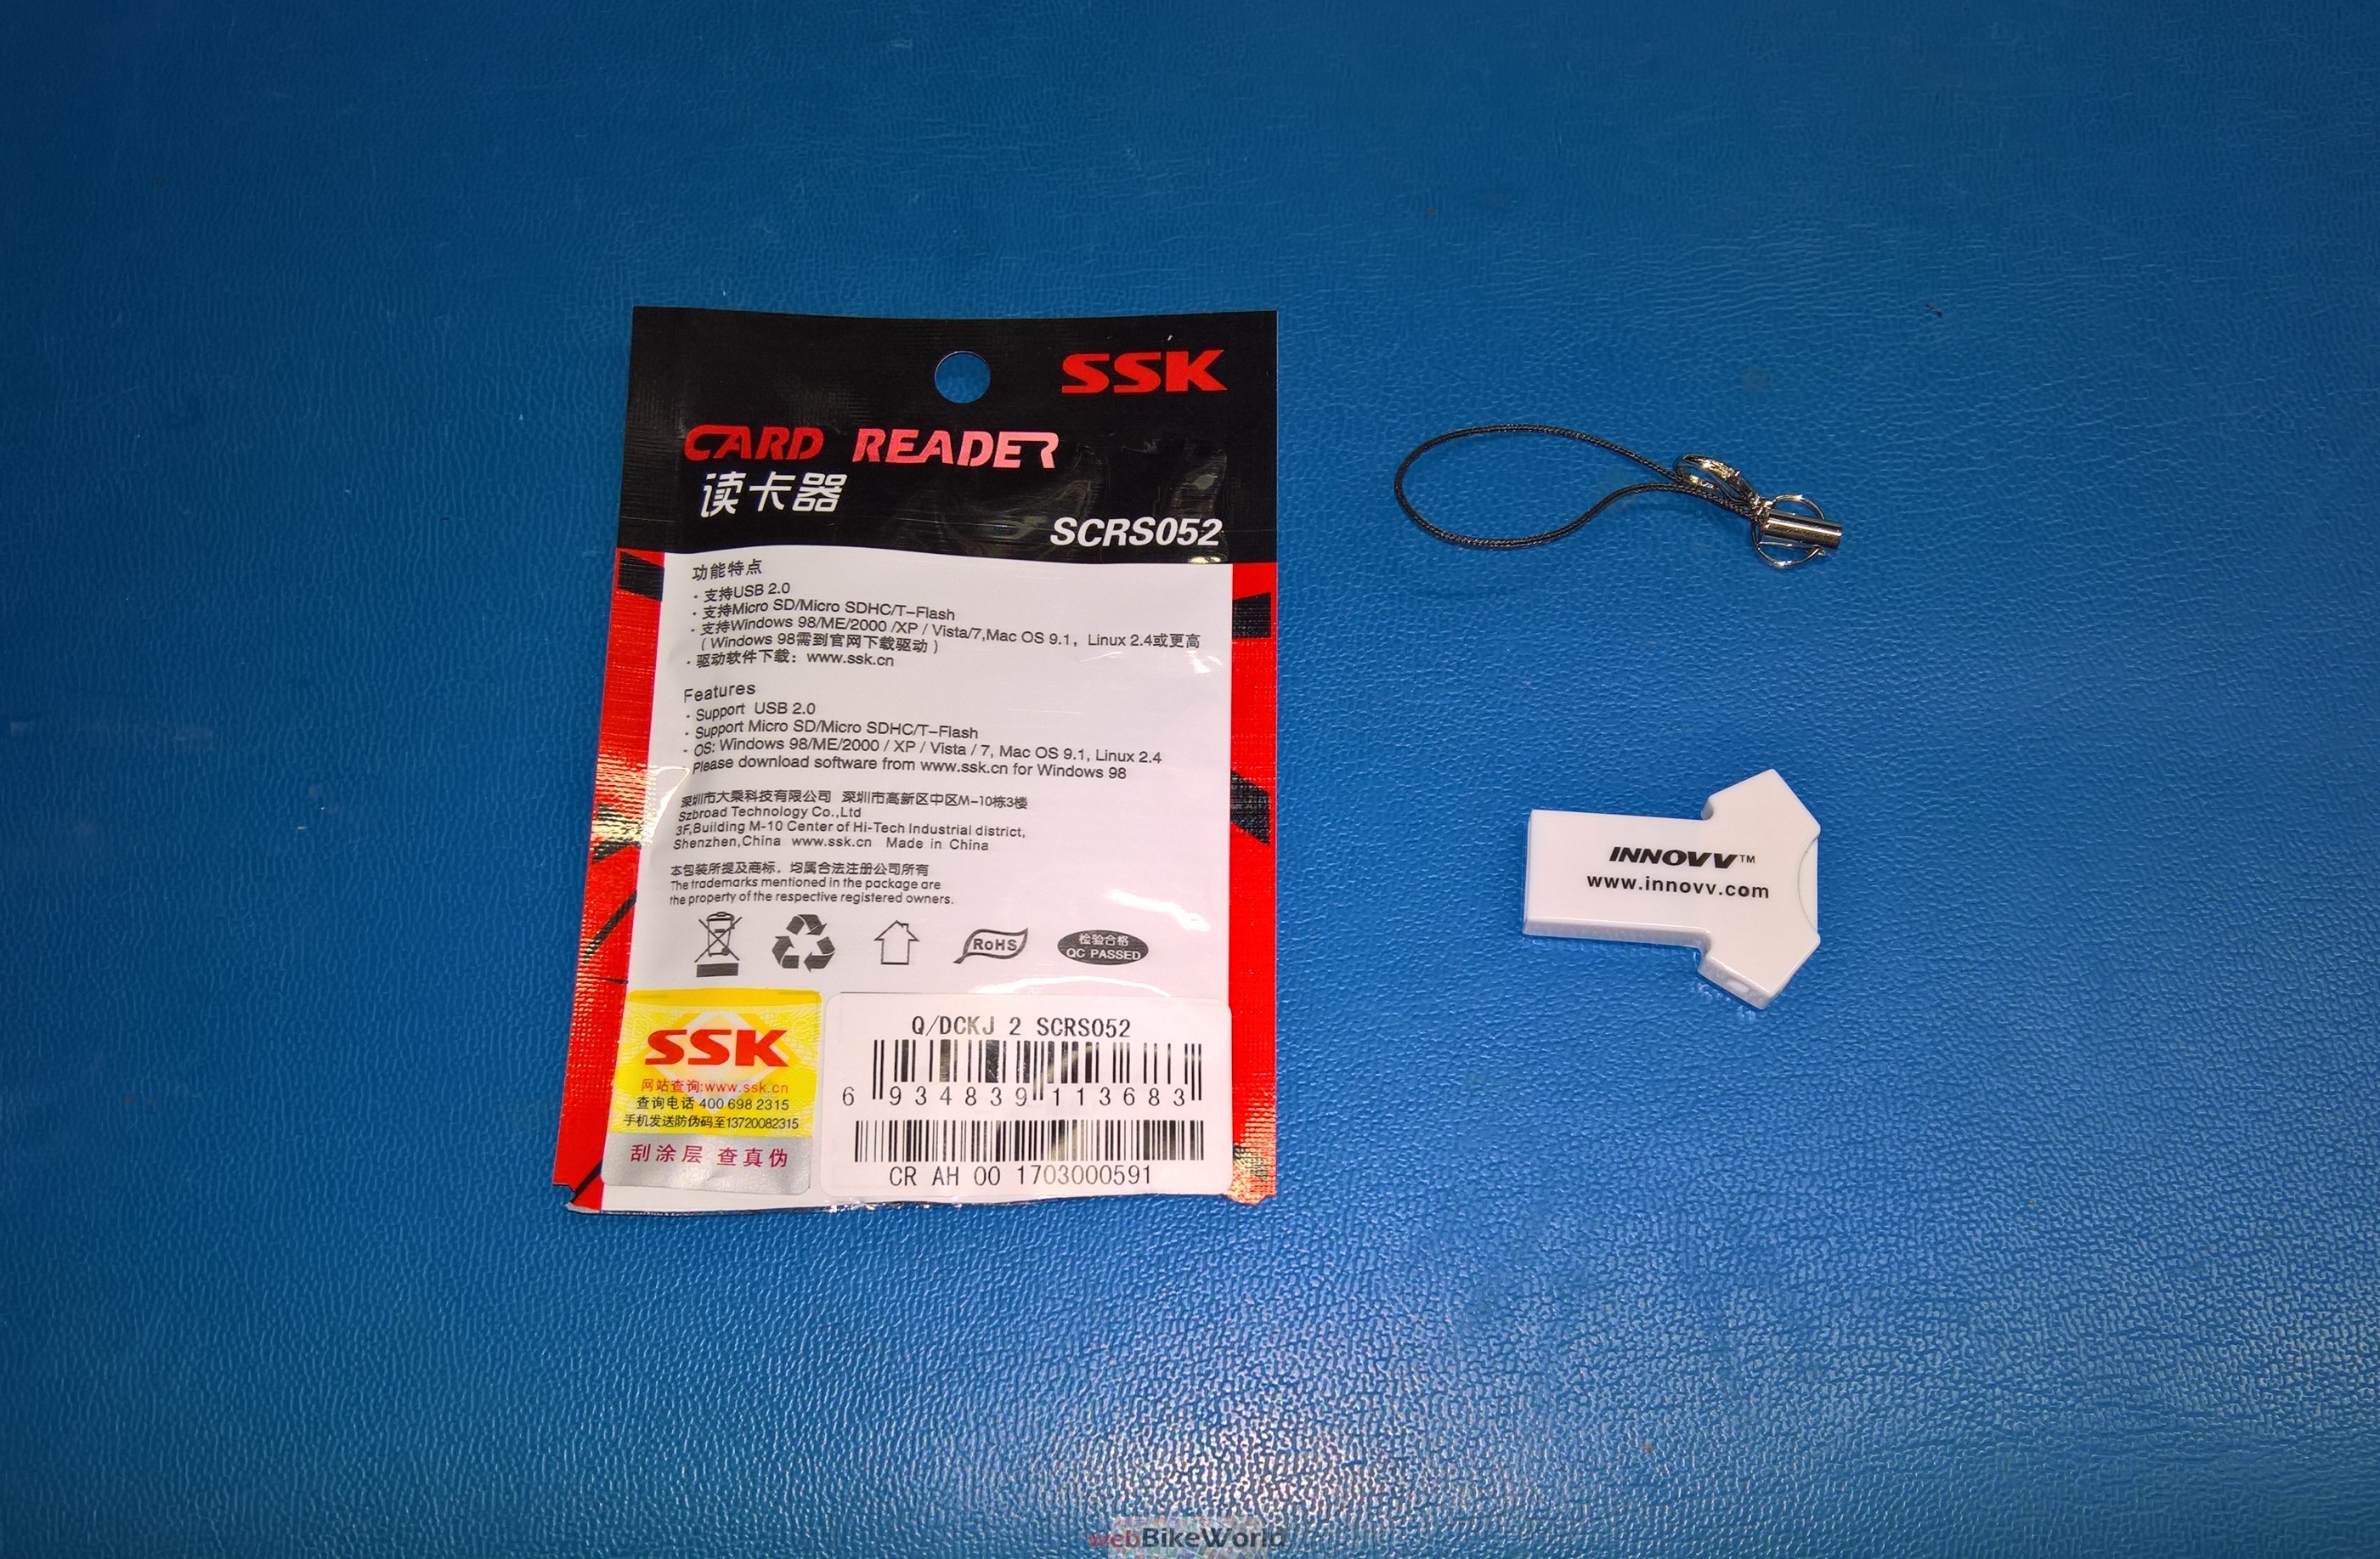
USB 2.0 Card Reader with security loop strap, and
Installation Guide/User Manual handout
Innovv C5 Components
The Innovv C5 is truly the sum of its parts in providing a multi-component turn-key solution suitable for almost any platform.
Innovv C5 Components
DVR Module :
Innovv C5 DVR module in easy reach and viewing
The face side of the small module has a sealed screw insert with three tactile pressure activated controls for input; all three controls have integrated LEDs that provide visual communication.
With the module oriented to put the INNOVV logo at the top, the upper oval button is the WiFi connection control, the one below is the Power & Recording (On/Off) control and the large bottom rectangular button is the Reset control.
The small 70 x 46 x 21mm (2.75 x 1.81 x 0.8in) aluminum module is available in black or gold and has an overall International Protection Marking (IEC standard 60529) rating of IP65 (dust & water protection).
A key component in providing dust and water protection is the weather-proof screw-type USB-C screw-interface power and data connector used on top of the module.
A somewhat less robust but effective silicone cover (cap) recesses into the raised edges of the module, protecting the bottom interface ports.
The bottom section provides a 3.5mm external microphone (mono) port, the internal microphone hole, a micro-USB port, a small access hole for the reset switch and a micro-SD card slot, accepting up to 128GB media – the faster the better.
Just keep in mind that the silicone flap needs to be fully engaged to maintain environmental integrity of the module per its IP65 weatherproof rating.
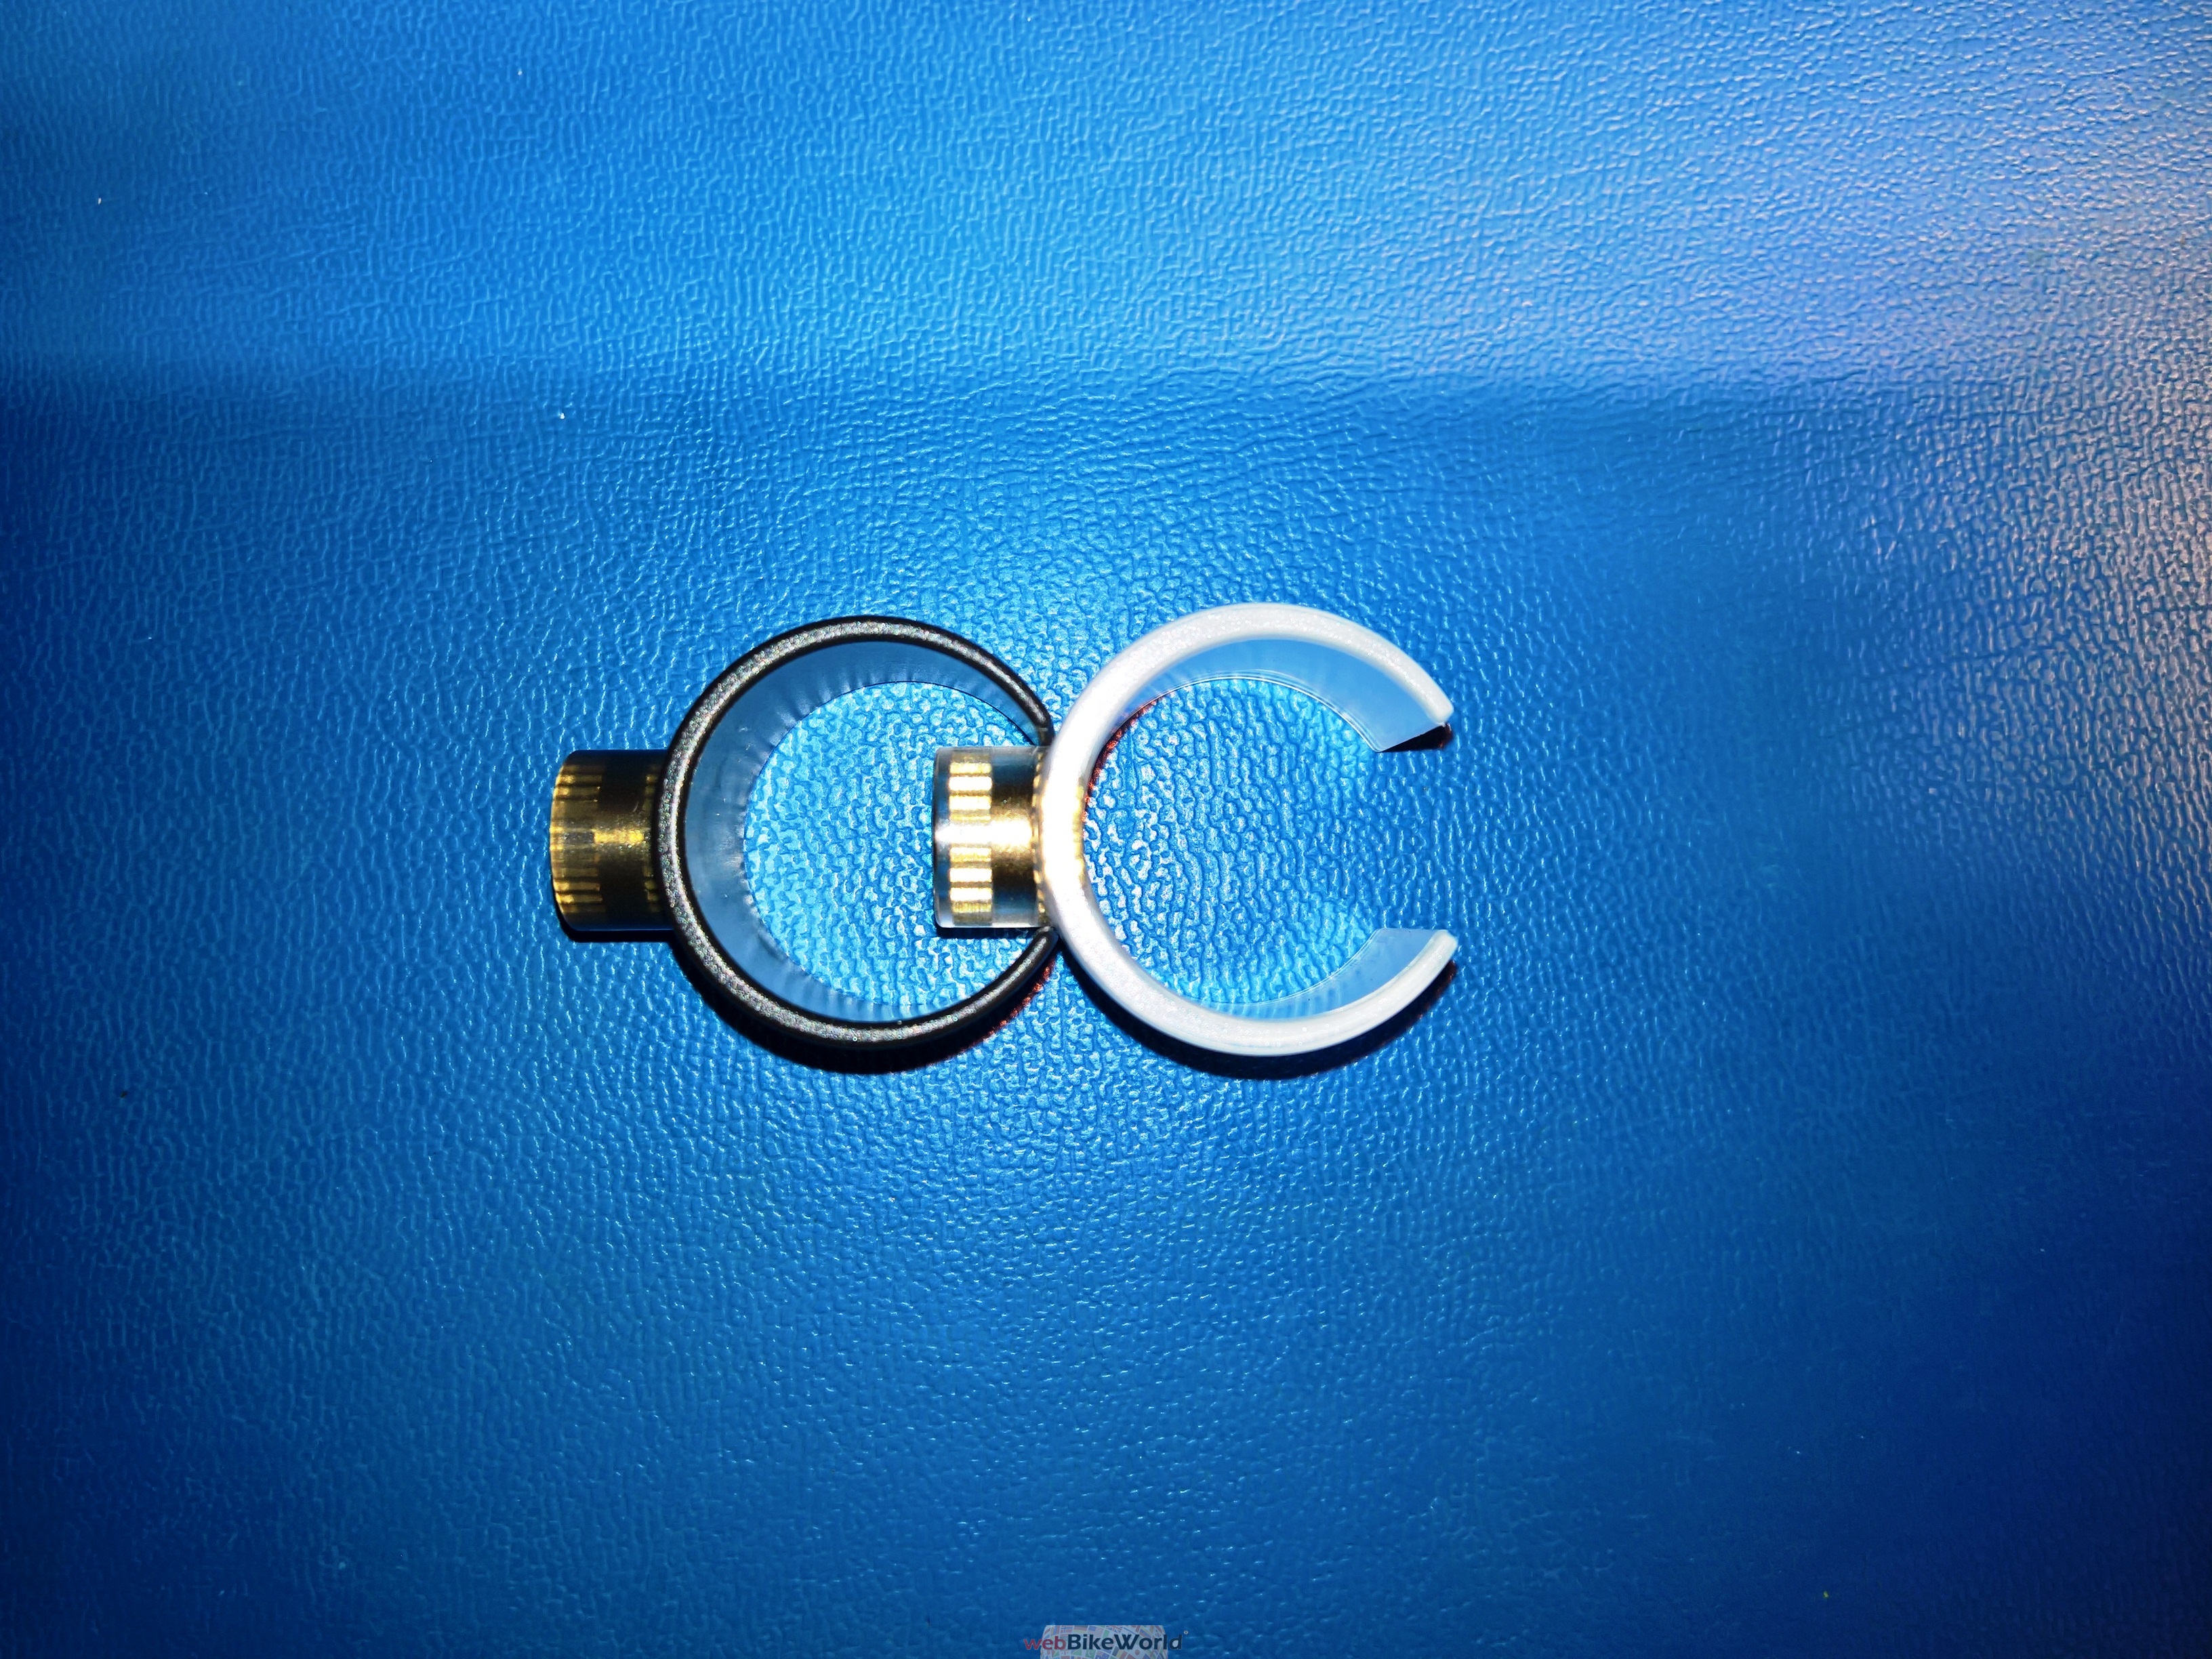
Lens and Lens Holder :
Left to Right, original and new stronger lens holder
At 25.5 x 54mm (1.0 x 2.13in) the tubular aluminum-bodied lens is small, sleek and low profile. It provides an encompassing 120-degree horizontal field of view, along with a bit of edge distortion – a minor tradeoff considering its other attributes.
And it is a totally sealed unit, from its permanent integrated lead to the actual lens and as such, it features an IP68 (immersion) rating.
Obviously the most rugged piece supplied with the C5 kit, the lens has an impressive operating temperature range of -20C to 60C (-4F to 140F).
Between its IP rating and operating temperature range the C5 lens should have the ability to handle almost any climatic condition.
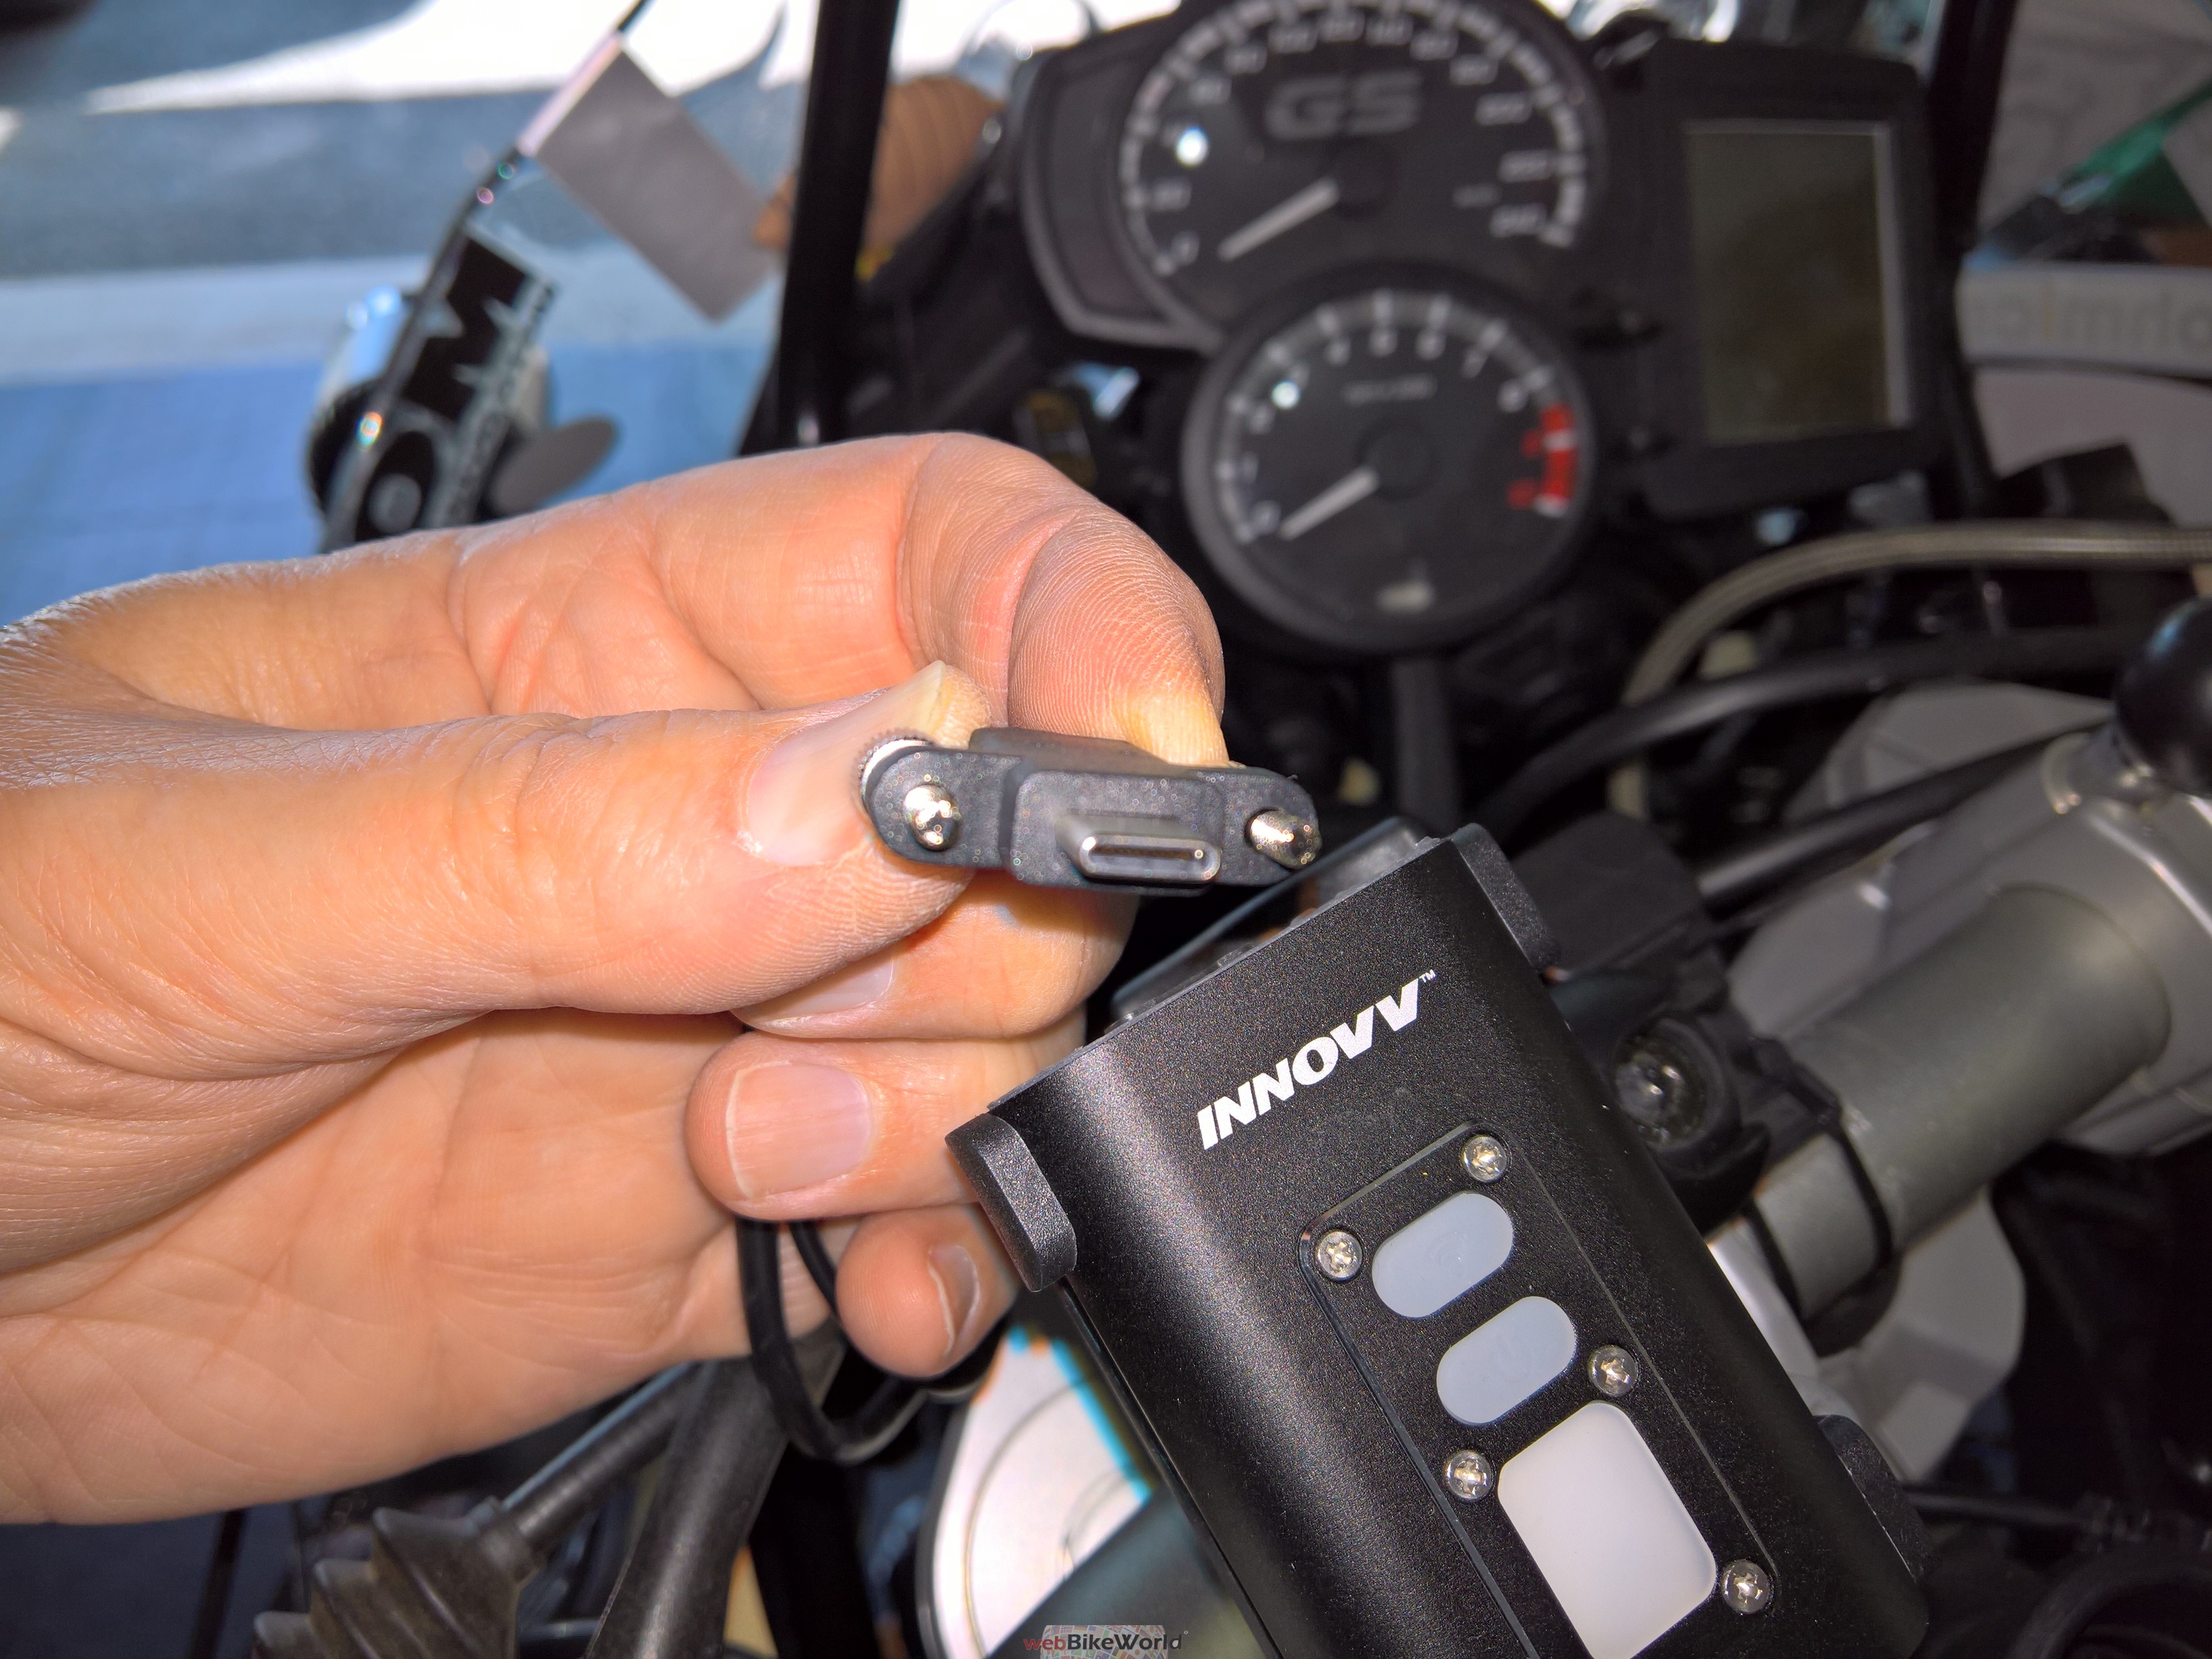
The integrated 1.8m or 180cm (70.8in) integrated long connection harness terminates with a USB-C connector, itself housed in the previously identified weather proof connector housing.
This sealing housing fits snugly into the receiving port on top of the DVR module as a pressure fit and secures with two small thumb-screws – unique and comforting in its design.
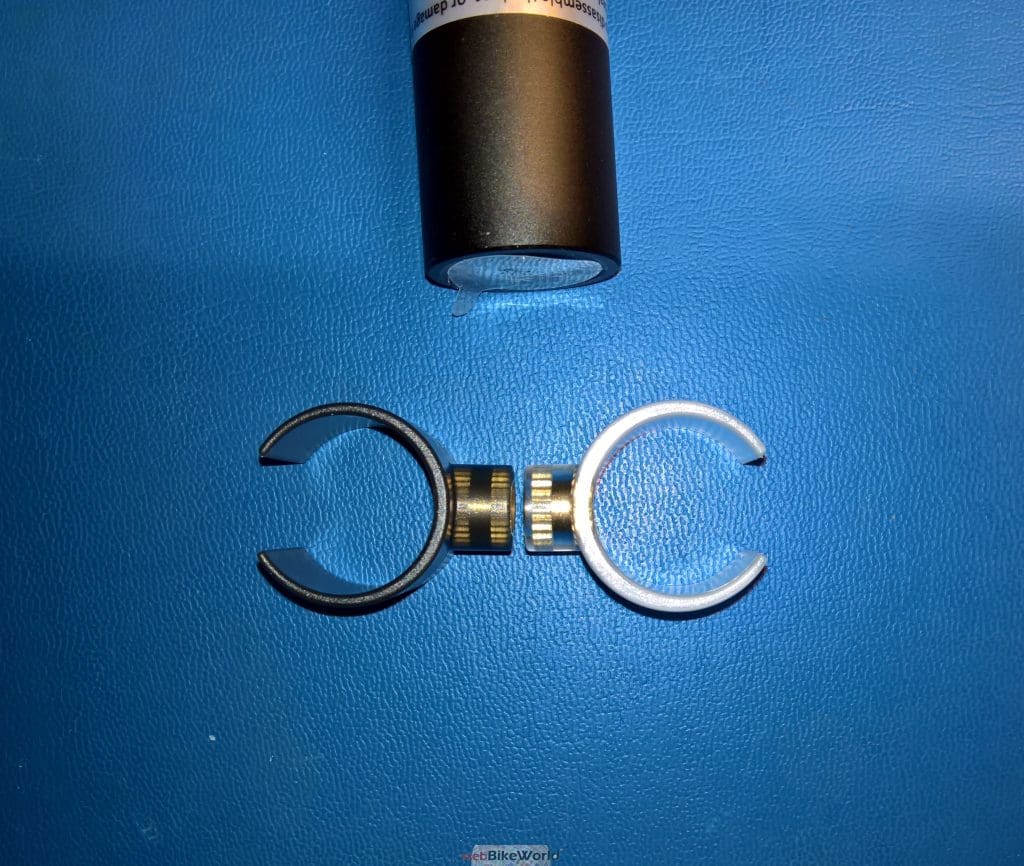
A (very) lightweight C-shaped lens holder with an integrated 0.25in (20P) threaded insert cradles and secures the equally lightweight lens.
Power Components :
Weatherproof coaxial power connector
The included DC/DC (12V to 5V) converter power supply is a small sealed component providing 5V DC (2A maximum) with a 10 second power on/off delay…a system safeguard. This component is also available as a separate product.
The 5V connection to the DVR module is made with a dual wire lead terminating in the male end of a waterproof coaxial connector that mates up to its other half on the shorter power lead segment, itself integrated into the main USB-C harness.
A 500MA Li-Polymer battery is the internal system power source capable of providing up to 60 min of recording at 1080p, along with a stated 60 min charging time.
The internal supply allows the system to power down under control when the ignition is switched off and the 10 second On/Off delay ends so that ongoing functions (like saving to a file) are completed without corruption.
Another function of this power source is to provide a critical fail-safe power supply, providing the means to power the system for short periods of time in event of an accident or, if the motorcycle is parked and subsequently ‘disturbed’; as the case may be.
DVR Holder :
DVR bracket and mounting hardware
This small lightweight plastic bracket provides a snap-in pressure-fit mount for the DVR module.
The bracket has four small holes drilled in a rectangular pattern on the back section and the mounting kit includes small sheet screws and double-side foam adhesive for use with the bracket.
An overlooked opportunity regarding this bracket is that the four-hole pattern used is not sized to accept a four-hole AMPS industry standard pattern plate or bracket.
Harness Lengths for Reference Purposes:
USB 3.0 rated video cable – 1.8m or 180cm (70.8in) provided, with 3m and 5m lengths available
DC 12v to 5V Converter – Input Red & Black are 60cm (23.6in), Yellow trigger lead is 80cm (31.4in); and Output DC Coaxial Connector (dual wire) is 60cm (23.6in)
External microphone lead is 2.5m or 250cm (98.4in)
Innovv C5 Installations
After completing the recommended one hour of charging prior to initial power-up, done by using the bottom micro-USB port, the next step is installation of the system components – initially on the 2014 BMW F800GS Adventure.
Finding the right home for components provides challenges, especially as motorcycles (for the most part) feature lighter trimmer designs and less (typically) encompassing plastic, but with more OE electronics and related components; no complaint really, just a statement of fact.
Thankfully most electronic components continue to shrink in size, like the small sealed Innovv 12V to 5DC converter/power supply that is a very welcome inclusion with the C5 camera kit and which is installable almost anywhere.
With the centre top panel removed exposing the airbox cover and battery box components, the converter is mounted with 3M Dual-Lock to the left of the Arboreal Systems Neutrino Black Box (NBB) V2 module – also secured with 3M Dual Lock.
Use of quick-detachable 3M Dual-Lock fastener allows the Innovv and NBB modules to be simply lifted away from the air box cover when it needs removal for air filter maintenance.
This location puts the converter in close proximity to an available circuit on the NBB or to the battery terminals – the option exercised all while keeping the converter well away from the C5 DVR module, eliminating or minimizing electrical interference – all good.
Before doing any electrical work, the negative and then the positive terminals on the battery are disconnected and isolated to prevent any (unplanned) incidents.
With the battery connections made, a length of yellow PET is added over the yellow trigger for protection and routed over to the right side of the motorcycle where it runs in parallel with the NBB V2 trigger wire back to the under-seat On-Board-Diagnostic or OBD plug.
The existing Blue Posi-Tap originally installed for the NBB trigger wire now hosts both leads to the 12V switched supply wire on the OBD harness – neither device draws much so they do not intrude on the onboard system or functionality of the OBD.
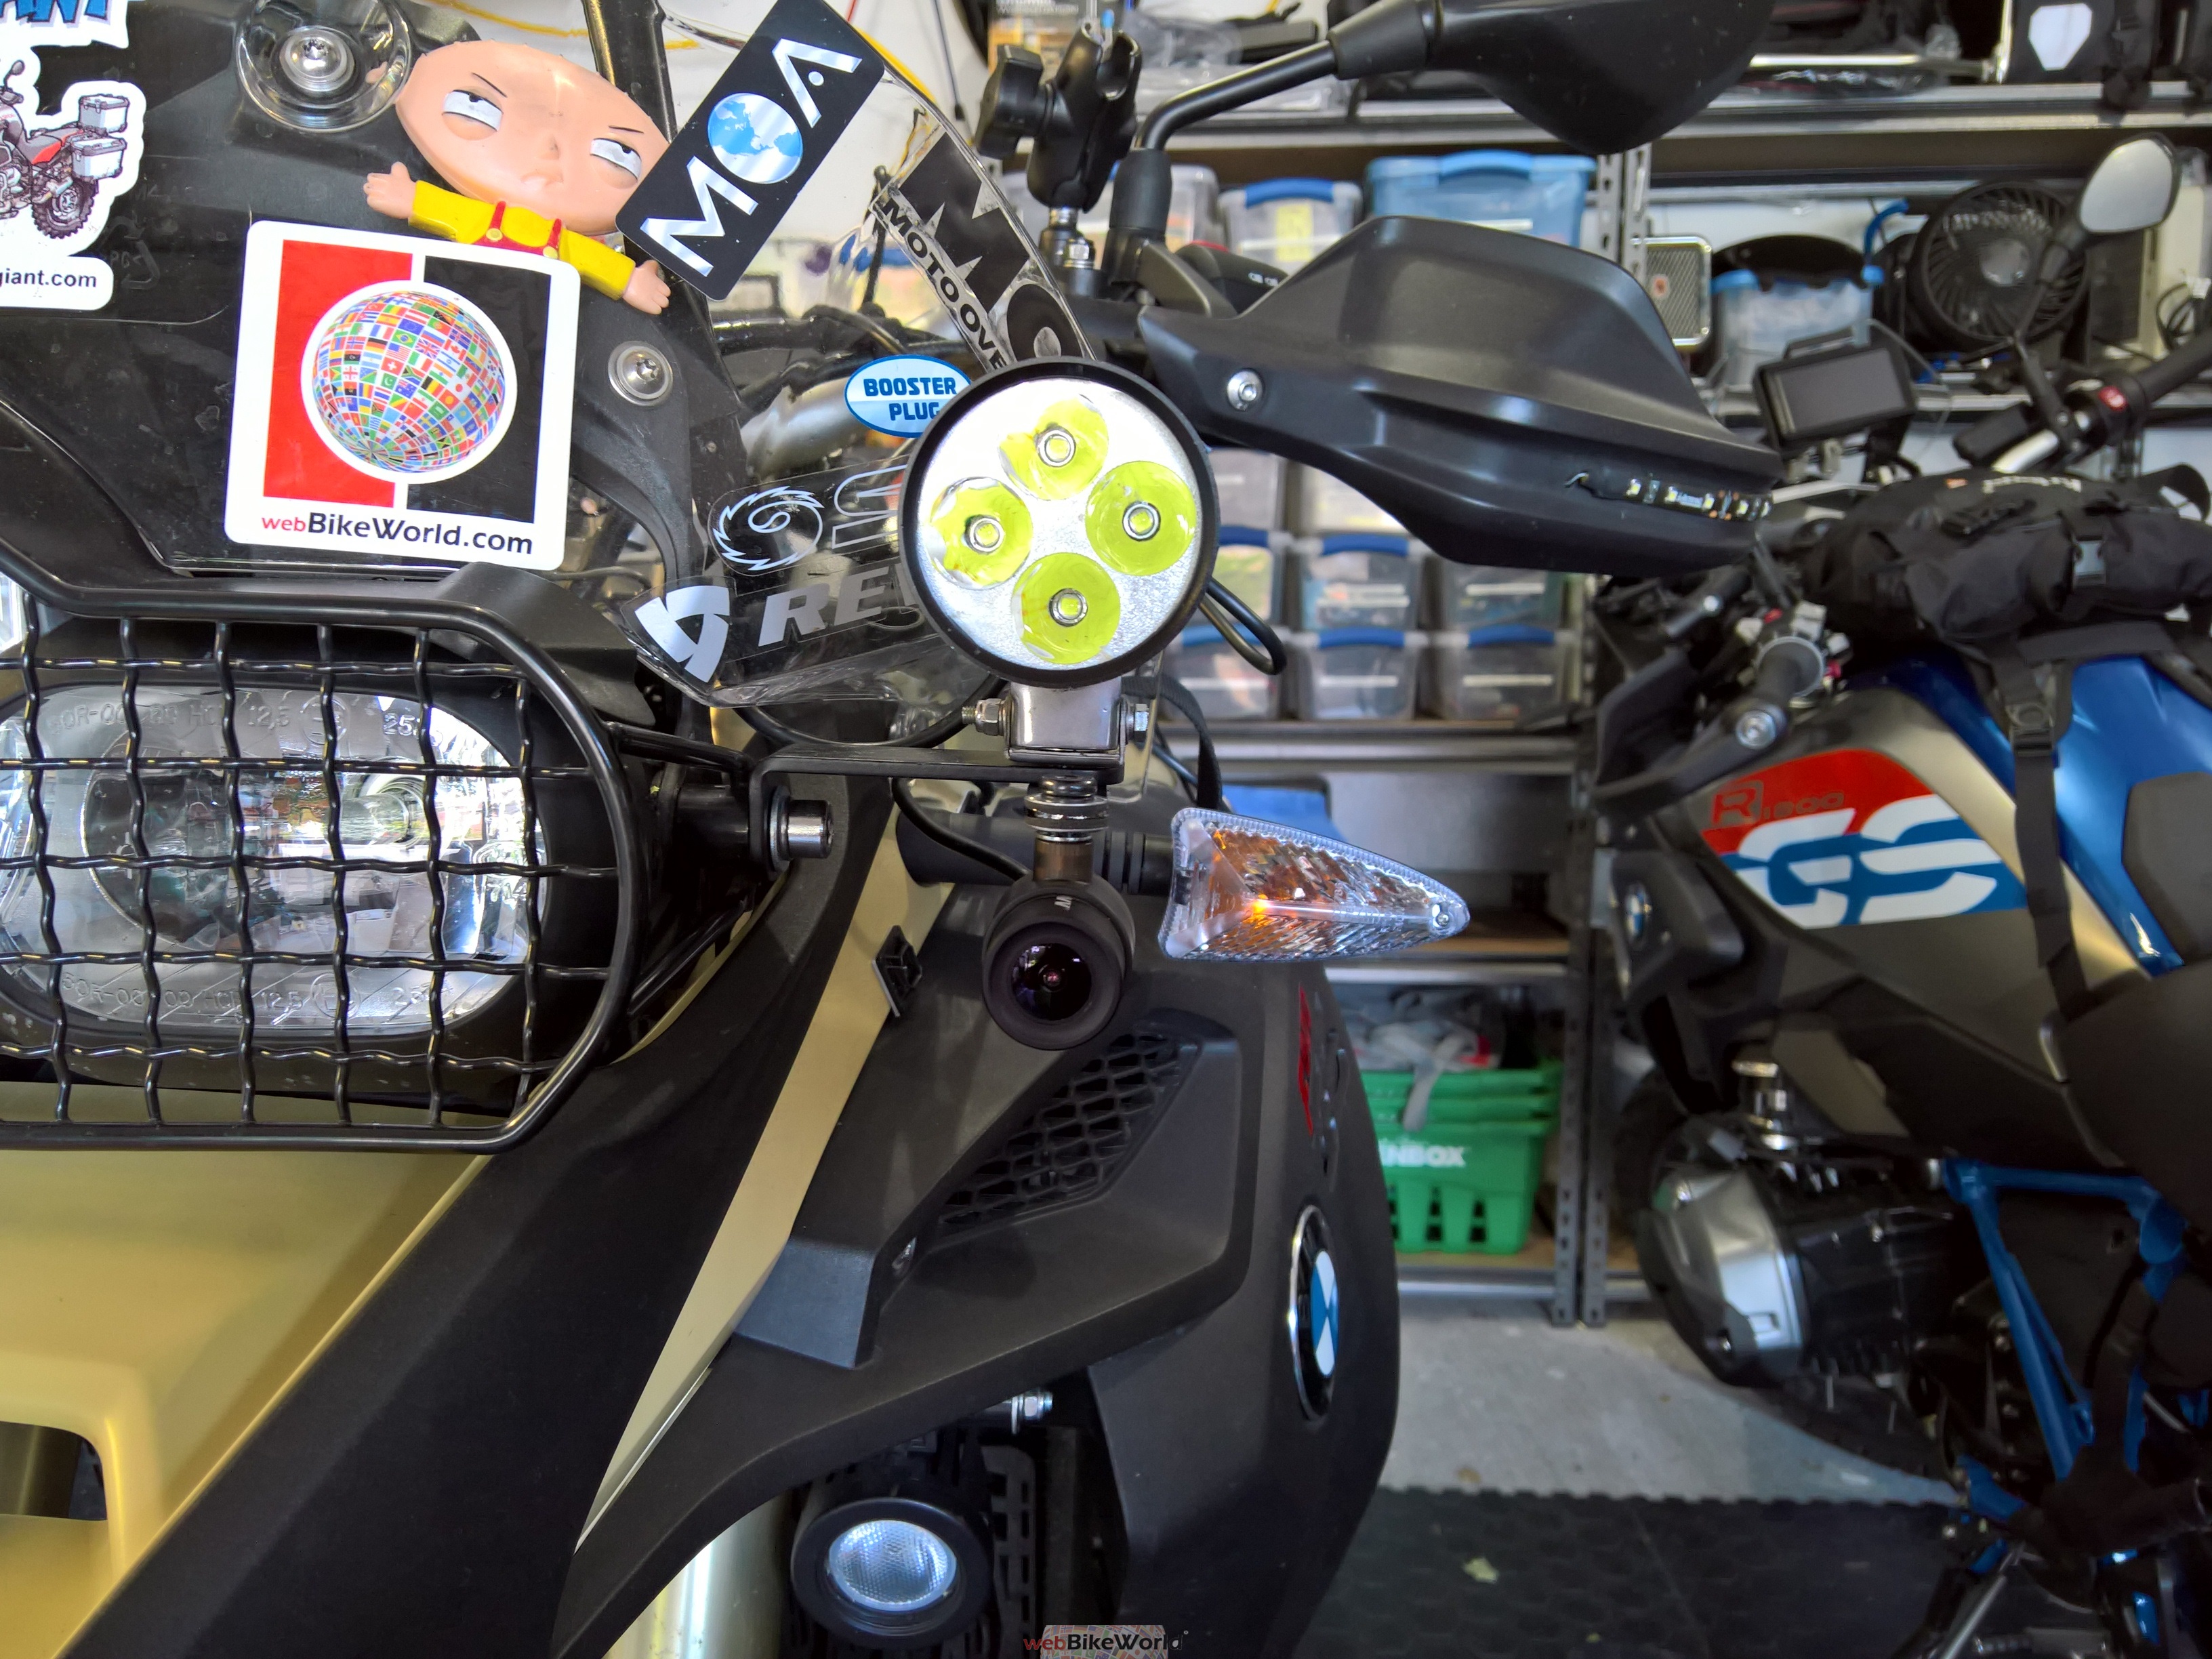
Initial Lens Mounting :
Front and Side view of the initial lens fitment
Several test placements for the lens revealed lots of options – some relatively exposed and some more protected with stronger bases.
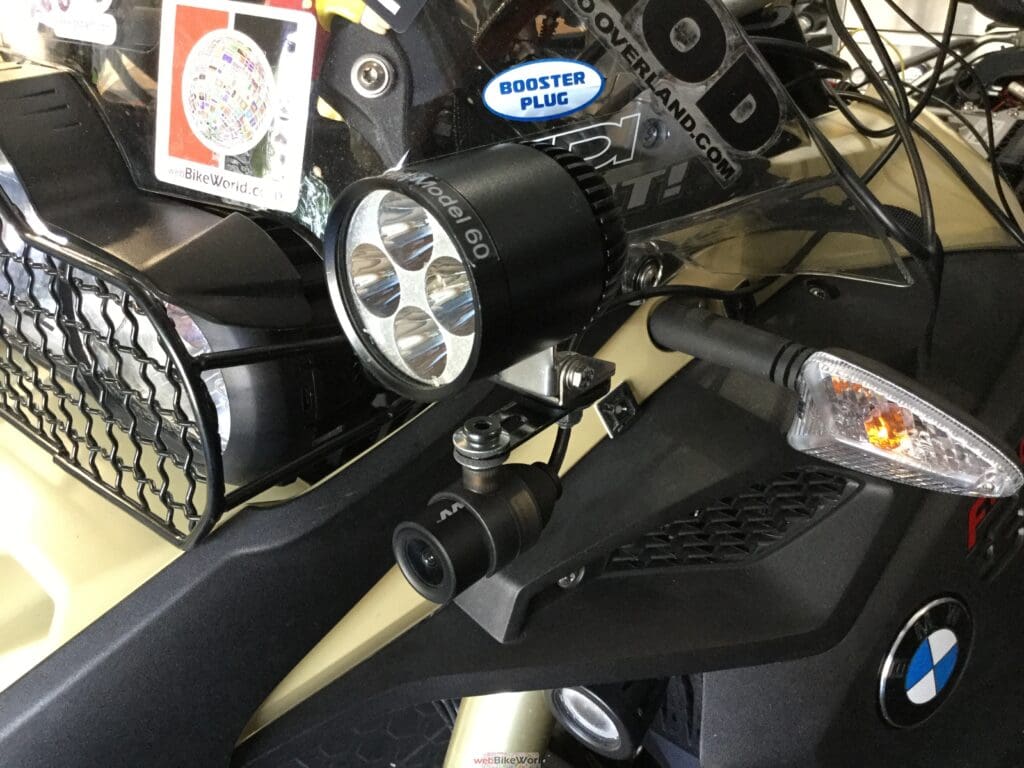
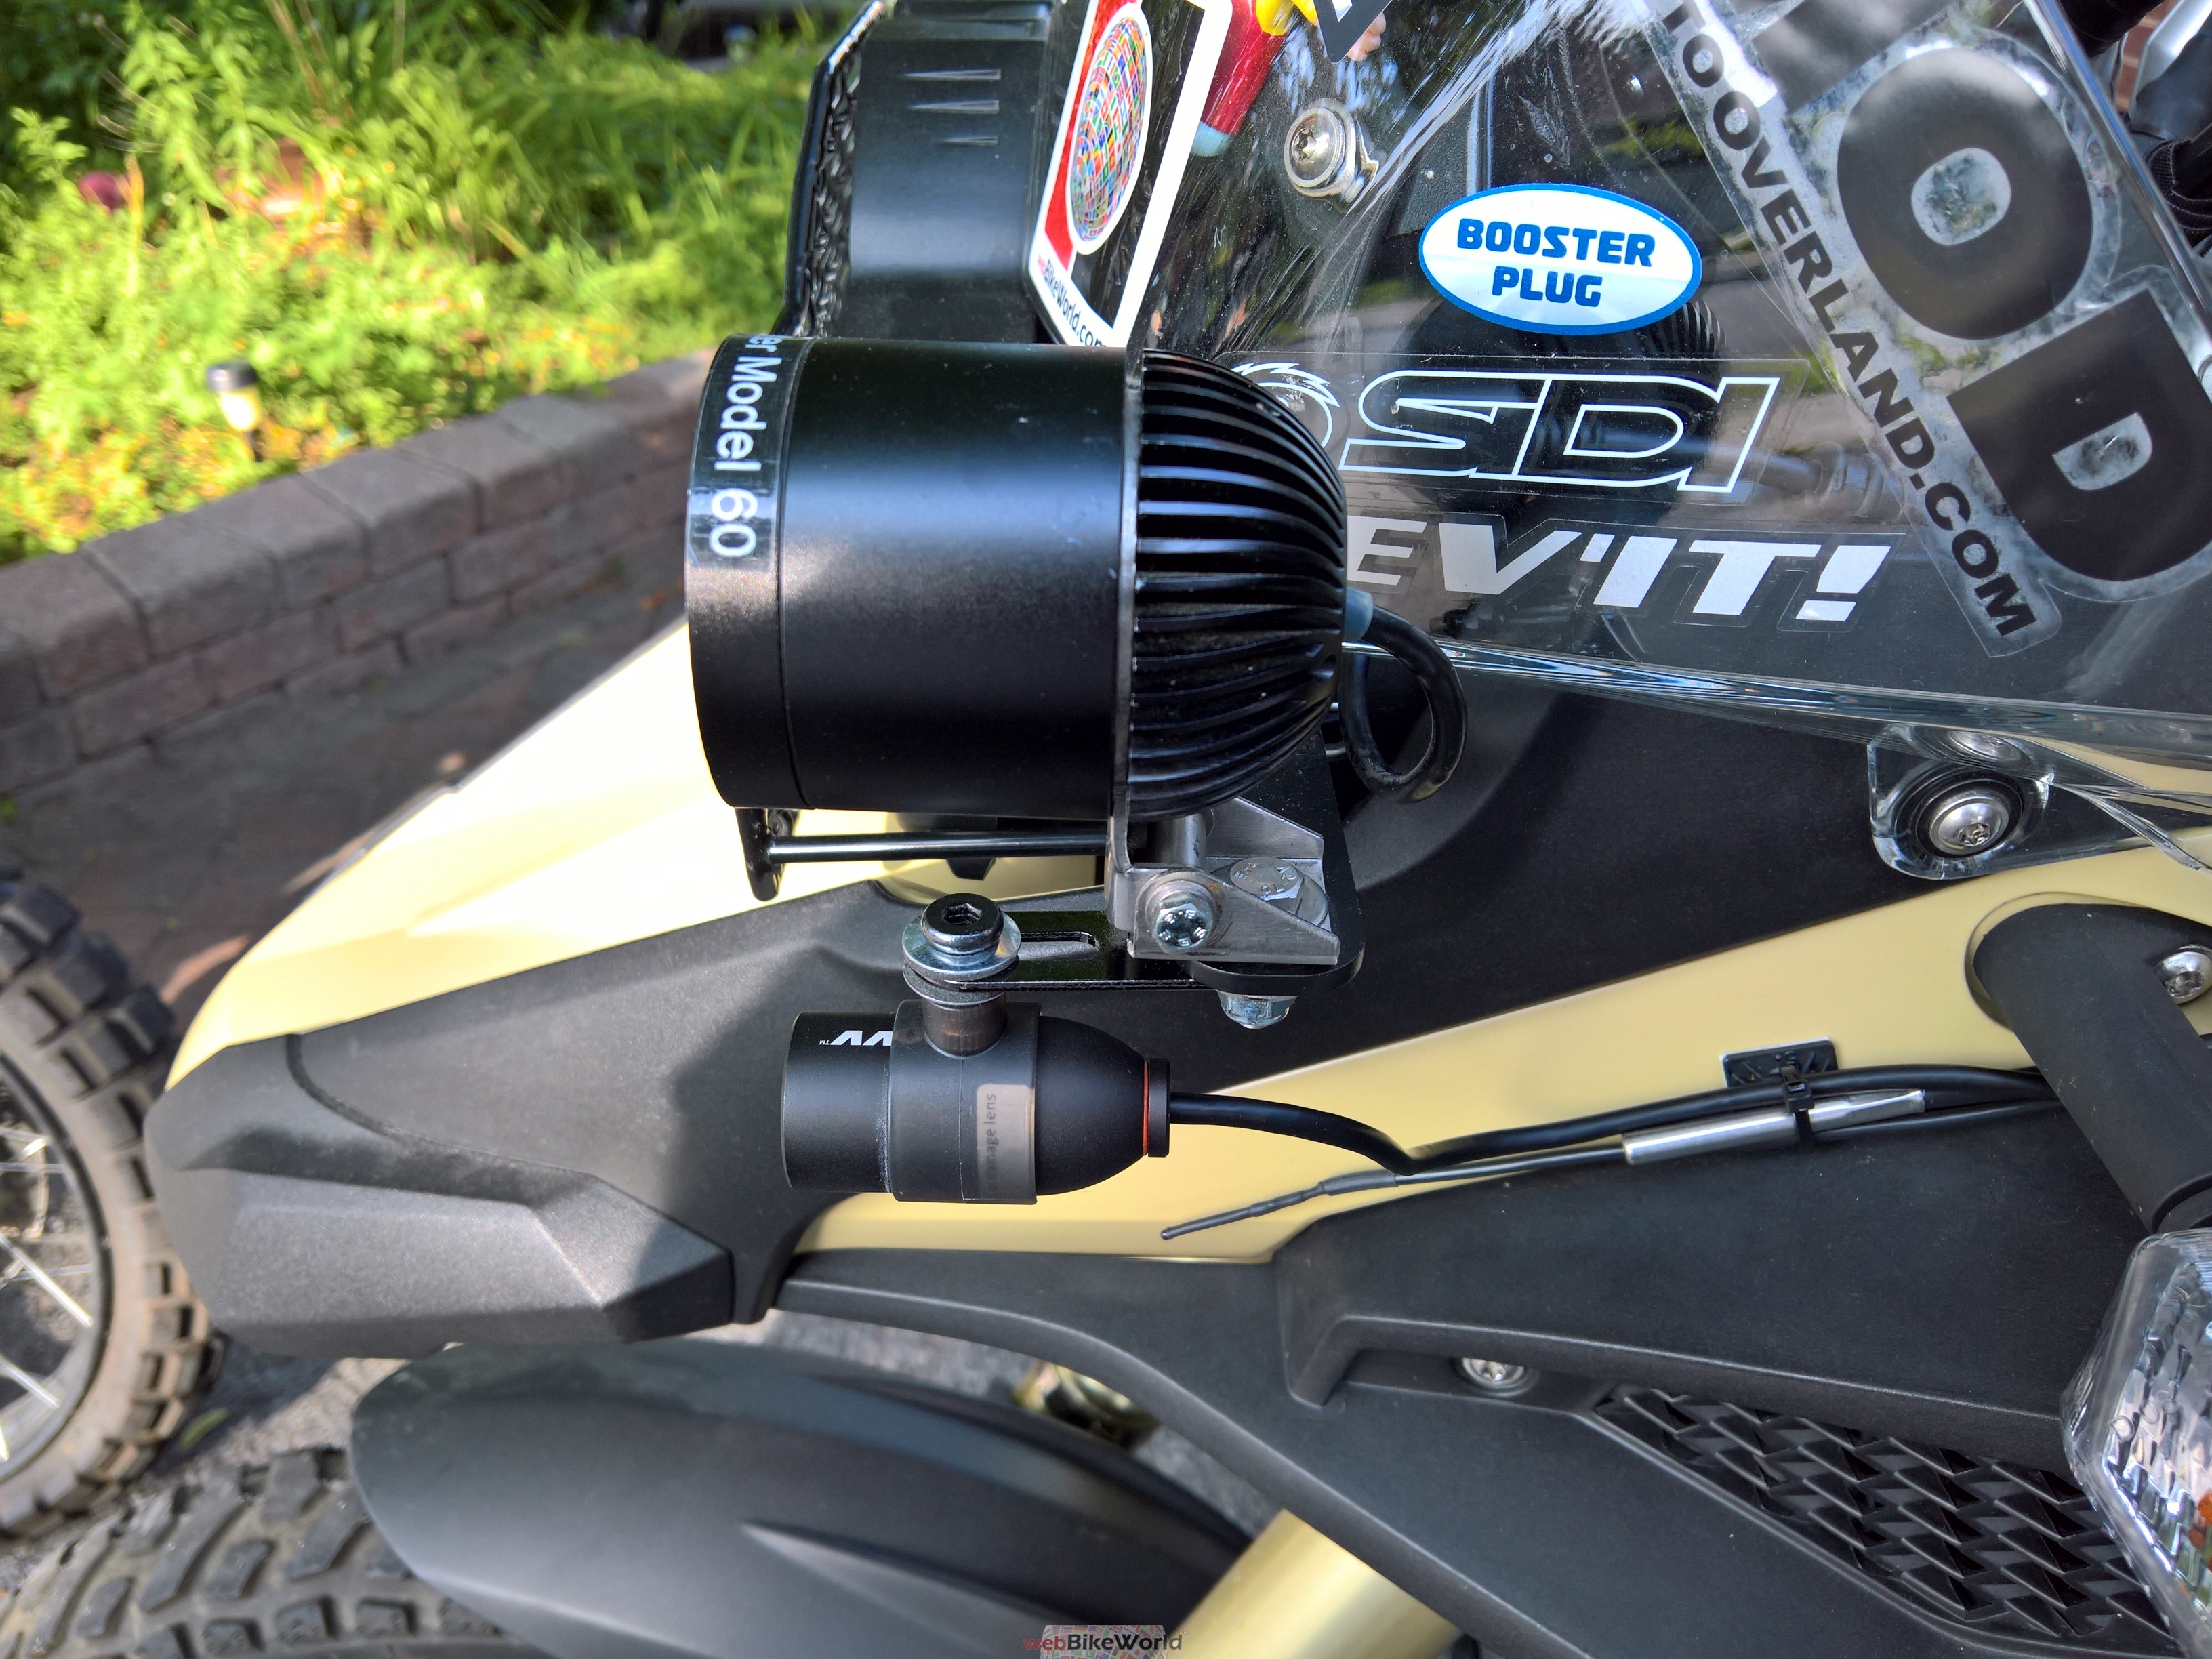
But the initial mounting point chosen is also the L-bracket perch for the left-side mounted ADVmonster M60 LED.
The flat bracket from the kit sits so the elongated cutout faces forward for the lens holder mount, while the single hole end provides the means to secure it to the lower side of the L-bracket, with the LED sitting on the top side.
The elongation provides adjustment of the lens forward or backwards and side to side while a cushion sandwich mount made from two of the flat and one of the silicone washers from the kit sits between the lens holder and the bracket.
This cushion sandwich serves (or should) to help absorb road and machine vibration and also takes up the excess length of the kit’s three-quarter inch long screw with its 5/8ths in of thread (longer than the insert in the lens holder).
Lens Holder :
Nicely formed piece but thin walled and lightweight; its integrated 0.25in (20P) threaded insert used for the hardware is far stronger.
Carefully tightening the hardware reveals that the holder side walls flex (a lot), raising the potential for failure of some kind over time and use – our concerns were well founded it turns out…
Once positioned the lens has a clear view of the way ahead without any parts of the motorcycle intruding into the wide-angle view of the way ahead and laterally.
But sure enough, after two weeks of use and some adjustments of the lens and holder (which may not be the norm of course), two observations were made: stress cracks appeared on the walls of the holder; and, the tubular lens moves and pivots in the holder.
A fix of sorts uses shaped sections of Gorilla Clear Repair tape to cover and reinforce the brittle sides including the cracked areas while small strips of the tape overlap the front edges of the holder and lens to bind the two components together and maintain lens orientation.
As is usual, especially with a new product, observations with (constructive) feedback points were forwarded to the Innovv C5 team lead, who was quick to acknowledge the information – a good start.
Follow-on correspondence identified that the holder piece was has been redesigned for more strength and better grip. Other observations submitted have also been added to the team’s review list. Bottom line here – support from Innovv remains quick and positive.
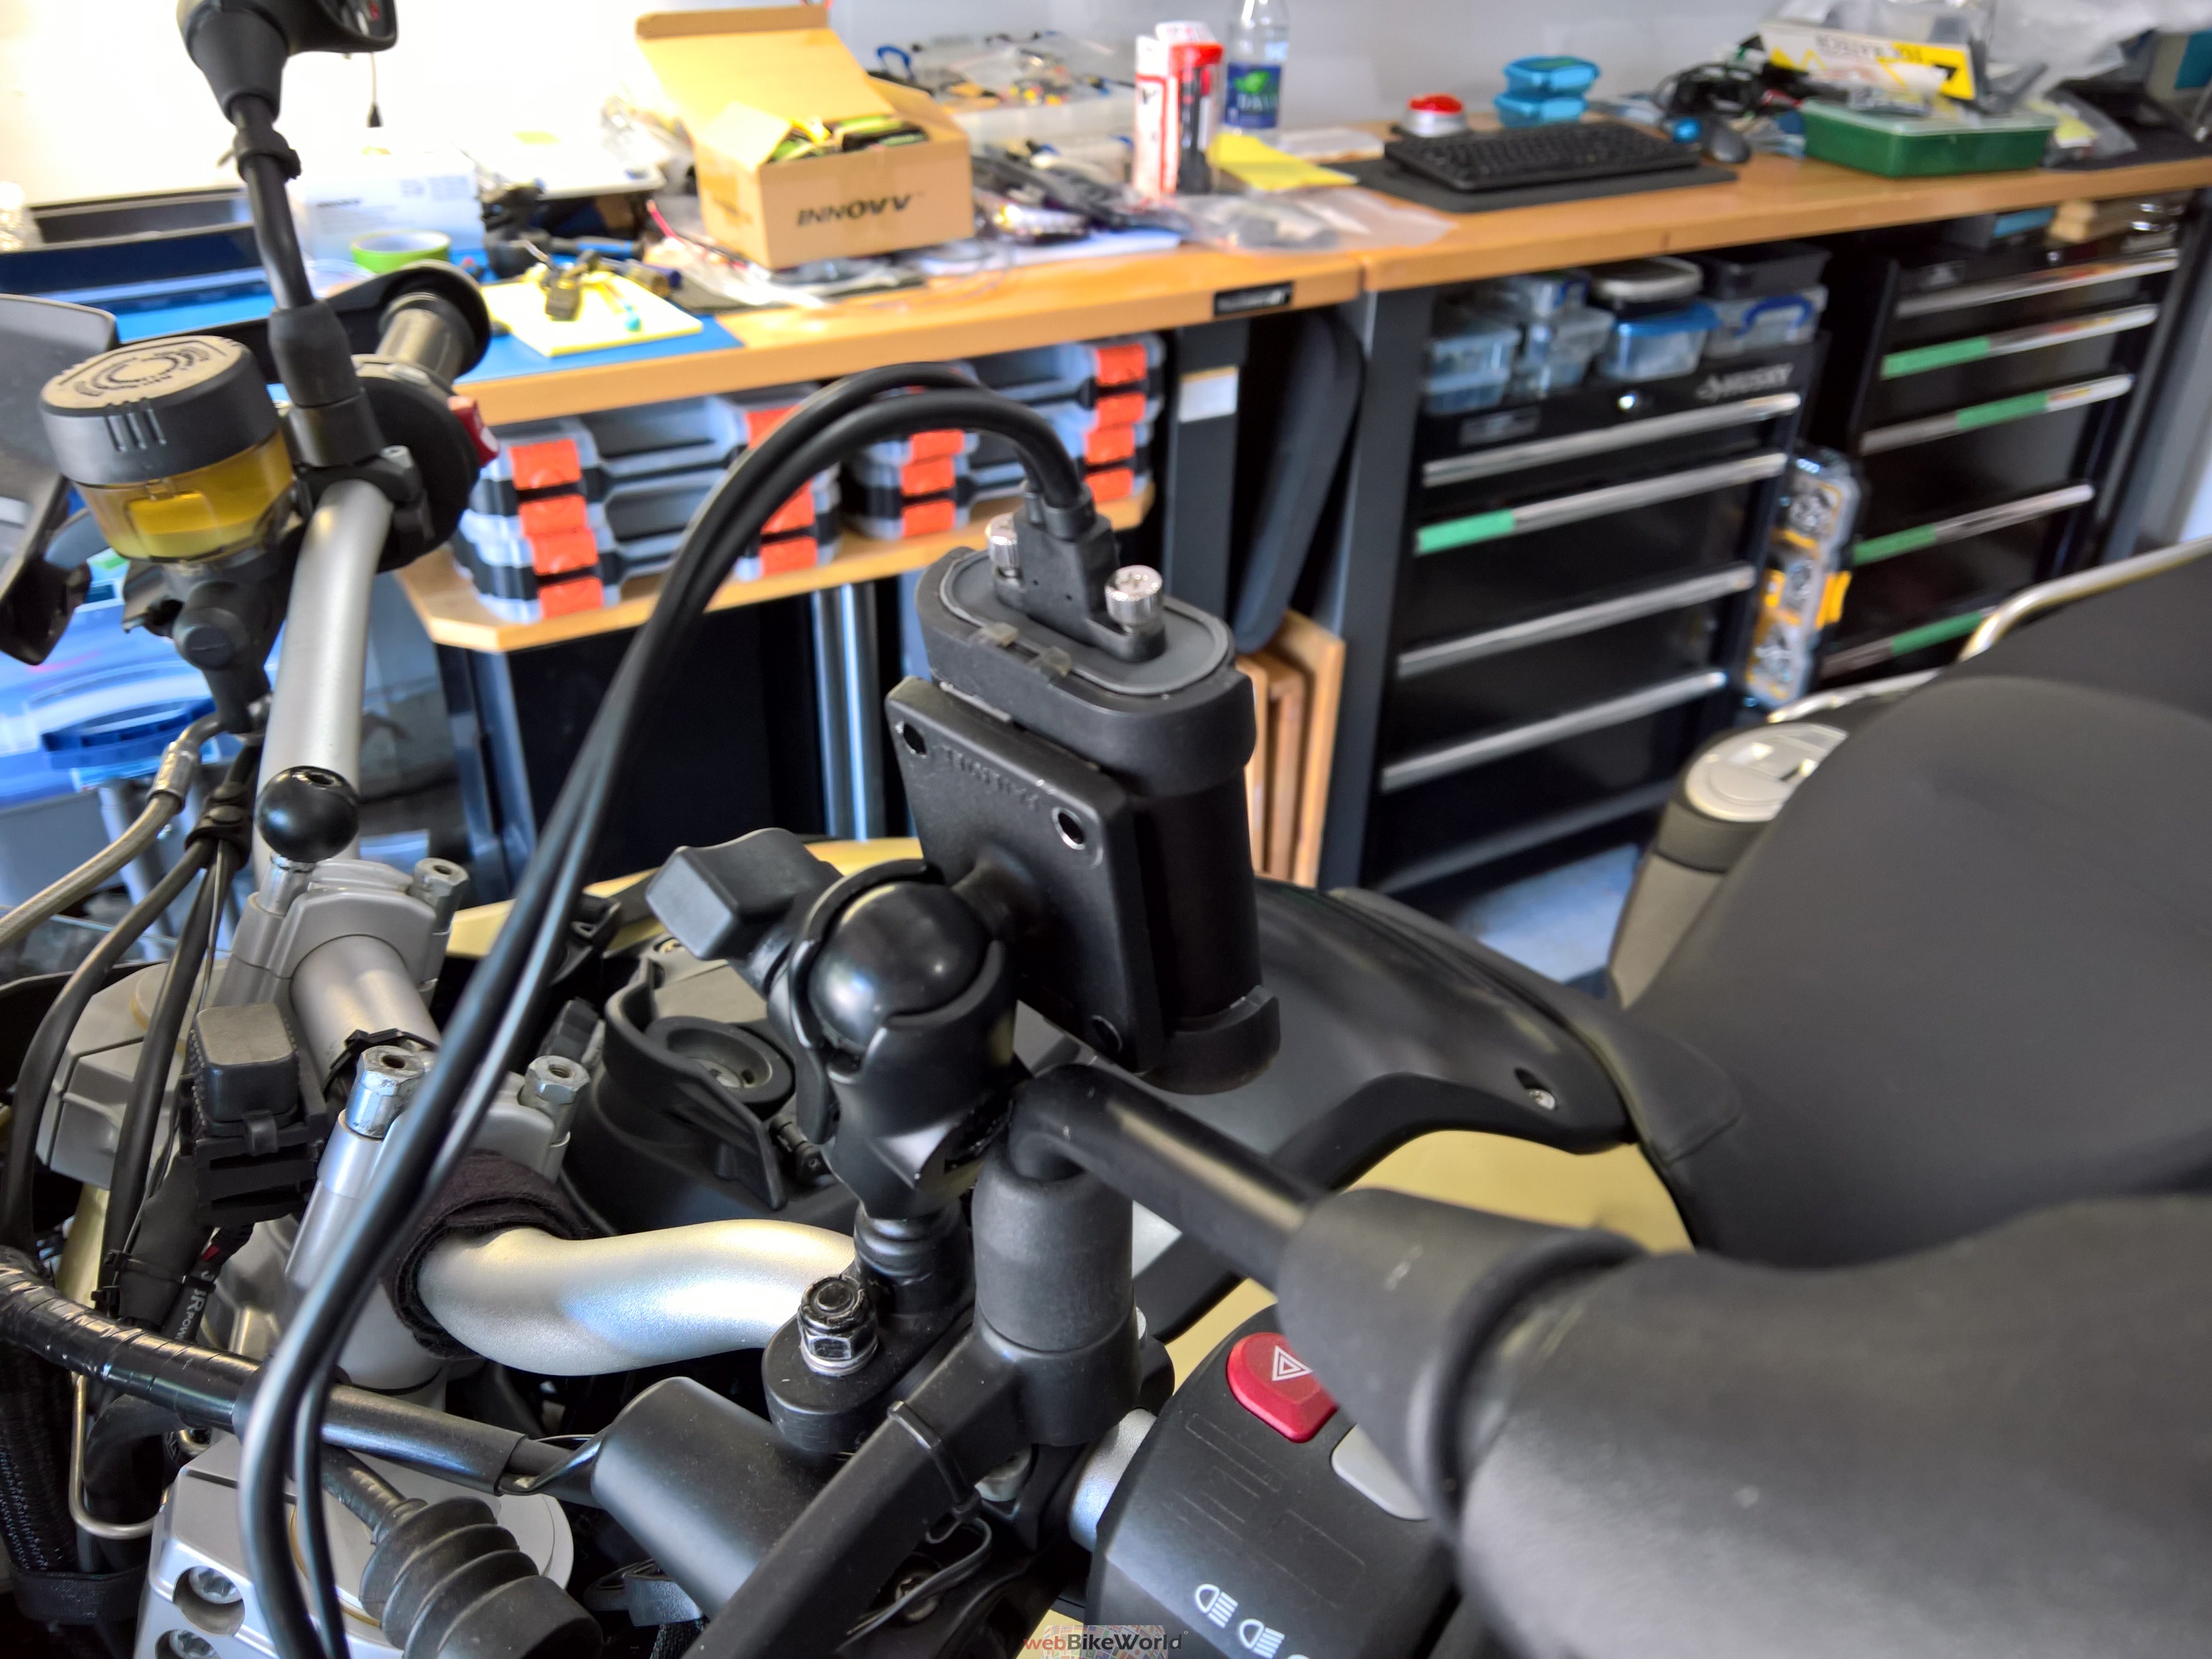
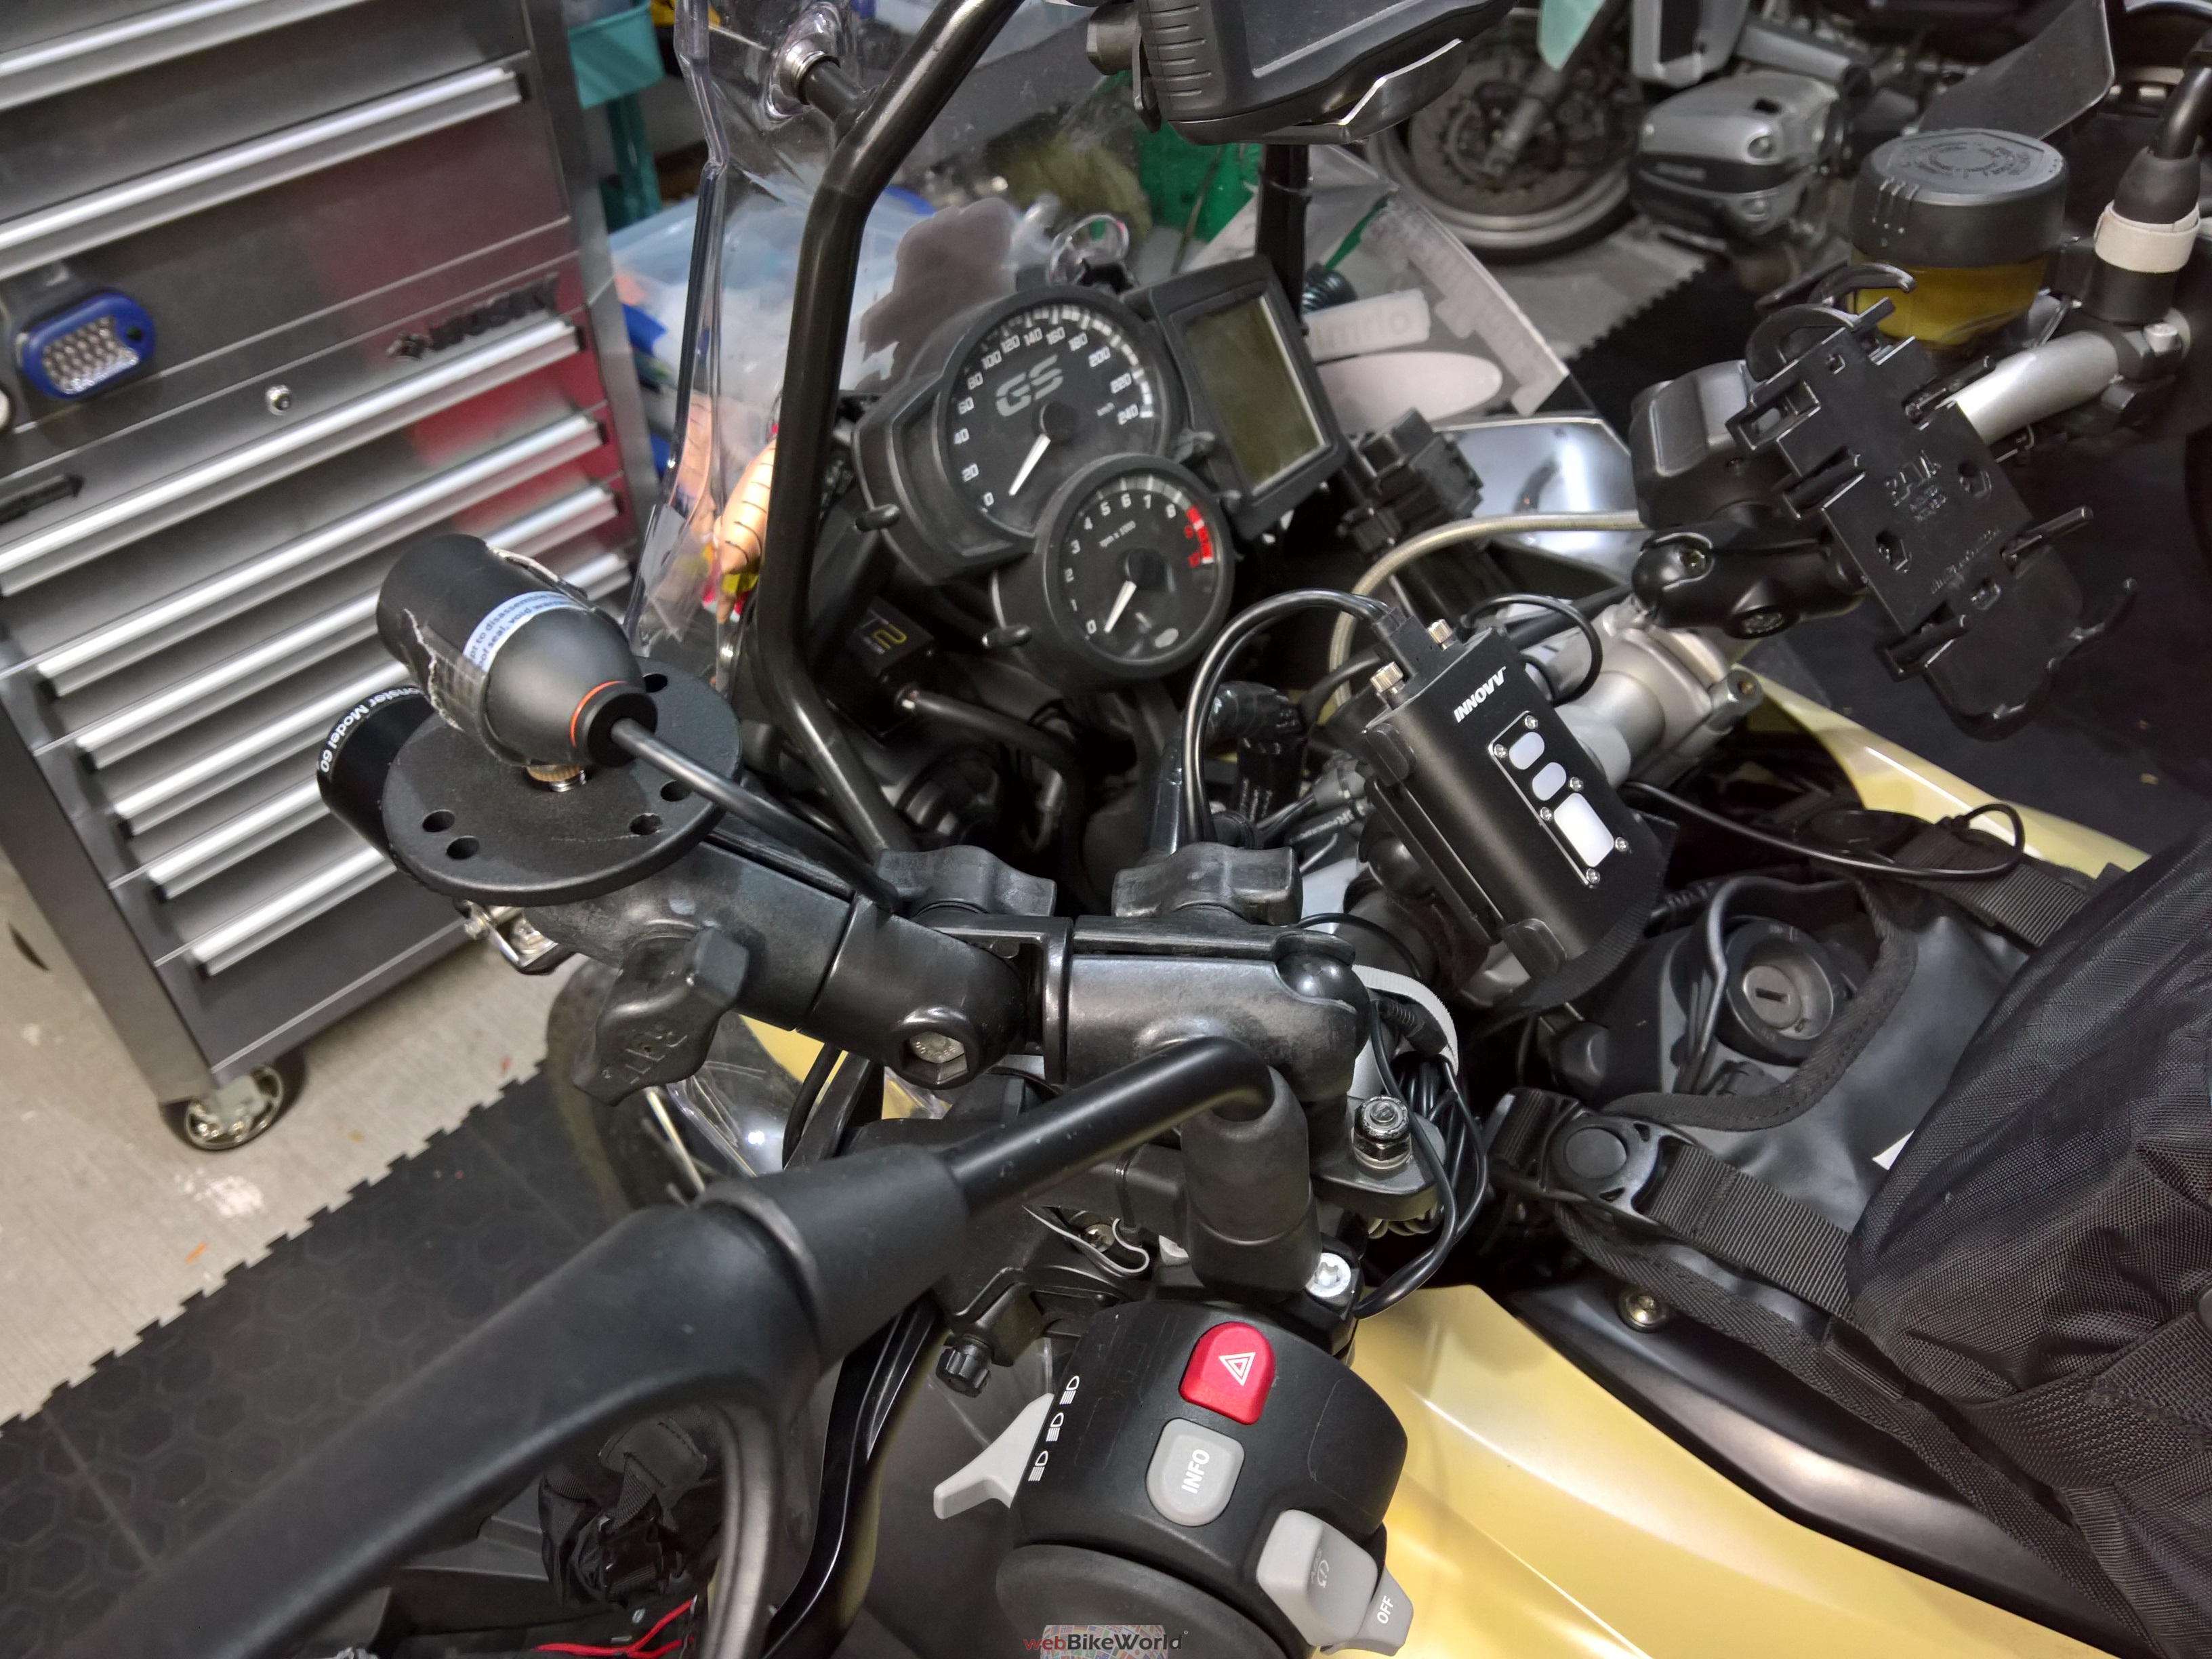
C5 DVR Module :
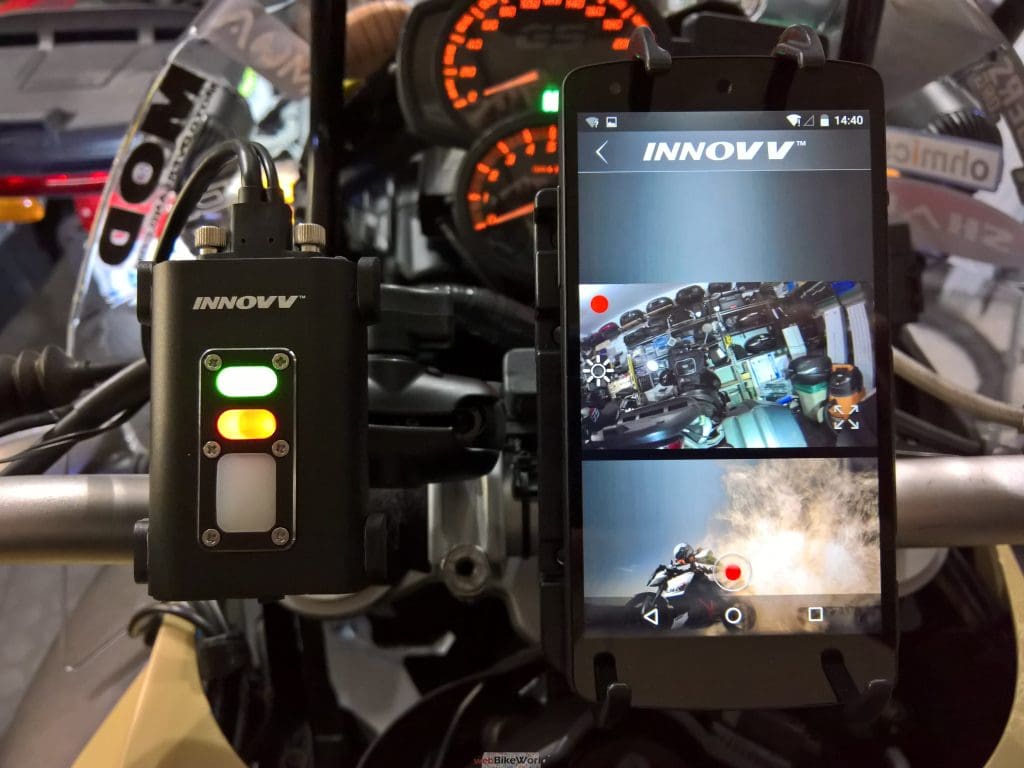
DVR module in clip mount and RAM-B bracket
The module may eventually find a home in the small crowded under-deck area behind the full-length seat – the leads are certainly long enough to accommodate this front to back installation.
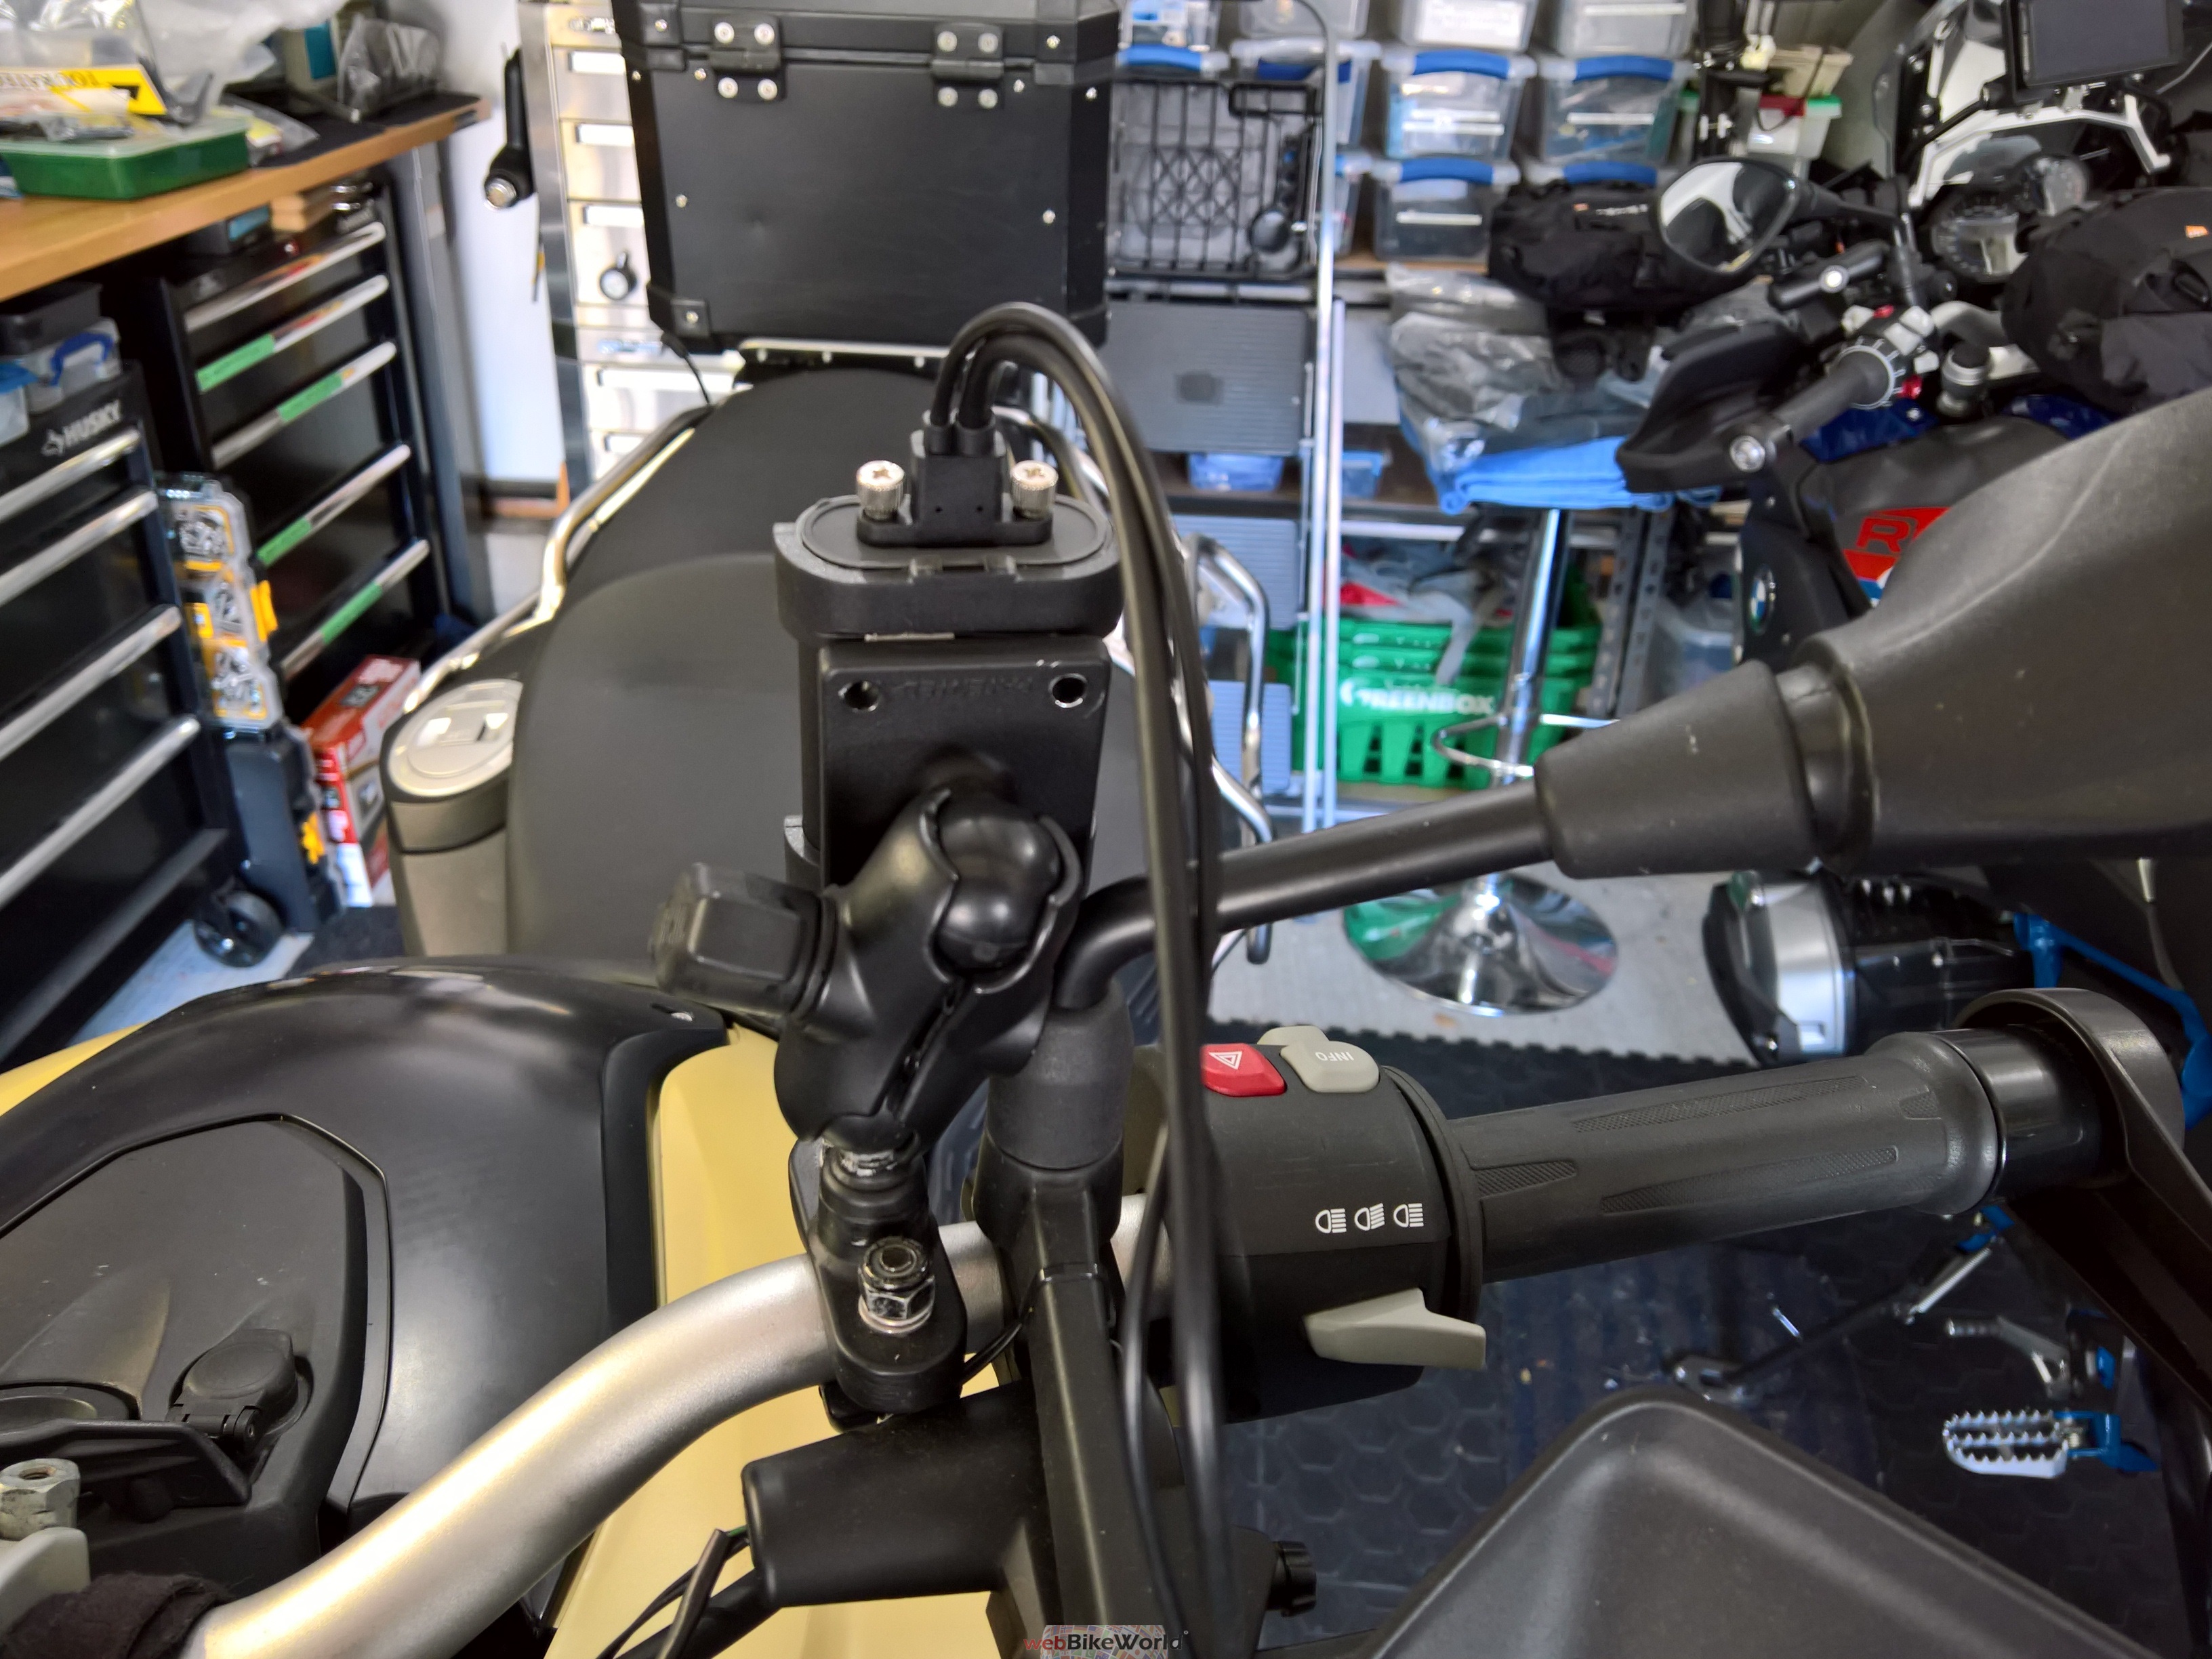
But in wanting to test the C5’s ability to withstand environmental conditions directly and allow direct access to C5 DVR module controls, initial fitment of the module is on the more exposed left handlebar area.
The module is secured using a RAM-B handlebar clamp base (PN RAM-B-367U) installed on the upper left 8mm handlebar clamp mounting point, while a RAM-B rectangular AMPS plate mount (PN RAM-B-347U) is stuck to the back of the Innovv mounting bracket with 3M adhesive.
A short 1.75in RAM-B arm (PN RAM-B-201U-A) mates the two RAM-B ball mounts together to provide lots of positioning flexibility; RAM medium or three-way flex arms also work well.
The power harness exits the front left of the top panel and runs along the left side of the steering head along with all the other cables and harnesses that make their way to the left side of the handlebar.
As located, easy and safe left-hand access to the DVR module is provided along with a good visual line, although the hard to see LEDs don’t provide much in the way of visual communications
Other Configurations :
If a fixed location is not desired or viable, the C5’s modularity and harness lengths provide lots of flexibility when looking for optimum lens and module placement and the most secure platform for a specific application.
The 0.25in (20P) threaded insert used with the lens holder is the near-universally accepted standard for camera mounting systems – many of which wBW has reviewed over the years and the use of RAM products just make things easier as well.
Bottom line – the Innovv C5 lens and holder combination can be affixed to almost any compatible mounting system, although users need to make sure the mounting location provides a stable platform for the lens allowing optimal video recording.
Innovv C5 Smart Device App Basics
Main App screen with menu
The Innovv C5 mobile WiFi app for Android (v5.1+) and iOS (v8.3+) is downloadable directly using the QR codes on the website or by searching for and installing the app directly from the Google Play Store or the App Store for iOS devices.
As is often seen, there are layout differences between the two platform versions, displayed on the (aging) Nexus 5 and the iPAD 4 Mini, but overall, look, feel and function is consistent; the team is also working on noted disparities.
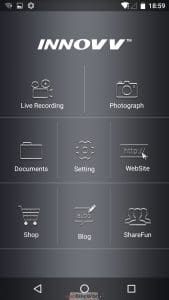
Once launched, two of the usual welcoming splash screens are presented, followed by the main interaction screen with eight active menu selections or tiles: LivingRecord; Photograph; Document; Setting; WebSite; Shop; Blog; and, ShareFun.
With the network connection made, exploring the tiles and their features is time well spent. I found the Record, Photograph and Settings selections got the most use overall; other menus provide further exploitation of the system’s capabilities.
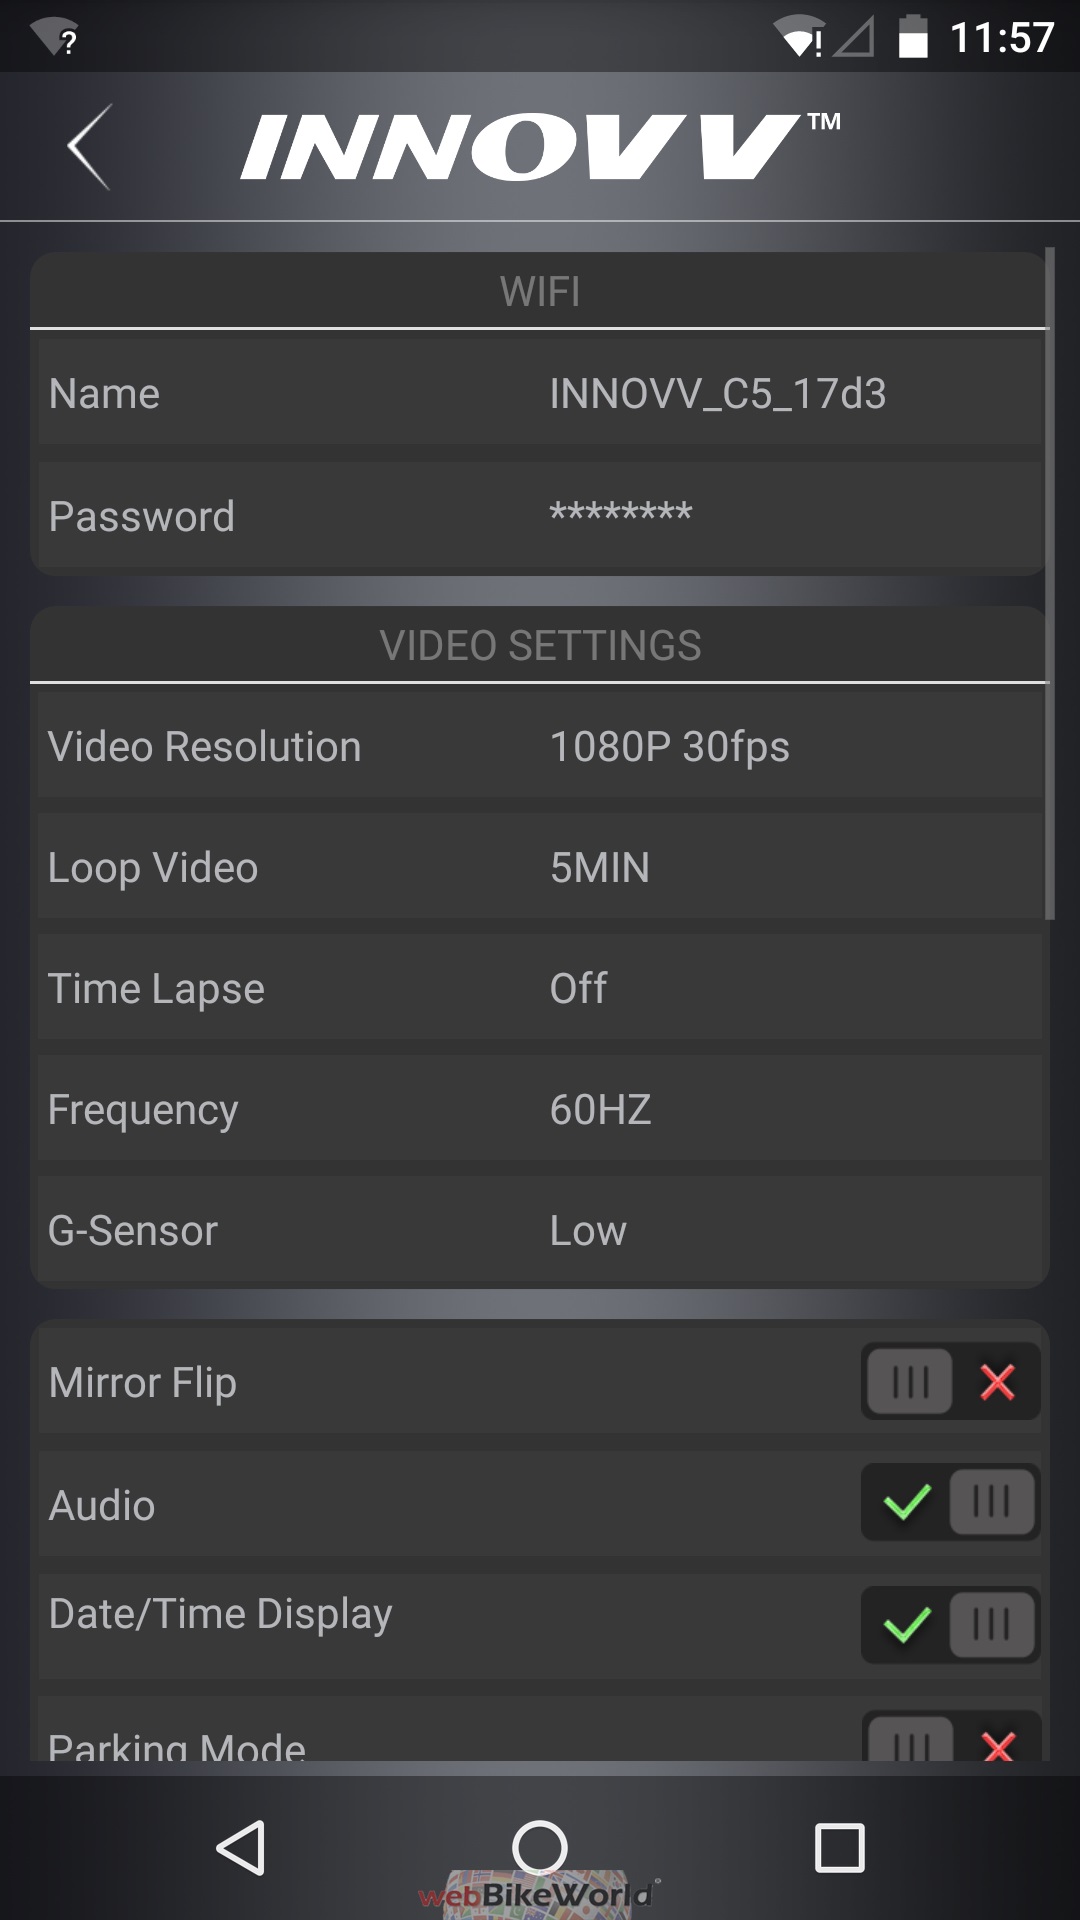
Available C5 System Settings
And before plunging into actual use of the C5 camera system, a listing of settings is provided:
Resolution settings – 1080p & 720p @60fps; 720p @ 30fps; file type is ‘TS’
Loop Recording = Off, 1min, 3 min, 5min or 10min; Time Lapse – Off, 100/200/500ms
Frequency – 50Hz/60Hz (set to regional power frequency, eg – 60Hz for NA)
G-Sensor – Off, Low, Mid, High
Delay Off = 30s, Off, 10s & 20s
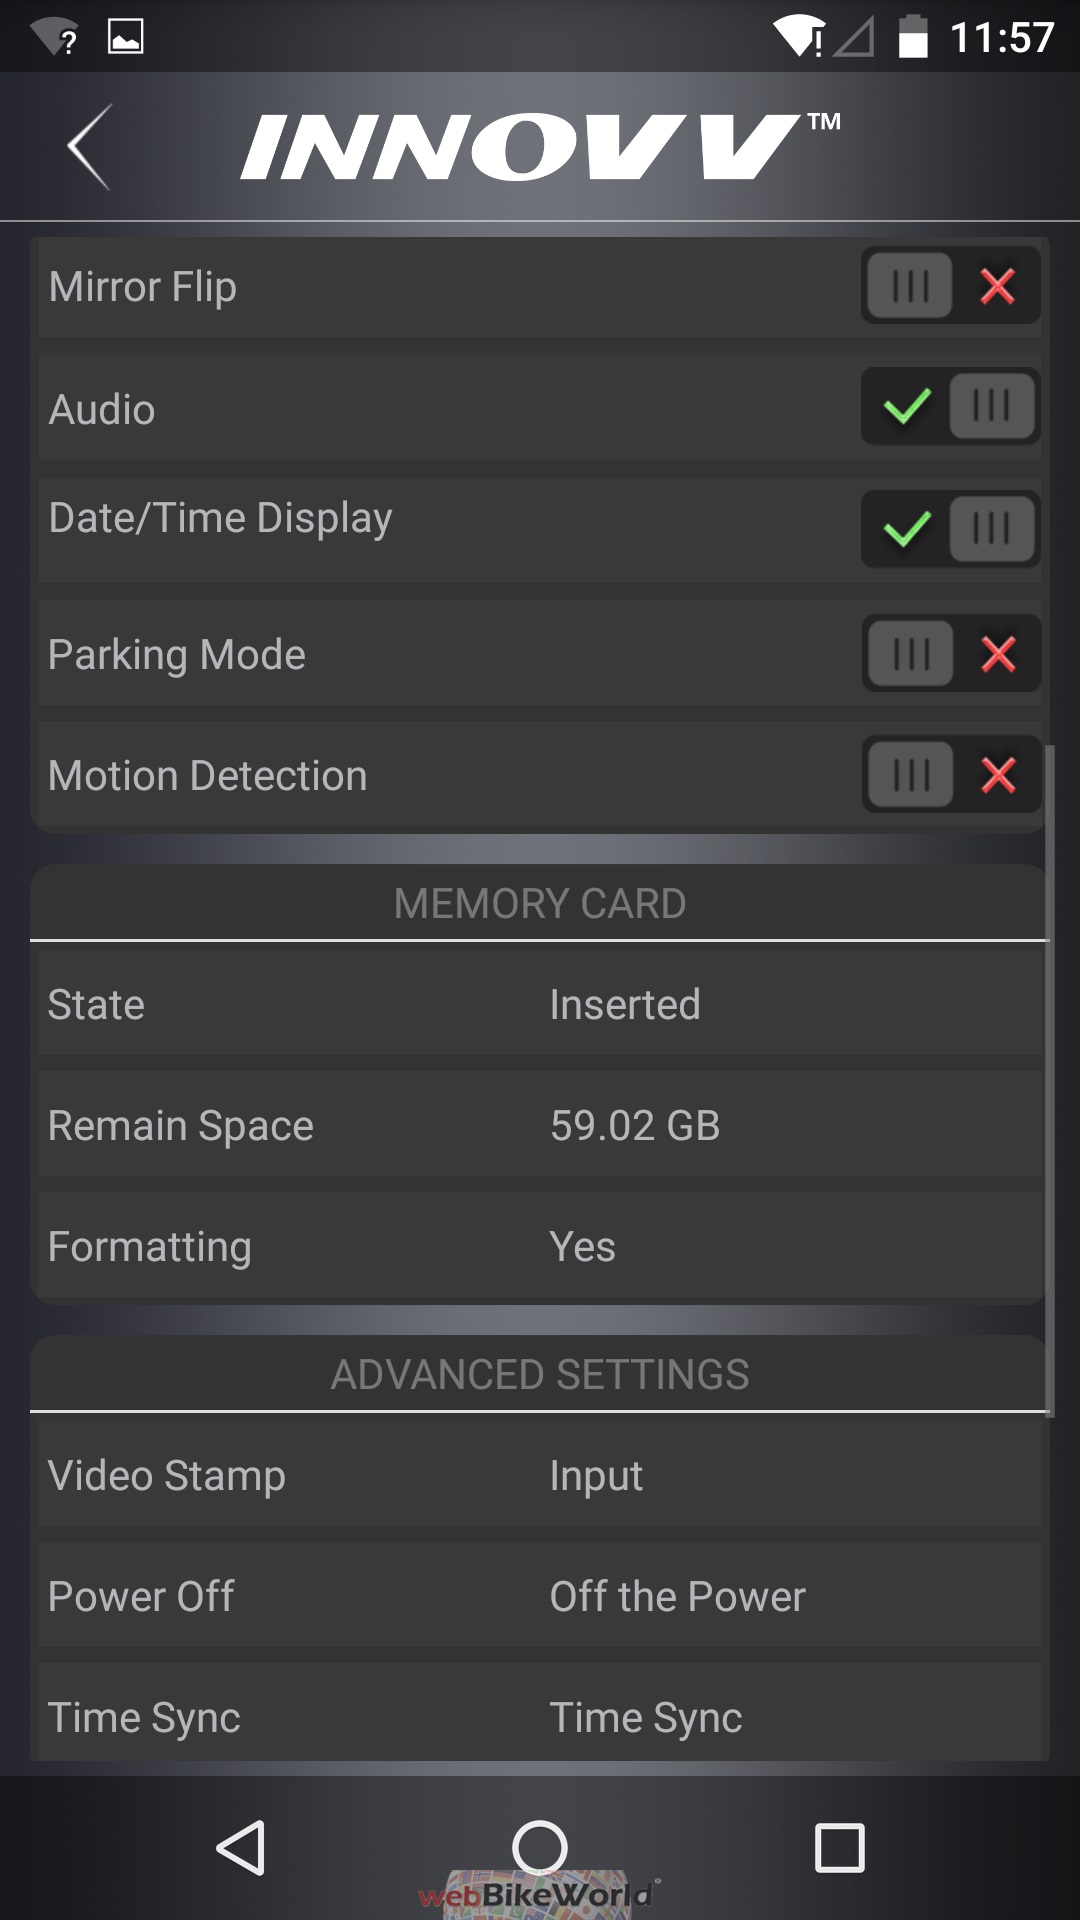
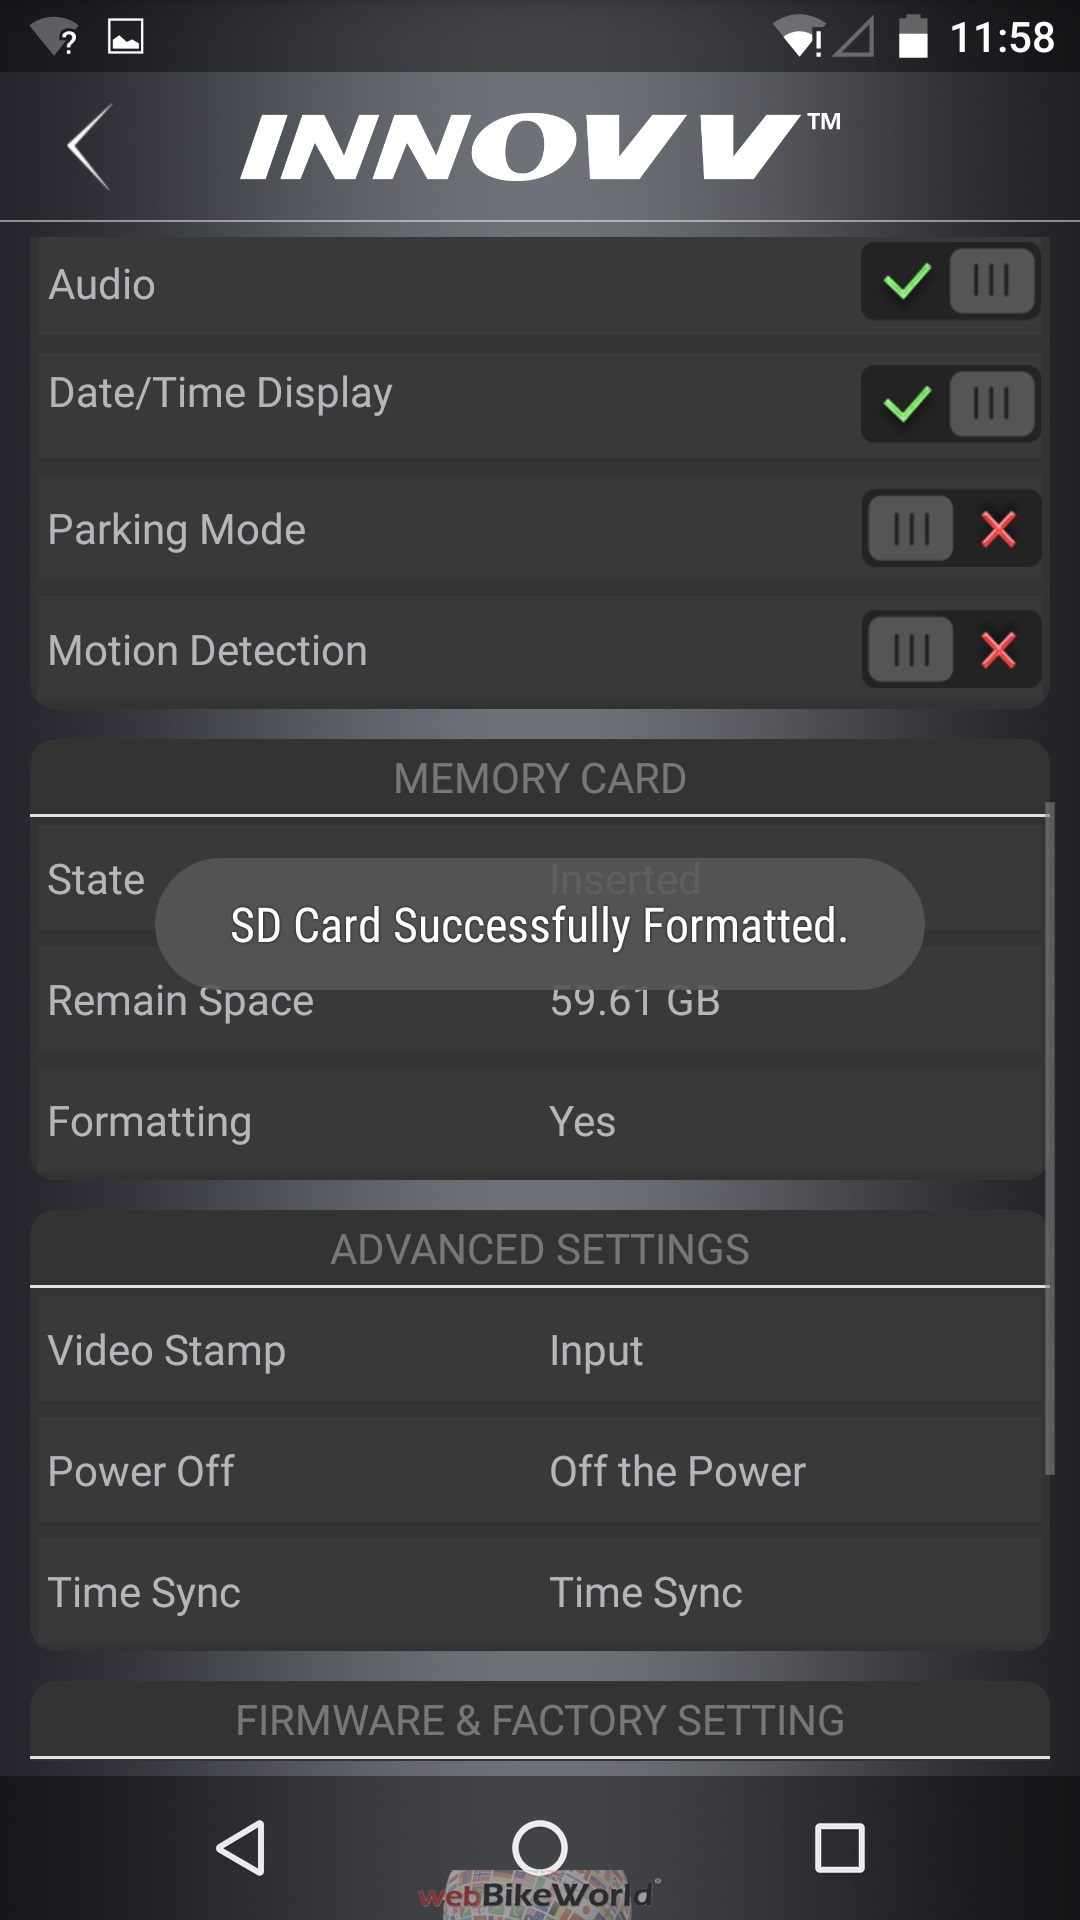
On/Off settings for Video Flip, Audio, Date & Time, Parking Mode and Motion Detection
Memory Card State = Inserted or Empty
Memory Card Remaining Space = available card space
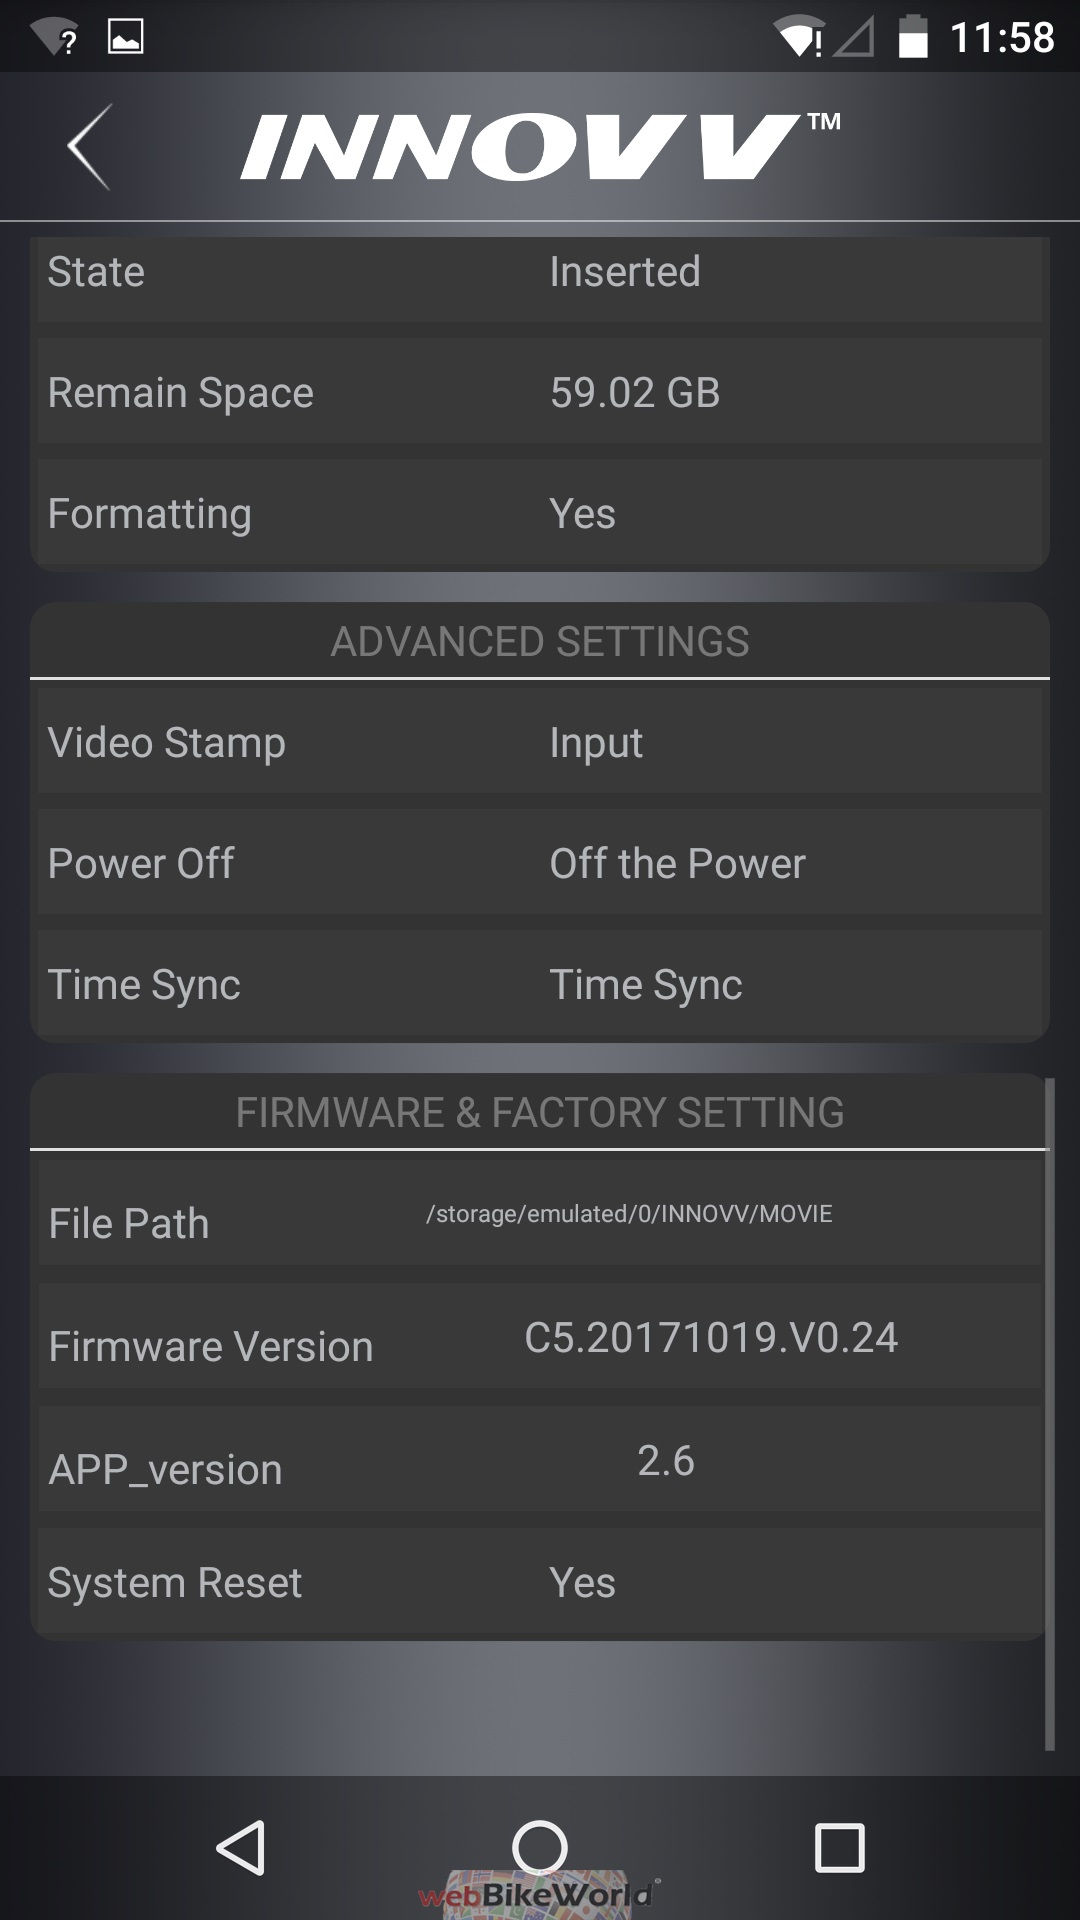
Memory Card Formatting = Yes
Video Stamp = Click to input
Time Sync = sync camera with the network connected device
File Path = default or set path for storage on the network connected device
Version Info for Firmware and App Version
System Reset = reset to factory settings
Innovv C5 Function and Performance
For initial testing, a 32GB SanDisk Class 10 HC-1 SanDisk microSD card is inserted into the slot on the bottom of the camera (orientation per the etched diagram); not the optimal media, but used for initializing the system.
Other microSD media used included higher spec (UHS-1 and 2) 64GB and 128GB AData media, a SanDisk Extreme UHS-3, 90/60 Read/Write MB/s and a Samsung 64GB EVO piece, which provided the best Read/Write specs we could find in locally available media (sigh).
When the C5 system is on and the network functioning, the main app screen will go live, after the two opening splash screens of course.
Select the Settings (Gear Wheel icon) for an initial tour and configure the C5 for the preferred settings – don’t forget to prep (format) the media if needed.
Media Prep :
Formatting of SD media done
If no microSD card is present the Red LED flashes 3 times per second as an alert signal.
With media inserted, formatting is done automatically (indicated by the Red LED going out and then turning on again) or manually using the app in the ‘Settings’ section – a confirmatory message is displayed once the media is ready; the system reboots as well.
System Integrity :
We must stress the need to make sure the bottom silicone cover is fully seated – it is a critical component in maintaining environmental integrity of the module…
Although one immediately realizes that using the external microphone or micro-USB connections negate any effectiveness of the silicone cover.
Startup :
With the ignition turned on and a ten second wait, the C5 boots up and subsequently enter its default video recording mode indicated by the Red LED flashing once per second.
A push of this middle (Red LED) button stops or starts video recording (the Red LED goes steady or flashes once per second respectively). Manual start-up of the system is done by pressing the Red LED button for three to four seconds to turn the device On or Off.
WiFi Connectivity :
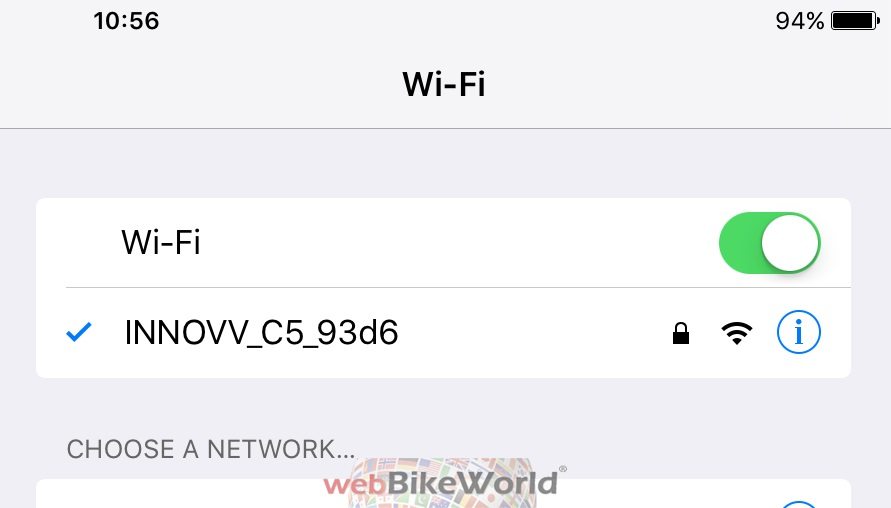
WiFi Network Identification on iOS
With the smart device ready to go and its WiFi on and in search mode (if needed), make sure the C5 is on and its Green LED flashing indicating that it is ready to be connected.
After a few seconds the ‘INNOVV_C5_93D6’ (or similar listing) appears on the device’s network listing – select and connect to this network. If required, enter the default password (PW) of ‘12345678’
Once networked, the Green LED on the C5 module goes to a steady on state. If the connection is shut down or lost, the Green LED flashes slowly indicating standby mode.
WiFi Connected and Ready
Functional Indicators :
As configured using the App, turning on the ignition or manually powering up the C5 will have everything automatically started, although I found that the network connection typically needs to be manually re-established from session to session.
This isn’t a bad thing really, especially if the paired device has a default connection for data or internet access, something the INNOVV connection doesn’t provide.
And as mentioned earlier, in anything other than low light or when under cover the LED indicators are virtually impossible to see – this is the same observation we made regarding the LEDs on the K1 dual channel system remote control module…
This issue may not seem critical when the C5 module is tucked away somewhere out of sight and networked to a mounted smart device used for ongoing management purposes and video viewing.
But if the module is mounted externally, as on the F800GSAdv to allow direct manual control rather than via the paired device and app, the (very) hard to see visual indicators are a real concern.
Recording :
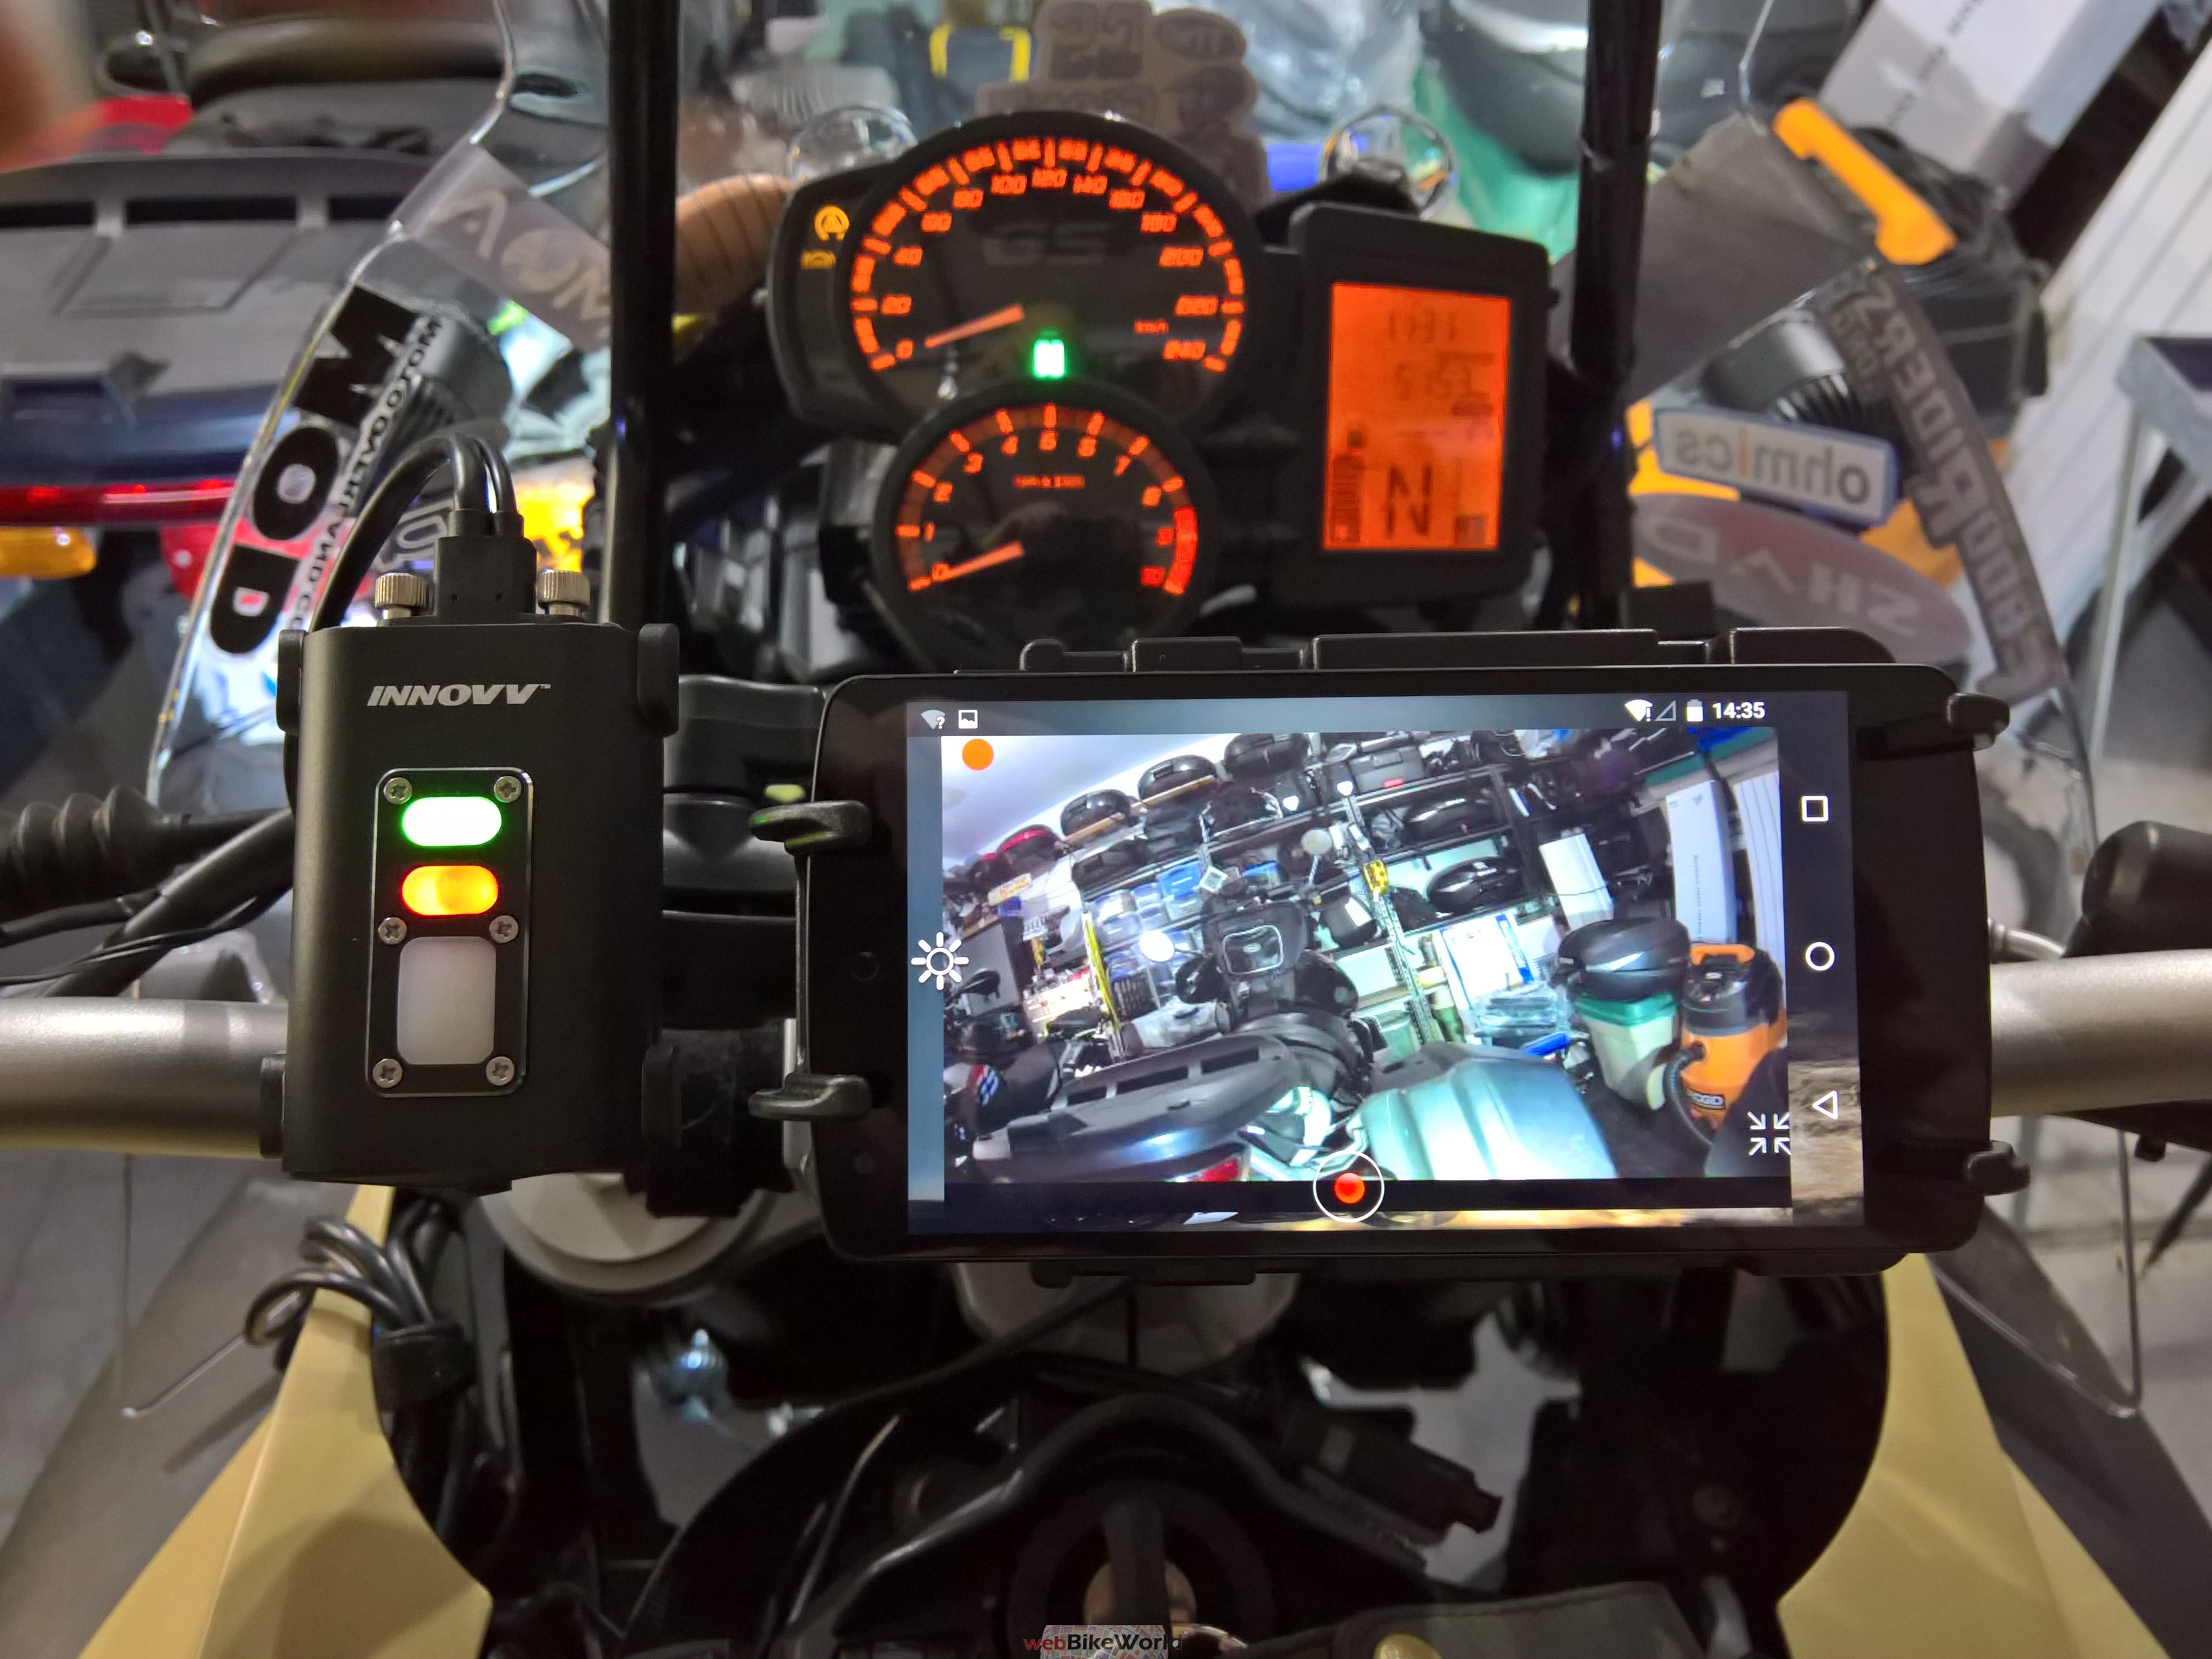
Live View during Recording
Press the centre Red button; from the app, press the upper left Video Camera icon to enter the recording section and then the Red square icon on the lower split screen.
If the upper screen’s single Red dot and/or the Red LED on the C5 is flashing, video is being recorded (default mode on start-up).
To stop recording, press the app’s small red square screen icon once or the Red button on the module – after two seconds the red square icon and the Red LED on the DVR module go solid. Press the icon or module control again to stop recording.
Audio :
Single channel (mono) audio is recorded if set to ‘On’ under the app. As could be expected the internal microphone is less than stellar – its port is under the bottom end silicone flap, although typical machine and road noises can be distinguished depending on conditions.
The external microphone provides more dynamic encompassing audio, especially if located in the cockpit area or inside the helmet allowing a travel monologue of sorts, which is what I typically use it for.
As noted by other users and acknowledged by the C5 team lead, the external microphone can be useful, but it also creates a lot of noise although most of it doesn’t end up on the audio track. And don’t forget that using the external port removes any integrity of the bottom seal.
Photograph :
Selecting the upper right Camera icon provides the means to take individual photos (per settings). When a photograph is taken a ‘processing’ pop=up appears on the screen while the module’s Red LED flashes three times, then reverts to solid Red.
Adjustments :
The app provides some dynamic adjustment features not available when using the basic DVR controls.
The left side ‘sunshine’ icon, when tapped allows exposure adjustments – a feature that can be used to good advantage for better video depending on conditions; it pays to play and compare video done between the default and slider settings.
Nevertheless, it is a cool feature that can be done dynamically by tapping and adjusting the on-screen slider – just do it when stopped though…
I did find though that after changing video modes or initiating a new session that the slider settings had to be (often) reset to the desired level.
Full screen (landscape) and split screen (portrait) modes are toggled by pressing the ‘Arrows Out or ‘Arrows-In’ icon (they reverse depending on the mode).
Depending on where the paired smart device is mounted or carried, the app, in accordance with the device’s sensors and settings, tends to flip between the two modes; it often seems to be at random rather than due to any severe change in motorcycle or rider angle.
The upper left ‘Back’ button is the usual < icon. And if turned on under the settings, motion detection and parking modes are indicated by the running figure and dark encircled ‘P’ icons respectively.
Motion Detection Mode :
If enabled, this recording mode is indicated by a figure in motion icon on the app screen. If motion is detected when the motorcycle is parked, the device turns itself on powered by the internal battery and begins recording.
This activity is indicated by the Power/Record LED flashing. After ten (10) seconds, the recording session stops, and the data saved to the EMR folder on the media. Then the system powers down, unless motion is again detected.
Parking Mode :
If enabled, a dark encircled ‘P’ icon indicates this mode is active. As with the motion detection mode, the internal battery is utilized to record impact events to provide a fail-safe recording capability.
If activated the device will record one (1) minute segments of each triggering event, saving the data off to the EMR folder. Then the system powers down until another event is detected.
Due to a combination of factors, some related to the host motorcycle and some that could (possibly) be attributed to the C5, I found that any of the G-Sensor settings can result in multiple 12 or 60 seconds video clips in the EMR folder.
These parallel actions don’t inhibit creation of the normal recordings overall although they do demand more of the system’s resources including storage space. Accordingly, users may want to determine the optimum setting (Off, Low, Mid or High) for their use.
Protected Recordings :
If Motion Detection Mode or Parking Mode recordings are made, the files are saved off as ‘protected files’ in the EMR folder on the media – but ONLY if external power is not active.
If external power is active when either motion detection or parking mode video is generated and subsequently stored in the EMR folder, the user must move or copy the files to another storage location to preserve them.
I review and move the EMR folder files regularly, along with regular loop video that might be of ‘interest’. Traffic related video and photos from installed K1 and C5 systems have proven valuable to us and others.
Dynamic C5 Control :
While the C5 is more than happy to work in its default mode, much like how the K1 Dual Channels systems are used, the C5’s WiFi and app provide dynamic interaction with the C5 system.
And to repeat, interacting with the C5 system needs to be done in a safe and responsible manner…distracted riding is distracted riding!
Reviewing Media :
Select the ‘Document’ icon (centre left) to review video and photos – individual files from the device or from an attached storage venue are selectable for playback, step-through review, download/transfer or deletion.
Firmware Updates :
The process isn’t totally intuitive, but if you have updated other products similar to the Innovv devices the process can be stepped through with a bit of due diligence.
I tried to update the C5 with an earlier firmware release provided, but it never worked. But after getting a direct Dropbox link the latest build (FW v0.24) is downloaded and the .BIN file extracted.
After clearing all files and folders off the micro-SD in use, the firmware file is copied from the PC folder to the ROOT directory of the media using the micro-USB connection – leave the module connected to the PC.
Turn the C5 system Off and then On, using the Red LED control – the LED flashes once then goes into a first and then a second sequence of rapid three time per second pulses indicating that updating is taking place.
When finished, the Red LED flashes once then goes solid Red – this step is done. Reboot the module using the front power control or, alternatively reconnect the module to the USB-C harness and with the C5 activated make the network connection to a paired device.
Launch the Innovv app and select Settings and scroll down to the bottom of the page to verify that the latest update is installed. All previous settings should be retained, but it never hurts to verify things…
Innovv C5 Pros
Innovv C5 Cons
Sealed, ruggedized, IP68 rated lens
Lens holder fragile – now redesigned
Simple lightweight lens holder
Silicon seal on bottom impacts integrity
Ruggedized, aluminum, IP65 rated module
External microphone port negates integrity
Weatherproof 12/5V DC power supply
Control LEDs hard to see
Waterproof main harness and connectors
App is very useful, detailed, but still quirky
USB-C interface for high data rate support
Motion/Parking Mode activation sensitivities
Lighting (exposure) control is cool tool
…need to find Ultra-fast media…
External microphone works quite well
Ultra-fast media up to 128GB supported
Excellent reliability regarding components
Conclusion
Based on its product line, conversations with fellow riders and forum threads it seems Innovv is gaining traction in the market space with a short list of focus products providing features, performance and value.
From the past up to the present our experience with the Innovv K1 Dual Channel Camera systems, 12V/5V DC Adapters, Power Hub1 brick, various USB products and now the Innovv C5 remains positive.
Comparatively in reviewing K1 and C5 video, the C5 output seems sharper with better colour balance over a wide range of conditions and we can’t forget the dynamic exposure feature.
Both the K1 and C5 provide very good to excellent low-light video but again the C5 seems to take the lead here as well – perceptively sharper when viewed on a larger screen with better detail definition.
What we have found though, unlike the K1 lens modules that seem to provide great video no matter what or where they are mounted, is that the lightweight C5 lens and holder perform best when given a very good stable platform, especially for varying terrain and riding conditions.
The BMW F800GSA with its light weight and sensitive long-travel suspension didn’t prove to be the best high-speed platform for the C5 although using a good isolation-style mount provided better results than in just using the kit pieces.
By contrast, on machines like the R1200GS Rallye with its long-travel Telelever based and ESA managed suspension, using both the kit pieces or more stable mounts rendered good to very good video even on rough roads and trails.
Two helmet-mounted configurations provided the best video – acknowledging the need for some wire management of course, with the WiFi link and live view feature proving their value every step of the way.
Bottom line – although not without issues, all identified above, our experience with the C5 single channel system indicates that it is all it claims to be – with the potential to satisfy a lot of users across a broad spectrum of applications.
And no, so far, we have not experienced the intermittent low temperature issues that we still get every year with the K1 systems when temperatures drop to 5C and below…
Finally, we know Innovv, particularly the C5 team, is listening to users and working to refine the C5 product.