Categories
BikeExif cafe racer Custom Motorcycles Other Motorcycle Blogs Yamaha motorcycles Yamaha SR500

Grey Power: Angry Lane’s Yamaha SR500 cafe racer

Grey Power: Angry Lane's Yamaha SR500 cafe racer
Hong Kong might be the eighth richest country in the world, but it’s most definitely not a mecca for custom bikes. This is the first build we’ve featured from the tiny city-state.

There are signs of change though, and one of the clearest signs is the rise of Angry Lane—a custom shop run by French brothers Guillaume and Ben Barras. In the 70s, their mother worked for the Paris fashion house Courrèges, and their father was a self-taught technician and mechanic. The perfect blend of skills for running a custom motorcycle business.

Grey Power: Angry Lane's Yamaha SR500 cafe racer
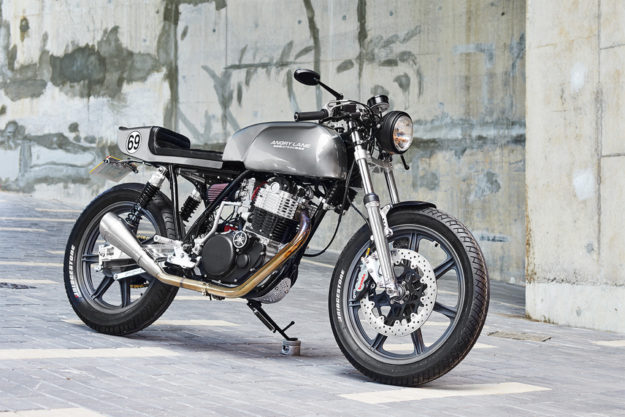
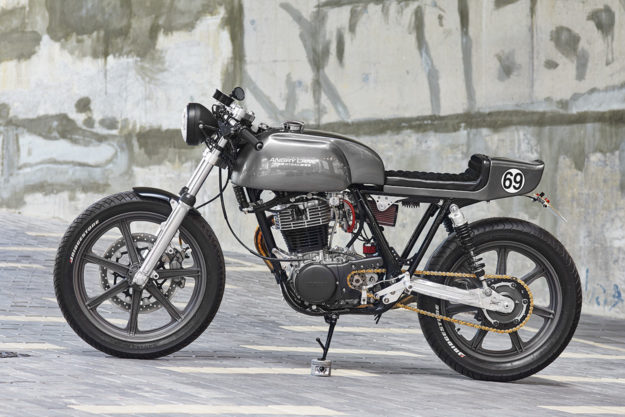
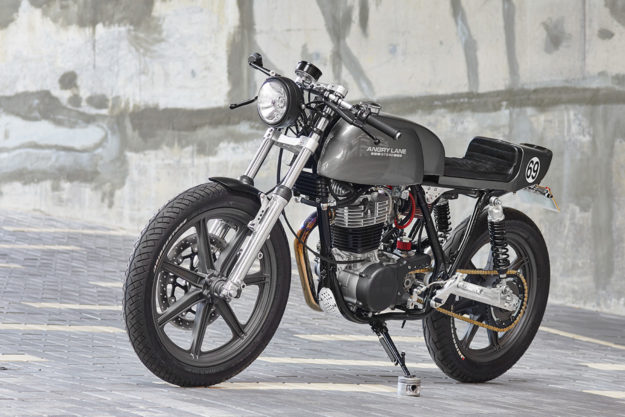
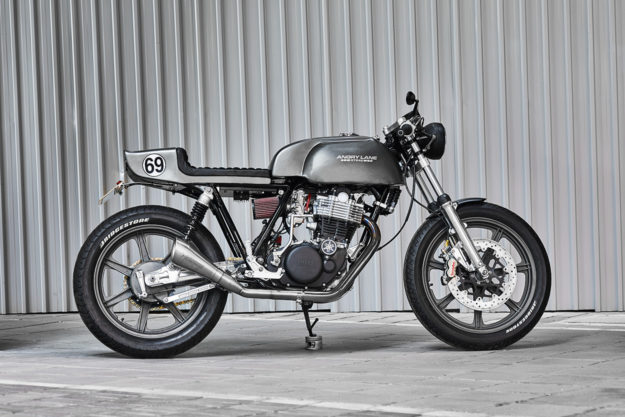
Angry Lane have built around 30 bikes so far, and this cool grey 1999 Yamaha SR500 suggests that those skills are being put to very good use indeed. “Our client wanted a 1960s race-style bike with a big tank and some muscle,” Guillaume tells us.

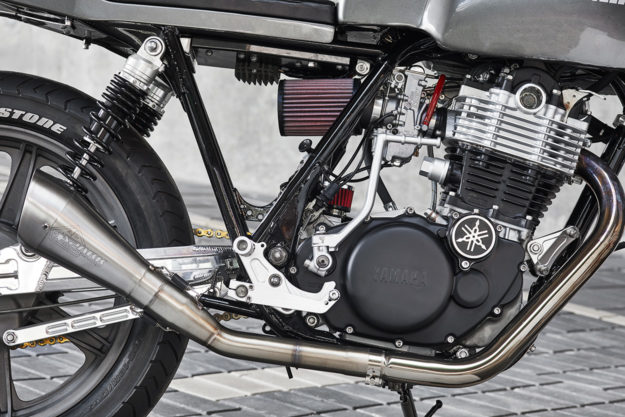
The standard SR500 is fairly perky around town, but it won’t tear your arms out of their sockets. So the brothers had the cylinder bored out by the German SR specialists Kedo, and installed a 90mm piston to boost capacity to 540cc.

Grey Power: Angry Lane's Yamaha SR500 cafe racer
Compression goes up from 9:1 to 10:1 and gases exit via a big bore header pipe leading to a classy Spark exhaust.

There’s also hotter cam, designed for mid-range power, plus Kibblewhite lightweight racing valve springs. A Mikuni TM40 carb and K&N filter complete the tuning package, and there’s a high-flow oil pump hooked up to racing lines to keep the engine cool in the humid subtropical climate. It’ll stay looking good too, thanks to a thin film ceramic coating in silver and black.

Grey Power: Angry Lane's Yamaha SR500 cafe racer
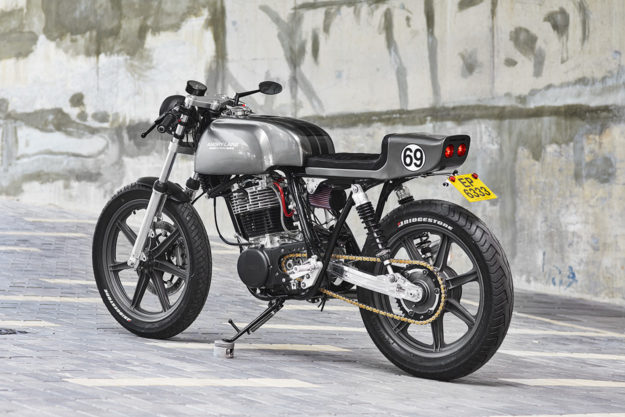
Angry Lane have wisely upgraded the suspension to handle the extra engine output, dropping a set of Wilbers springs into the fork tubes and installing a pair of modern YSS shocks out back. They’re hooked up to a race-spec swingarm.

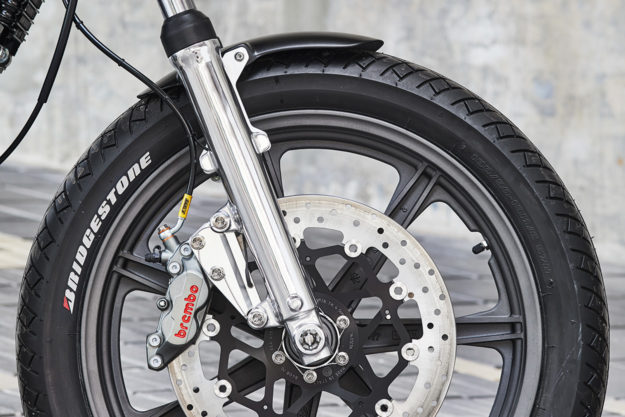
There’s a Brembo caliper and disc acting on the front wheel, supplied by Motorquality in Italy and fitted using a special spacer and caliper bracket from MotoLanna. Guillaume and Ben’s attention to detail is superlative—even the titanium screws are safety-wired.

Grey Power: Angry Lane's Yamaha SR500 cafe racer
The wheels are an eBay find: they’re original SR500 American model wheels, made from 1978 to 1981. Angry Lane have given them a ceramic coating too, but this time in a tungsten shade. They’re shod with sticky Bridgestone Battlax BT45 sport touring tires—no Firestones here.

The striking bodywork is all-new, with a Norton-style tank and a very neat custom aluminum tail unit, inspired by the classic Ford GT40. The simple black upholstery was tackled by Ben himself and the paint is automotive 2K, applied to the frame as well.

Grey Power: Angry Lane's Yamaha SR500 cafe racer
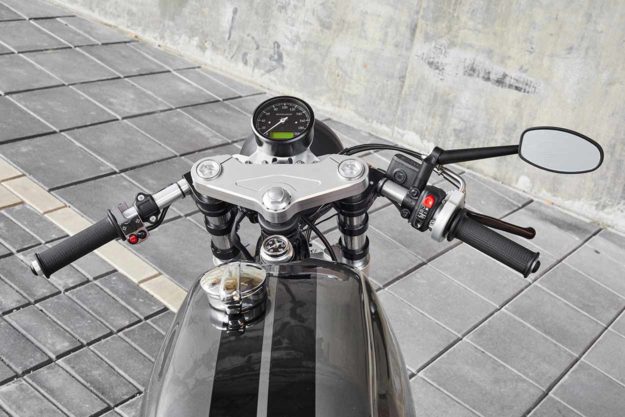
The rider grips LSL clip-ons, and there’s a quick action throttle for extra snap on acceleration. Other goodies include a Grimeca master cylinder, a new LSL headlight, and a speedo and blinkers from Motogadget.

Grey Power: Angry Lane's Yamaha SR500 cafe racer
Compact and fast, this SR500 looks perfect for blasting around Hong Kong Island. Because once you escape the downtown traffic jams, there are miles of smooth highways, twisting and turning through dense forests.

On a bike like this, it’d be pretty hard to feel angry after that Sunday morning ride, wouldn’t it?

Angry Lane | Facebook | Instagram | Images by Jason Bonello at Velocity Images

Grey Power: Angry Lane's Yamaha SR500 cafe racer

Categories
Cruising Other Motorcycle Blogs

2017 Triumph Thruxton Gallery

Bikes

Ten pictures of Triumph’s quintessential cafe racer

Ten pictures of Triumph’s quintessential 1200cc cafe racer, the 2017 Triumph Thruxton…
Categories
Builders Custom Motorcycles Customs Editorial Other Motorcycle Blogs

Urban Harley Street 750 In “Bad Luck” Green

Positioned as an ideal entry to the Harley-Davidson brand with minimalist Dark Custom styling and built for the urban environment, you don’t expect a custom Street painted in “bad luck” green. For Austrian builder NCT Motorcycles, the legend of the…

This is a content summary only. Click on headlines for full links, images, other content and more!

Categories
Moto Where Motorcycle Travel Other Motorcycle Blogs

Markham/ Scarborough ride

Click here to view this route

Tagged with: On Road, Twisty

Length: 22.90km / 14.31mi

View recent routes in:
Canada »
Ontario »
Toronto

View all routes from lucaseng5255

Categories
BikeExif cafe racer Custom Bikes of the Week Custom Motorcycles Other Motorcycle Blogs Yamaha motorcycles

Custom Bikes Of The Week: 30 July, 2017

The best cafe racers, scramblers and bobbers of the week
A Yamaha R6 with 70s-inspired bodywork, a Ducati Hypermotard converted into a Pikes Peak racebike, and a fire-breathing two-stroke Kawasaki triple with an extra pair of cylinders grafted on…

Kawasaki KH500 by Allen Millyard
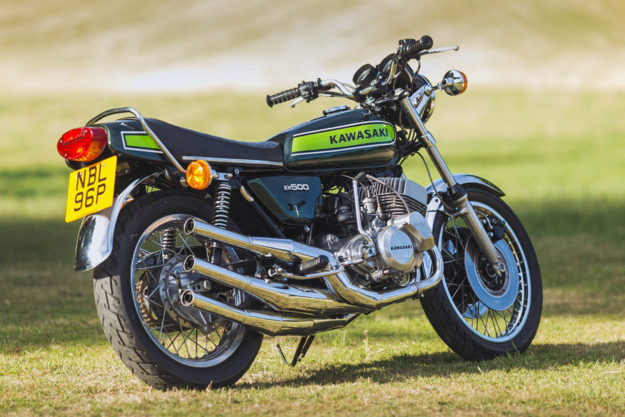
Kawasaki KH500 by Allen Millyard Allen Millyard is a special brand of engineer. He’s speed obsessed for sure, but he’s also known to sweat the design details that make a fast bike something to truly behold. His name may ring a bell thanks to the Viper V10-powered beast he built to attempt a 250 mph run, but this time around, Allen decided to chop the cylinder count in half—to a more modest five.

The KH500 you see here features all the terror of Kawasaki’s famed two-stroke triples with an extra pair of cylinders grafted on for good measure. That measure translates to around 109 hp at the rear wheel, and we can only imagine the struggle to keep the front wheel planted when the bees hit full buzz.

Kawasaki KH500 by Allen Millyard
The true beauty of this package lies in its sleeper status. Everything on the KH500 maintains those classic UJM looks. It’s really not until you examine things from side to side (or the rear) that the insanity is revealed. The owner of this example, Pip Davidson, has said he always wanted a garage full of two-strokes. Who’d have guessed he get that with one bike, though? [More]

Yamaha YZF-R6 by Vintage Addiction Crew
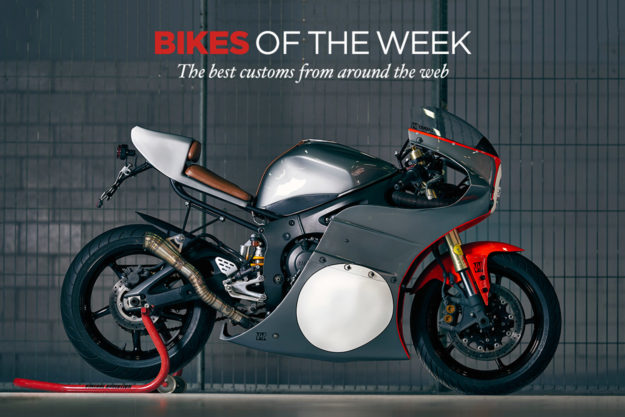
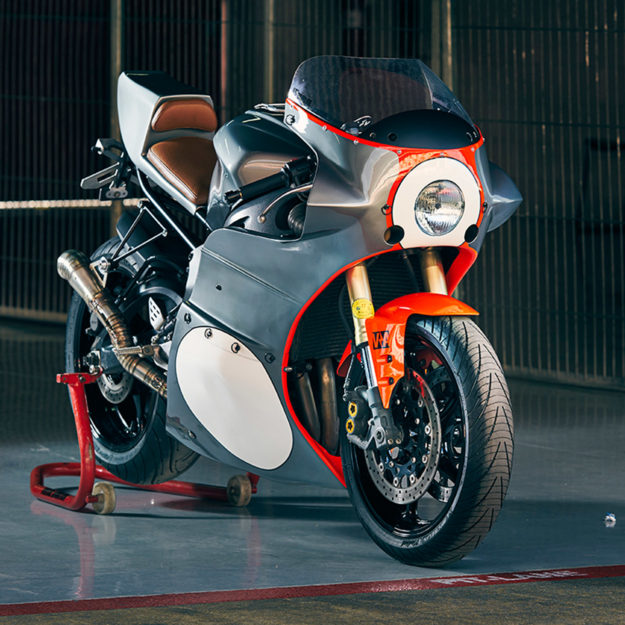
Yamaha YZF-R6 by Vintage Addiction Crew Last week we showed you what Barcelona’s Vintage Addiction Crew could do with a late model KTM EXC. That neo-retro tracker was undoubtedly cool—but this week we’ve discovered that Joe and the crew can do even better with a crotch rocket on the bench.

The rocket in question is a 2005 Yamaha R6 and VA have transformed it into one of the prettiest supersports I’ve seen in a long time. As with any fully-faired bike, much of the visual credit goes to the bodywork—and this set of 70’s inspired ‘plastics’ is spot on. To ensure a snug and slim fit, the VA Crew needed to rework the R6’s subframe. The new perch hides the battery and much of the electrics, and is capped by a perforated, brown leather seat complete with matching bump stop, that matches the tank’s new strap.

From a performance standpoint the R6 is already a fire breather but that didn’t mean things would go untouched. The airbox has been tossed and a new custom GP-style exhaust has been expertly pieced together to help this screamer wail like a banshee. [More]

Ducati Hypermotard Pikes Peak racer by Deus
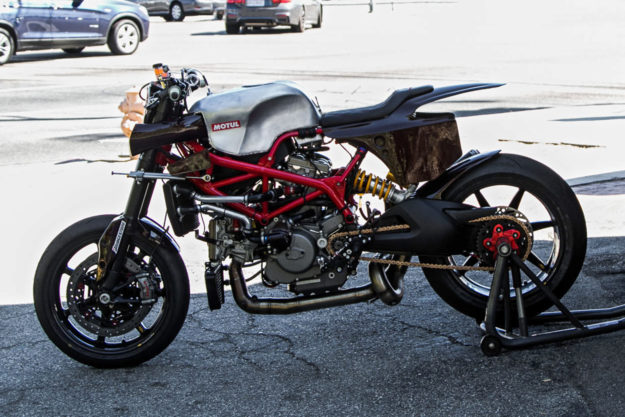
Ducati Hypermotard Pikes Peak racer by Deus It’s not often that we feature an unfinished product on these pixelated pages. But when Michael ‘Woolie’ Woolaway decides to build a Pikes Peak racer, even the R&D is exciting.

Working from a 2014 Ducati Hypermotard, Woolie has scrapped the stock, 95 hp L-Twin in favour of an 1198RS unit with 200 hp. He’s also put the SuMo on a diet. Nearly ninety pounds of excess have been trimmed from the Duc so it now tips the scales at a scant 347 pounds…wet. That translates to 1.7 lbs of machine for every pony to motivate up the mountain, which sounds just about right in our books.

Helping to keep the bike planted under full crack in the the thinner air and through each of the 156 turns, Woolie has grafted some carbon fibre winglets from a Formula 1 car onto the Duc’s trellis frame. And to make sure the motor doesn’t cough and wheeze in the upper stratosphere, custom ram-air intakes were formed in carbon fiber by Woolie’s mate Paul Taylor of Taylor Made Racing. With roughly eleven months of testing ahead, we expect a few changes to take place, but damnit if the House of Deus isn’t off to a rocking start. [More]

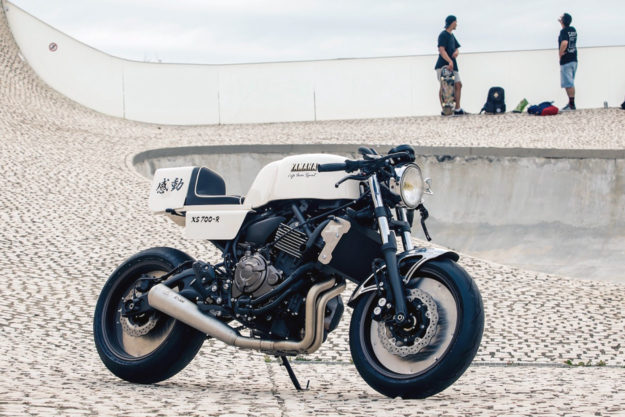
Yamaha XSR700 by Cafe Racer SSpirit
Yamaha XSR700 by Cafe Racer SSpirit Yamaha’s Yard Built program is one of the most exciting OEM backed initiatives we’ve come across. The sheer number and quality of builds is staggering and it’s shone a flattering light on the tuning fork brand’s lineup. And they’re simply not slowing up. Case in point: this retro racer XSR700.

Christened ‘XS700-R,’ this custom comes to us from Cafe Racer SSpirit, a group of lads based in the Basque Country near San Sebastián, Spain. It’s their twenty-fifth build, so Juan Carlos, Hugo and Juan Carlo are no strangers to adversity in the garage—but the strict parameters of the Yard Built program meant they had to shelve the grinders this time around.

The key visual here was masking the hulking tank. To do that, and execute their vintage vision, the rear bodywork and a matching tank cover were 3D printed. In my eyes, the new lines suit the snub-nosed stance of the XSR700 and, thanks to an easy install method, I imagine a few kits will find their way onto owners’ bikes. Other touches won’t be so easy though. The machined cooling fins on the powerplant come from a modified XVS650 Dragstar’s twin and you’ll need to know a good laser-cutter to score a matching set of wheel discs and radiator guards. [Cafe Racer SSpirit]

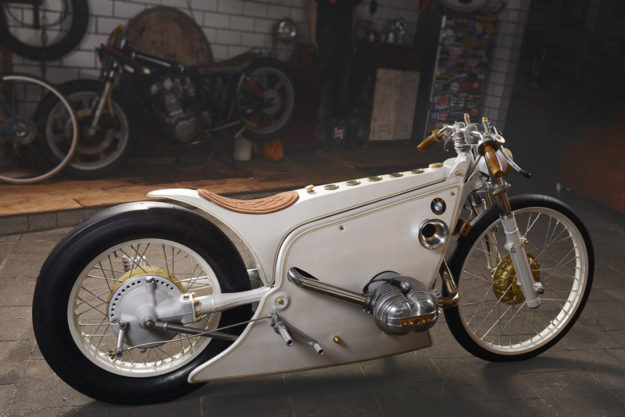
Turbocharged BMW R80 by Kingston Custom
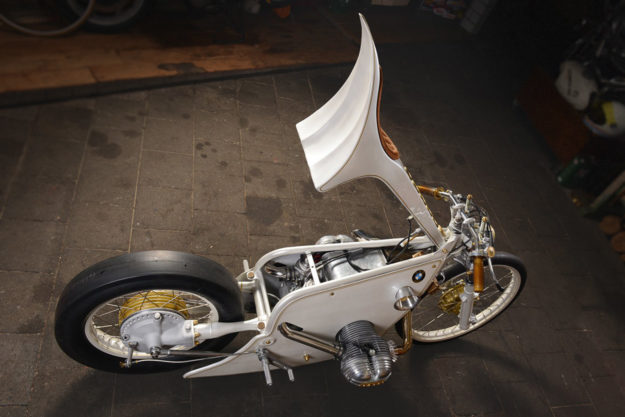
Turbocharged BMW R80 by Kingston Custom We’re pretty blessed around these parts. Our inboxes deliver some of the most exquisite examples of moto-craftsmanship on an almost daily basis. But every now and then, one comes along that redefines perfection. Dirk Oehlerking of Germany’s Kingston Custom has just pulled the wraps off his White Phantom and we’ve put the call into the Oxford Dictionary to revise their text.

It’s hard to know where to start with this glorious creation, so I’ll try from the beginning. The donor for this project was a BMW R80 RT. I know that seems impossible, but Dirk needed the balance of the RT’s 798cc boxer to work with because that gorgeous plenum beneath the roundel on the right feeds a turbocharger. The forced induction almost doubles the airhead’s output to triple digits, which is why there’s a drag slick spooned on out back. The suspension up front has been drastically shortened and is now sprung via external coils.

The aluminum bodywork has been flawlessly executed with barely a pube’s width of panel gap at any location. The fuel cell and seat are a one-piece unit, hinged at the neck to allow for inspections between runs, and topped by brass-ringed gauges to display the essentials. The whole unit hugs the custom frame, and frames the rear wheel so well it brings a tear to the eye. [More]

Turbocharged BMW R80 by Kingston Custom

Categories
Custom Motorcycles Editorial Other Motorcycle Blogs

The Short List To Buy Ducati Would Include Polaris And Benetton

(Milan, source Reuters) Italy’s Benetton family is among five bidders shortlisted to buy Italian motorcycle brand Ducati, which is being sold by Germany’s Volkswagen, a source close to the matter said yesterday Saturday July 29. The finalists will be given…

This is a content summary only. Click on headlines for full links, images, other content and more!

Categories
Custom Motorcycles Editorial Other Motorcycle Blogs

Joke Of The Week

How Is Noreen? A sweet grandmother telephoned St. Joseph’s Hospital. She timidly asked, “Is it possible to speak to someone who can tell me how a patient is doing?” The operator said, “I’ll be glad to help, dear. What’s the name and room…

This is a content summary only. Click on headlines for full links, images, other content and more!

Categories
Moto Where Motorcycle Travel Other Motorcycle Blogs

Viaje 4 Dias CA-AZ-NV-CA

Click here to view this route

This route passes through: Descanso CA, Julian CA, Palm Desert, Big Bear Lake

Length: 400.53km / 250.33mi

View recent routes in:
United States »
California »
San Ysidro

View all routes from chanoc1077

Categories
Moto Where Motorcycle Travel Other Motorcycle Blogs

Birthday Ride 2017 – 200km

Click here to view this route

Length: 202.30km / 126.44mi

View all routes from fhudon

Categories
Bike EXIF Guides BikeExif How To Build A Motorcycle Other Motorcycle Blogs

Workshop Guide: Painting A Motorcycle

Workshop Guide: Painting A Motorcycle
Whether you’re trying to save a few bucks, or you just like the challenge of doing everything yourself, at some point you’ll probably consider painting your own bike. But not everyone has their own air compressor at home, or a spray booth and a decent spray gun.

But who says you can’t paint some of your motorcycle in your home shop with aerosol paint? Okay, you might not get the same result as a professional painter with a spray booth. It won’t be as durable as modern, two-part automotive paint. And you’ll probably spend time and money stripping it off and sending it to a professional after you change your mind.

But if you want to learn some new skills, have some fun, and get the satisfaction of doing it yourself, stick with me and speed up your learning curve.
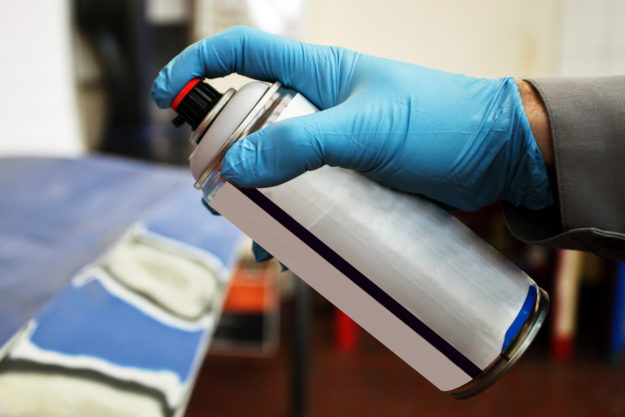
How to paint a motorcycle
You can get an acceptable result painting in your home shop, if you learn, practice and follow a process. So I’ve broken my process down into six steps: we’ll cover the first three this week, and the rest next time.

Before you start, be sure to talk to your local auto body supplier for detailed product information and recommendations. After you’ve read this article, you should be able to ask intelligent questions.
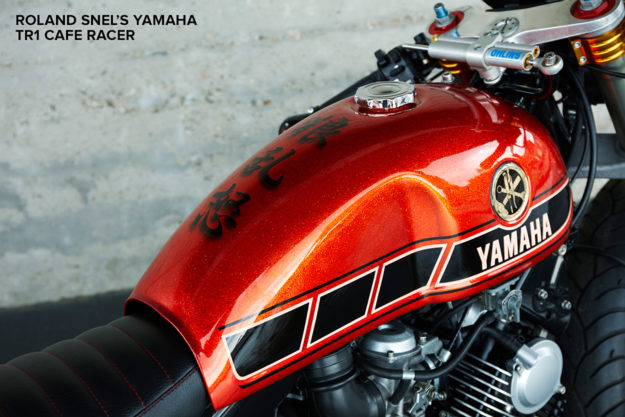
Paint on the tank of Roland Snel's Yamaha cafe racer
Step 1: Think about the final finish What color scheme does your project have? Will it have lettering, decals, patterns or lines? Flake or flat color? Gloss or matte?

Once you have a final finish in mind, it will help determine the painting process and products needed. A rough design of your paint scheme will help you plan the painting steps, so don’t be afraid to make a sketch with your design drawn in.
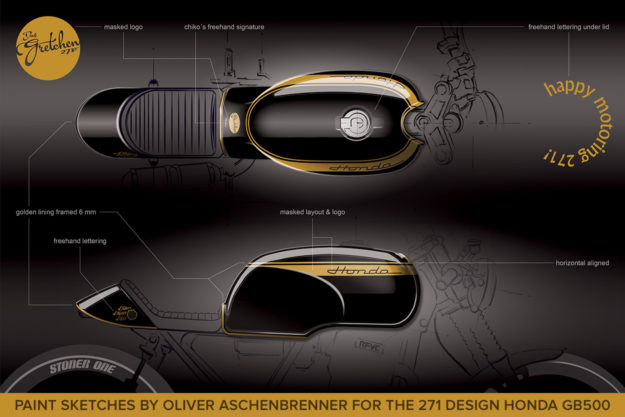
Paint sketches by Oliver Aschenbrenner for the 271 Design Honda GB500
Step 2: Choose a paint system Assuming you don’t have an air compressor for this process, your paint selection is a little limited. So let’s cover some terminology that you might hear around paint technology.

Single stage paint is a paint where the color and the gloss are achieved with a single paint coating. Two-stage paints require one paint layer for the color, and another for the protective clear coat (which could be gloss or matte). These two-stage products are commonly called base coat/clear coat systems.
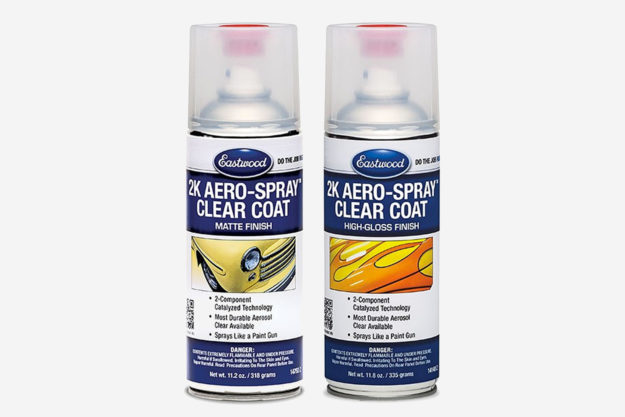
Eastwood's 2K AeroSpray™ High-Gloss and Matte Clear paint
1K coatings are coatings that do not require a hardener, activator or other product to cure. House paint is a basic example of such a product; one-shot pinstriping enamel is another. (Most aerosol paint falls into this category too.)

2K coatings are products mixed with a hardener just prior to spraying, so as to activate a chemical reaction during drying. This provides a durable finished surface much less susceptible to damage from weather, UV rays, fuel or chemicals. Your average body shop will be spraying a 2K finish on modern cars in their spray booth.
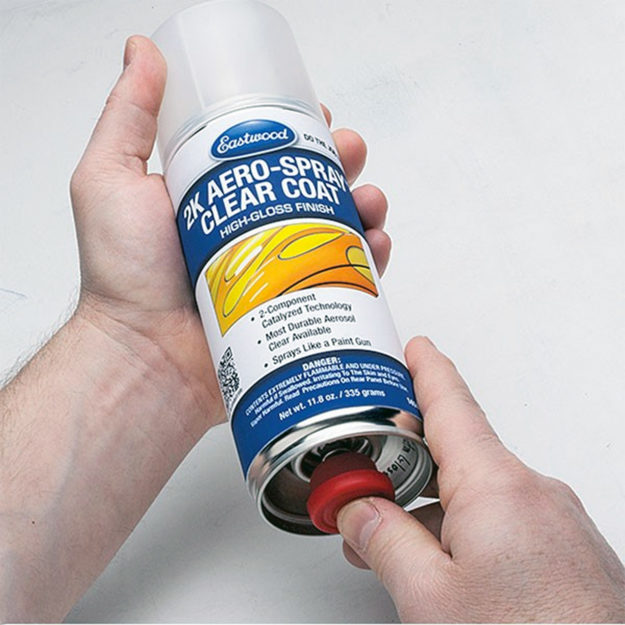
Eastwood 2k aerosol spray paint suitable for motorcycles
As with everything, there are exceptions. Some vendors can supply an aerosol can that delivers a 2K clear coat. They manage this with a separate chamber in the can that contains the hardener. Right before spraying, you activate the hardener supply and it mixes with the clear coat. You then have a limited window to spray the clear coat before the paint in the can ‘goes off.’

And, of course, you could have a two-stage paint system with a 1K base coat (color) and a 2k clear coat. Online sources like Eastwood are a great place to start investigating your options.
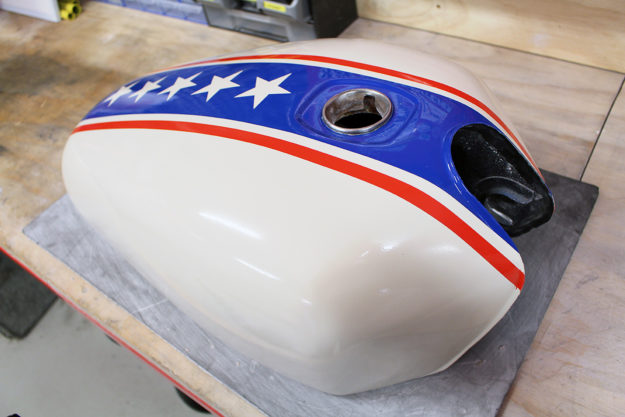
Motorcycle tank painting
For a personal project, I resprayed my Kawasaki Ninja ZX-9R commuter bike in black and gold, with a 1K base coat, and a 2K matte clear coat over an eBay sticker kit.

The fuel tank you see above I painted especially for this article. I used a high-quality (read: relatively expensive) enamel aerosol paint from the hardware store, for a couple of reasons:

1. The re-coating time was fast—about 20 minutes. I had lots of paint to lay down, and a deadline!
2. This tank was full of rust holes, so would never go back on a bike, and would only ever be garage art.
3. It was far cheaper than a proper automotive paint.

If you want to tackle a project like this, I’d encourage you to do something similar. Find a surplus tank or fender and practice some of these techniques before you aim the aerosol can at your project bike. At worst, if it doesn’t work out, or you don’t like it, you can strip it off and start again.

Is there better paint for the final finish on your bike than hardware-shop enamel? Yes! Paint product availability will vary depending on where you are in the world, so go ask your local suppliers for advice, or check out the Eastwood site and their resources.

Step 3: Preparation Prep is crucial to a quality finish. My general process is: remove paint, fill, sand, prime, spray putty/filler, sand, and prime again.

Remove Paint You can repaint over an existing coat, whether it’s on a frame or a tank. If the paint is in good condition, you can simply scuff it up with 400 grit wet-and-dry paper and paint over it. You might be taking a risk with compatibility with the original paint, so test the existing paint first. Hold a rag soaked in general purpose thinners on the paint—if the thinners dissolves the existing paint, consider stripping it off.

I much prefer to strip to bare metal regardless. I like to know what I am working with. You can see my favorite methods of removing paint in this article, but paint stripper is available in aerosol cans which might be suitable for a smaller motorcycle project.
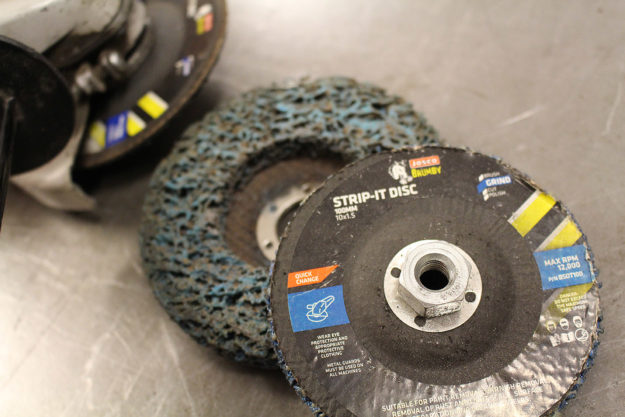
Stripping disc for motorcycle paint preparation
On our project gas tank, I had previously sanded the paint off. The downside of sanding is that it leaves deep scratches in the metal—strip-and-clean discs are a clear winner here.

You may have heard advice about preventing or neutralizing rust on your bare metal. I normally don’t bother, as I go straight to the next step within hours of stripping the paint.

Fill On a new or reproduction tank, or on a frame, you might be able to skip this step. Otherwise, line up some automotive body filler. This is normally a two-part product—you need to mix a hardener with the filler to start a reaction that cures the product.

Before mixing up the filler, put on some disposable gloves to protect your skin. Use wax and grease remover with a clean rag, and wipe over the tank to ensure it is spotless and ready for the next step.

You’ll need a surface to mix the filler. Some sources suggest cardboard will absorb resins from the filler, so I use a $2 plastic chopping board from that big Swedish furniture store. Pick up some plastic body filler spreaders; these are a buck or so. (You can use any stiff plastic card if you’re really on a budget.)

Follow the instructions on the product packaging. Mine said something like “mix one part hardener to 50 parts filler by weight.” I have no idea how you’d actually do this, so I scoop out some filler with the spreader and squeeze out a thin line of hardener across it. Use the plastic spreader to continually fold the mixture into itself until it has a consistent color and texture.

You need to keep moving now, as the filler is starting to cure. Use the plastic spreader to drag filler over the surface. I hold the spreader with my thumb on one side and three fingers on the back—I can then curve it to match the surface better. With a few attempts, you’ll soon determine the best angle and pressure to leave a smooth coat on the surface.

Apply a coat no more than 3mm or 1/8” thick at a time. If you have a deeper dent to build up, apply 3mm then let it dry before applying further coats to build it up.
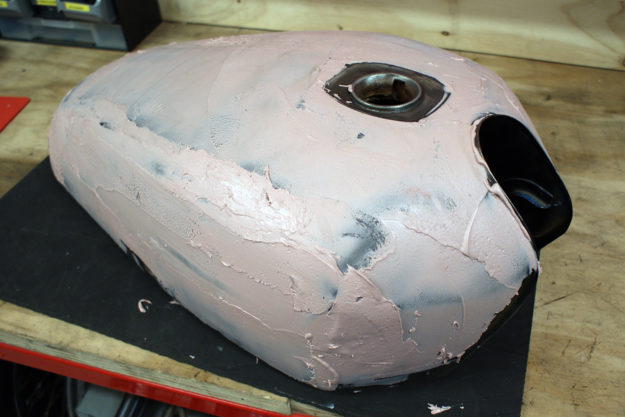
Body filler preparation for motorcycle tank
You’ll find the filler getting harder to work as the minutes pass and it cures. Mix up small quantities so you don’t waste any. Aim to smooth out the filler as much as possible; leaving mounds and humps will add a lot of sanding work in the next step.

Sand Once the filler has cured (around 30 minutes if all goes well), you can start sanding. I aim to remove filler as quickly as possible, without leaving massive scratches that I’ll have to fill again later. My hardware store stocks 80 grit aluminum oxide paper in bulk rolls, so I start with this. The 80 grit doesn’t leave significant scratches, and the aluminum oxide paper resists clogging.

While working on this project, I found a 5lb box of assorted grit paper, which would be a good option if you wanted to order online. I also use a color sanding block, which is a firm foam pad that you wrap your abrasive paper around. Rather than a hard, straight block—which is fine for straight, flat surfaces—the color sanding block conforms to a curved surface.
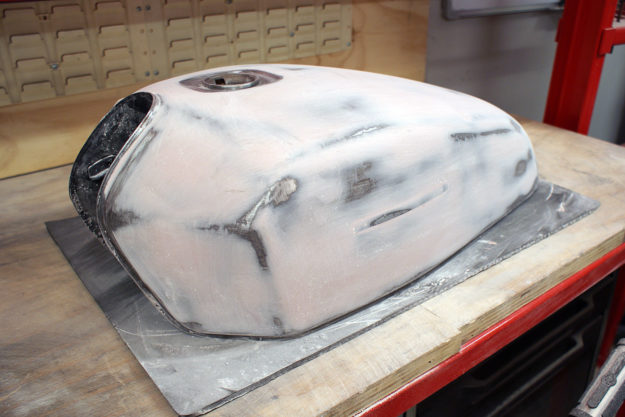
Sanding down a motorcycle tank
With some reasonably coarse paper wrapped around a color sanding block, start smoothing out the filler. This is dusty work, so wear a disposable dust mask. Keep working though your supply of abrasive paper until the filler is only left in the low spots, such as dents.

Run your hand, palm down, over the surface. You’ll feel any low spots—the filler in these areas isn’t high enough to match the existing surface. Mix up some more and repeat the filling and sanding process.

This step will likely take the longest, but is the foundation for your paint finish. In the tank I painted for this article, I spent around four hours filling and sanding. Mostly sanding. Be aware that while it might look great at the filler stage, the first coat of primer will really help highlight any flaws in this step. If you can see the flaw now, you can guarantee it will be visible under paint. Now is the time to patch it with filler and smooth it out.

Before your progress to the next step, I would recommend progressively finer sanding with 120, 240, and 400 grit papers. I’ve found I sometimes have trouble covering 80 grit sanding scratches in the priming and painting stages if I don’t smooth the filler coat further.

Prime A primer is used to provide a key between the surface and paint, or in this case, between the filler and paint. Your paint supplier will recommend the best primer to suit your final paint finish product. The packaging will suggest how thick to lay it on, and how long you need to wait between coats.
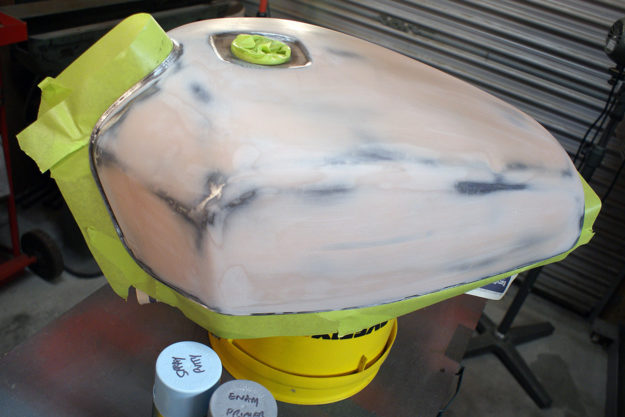
Masking a motorcycle tank for paint
Before you shoot any primer, you’ll need to use tape to mask off any parts that don’t need paint, like the fuel filler. I also mask from behind the tank seam to prevent any paint blowing onto the underside of the tank. I use a reasonable quality painter’s tape, not cheap domestic masking tape.

At the absolute last second before applying primer, or any coat for that matter, use a tack cloth and wipe the surface you’re about to paint. The tack cloth will pick up any dust or dirt that has settled and minimize how much ends up in your paint finish.
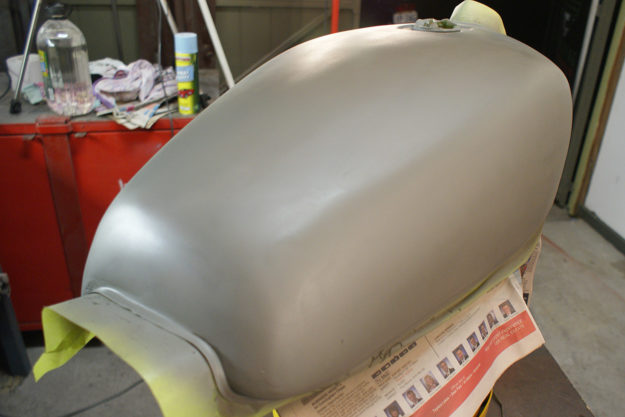
Painting a motorcycle tank with primer
The primer you use might contain some filler product to help smooth the surface. If so, you can sand the primer. You might use a 240 grit at this stage, then a 400 grit before the next step. Taking the high spots off will level out the surface further. If you sand back to the body filler, prime it again before moving to the next step.

If the primer doesn’t contain any filler (or enough to cover any marks) you might add the next step.

Spray putty If you find some minor scratches in the primer, a spray putty can help fill these. Follow the product instructions—the spray putty I use suggests three to four coats, then sanding. Again, you might end up sanding the majority of the putty off, with only the putty in the low spots remaining.
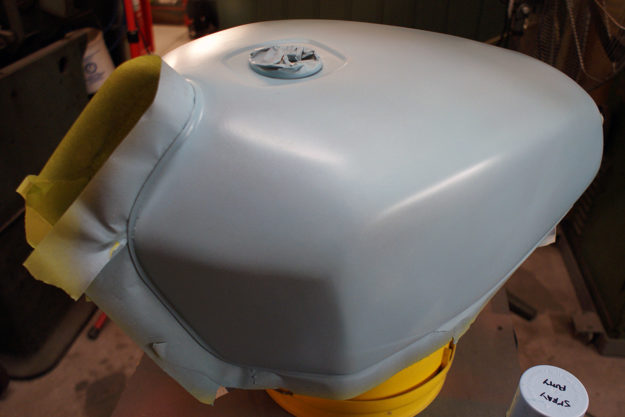
Spray putty on a motorcycle tank
Check your spray putty coverage and sand any marks out. Spot patch with more body filler if the spray putty didn’t cover up your earlier sins. Give it a final sand and check with your hand again. Hopefully you can’t feel any more marks in the surface. If you’ve sanded back to bare metal, or the product recommends more primer over the putty, spray it on before moving to paint. And that’s what we’ll cover in Part II in a couple of weeks.

Download a free Amazon shopping list of supplies and consumables needed for a paint job exactly like that described in this article here.