Harley-Davidson owned the internet yesterday. Unless you live under a solid aggregate of minerals, you’ll know that the Motor Co. teased its upcoming model range—including the productionized Livewire, a streetfighter, and an adventure tourer called the ‘Pan America.’
But did you notice there was no mention of the Sportster? Could this finally be the end of the road for the venerable roadster? Fear not. There will always be killer Sportster builds to keep the massive second-hand market alive—like this rowdy flat tracker from Australia’s Gasoline Motor Co.
The Gasoline crew developed a taste for flat track racing after blasting round their local track at Appin, an hour’s drive out of Sydney. At first they used a KTM 450 shod with Dunlop DT3s, but founder Jason Leppa realized it was soon time to move on to more appropriate machinery.
“Learning the ropes of sliding at high speed on the dirt soon turned into a need to practice on a heavier Harley XR1200X,” he tells us.
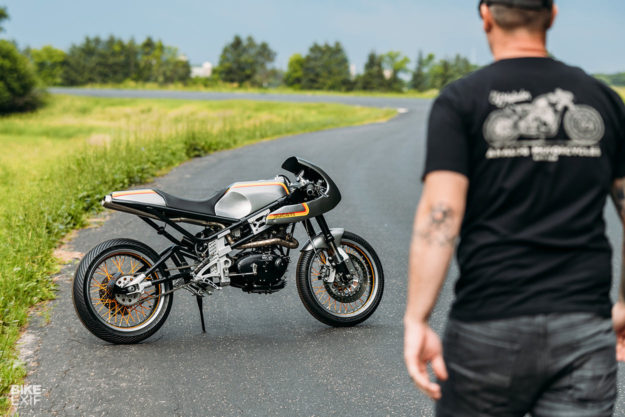
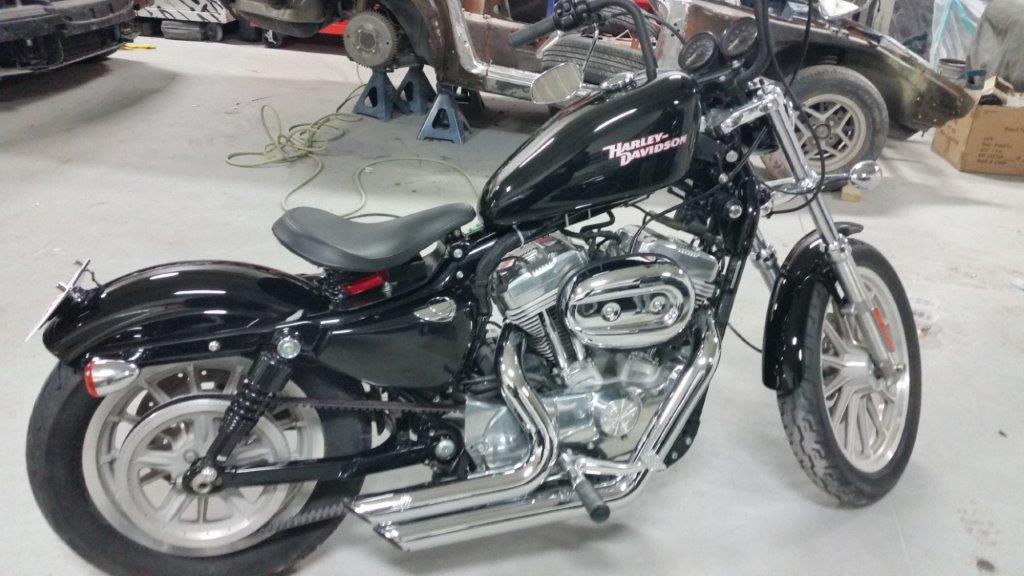
At first glance, this V-twin street tracker looks like a no-fuss hooligan racer. But it’s primed to tear up asphalt as well as the dirt—and has enough of the right bits to make it street legal.
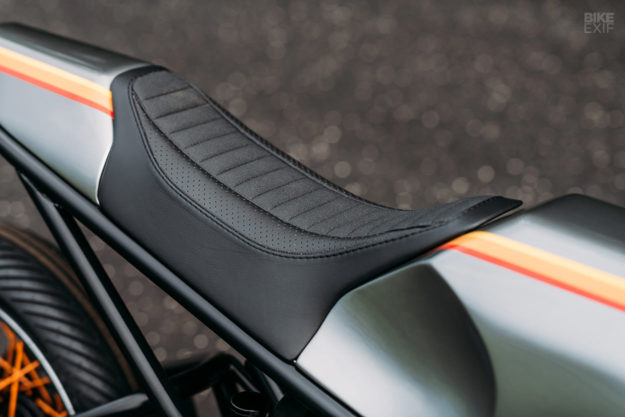
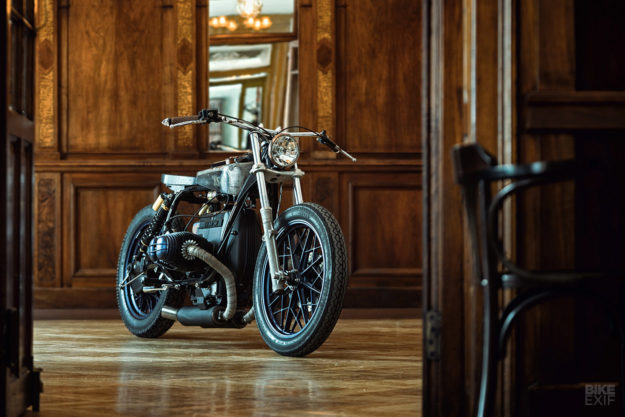
A 2000-model Harley-Davidson Sportster was the starting point for what became the ‘XX Tracker.’ Gasoline stripped it down, then threw away anything they could to save as much weight as possible.
A monochrome palette was on the cards from the word go, so the engine was removed and painted black, while the frame was refinished in white.
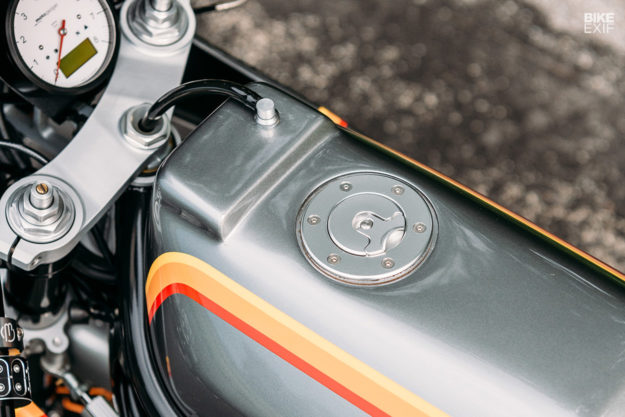
Gasoline kept the Sporty’s stock oil tank, but tossed the fuel tank, seat and fenders. In their place are a fiberglass tank and tail, hand made by Phil Little Racing in the classic American flat track style. The livery is simple and tasteful: gloss black, with a few custom decals.
As per normal flat track spec, the XX Tracker rolls on a pair of 19” hoops—in this case, lifted from an early model Sportster and powder coated black before being wrapped in Maxxis dirt track rubber. Roger at Retroline added a super-subtle touch: white pinstripes on each rim.
Custom-machined triple clamps were installed to get the front wheel to fit, and spacers ensure the sprockets line up at the rear.
The forks were fitted with new 11-1130 springs from Progressive Suspension, and shaved of any unused mount tabs. And a set of custom-tuned Nitron shocks was installed out back, dialed in to the rider’s weight.
Gasoline have also added a chain conversion kit, with an oversized 60-tooth rear sprocket for maximum pull-away out on the track.
As for the motor, it’s stock inside. On the outside there’s an S&S Cycles Super E carburetor, and a high flow Slant air filter from Roland Sands Design. And, of course, a massive, in-your-face twin exhaust system that provides max airflow and sounds magnificent.
It’s the work of Niko at Hi-Tech Mufflers, who built it up piece by piece from stainless steel. The Gasoline crew then whipped up a big ol’ heat shield in-house, to cap it off.
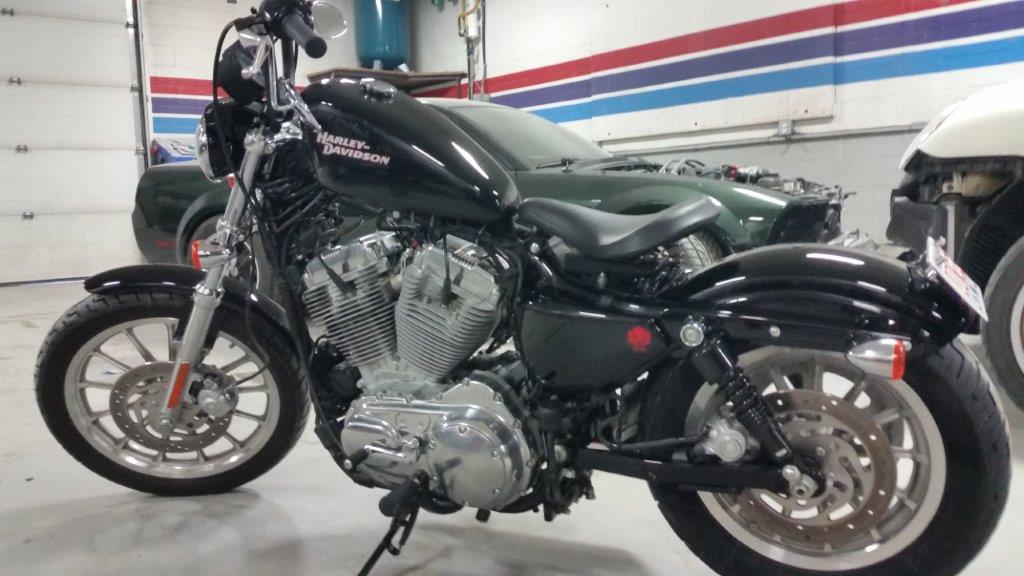
Those are the obvious changes—but there’s a ton of subtle tweaks on the XX Tracker that tie everything together. The stock mid-mount foot controls were converted to ‘low-mount’ controls, and upgraded with a grippier set of pegs.
Up top, the guys added a set of high-and-wide 1” bars, but trimmed off the cross brace that came with them. The levers are standard, but the throttle and grips are new—along with the mini switches and internal wiring.
The stock handlebar clamp was milled out to accept a tiny LED dash from Motogadget, plus a set of LED warning lights. The entire electronics package is discreet, with a trimmed harness running through Motogadget‘s popular m.unit control box, and activated by their keyless RFID ignition.
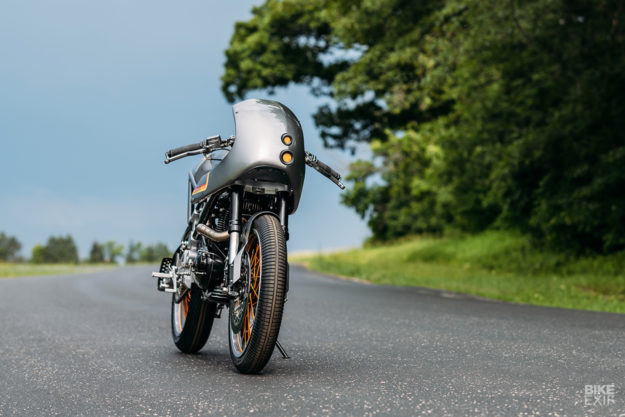
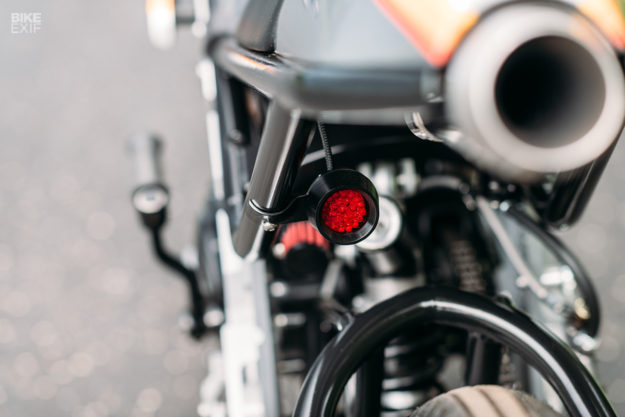
The ‘headlight’ is actually two powerful LEDs, mounted down low on a pair of custom-made engine crashbars. Out back is a floating license plate bracket, which also carries a thin LED taillight. Turn signals are present at both ends; small pin units flanking the tail, and wraparound LEDs on the forks.
Gasoline’s XX Tracker nails the Sportster tracker vibe flawlessly, tweaking the timeless recipe just enough to make it the perfect Harley for both road and track.
It’s uncomplicated, beastly, and a loud reminder that the Sportster’s going to be around for a long, long time.
Most customs start out with a frame and motor from the same donor. But sometimes it’s a mix and match affair—and every once in a while, we see a truly exotic pairing.
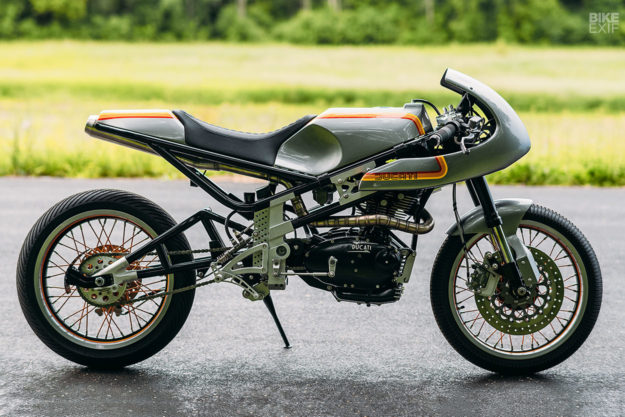
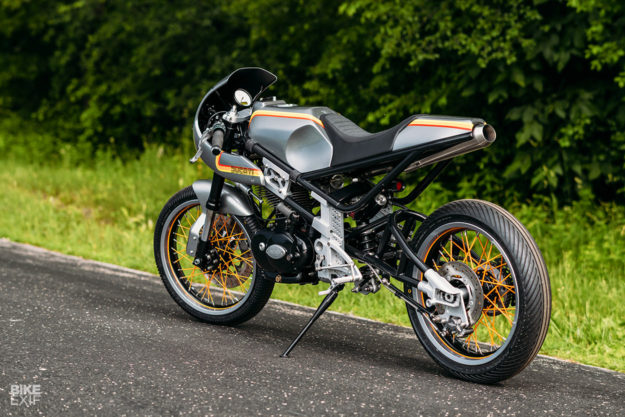
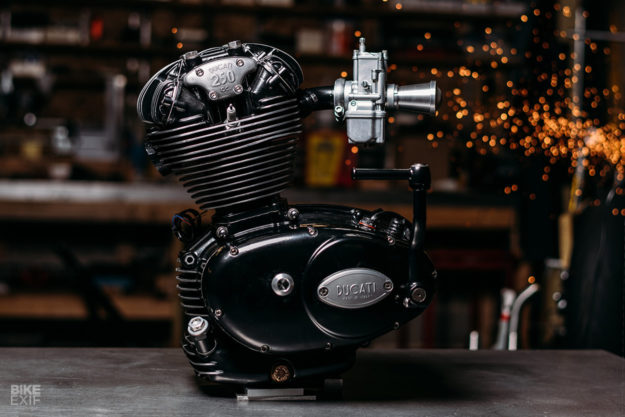
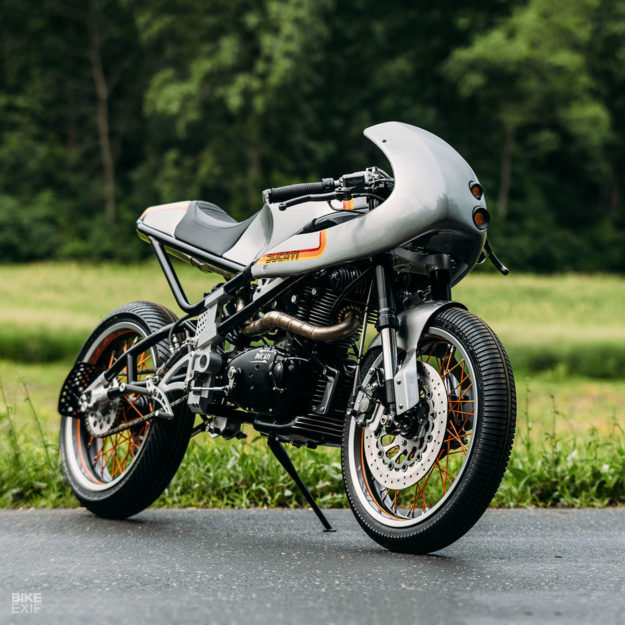
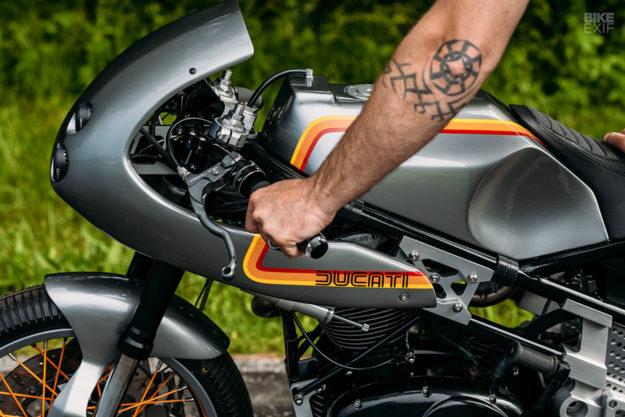
This pint-sized racer from Analog Motorcycles is the most unique match-up to come our way: a 1968 Ducati 250 ‘narrow case’ motor mounted in a Moto3 prototype frame, and wrapped in a plethora of hand-made bits.
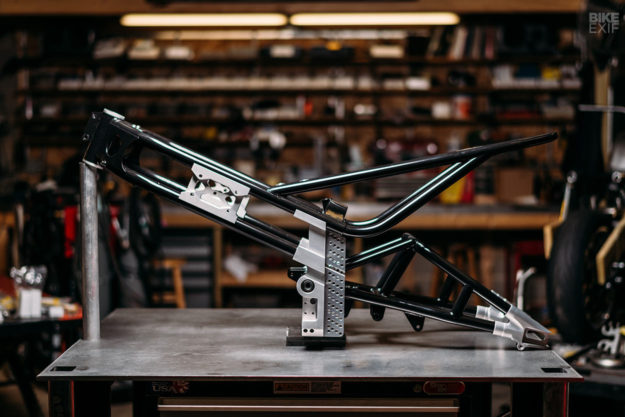
The project kicked off about three-and-a-half years ago, when chassis specialists FrameCrafters reached out to Analog’s Tony Prust. They’d built a frame for an Analog project in the past—and were itching to work with the Chicago-based shop again.
Karsten of FrameCrafters made Tony an enticing offer: He had their first prototype Moto3 chassis sitting in the shop, and would Tony like to do a build with it?
“They would take care of fitting whatever engine I chose and get it to a rolling chassis, and we would take care of the rest. I said: ‘Of course!’”
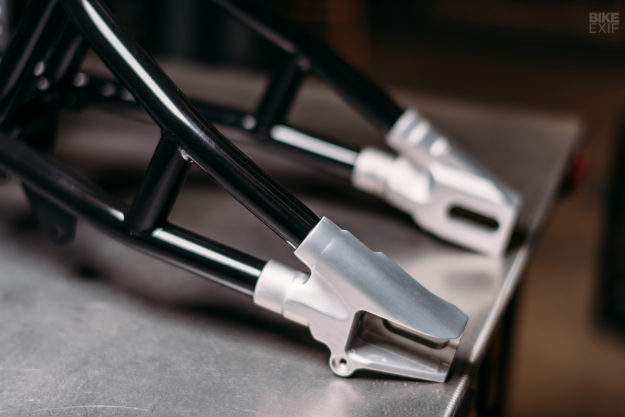
The chassis was originally developed eight years ago, and has been used by a couple of pro AMA-level racers with the engine it was originally built for: a Yamaha YZ250. It’s a bi-metal design that combines chromoly tubing with billet aluminum junction points, and it’s a thing of beauty.
Joints are either bolted or bonded with space-grade epoxy. The idea, Tony tells us, is to make production easier, and to create the perfect amount of rigidity and flex where needed.
Around the time FrameCrafters pitched the idea, Tony came across three bikes’ worth of bits and pieces from vintage Ducati 250 singles. There was at least one complete engine in the pile, originally built for racing, so he sent that off to FrameCrafters to start mocking up the chassis.
They stretched the Moto3 frame one and a half inches, not only to wedge the motor in, but also to make mundane maintenance tasks easier. “It could have probably fitted without lengthening,” explains Tony, “but then you would need to drop the engine to check or change a spark plug, and that was not going to work for us.”
FrameCrafters whipped up two front engine mounts, and a rear mount to attach the back of the engine to the frame and swing arm. Analog designed the subframe, which FrameCrafters then welded in to the Moto3 chassis.
Bill Bailey, machinist whiz and regular FrameCrafters collaborator, milled all the aluminum junctions by hand. When everything was buttoned up, Analog spent several hours giving the aluminum a brushed finished, then had it powder coated clear to preserve the hard work.
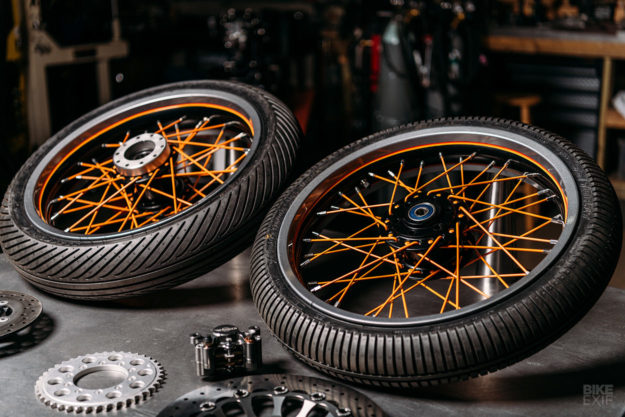
The Ducati rolls on rebuilt Showa suspension from an Aprilia RS125. A set of 17” Sun rims was laced up to a modded Honda CB550 front hub and a custom made Barnes quick-change rear hub.
Braking duties are handled by a full Beringer brake system, with HEL lines. Dunlop rain race tires round out the package: a KR189 up front, and a KR389 at the rear.
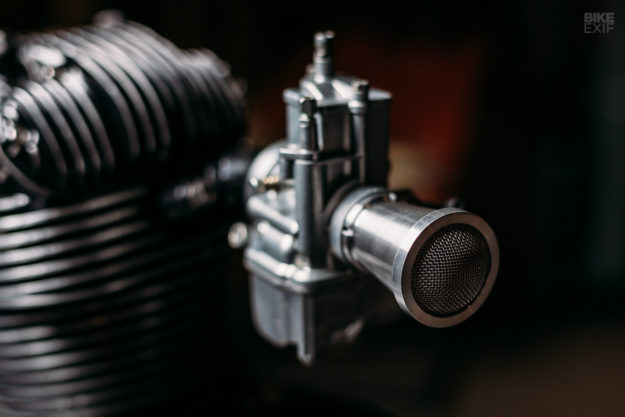
While FrameCrafters were fine-tuning the chassis, the leftovers from Tony’s pile of Ducati bits went to TJ at DemonTech. He put together another 250 engine, adding a 12V conversion and electronic ignition from Electrex along the way.
Other upgrades include a NOS Dell’Orto VHB27 carb, and a custom gearshift linkage to convert the bike to a left-side shifter. The kickstart lever had to be modified too, so that it would clear the rearsets and linkages.
As soon as Tony had the rolling chassis back in the shop, he started working on a wooden buck for the new tank and tail. “I had been wanting to make all the body work myself this time. I had a mentor by the name of Devlin Hunt coming in and helping me hone the metal shaping craft a bit more. I was already doing fenders, seat pans, number plates, etcetera—but not a tank yet.”
“I learned so much working with him, and he was an incredible mentor. He was a retired engineer and two-stroke guru, and was a self-taught metal shaper. He would not do any of the work; he showed me and then made me do it, which is exactly how I learn.”
“He unexpectedly passed away in February 2017, and that pulled all the wind out of my sails on the project.”
Tony put the Ducati on the back burner and went back to customer projects for almost a year. “I worked on the metal shaping craft a little bit more in the meantime, building the KTM ‘ArchDuke,’” he says.
“So when I got to the Ducati fairing, I was a little more prepared. That was a big undertaking for me, and I am really pleased with how it came out.”
Giving the bodywork a racing theme to match the Moto3 frame was a no-brainer, but Tony also worked in a few nods to Ducati’s back catalog. The paint is a Pantah TL Europe-only color scheme, laid down by Artistimo Custom Design. The stacked headlights reference the 999, and the air vent bump on top of tank the 900SS.
Poking out under the tail is a stainless steel Cone Engineering ‘Big Mouth’ muffler, hooked up to a one-off stainless steel pie-cut header. The tail light—an Analog catalog part—is mounted under the subframe; “similar to that of a GP bike set up for rain,” says Tony.
The smaller details almost outweigh the headline features on this firecracker. There’s a new wiring loom, built around a Motogadget m.unit blue Bluetooth-enabled controller. The speedo and bar-end turn signals are also Motogadget parts, the clip-ons are modified Vortex items, and the grips are from Cole Foster.
There’s a custom-mounted steering damper too, and Free Form Design machined up caliper mounts and rear set brackets. Capping it off is stellar upholstery from Dane Utech of Plz.B.Seated.
“We wanted it to have all the race parts and trim, and look fast sitting still, but using a beautiful old Ducati single engine. Just to make people scratch their heads a little when they look at it—and think to themselves, ‘Why?’”
Four new models bring Harley-Davidson into all-new segments of motorcycling
Harley announces production of the 1,250cc Pan America ADV, 975cc Streetfighter sportbike, 1,250cc Custom, and LiveWire electric motorcycle for 2019 and 2020.
I’m a little embarrassed to admit how unfamiliar I am with AGV so I did a little research on them. Hopefully, I’m not the only one who will benefit from a brief intro to this Italian manufacturer.
AGV or Amisano Gino Valenza has been around since 1946 making cutting-edge products for the world of motorcycling, primarily helmets centred around racing. In 2007 Dainese purchased AGV and has been adding their respected input as well. Add to that in 2008, 9 times MotoGP champion Valentino Rossi was named the honorary President of AGV because of how much he collaborates with their helmet designers and an impressive picture will form in your mind about what to expect from any AGV helmet.
Shopping Now? We Recommend:
webBikeWorld has worked closely with RevZilla over the years to provide our testers with products to review. In addition to being a great site to shop from, they’re also a great partner.
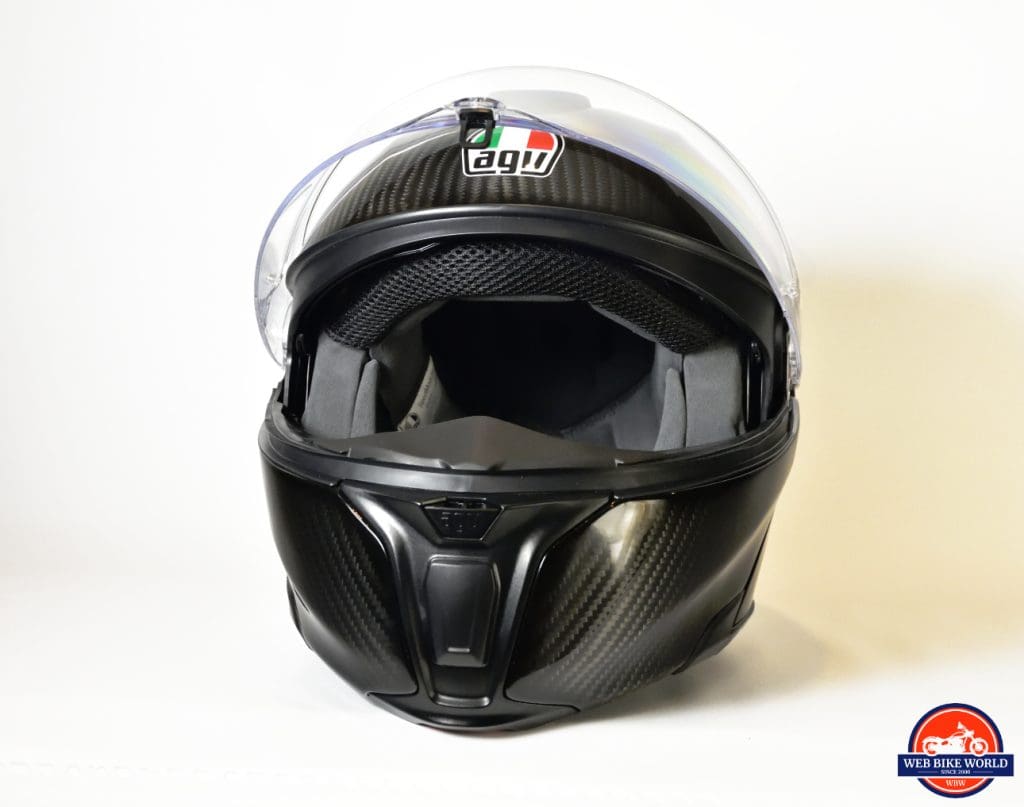
Unlike some other helmets I’ve reviewed, this isn’t the first time I’ve handled the Sportmodular Carbon.
I first noticed the Sportmodular while doing reconnaissance of the other pre-eminent modular helmet specimens a few months ago. The Shoei Neotec II and Schuberth C4 were why I walked into the store, but after spotting the AGV nearby and picking it up for closer inspection I immediately got “butterflies” in my stomach and a strong feeling neither Shoei or Schuberth would be getting my hard earned money with this AGV option available.
I’ve been reaching out to AGV directly ever since, trying to get one to review because I was so impressed. AGV hasn’t responded to my requests to this point.
Revzilla came to my rescue (and we love them for that!) providing a Sportmodular Carbon Gloss model for this hands-on review.
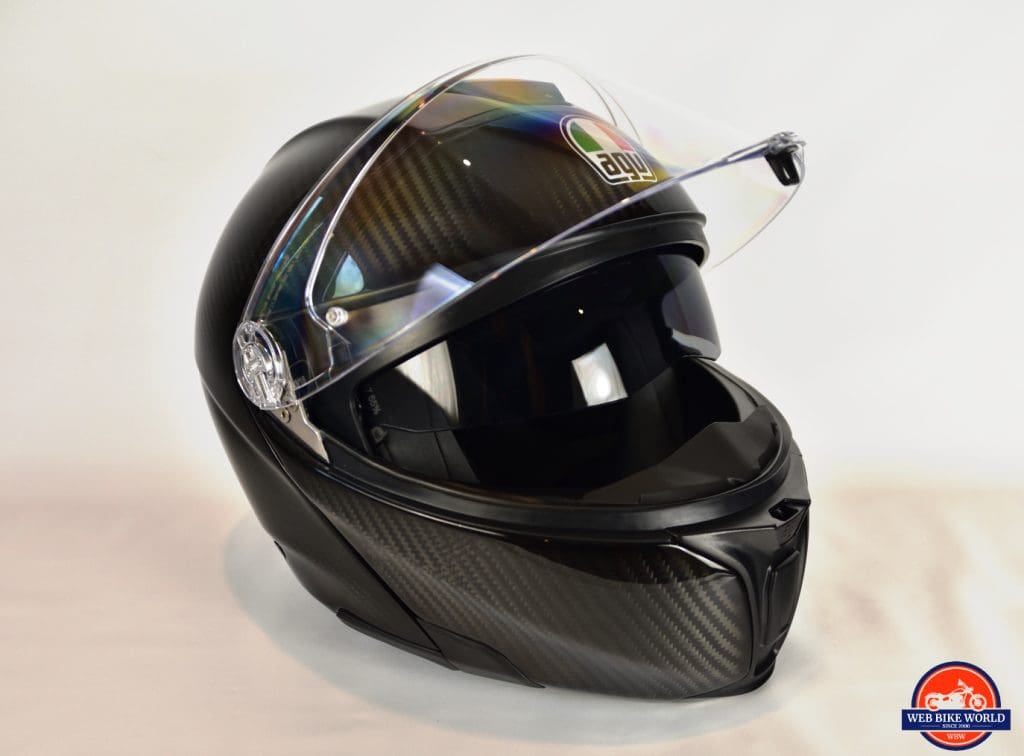
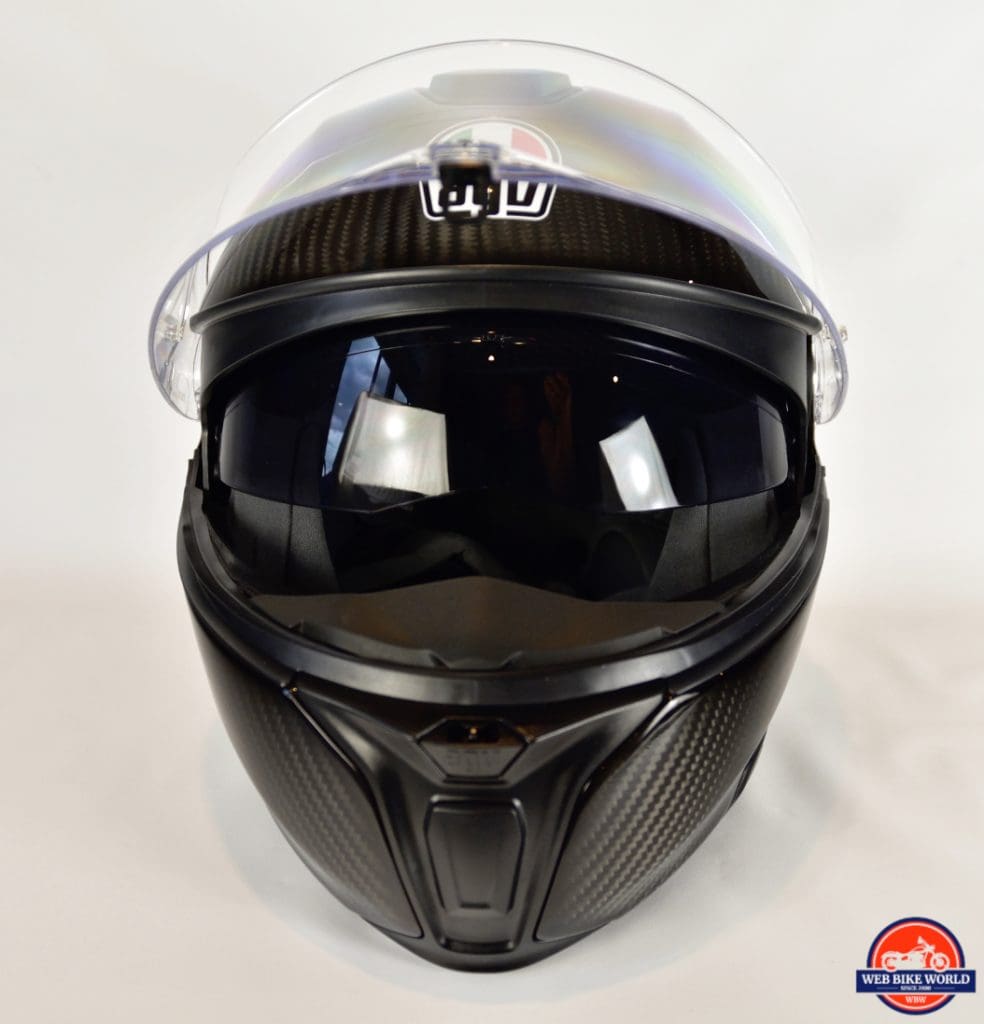
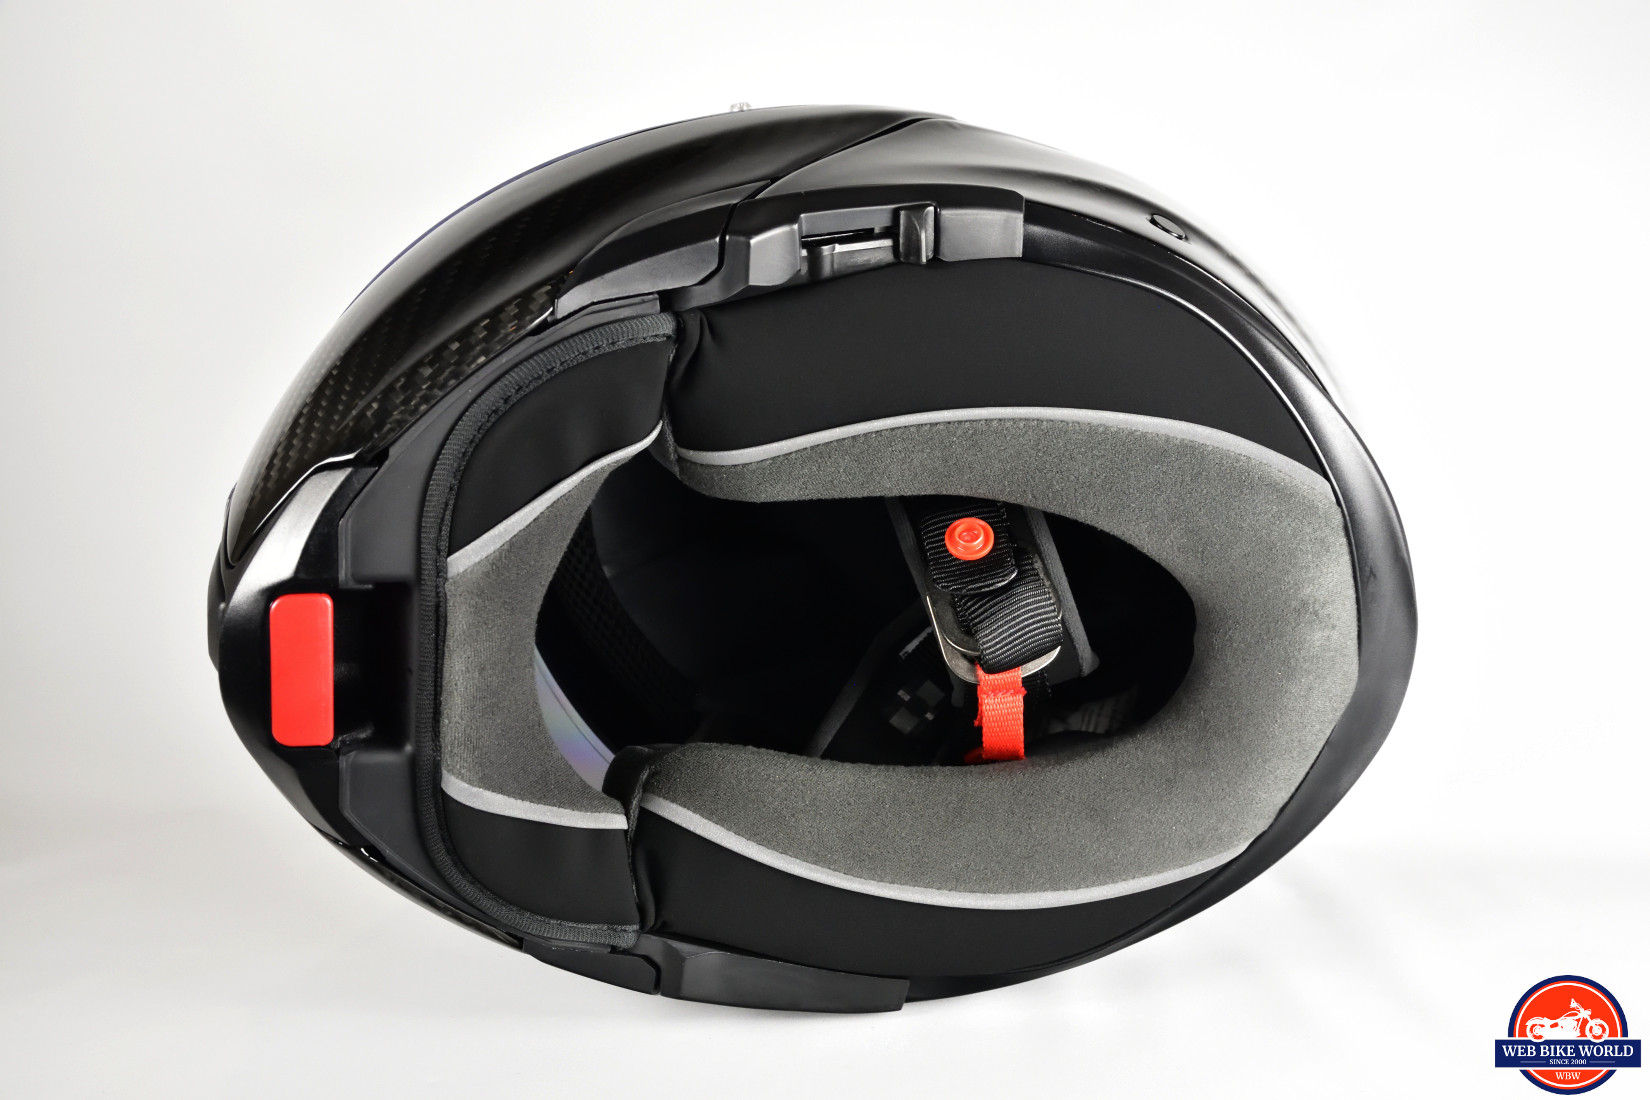
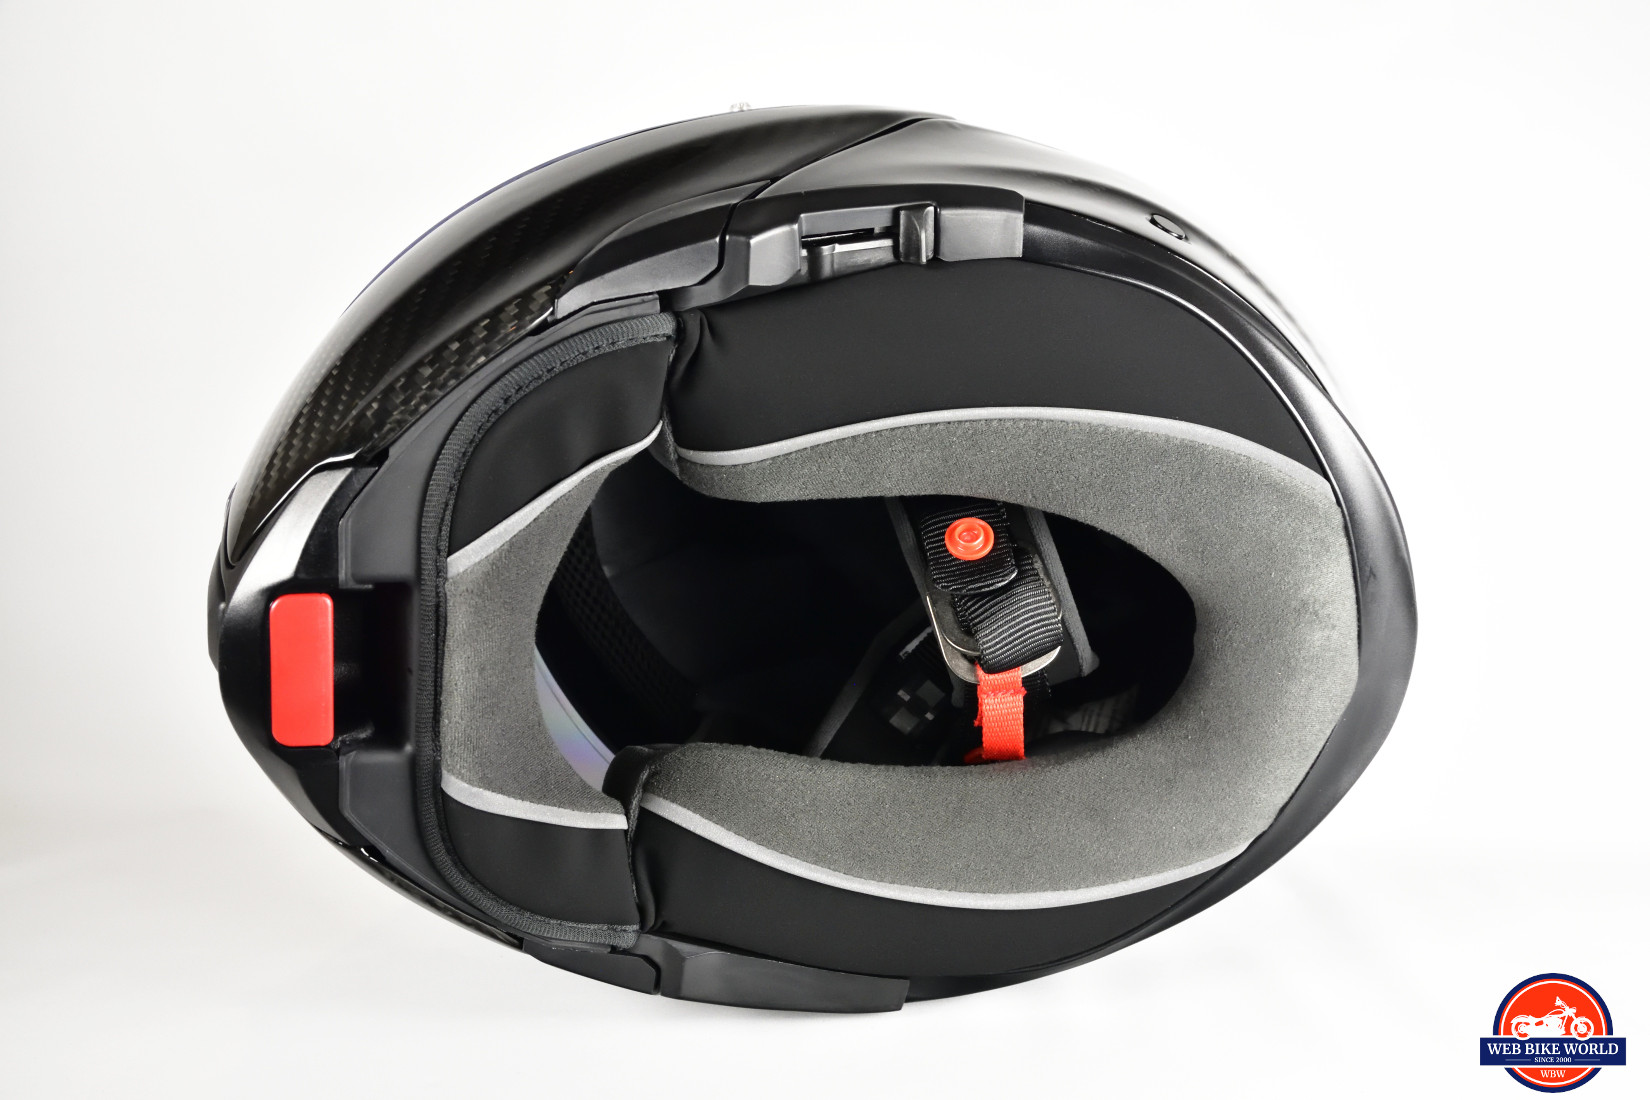
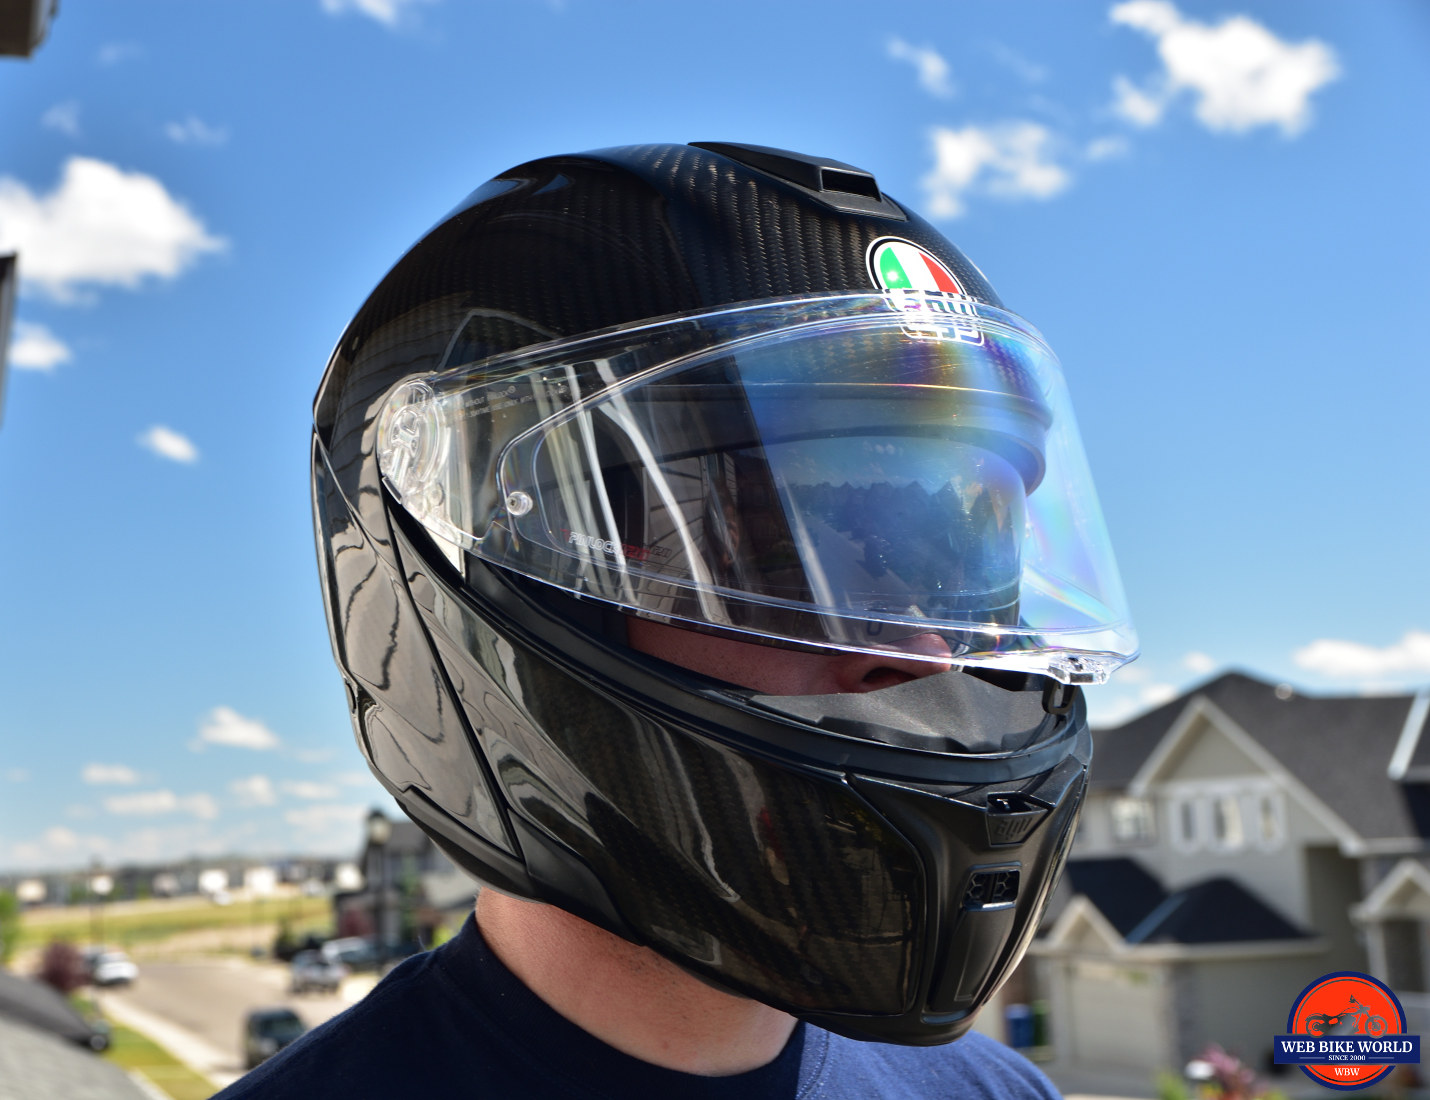
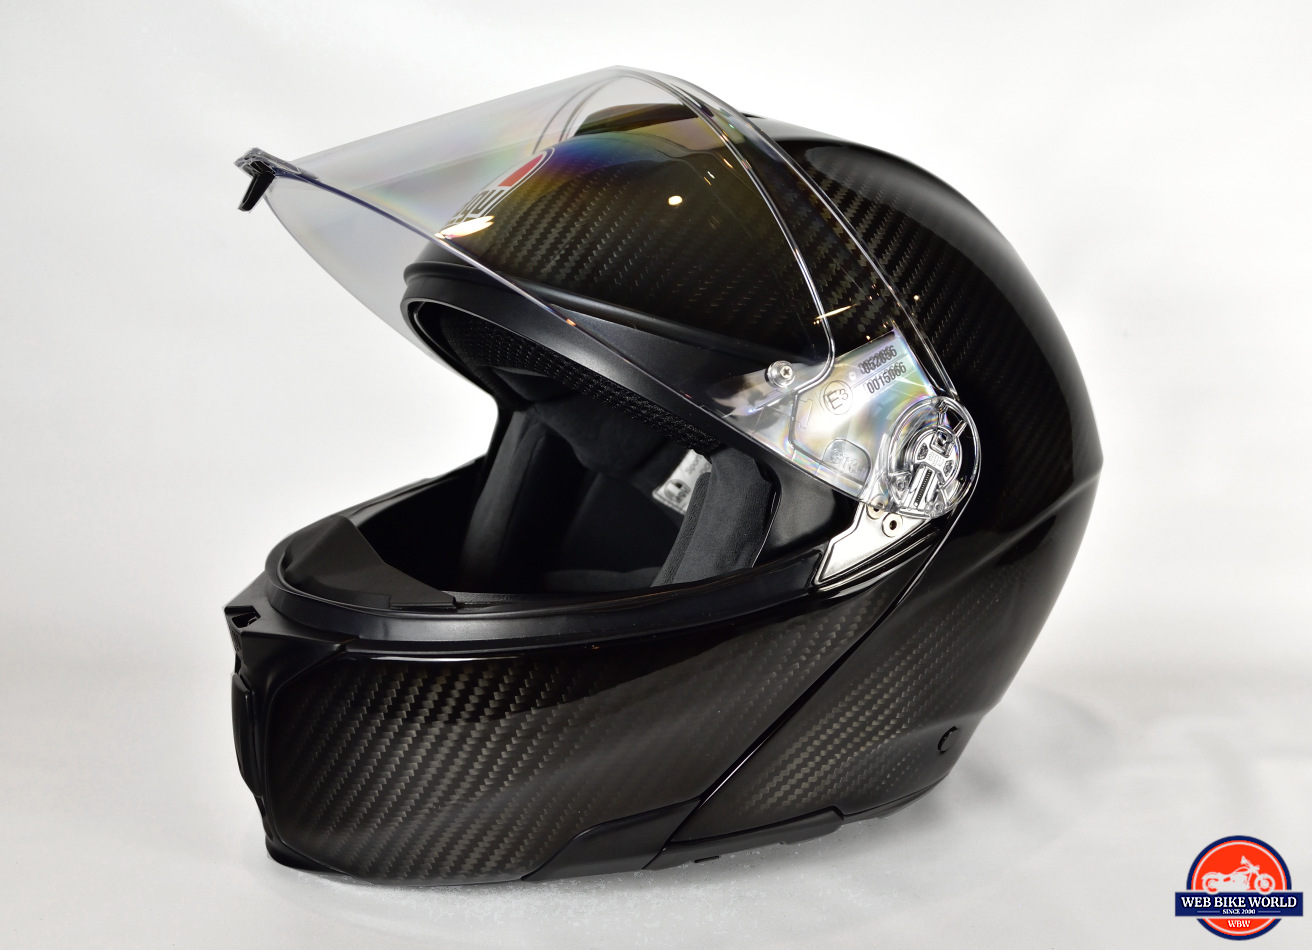
Thisintermediate oval helmetisform-fitting, compact, strong, incredibly lightweight, packed with well thought out features/design aspects that jump out at you as you handle it. It is undeniably soooo comfortable to wear with no pinch points on my head.
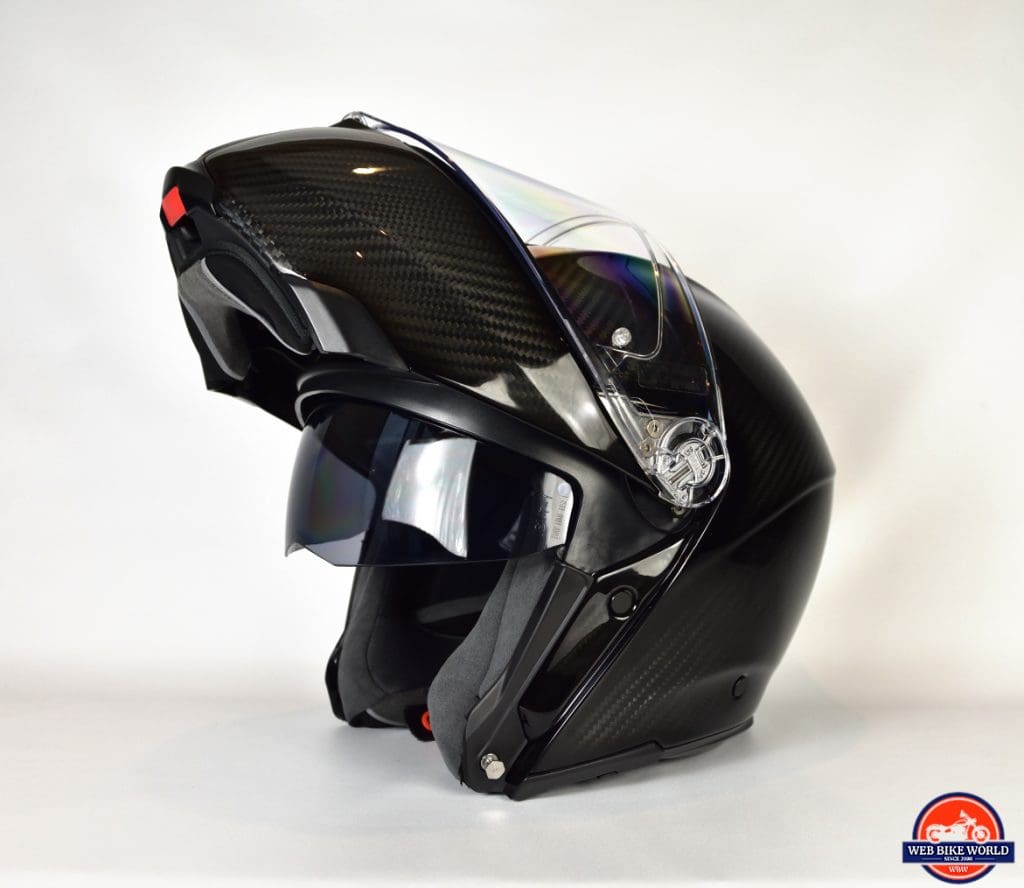
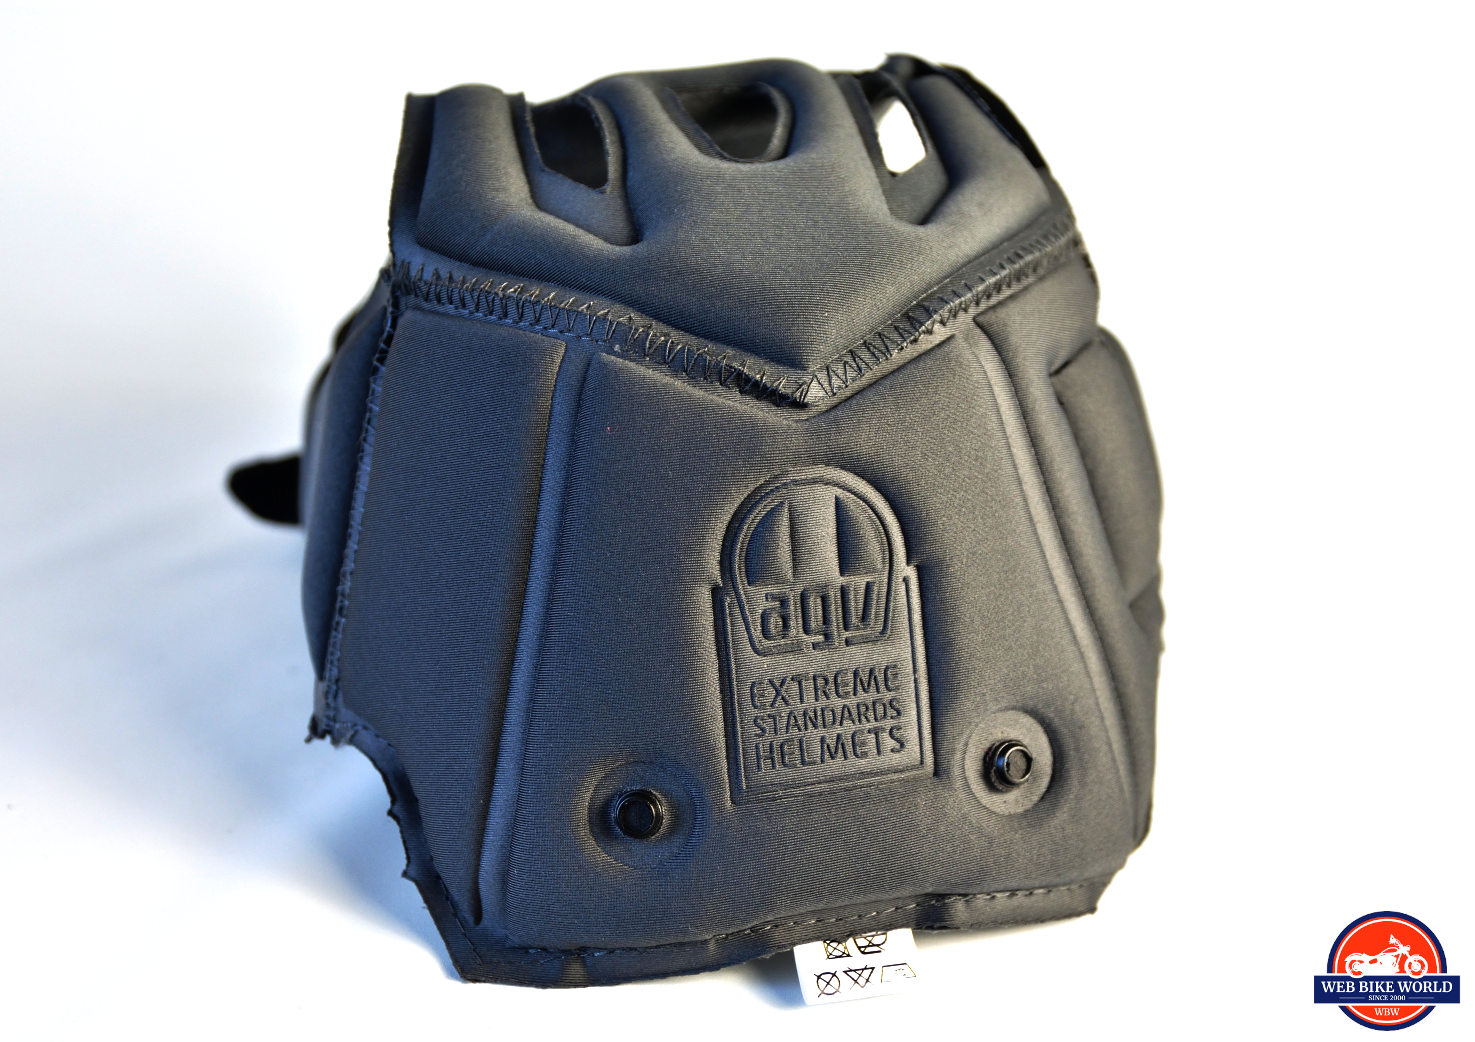
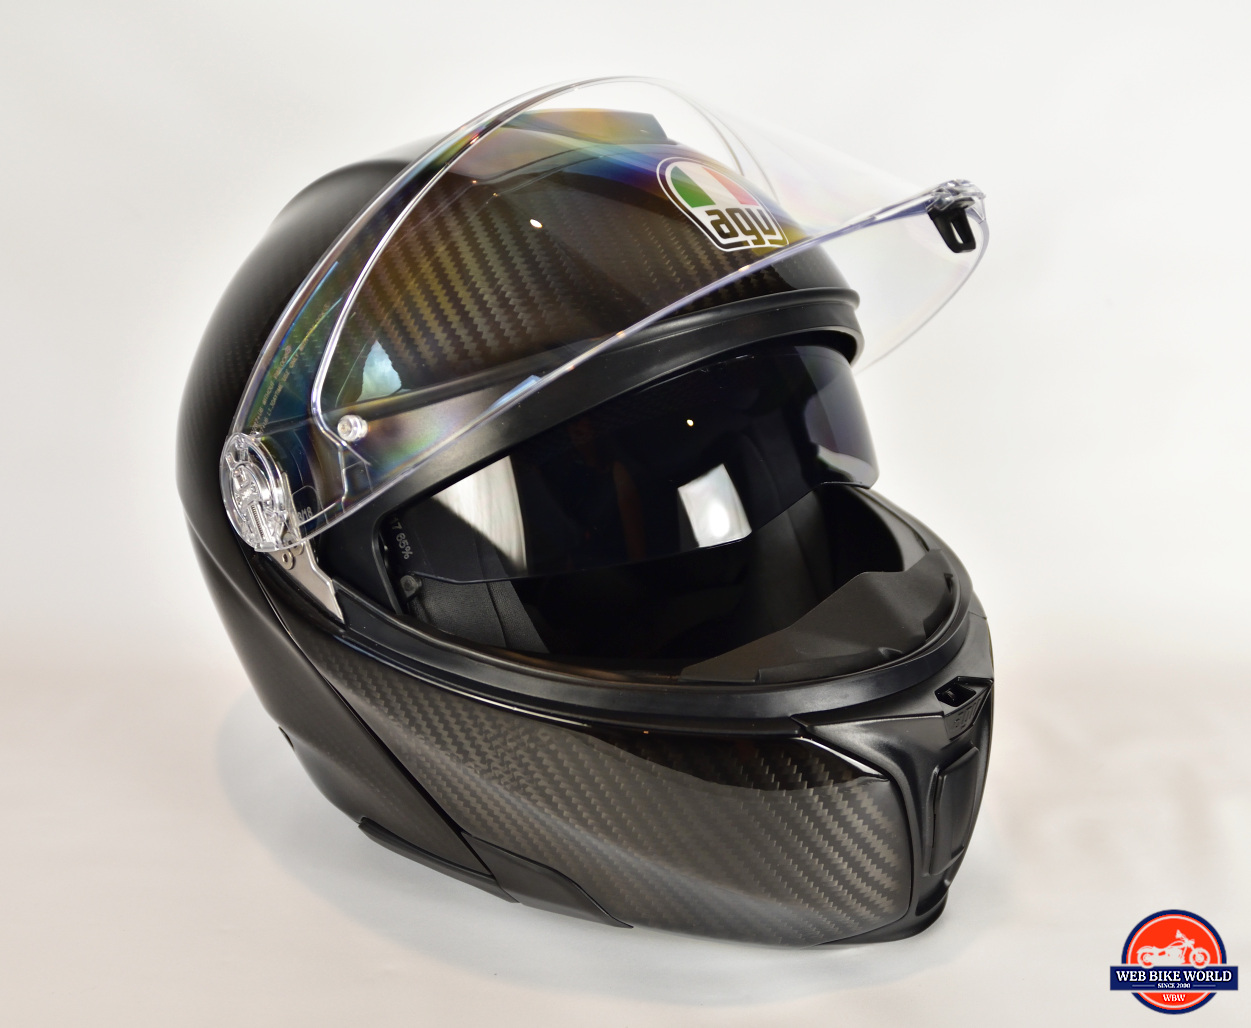
Carbon Fiber Goodness
This is the first carbon fiber helmet I’ve ever worn, let alone carbon fiber modular helmet. There is other 3K carbon fiber modular helmets on the market but none where the entire outer shell is carbon fiber, including the chin bar.
Super Lightweight
This makes it the lightest modular on the market weighing in at a claimed 2.85 lbs, and when compared to fiberglass, carbon fiber is just as strong but also stiffer. In cases where a degree of flexibility is desirable (like on a helmet) carbon fiber is the ideal choice even over fiberglass.
I measured the helmet’s weight on my own scale and found it was 3 lbs even, but my scale may not be bang on.
Fit and Finish
One Badass Looking Brainbucket
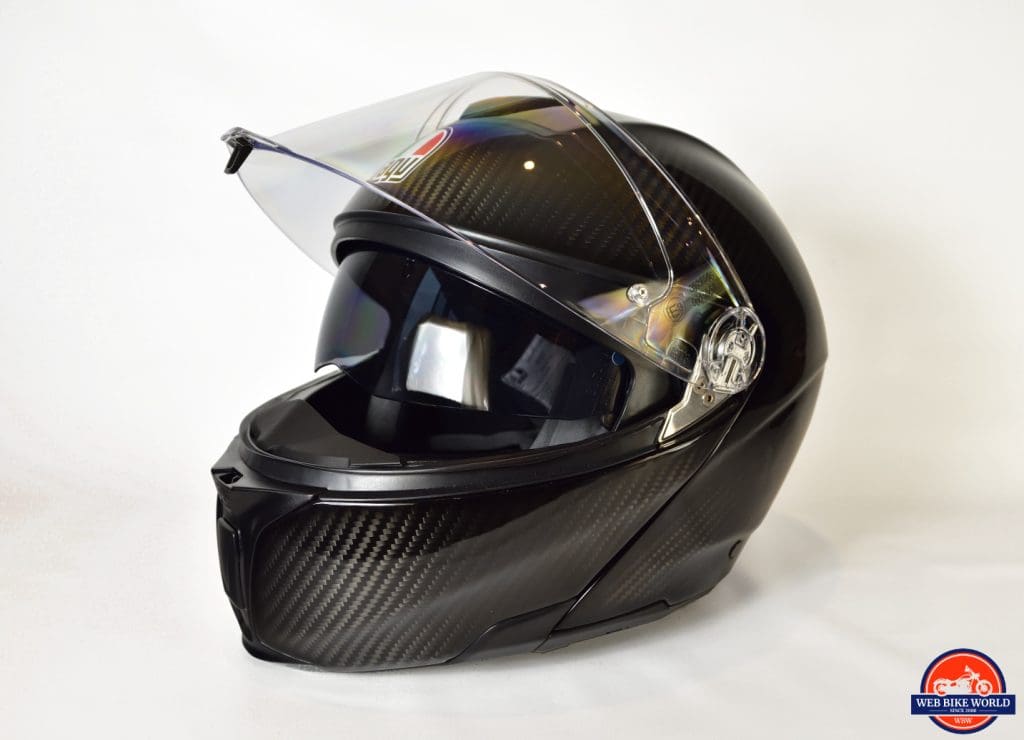
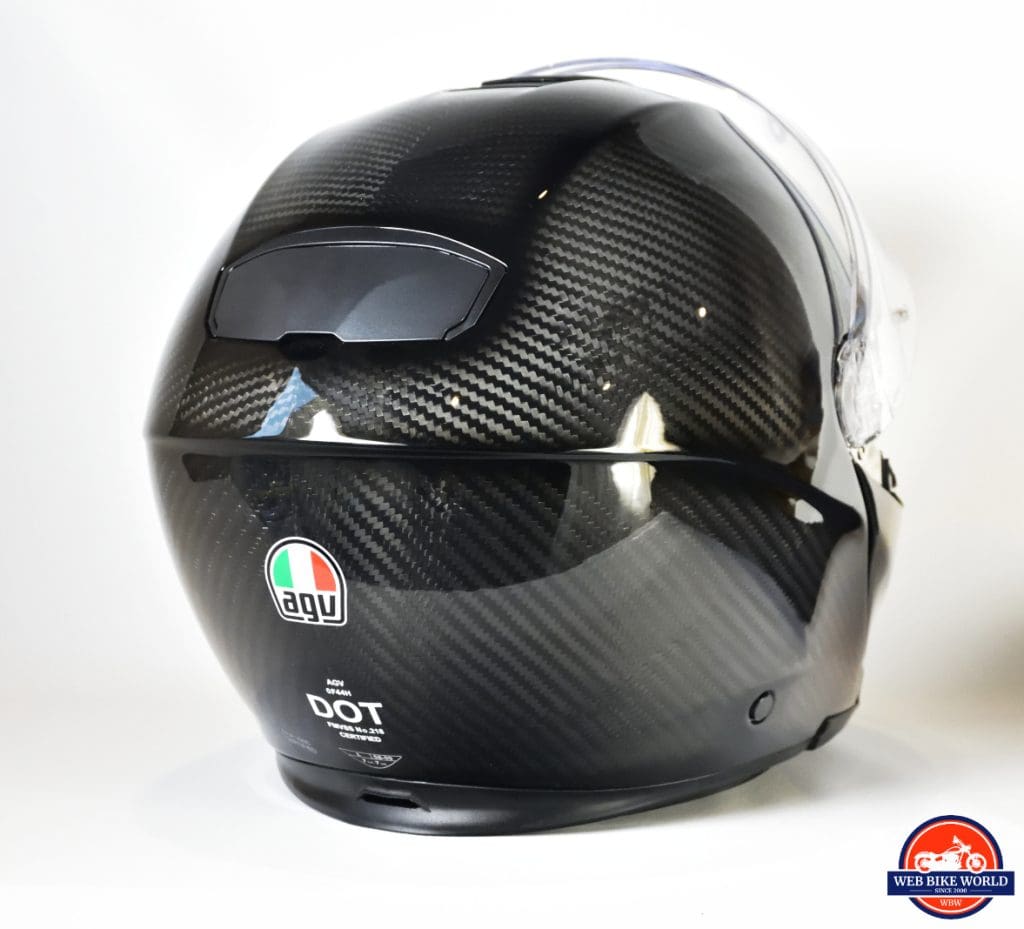
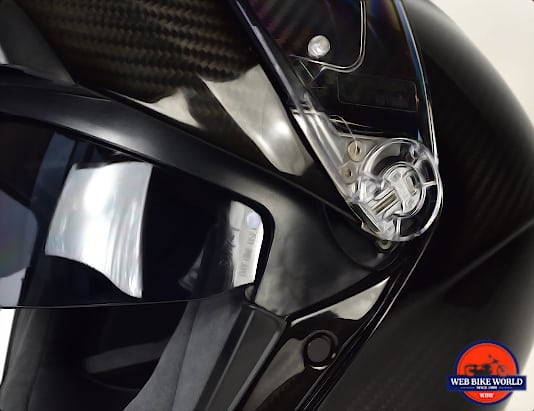
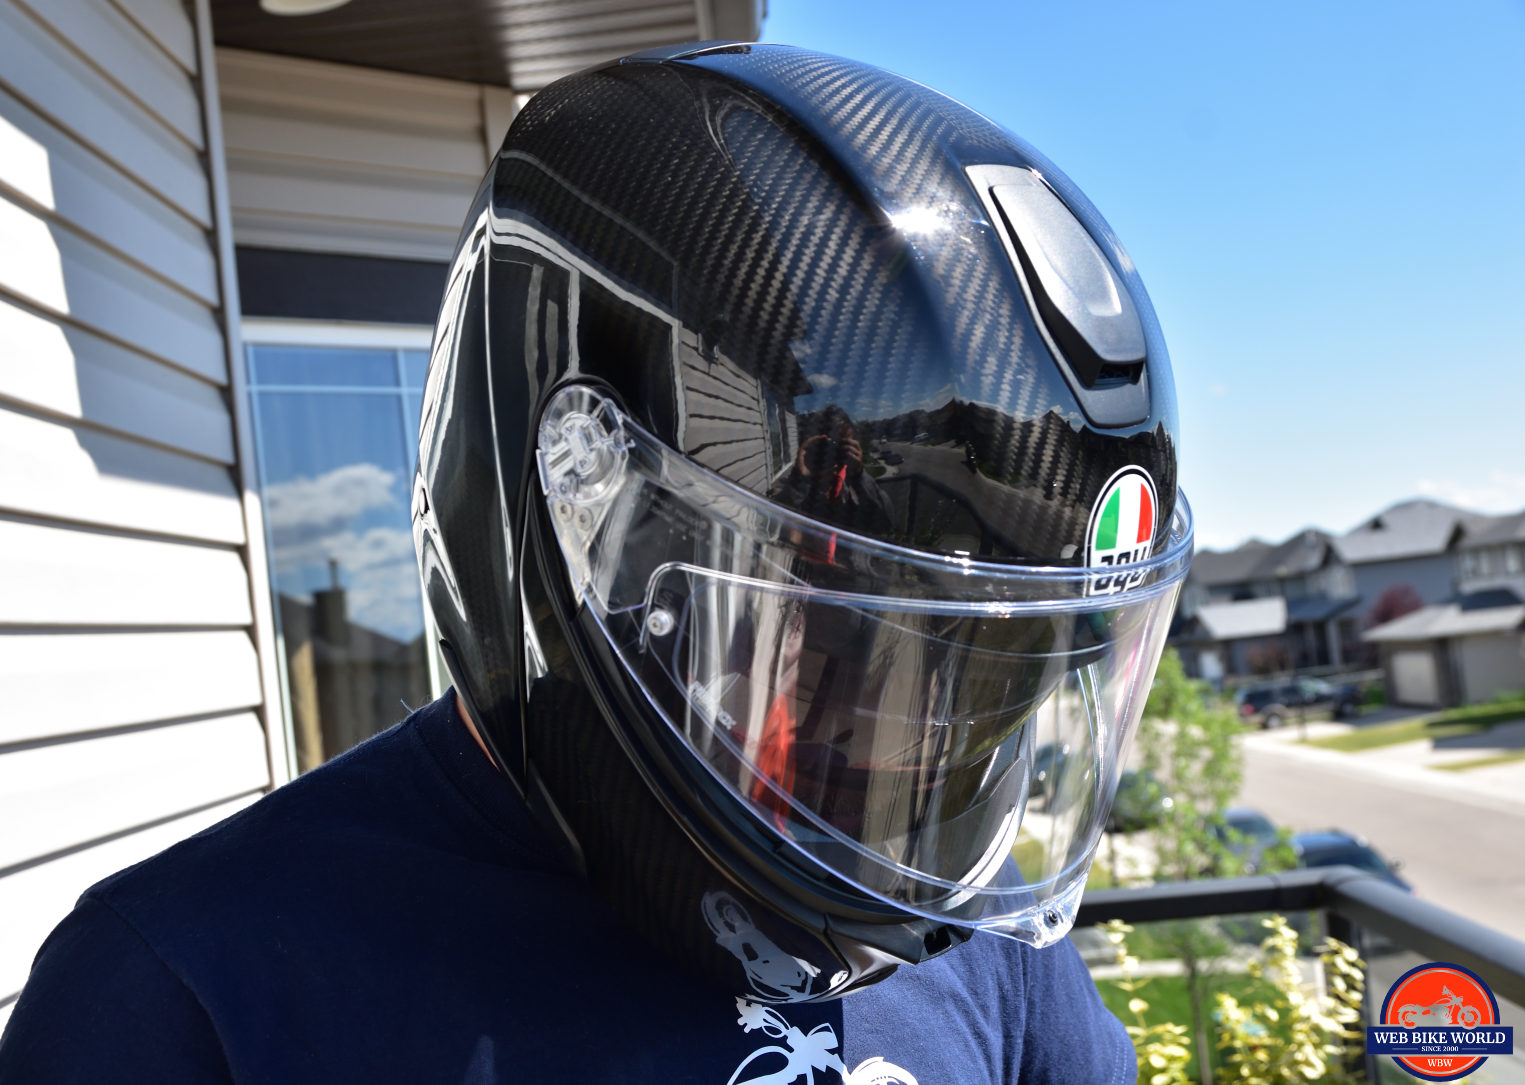
The black and grey, checkered-design of the carbon fiber encapsulated in the gloss coating are awesome to behold. It creates an illusion of motion even when stationary. I dig that and love the “space age” technical appearance.
One odd thing about the woven pattern of fibers on this particular helmet is what appears to be a flaw on the right side. A sort of wave or wrinkle is very noticeable running 5 inches long. I wasn’t able to capture it in a photo clearly enough to share, unfortunately. I’m not sure whether this would affect the structural integrity or not but it’s noticeable.
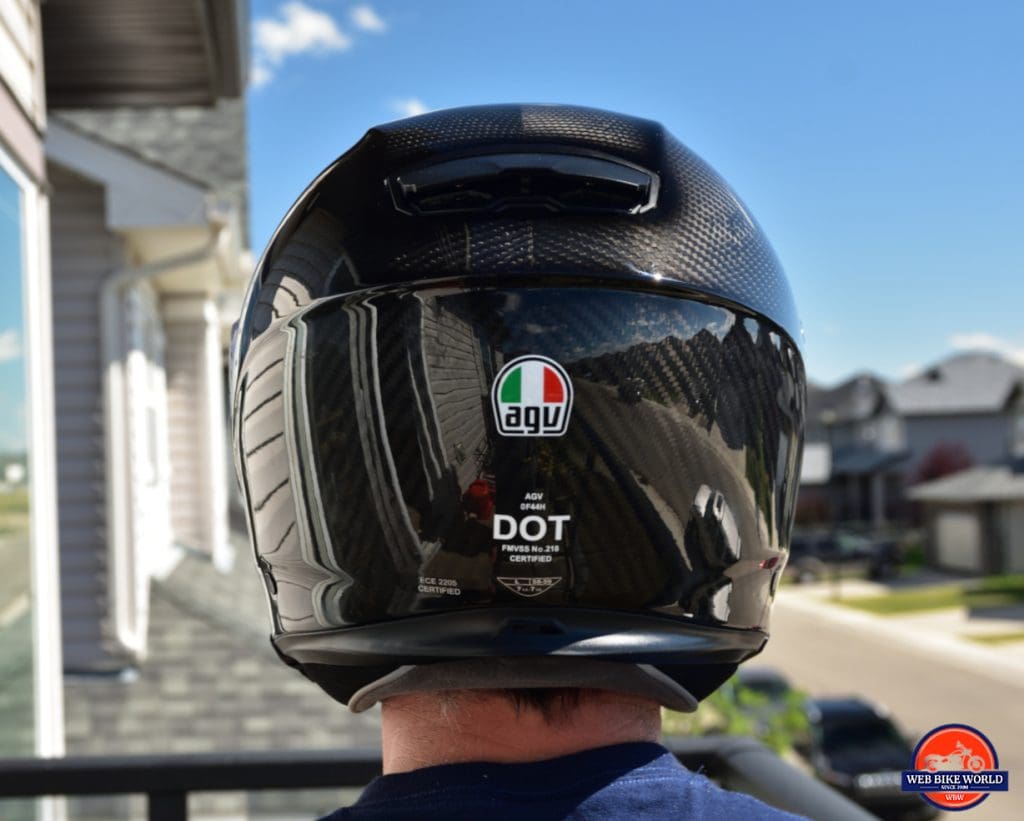
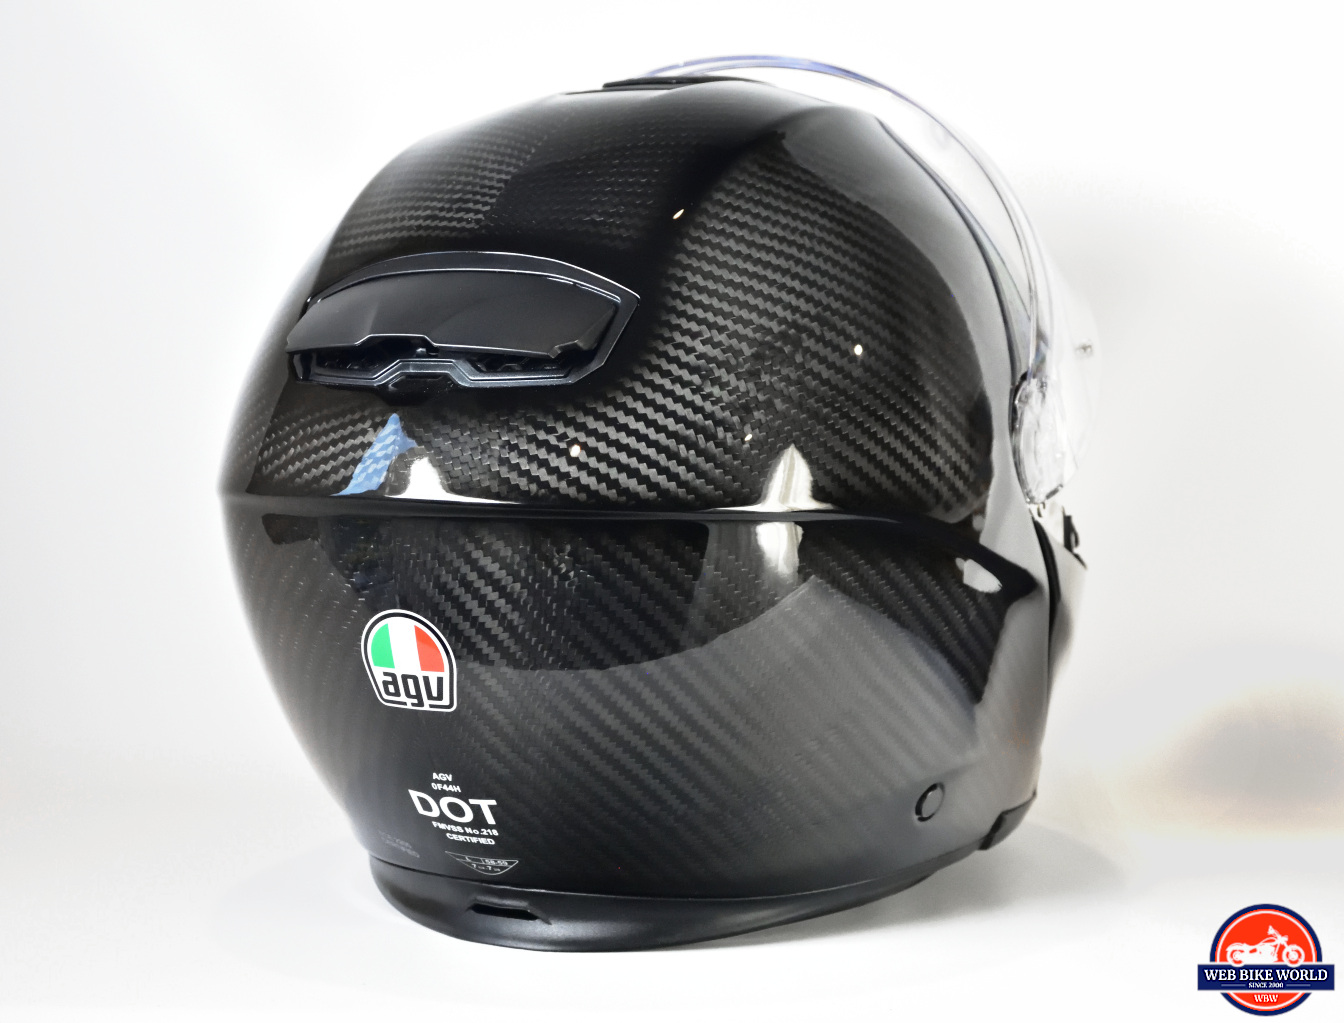
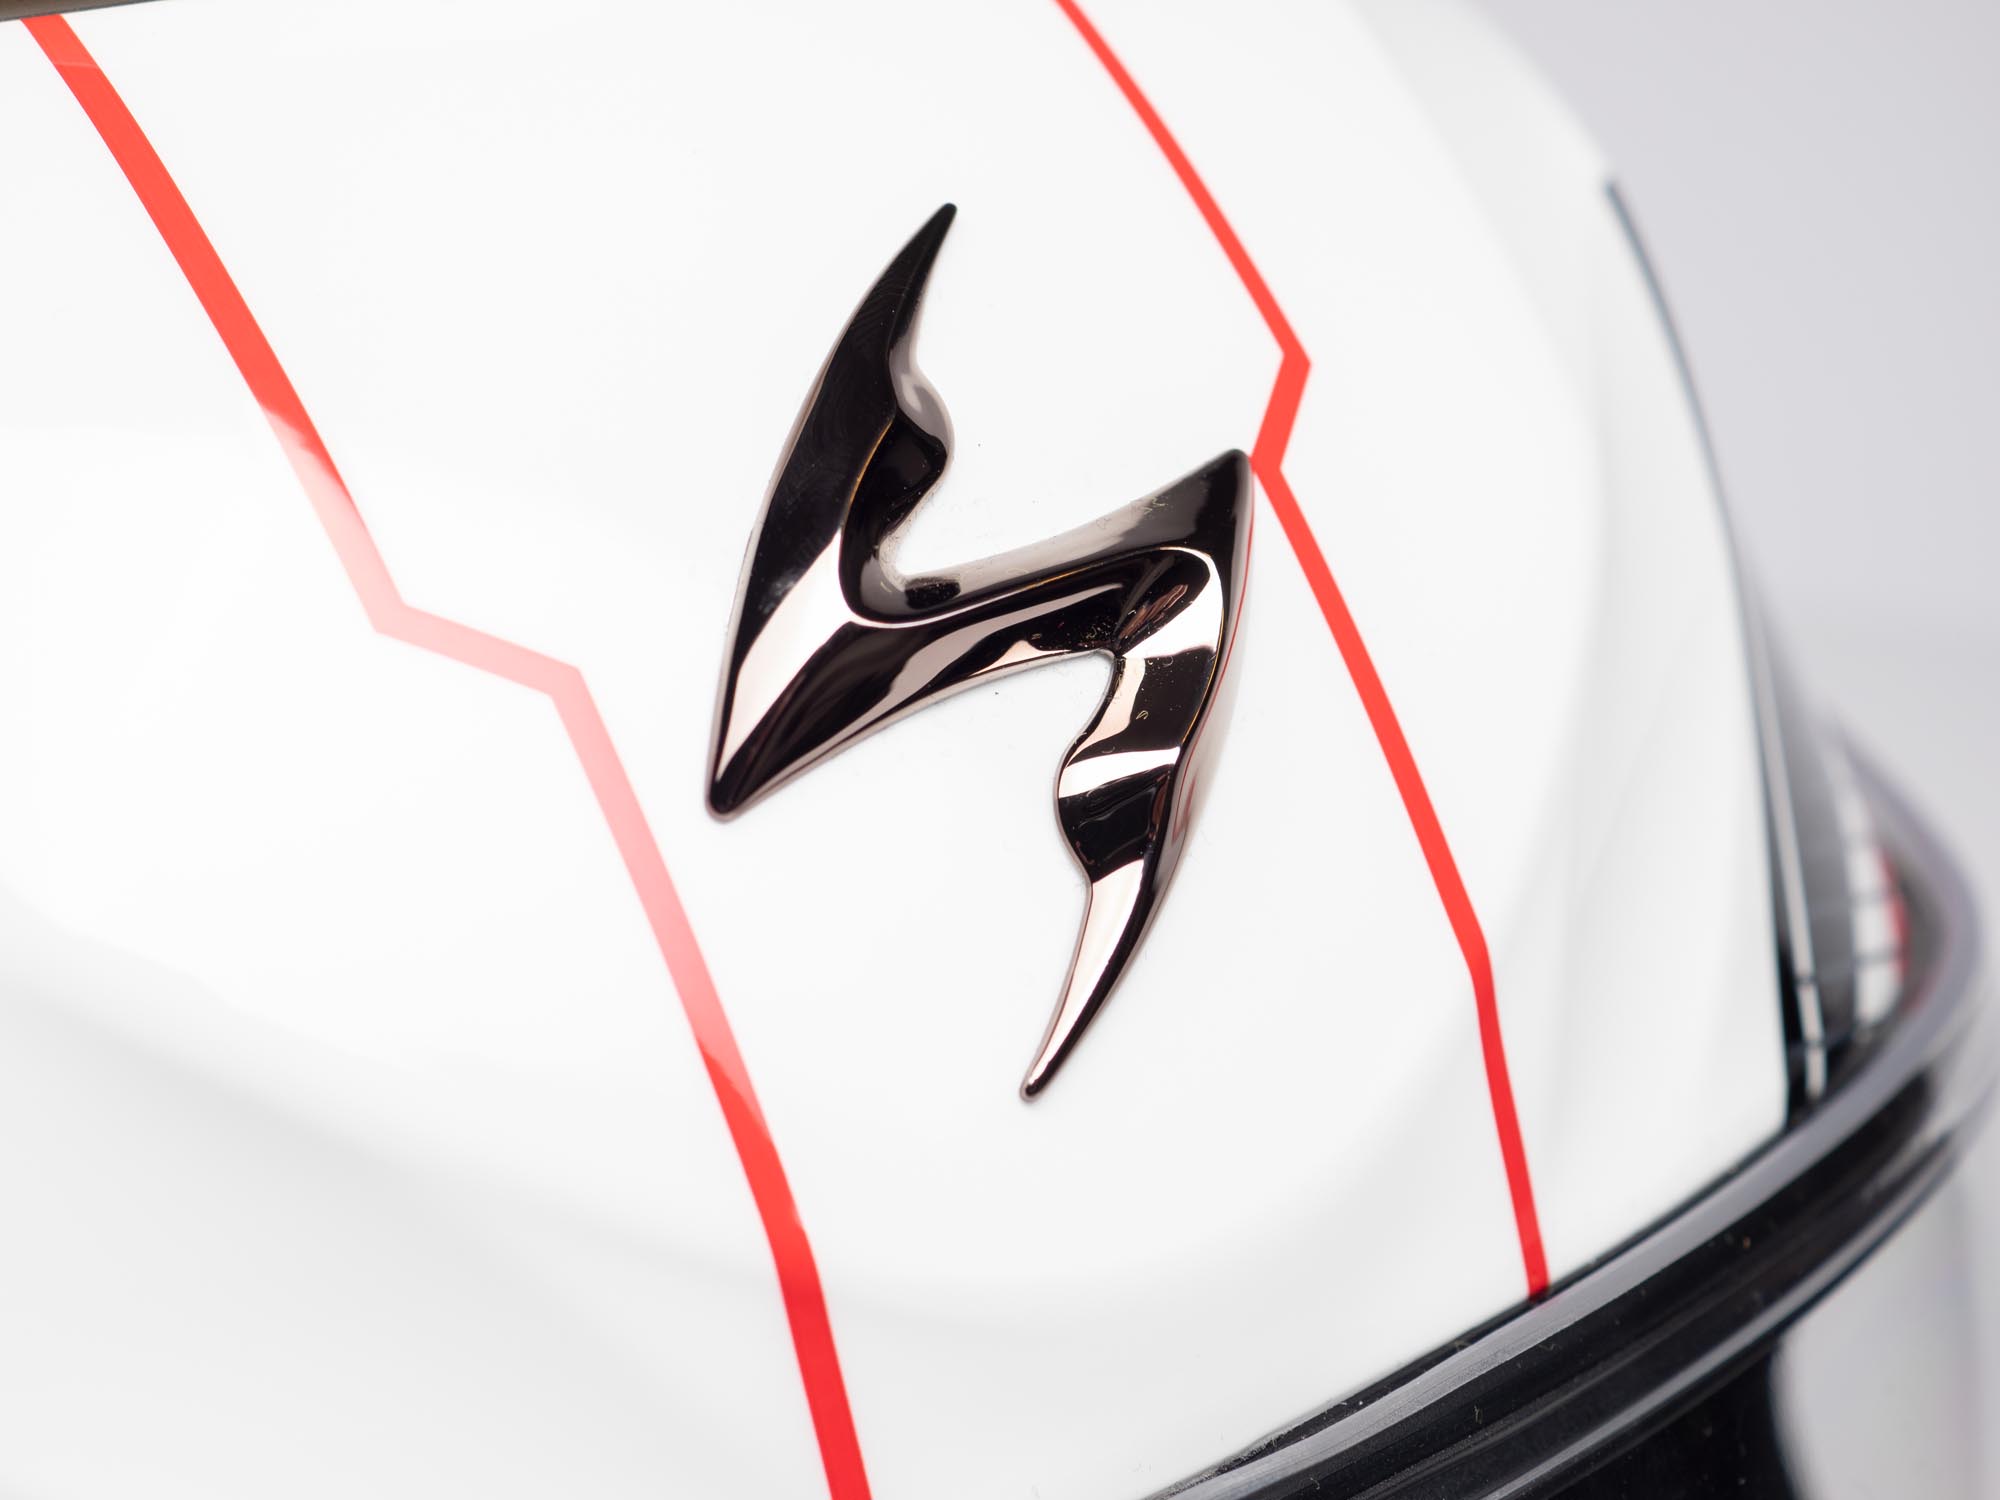
The AGV tri-color logos are tastefully found front and rear on the helmet. They are sized appropriately and the red, white and green colors pop nicely against the dark carbon fiber.
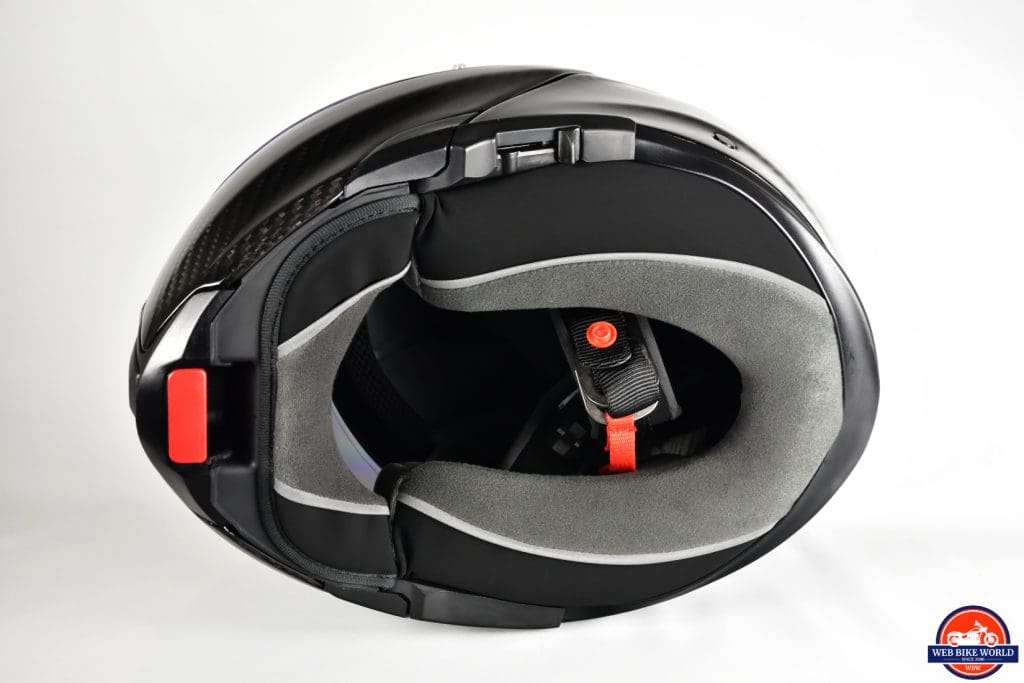
The inner padding follows suit using two shades of grey with some black. I like the small touch of an Italian flag found embroidered on the chinstrap.
Italian styling is evident in this helmet without being too flashy or overbearing. Nice job AGV.
Fitment
Once installed on my head this helmet is almost forgotten due to it being so light and comfortable. I don’t even bother taking it off while taking breaks during rides. It’s that good for me.
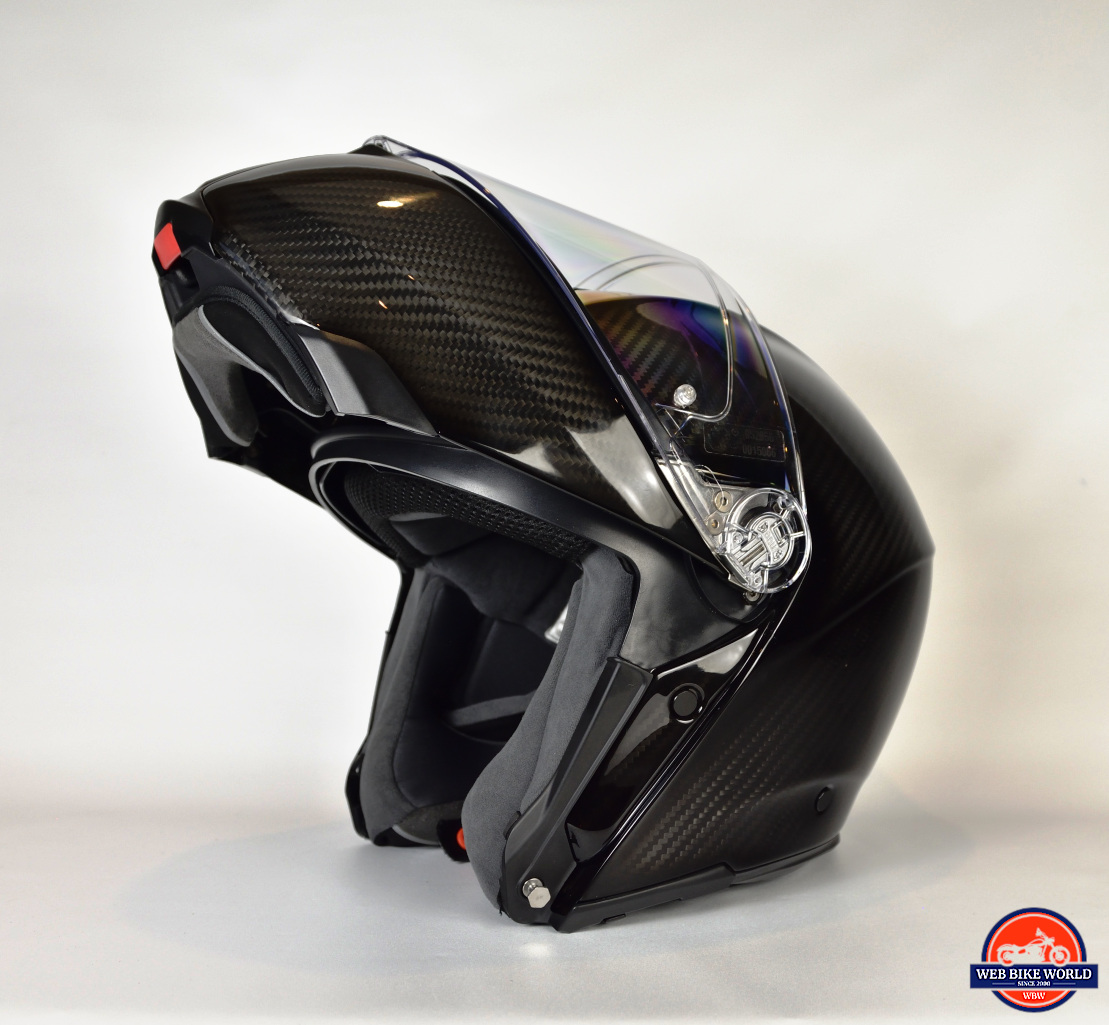
It doesn’t fit like other modular helmets I’ve worn. The rear portion sits further back on my face with the chin bar locked open instead of having sections on each side reach forward along my jawline closer to the corners of my mouth.
That makes it a bit awkward to put on with the chin bar locked open for me because there’s nothing to grab hold of and pry apart with my fingers, but I’m getting used to setting it on the top of my head canted forward and then pivoting that back of it down into position.
I can’t put this helmet on or take it off without the chin bar locked open unlike any other modular I’ve worn. The opening is just too small in diameter to do it. It’s made this way purposely to fit close and tight around the jawline and base of the skull/neck. If you’re claustrophobic that might irritate you, but I love it.
Chinstrap Issues
I think the main reason is that usually I hold and pull apart the chinstrap on each side while donning any helmet and the straps on the Sportmodular are set back about an inch further than on most other helmets. This throws off the balance when I lift it up by the straps causing it to flop around in my grip.
Having the strap back so far might lead to fitment issues with some face shapes too. My friend tried it on and found that the strap choked him a bit due to the positioning.
Definitely try this one on before buying to gauge whether something specific to your features like a larger Adam’s apple, pronounced jawline or thicker chin/neck might make the AGV uncomfortable for you. That goes without saying for any helmet, but with an extremely close fitting one like this one, it’s especially true.
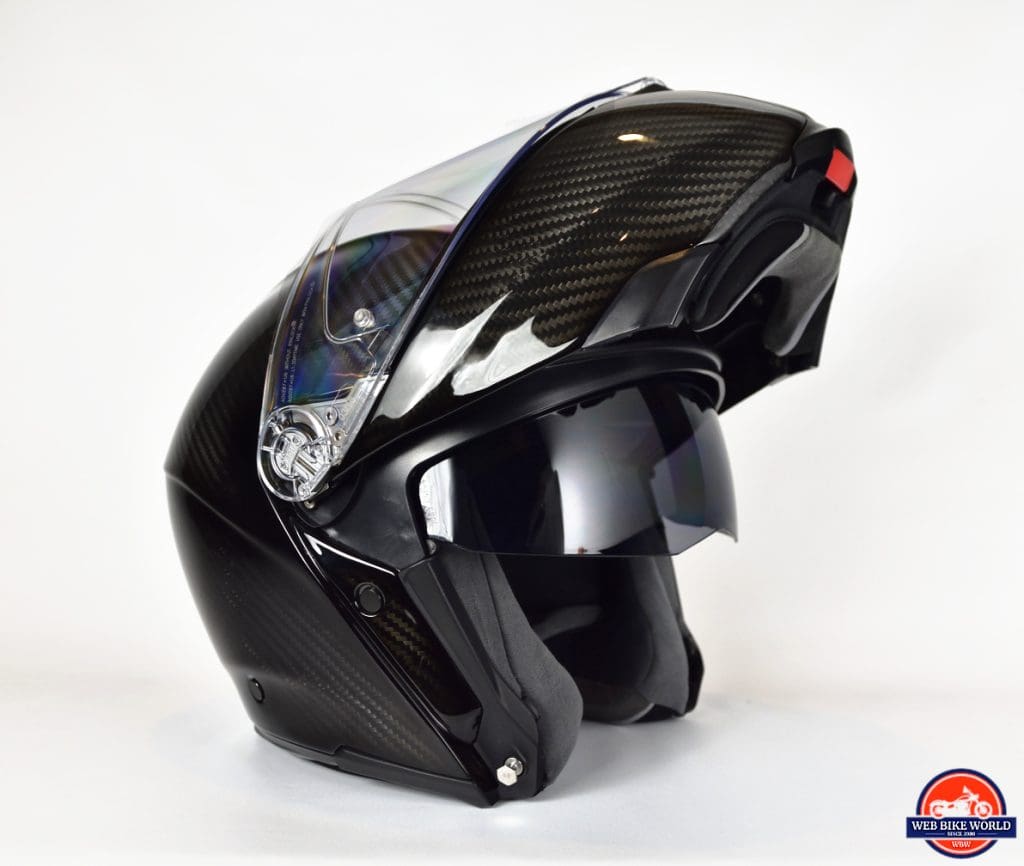
Tapered Shell Design
The lower part of the shell tapers inward noticeably. This is intentional with the goal of preventing collarbone injuries in the event of a crash. Something learned in the world of racing that was incorporated into this helmet design.
Shopping Now? We Recommend:
webBikeWorld has worked closely with RevZilla over the years to provide our testers with products to review. In addition to being a great site to shop from, they’re also a great partner.
How close fitting you may be wondering? Really close.
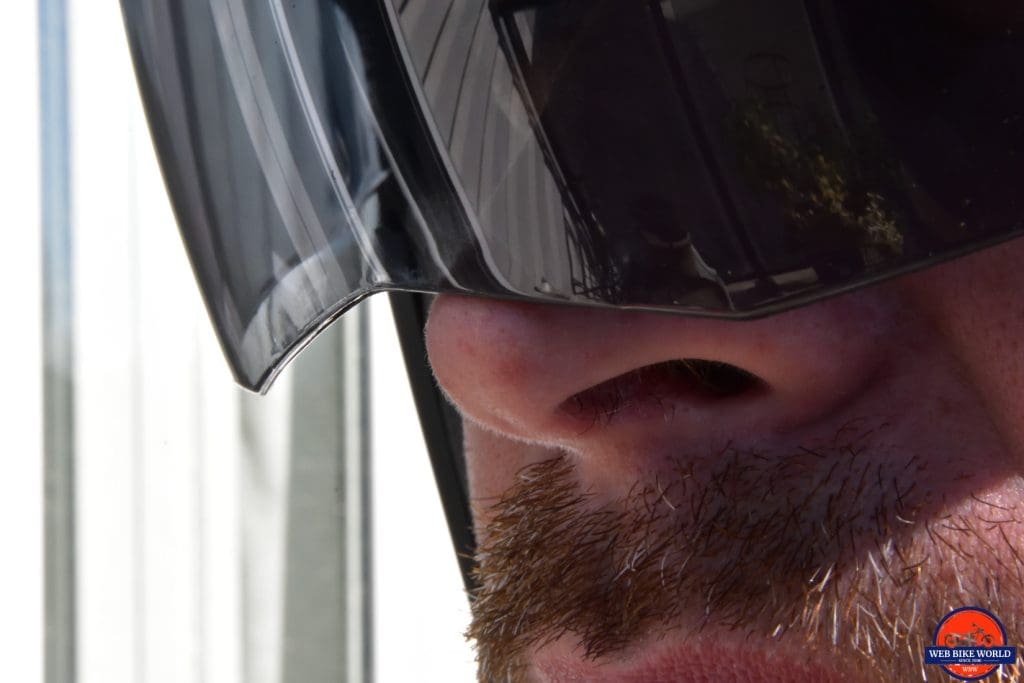
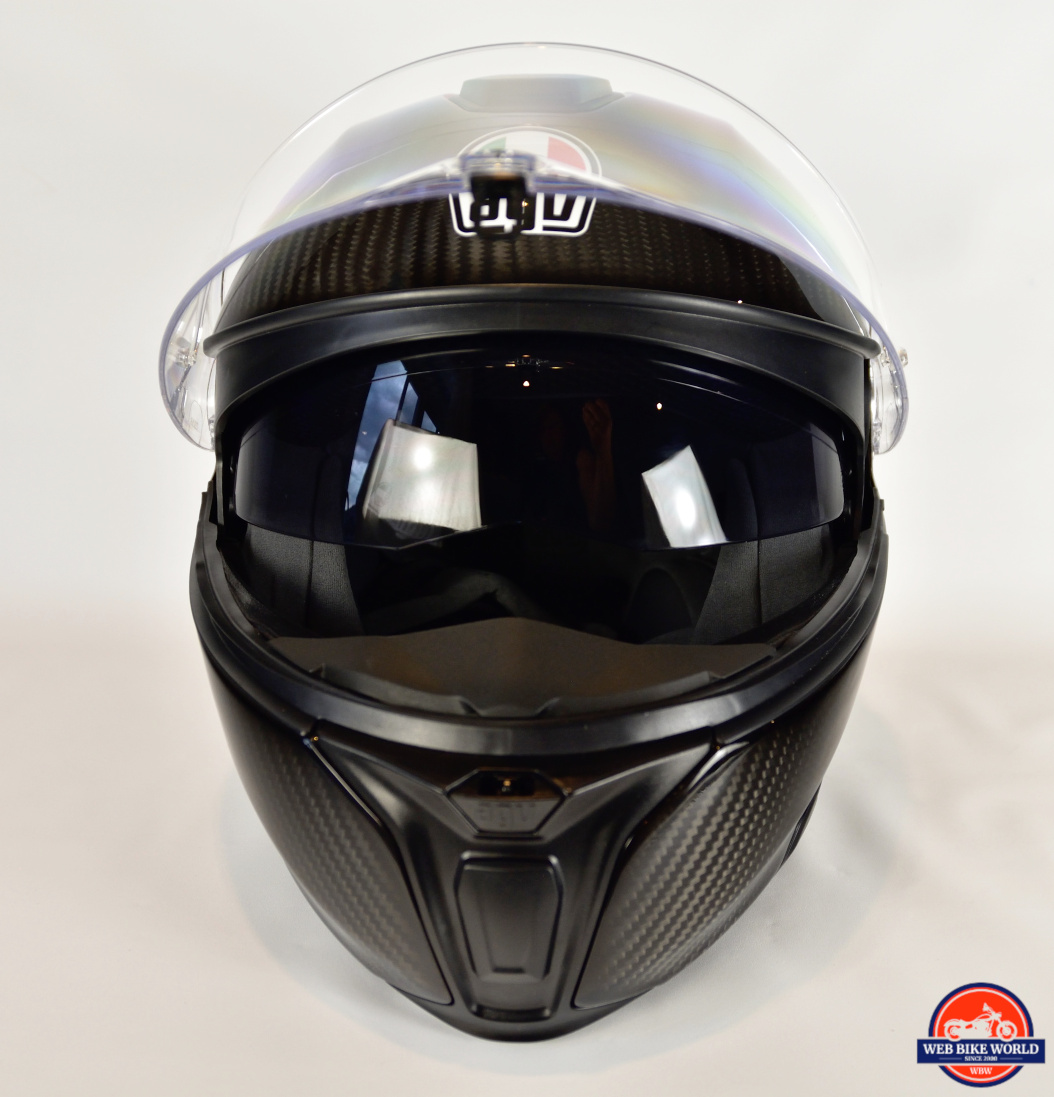
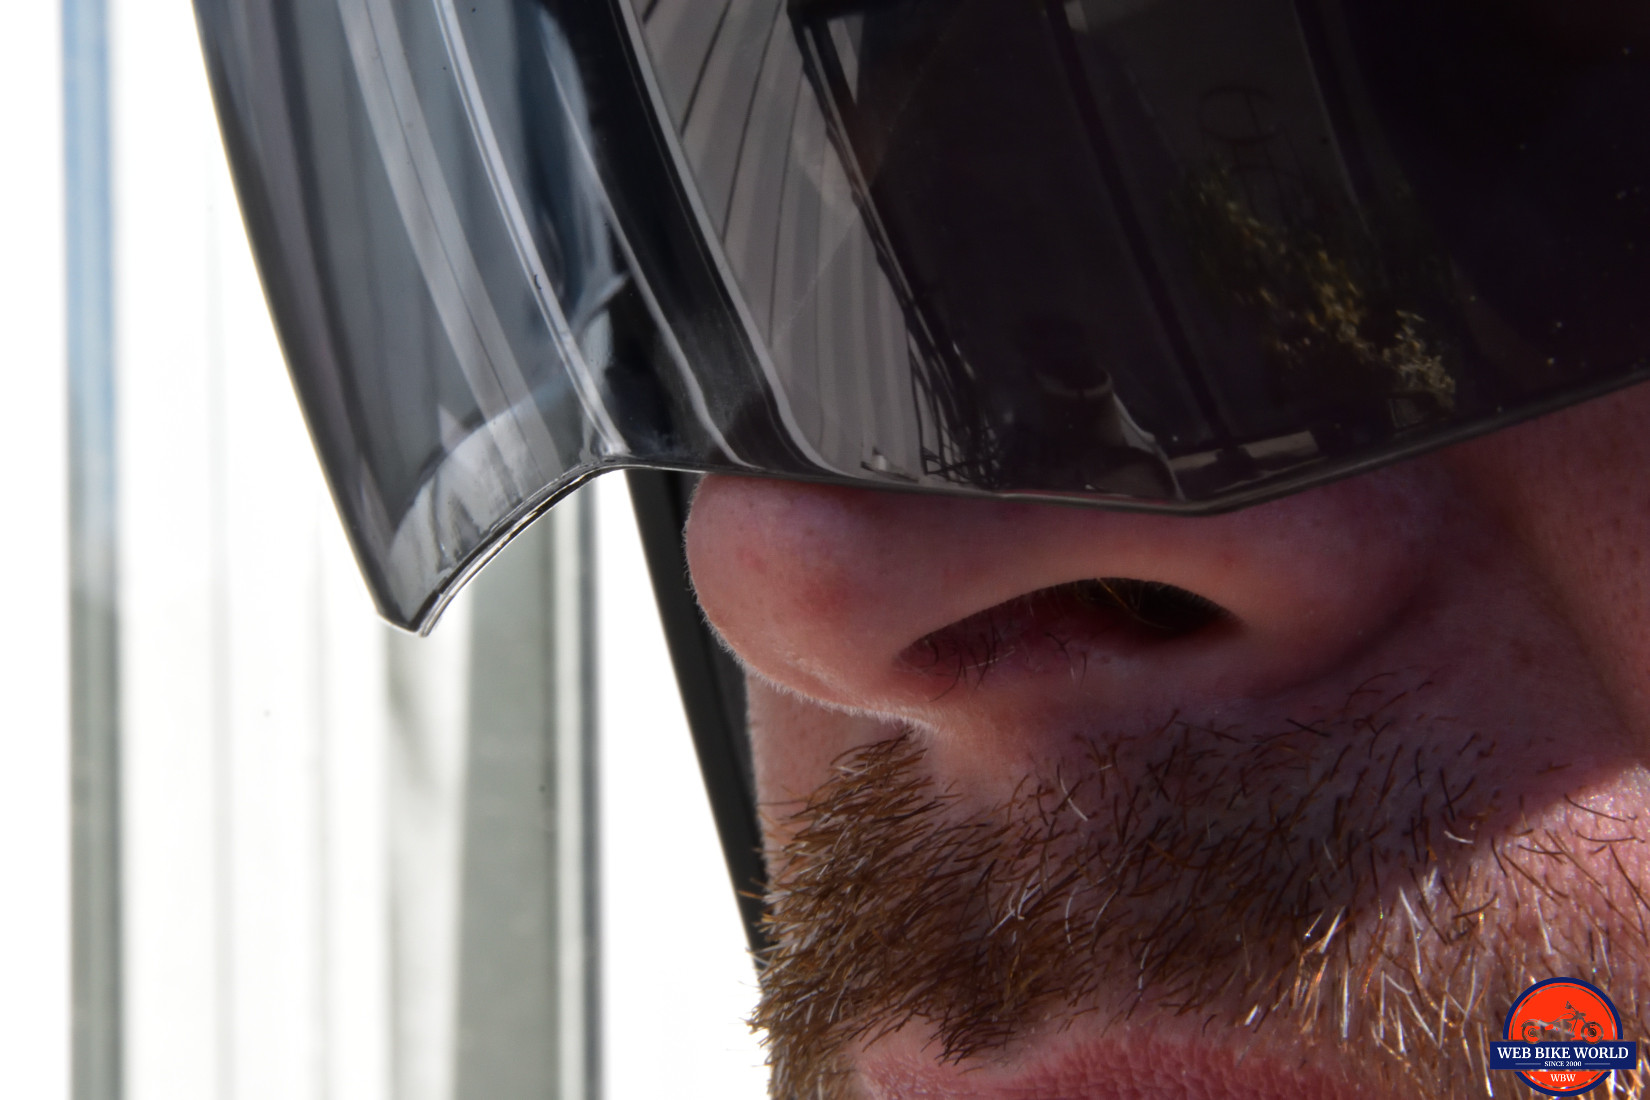
When I fully lower the integrated sun lens it touches the tip of my nose! It’s kind of a double-edged sword because having it come down so far means my entire field of view is shaded by the lens (excellent!), but whenever I ride over a bump the lens nibbles lightly on my nose. Not enough to cause pain or leave a mark, but it tickles a bit.
It’s not AGV’s fault because I admit freely to having a rather tall sniffer on me that is crooked thanks to me shooting my mouth off while playing hockey over the years and the ensuing fisticuffs.
The sliding switch that retracts or extends the sun lens is pretty easy to find and operate with my gloved left hand but the switch drags noticeably at the end of travel to hold the lens in position.
The tint on the lens is ideal for bright sunlight and distortion free as expected in a premium quality helmet. I like it a lot and compared to other integrated lenses I’ve looked through this is the clearest.
Visor
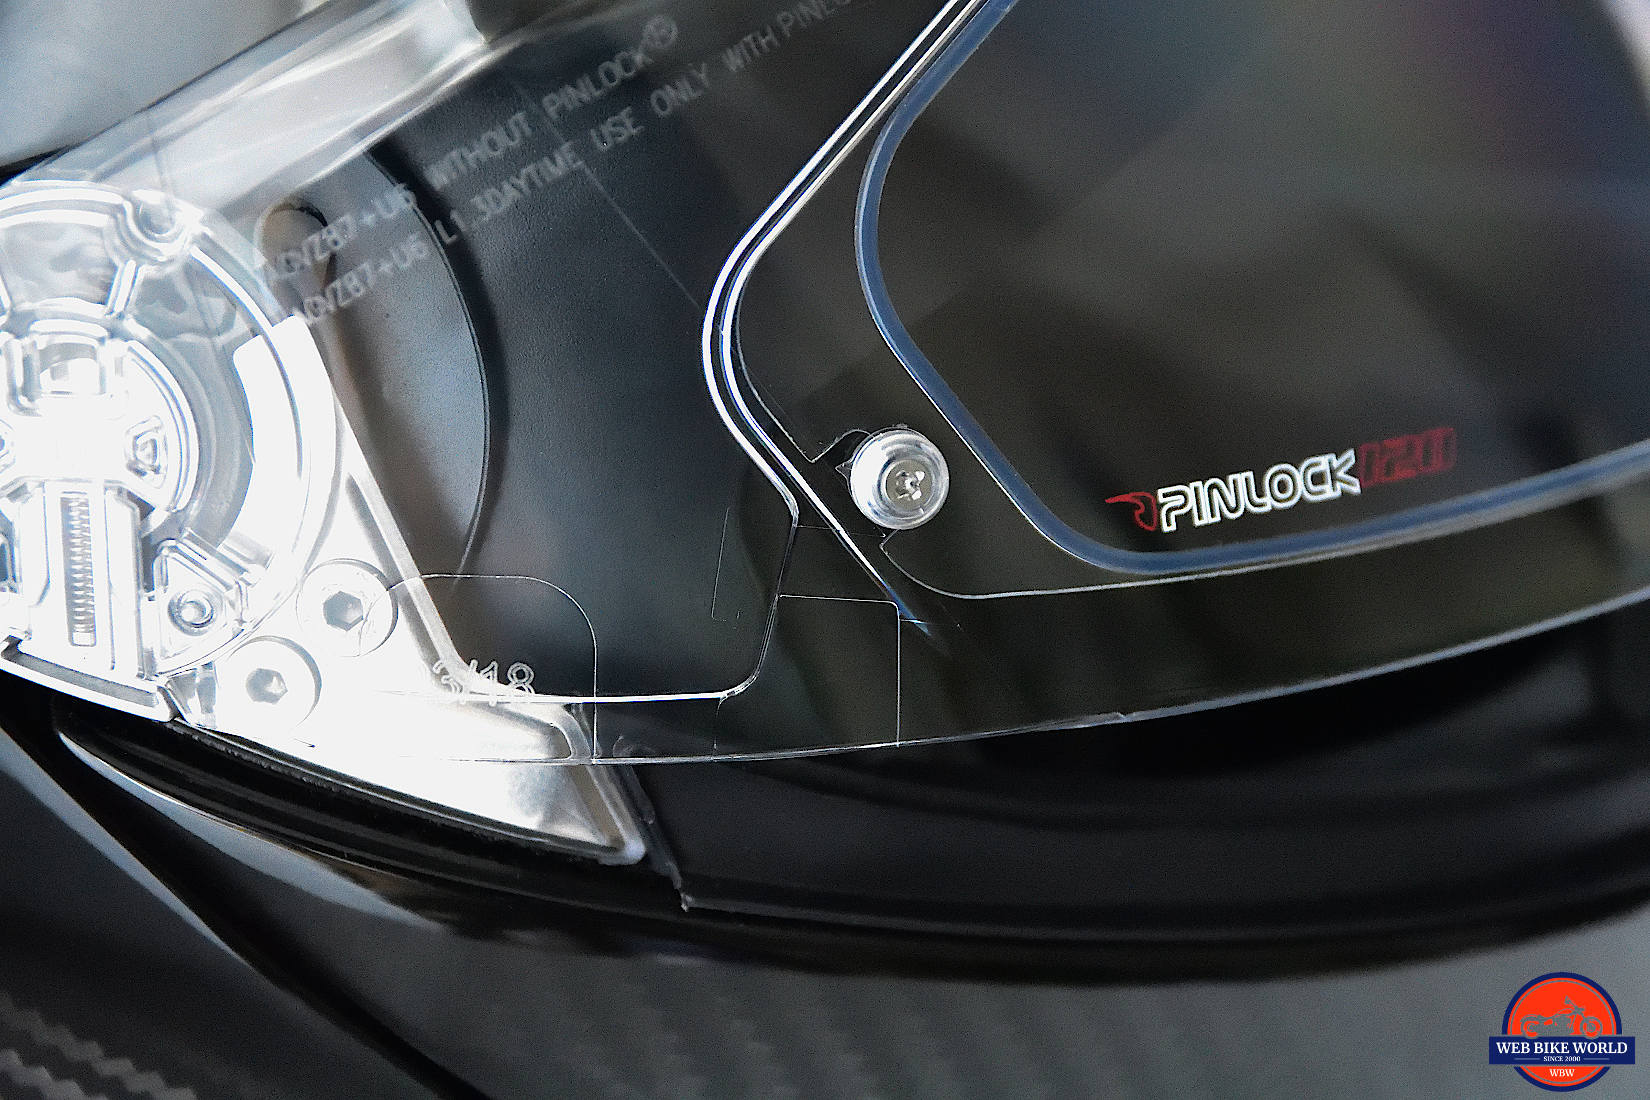
The visor is equally pleasant to look through and crystal clear even with the Pinlock installed. I had no fogging issues even when riding in the rain with the helmet, but found if I deliberately exhale in an exaggerated way out of my mouth I can momentarily fog up the visor due to how close it sits to my face. It clears immediately after I stop exhaling.
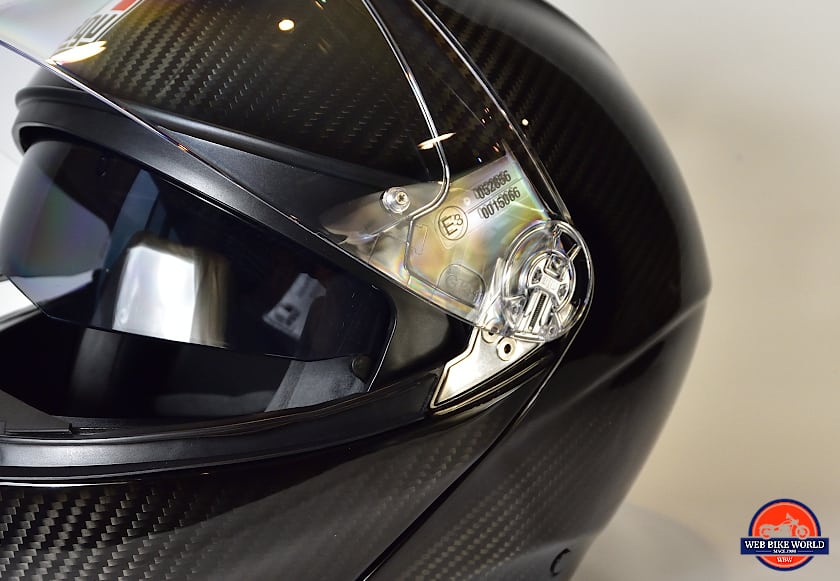
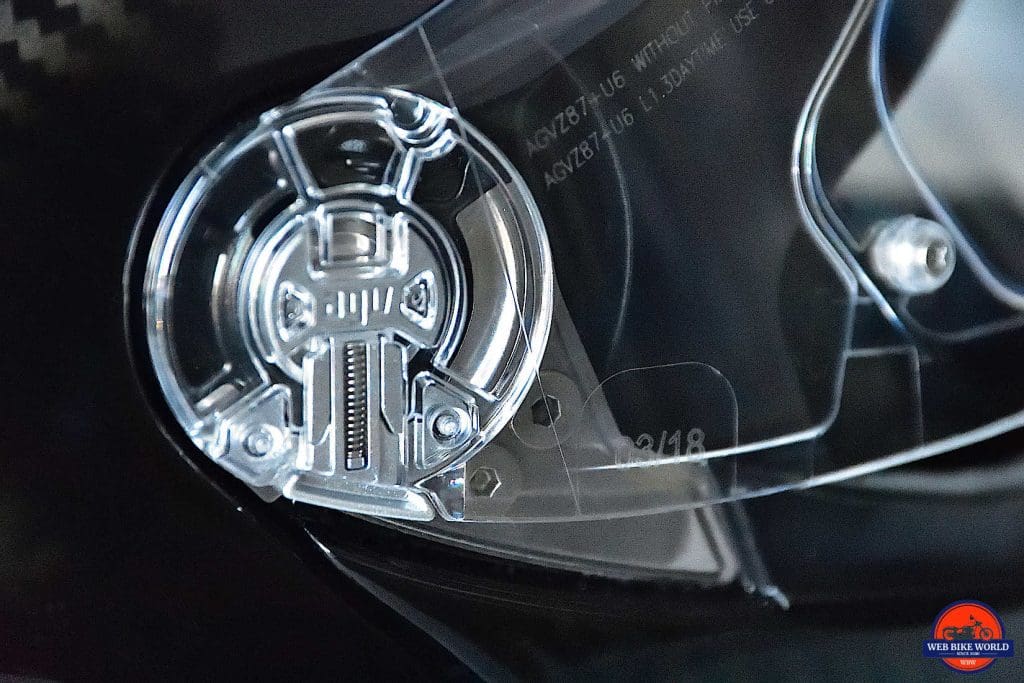
Annoying Locking Mechanism
The visor has a U-shaped tab hanging down in the middle that locks it to the chin bar unnecessarily. With the visor closed completely flush or just above flush the lock activates.
Why???
Luckily there’s only one small screw holding the U-shaped tab to the visor that could be removed to eliminate the locking feature and the need to push a release button to raise the visor each time. The button is hard to push with gloved fingers and the visor stayed put slightly open when it wasn’t locked. The lock is totally unnecessary.
Some other reviewers haven’t cared for the tab used to raise the visor being dead center and prefer a part to push on located on either side instead. I would agree that’s a better way to go, but I have no issue living with the tab in the middle, myself.
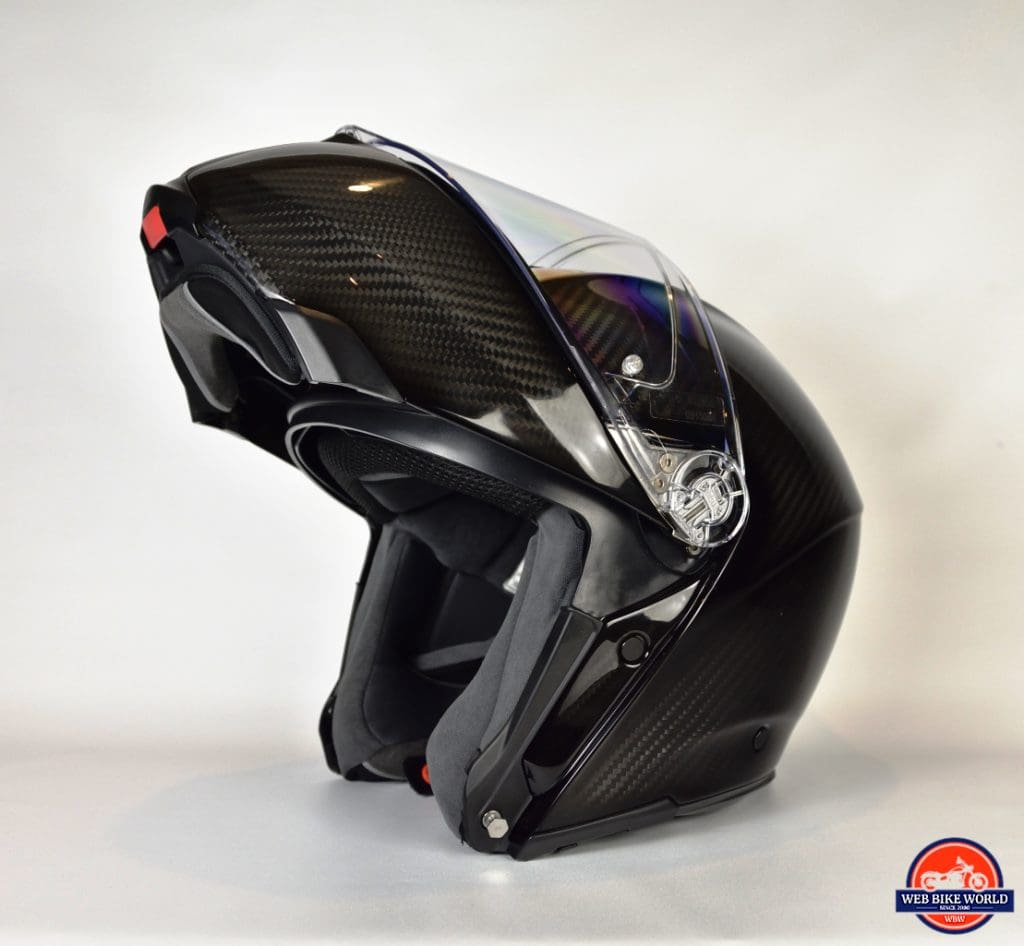
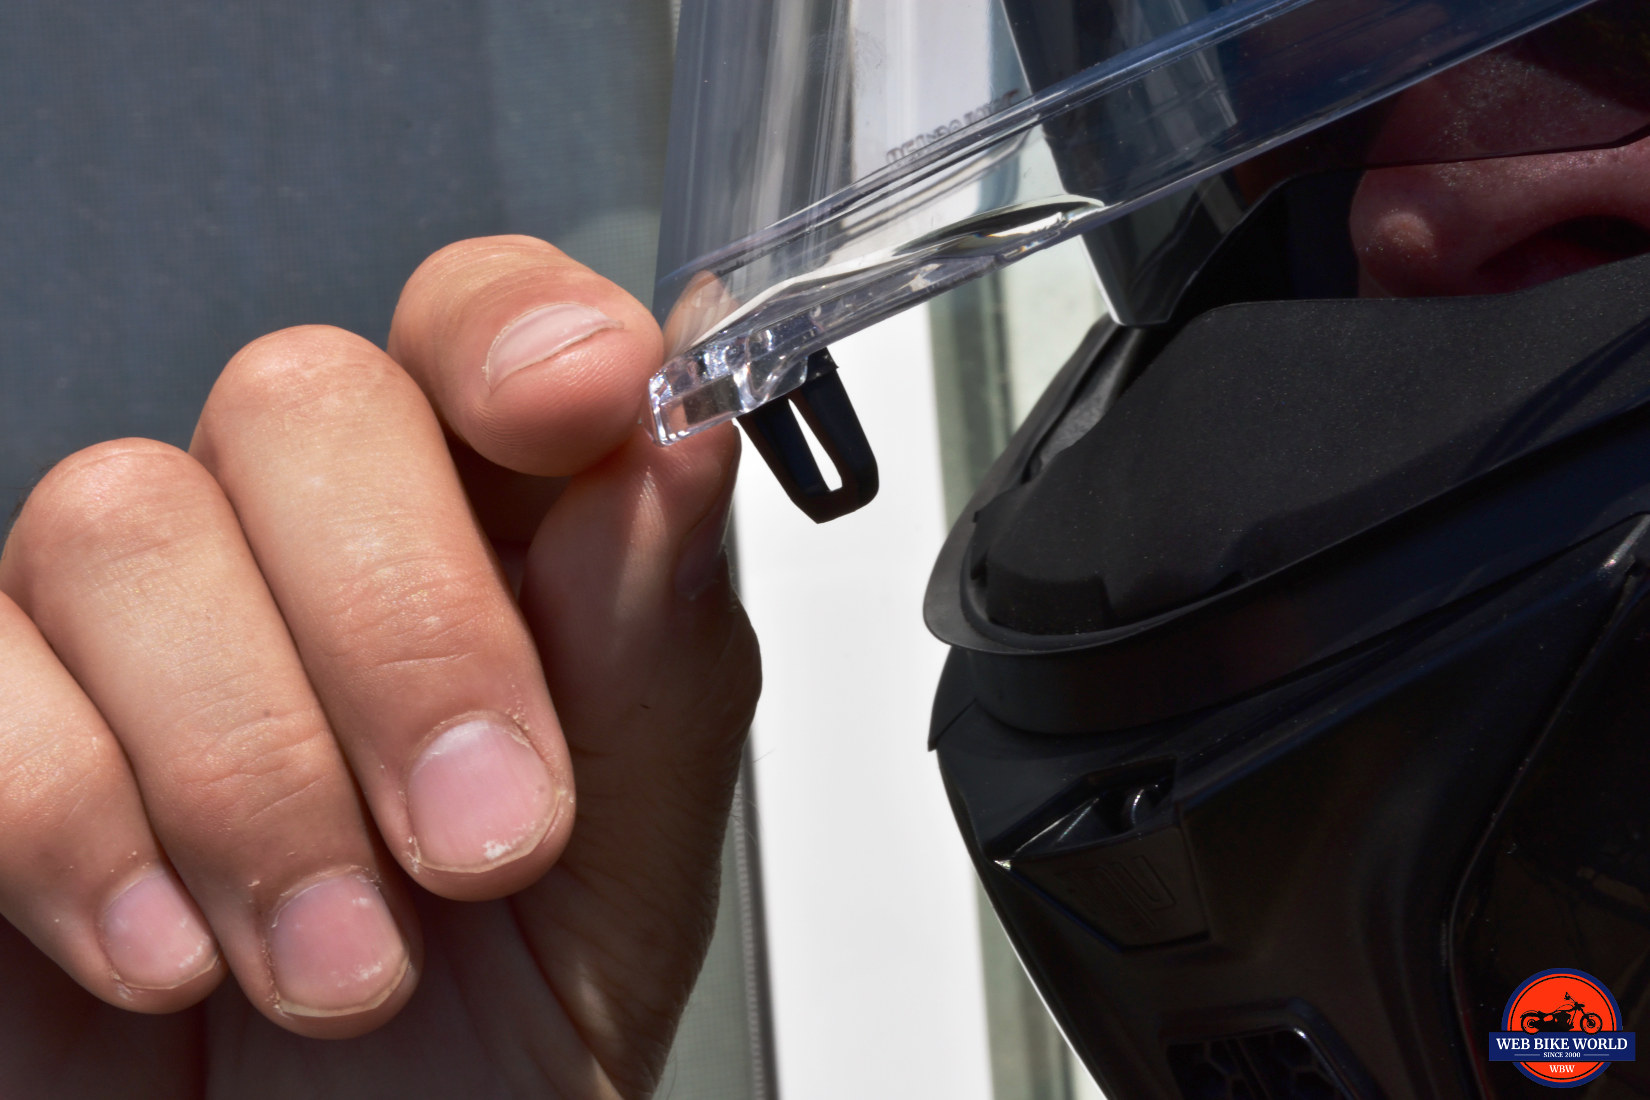
Quick Release Visor
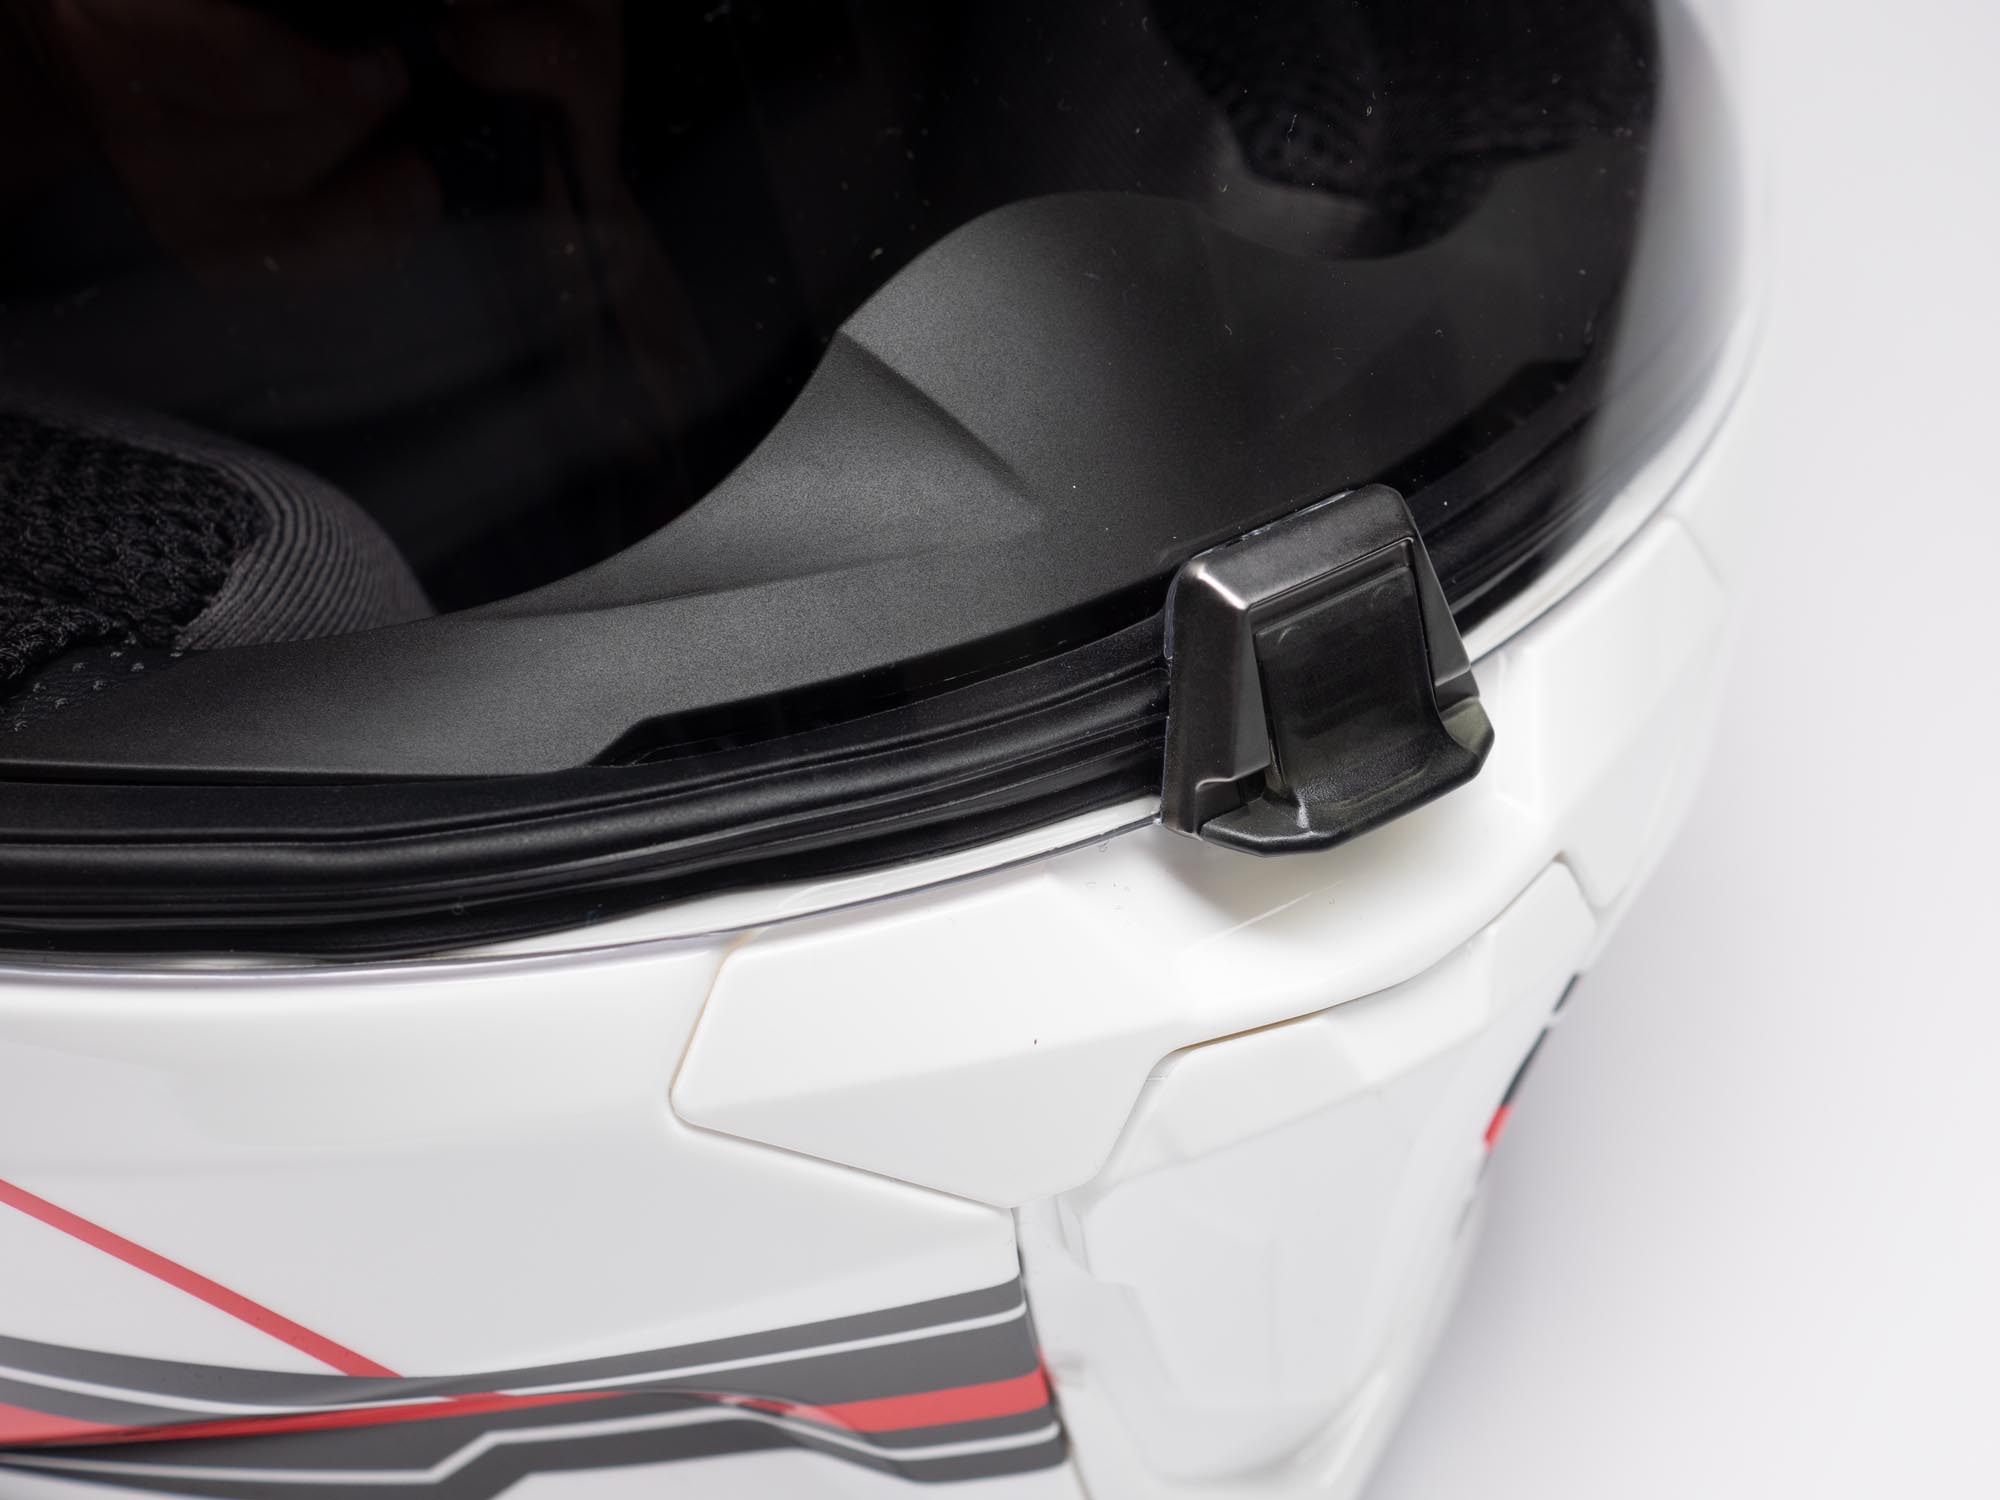
This visor comes off and goes on like nothing thanks to the small release levers on the pivoting points for the visor.
It’s very intuitive to see how tugging down on the bottom lever releases the visor from the helmet. Putting it back on is just the same method in reverse. I love it.
I like how compact the whole mechanism is compared to other helmets too. Bravo!
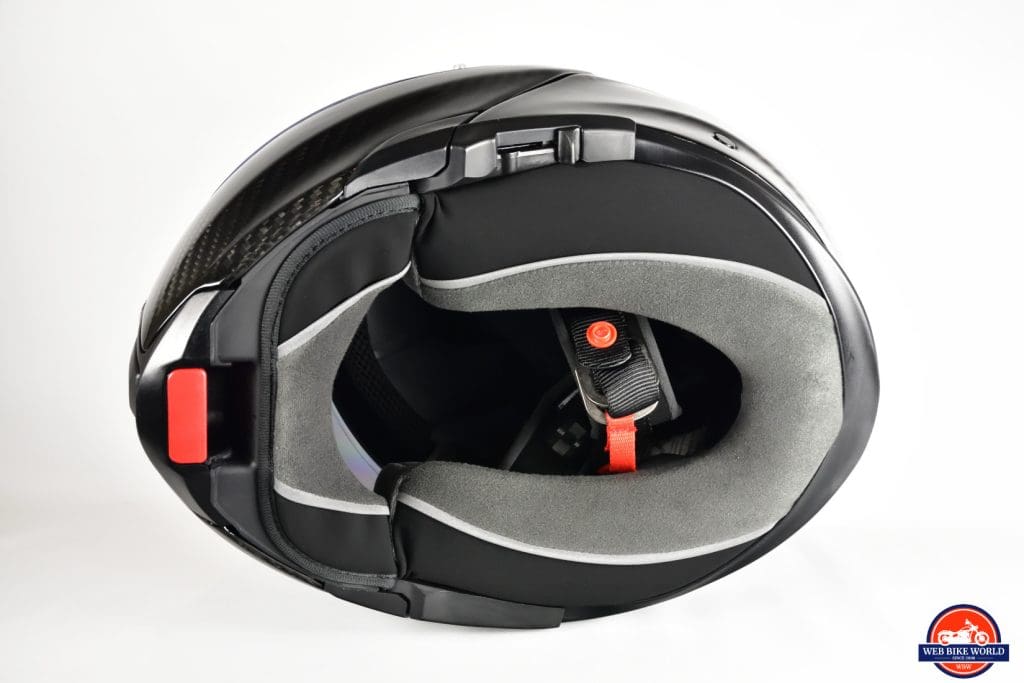
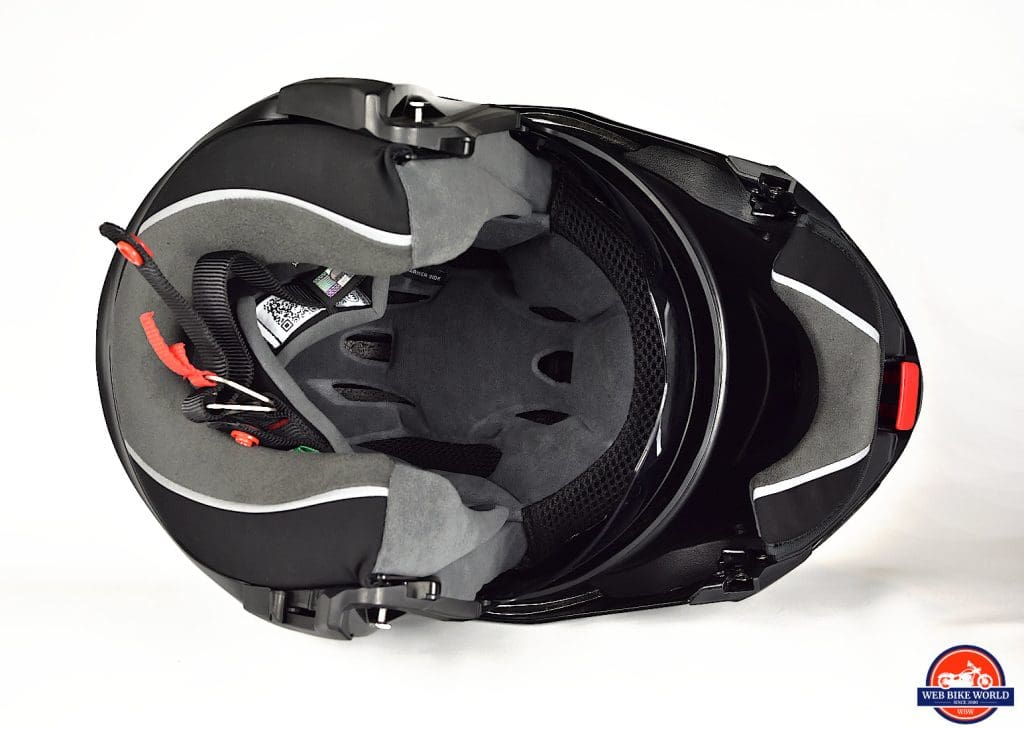
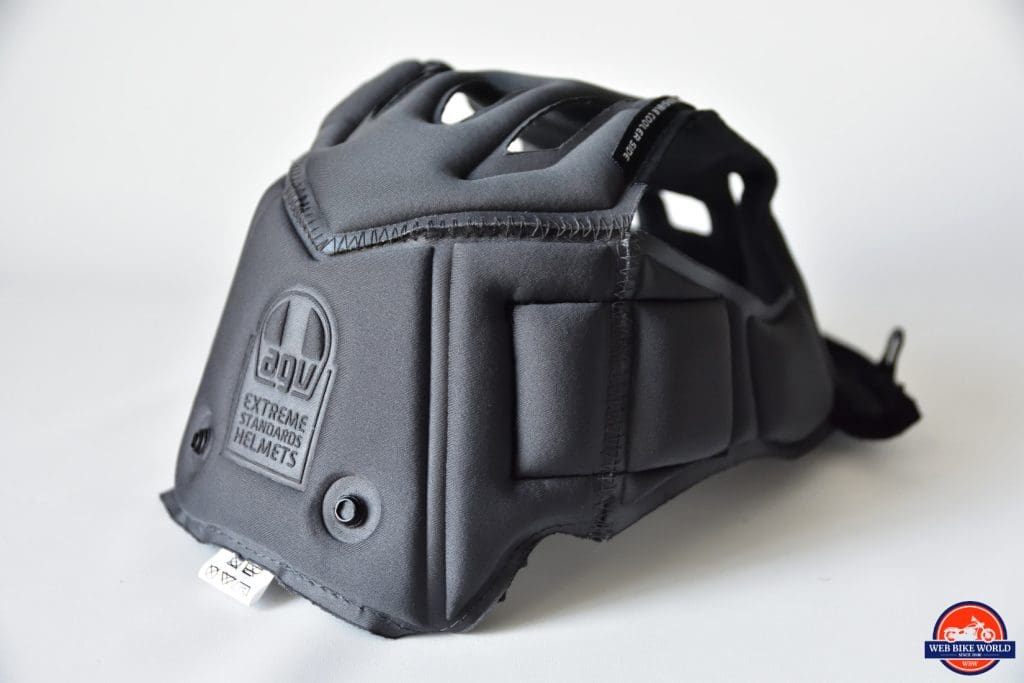
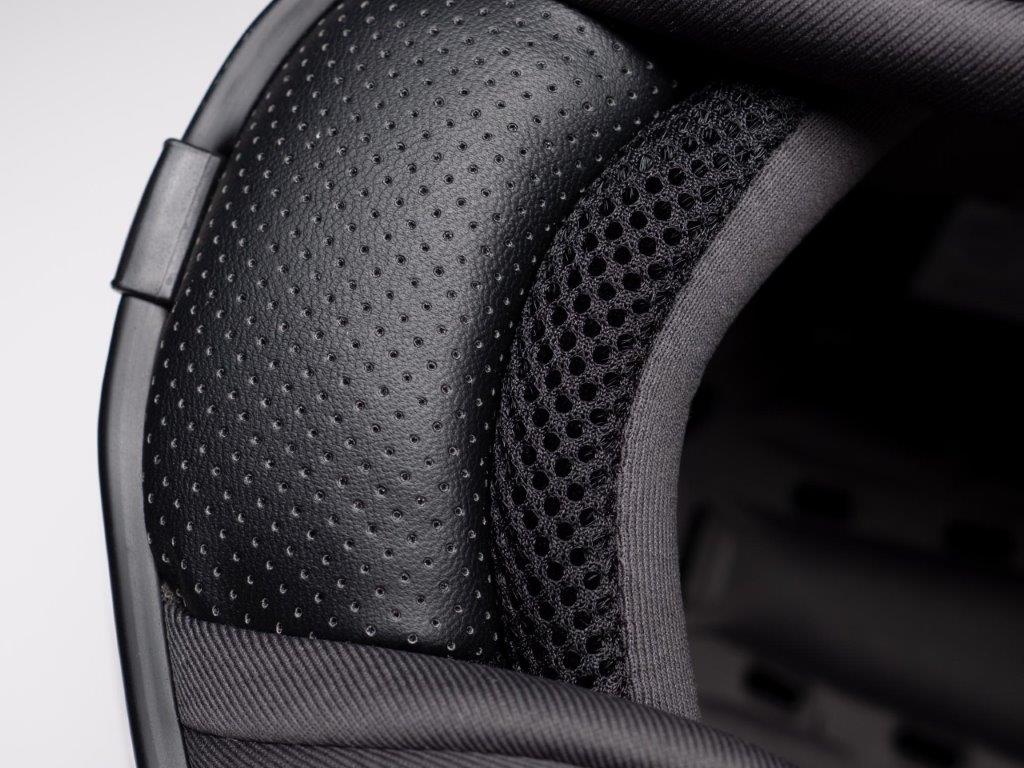
Comfort Liner
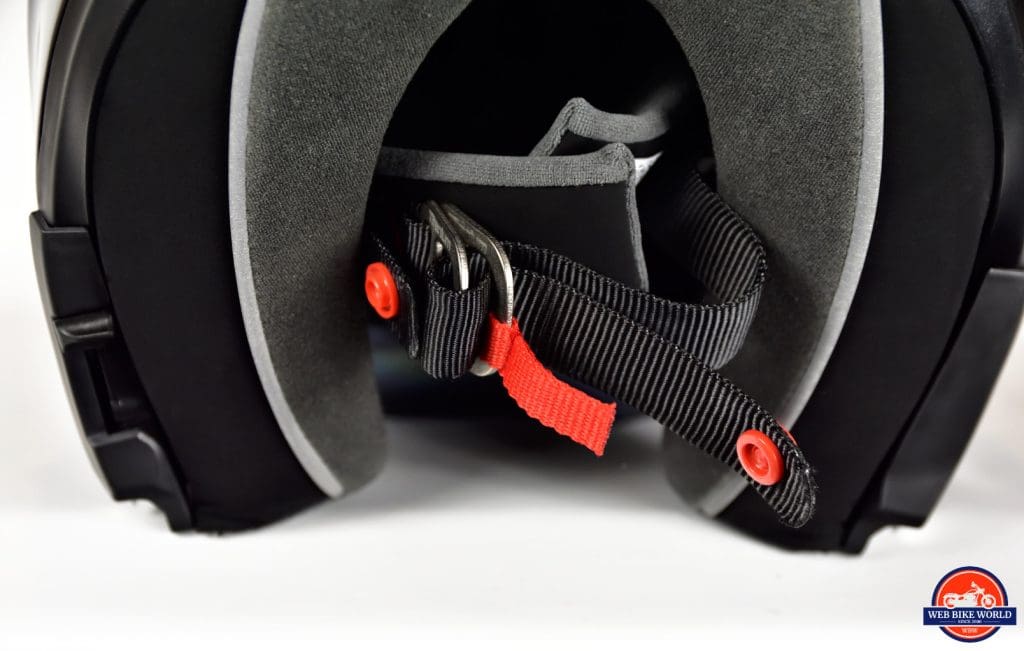
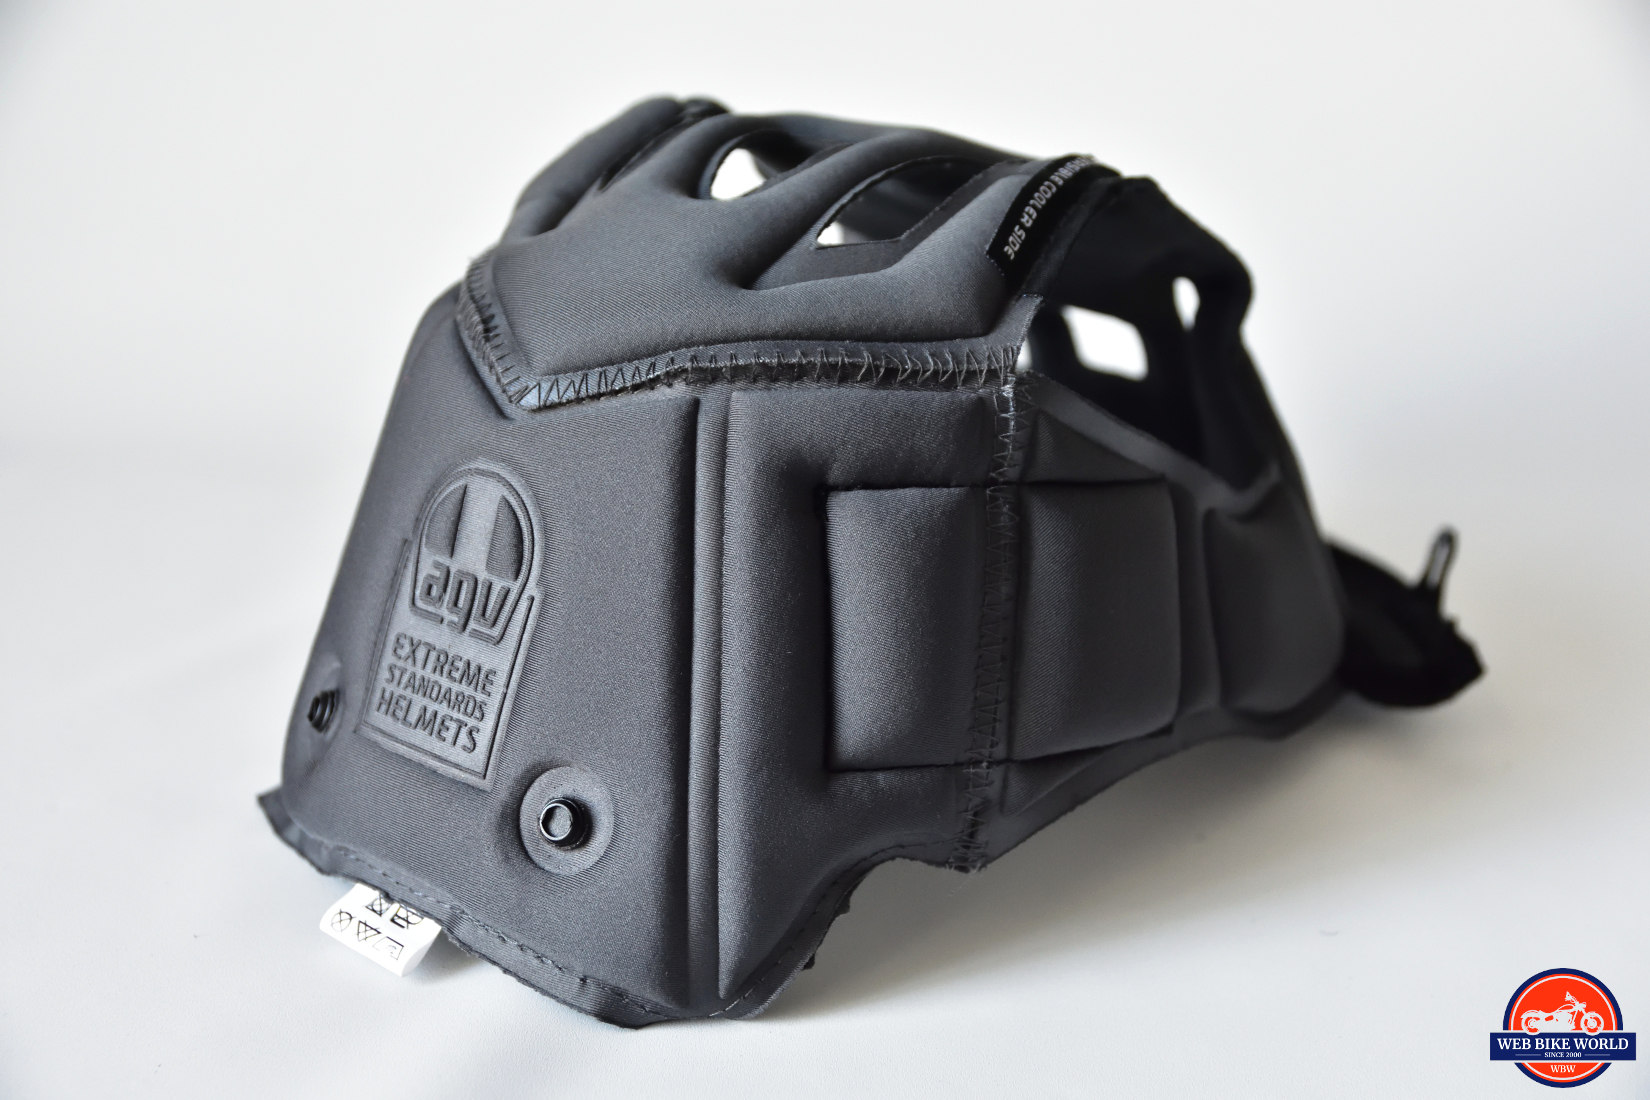
The liner padding is the nice stuff with the washable, antimicrobial, fast-drying, moisture-wicking standard expected in any high-end helmet. There’s only one size available with the helmet, but it does come with two different sized chin curtains to choose from in making the helmet fit you properly. The chin curtain is effective at keeping wind and noise out of your facial “living room”.
The bottom of the padding features two colors of microsuede, but on the inside part that changes to a smooth, silky section around where my ears need to slide and not catch while the helmet goes on. It works most of the time when I put the helmet on to avoid having my ears fold up.
Plastic snaps hold the padding in place well enough and removal/installation is straightforward. One thing different on this helmet is that the padding is one piece. You can’t remove the left side without bringing the right along for the ride. That may irritate some people, but not me.
BlueTooth Speaker Pockets
There are pockets built into the sides of the helmet on the inside by the straps, specially made to house speakers for BlueTooth systems. They work very well and even have felt glued inside to make easy installation of the speakers that come with a SENA 30K system for example.
It is unfortunate AGV hasn’t partnered with SENA or Cardo to incorporate one of their systems into this lid seamlessly like on a competitor like the Shoei Neotec II for example.
Shopping Now? We Recommend:
webBikeWorld has worked closely with RevZilla over the years to provide our testers with products to review. In addition to being a great site to shop from, they’re also a great partner.
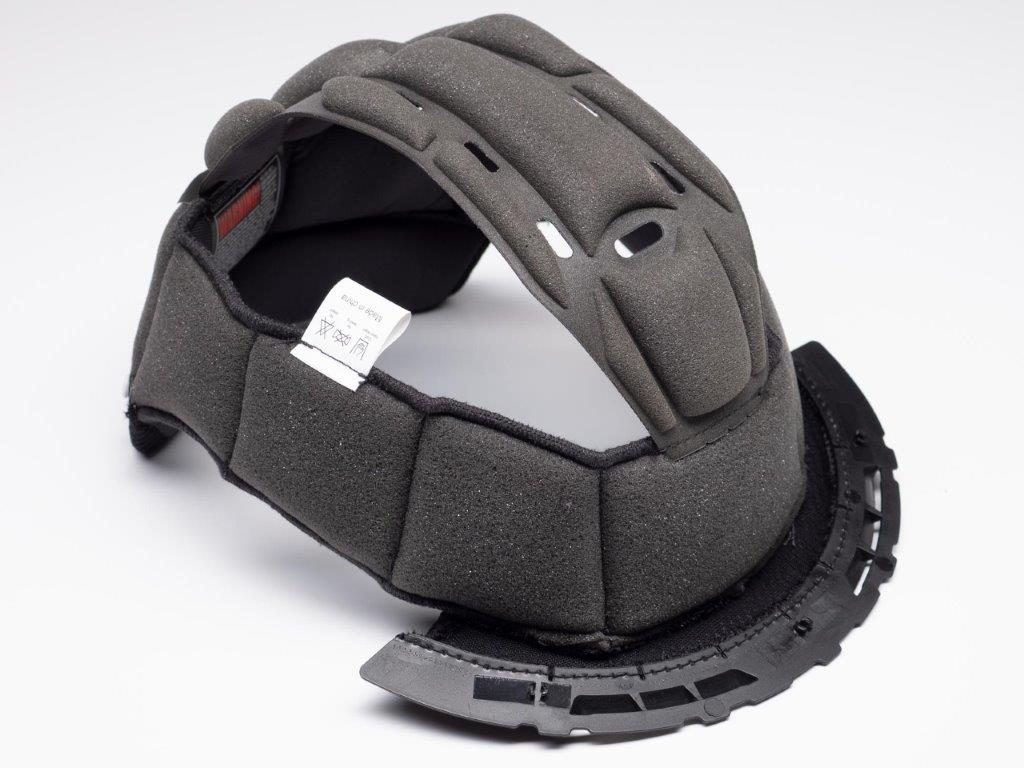
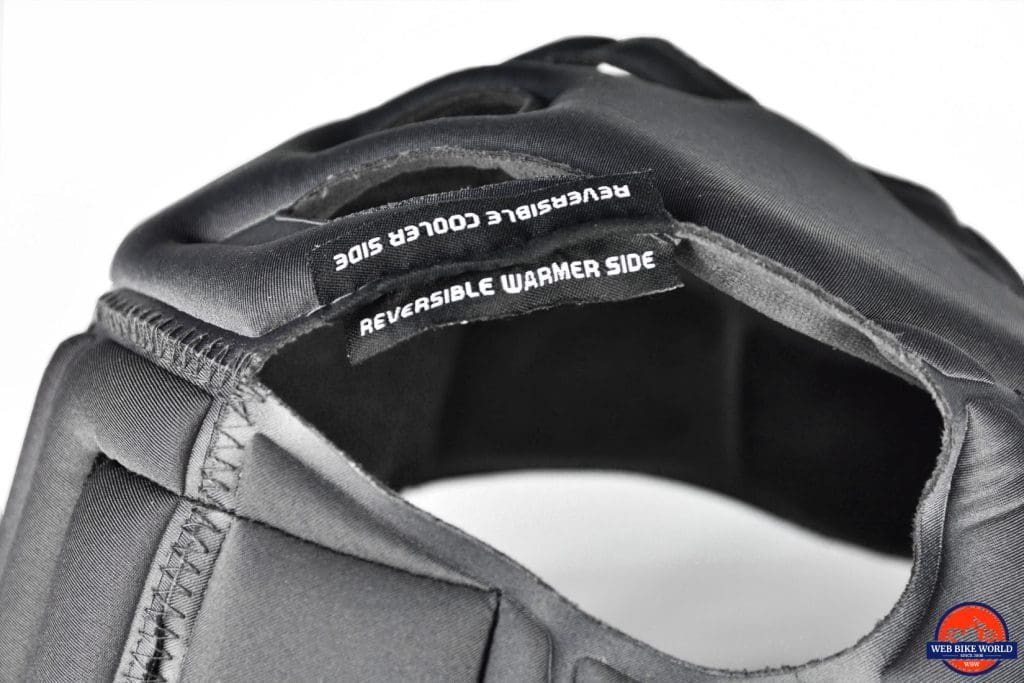
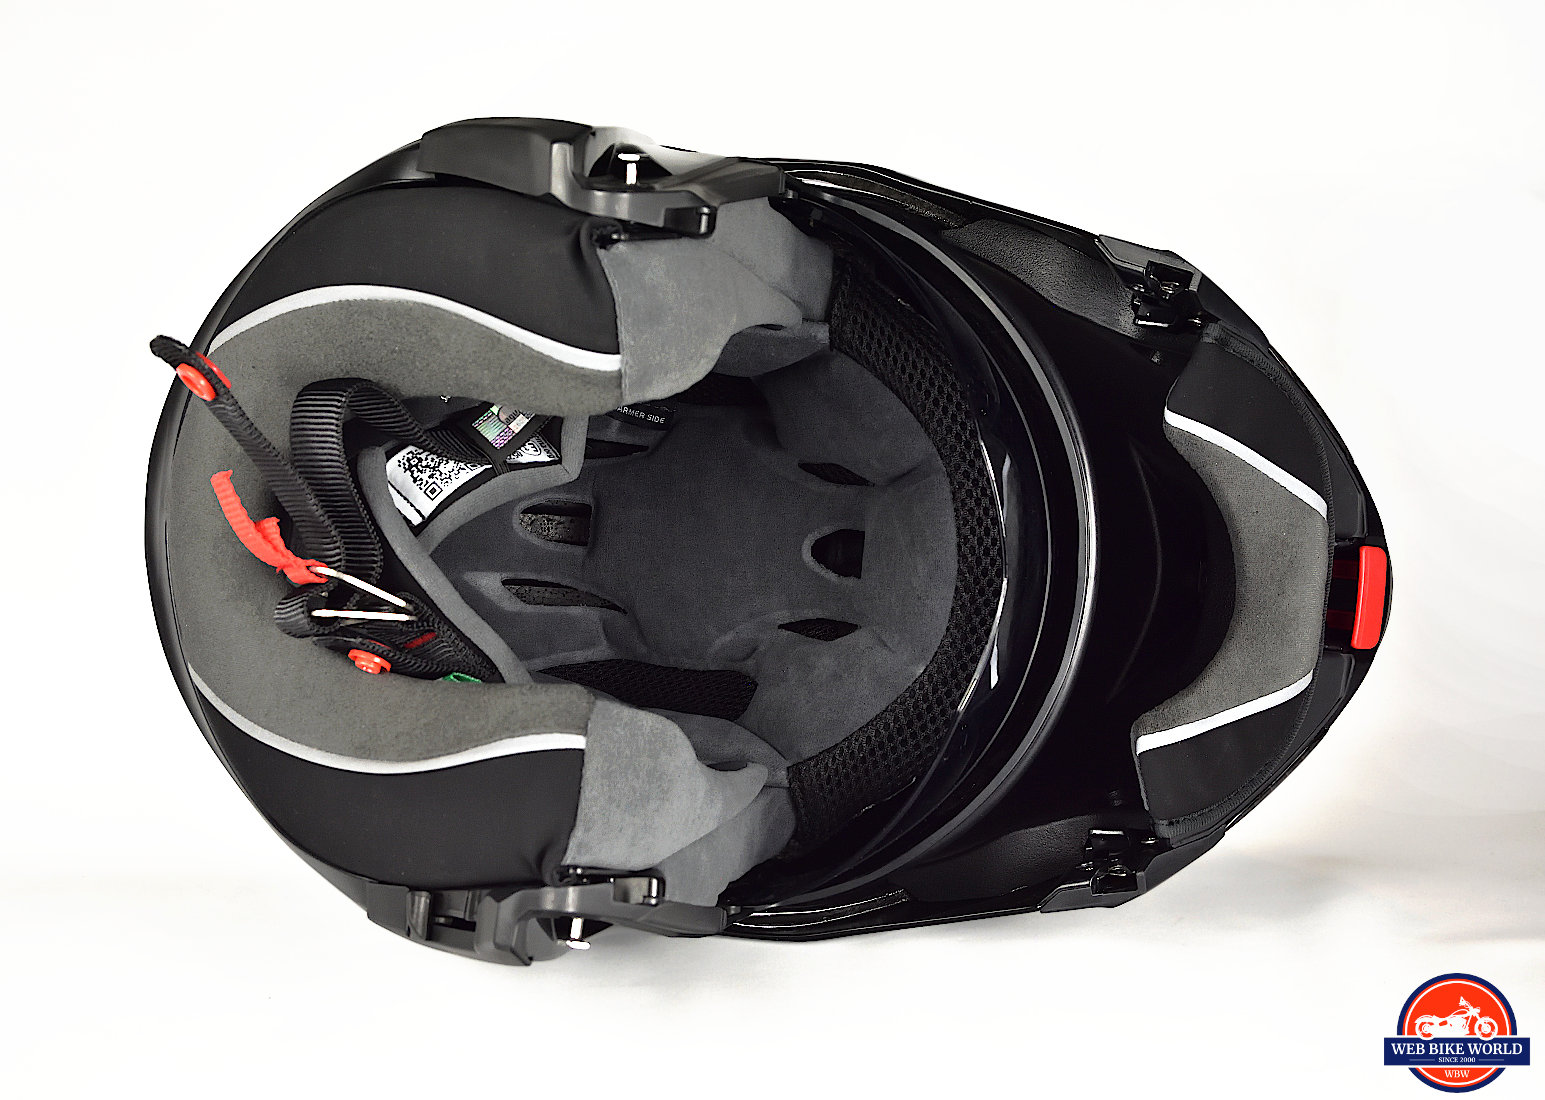
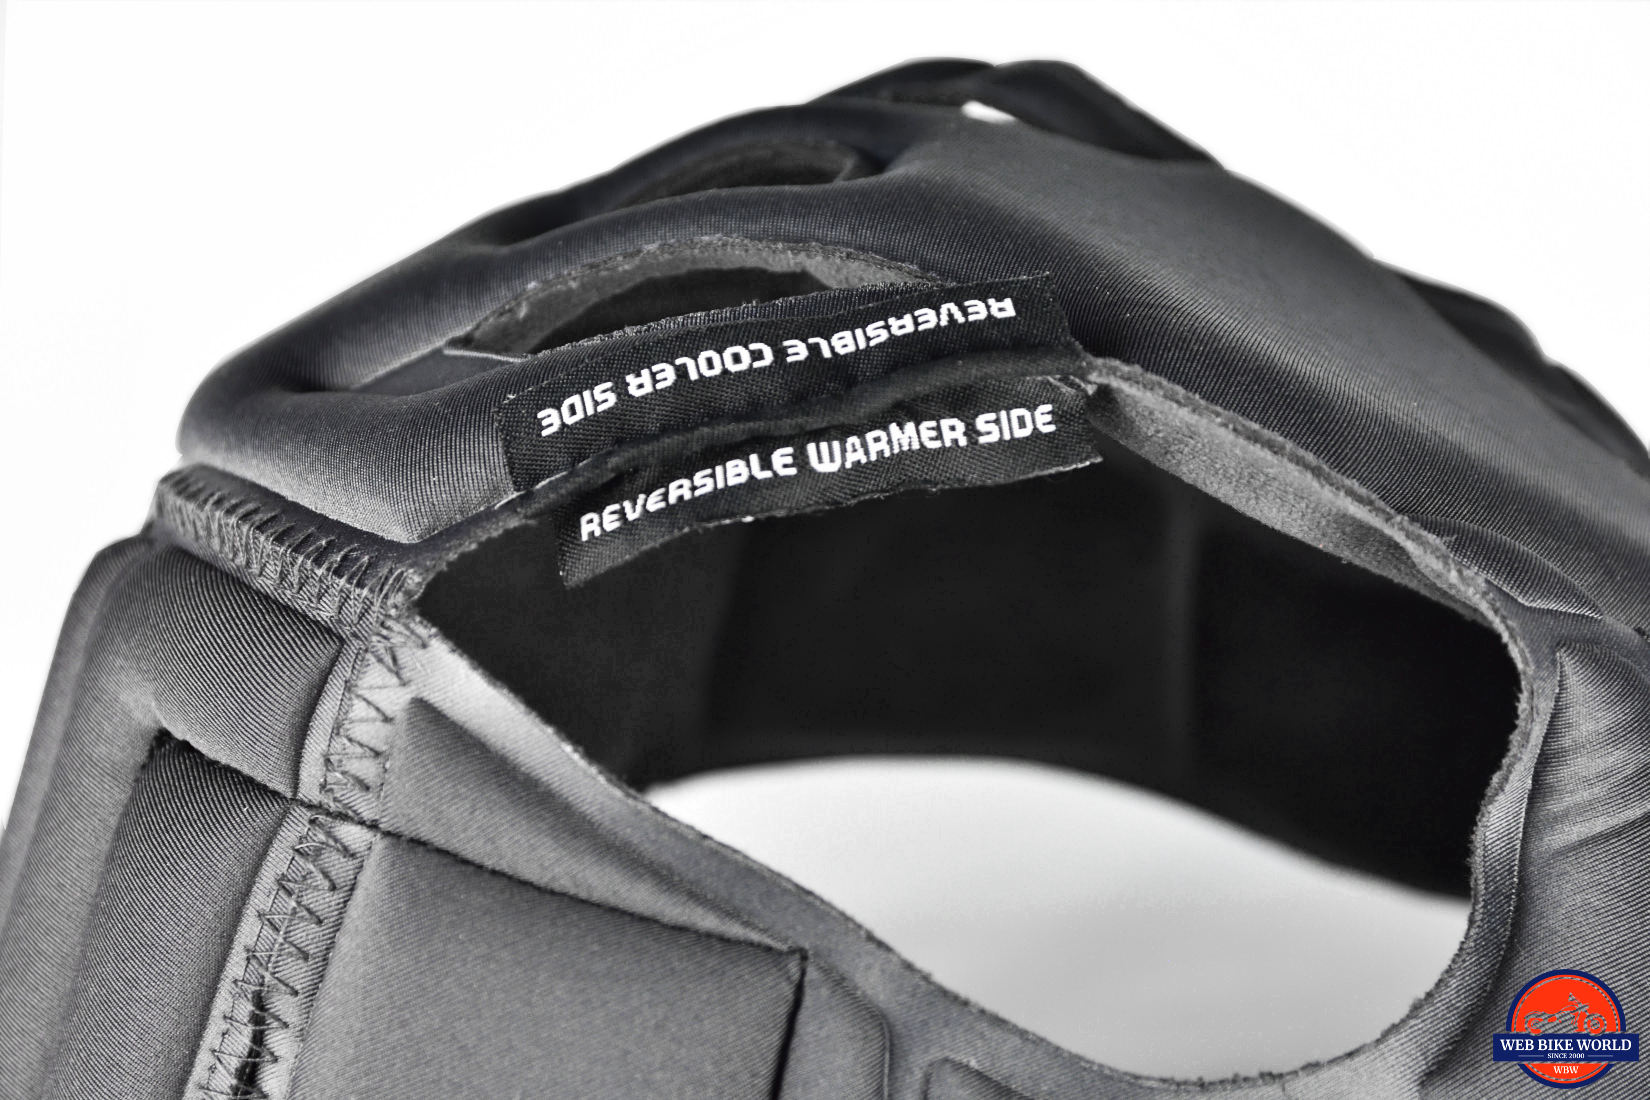
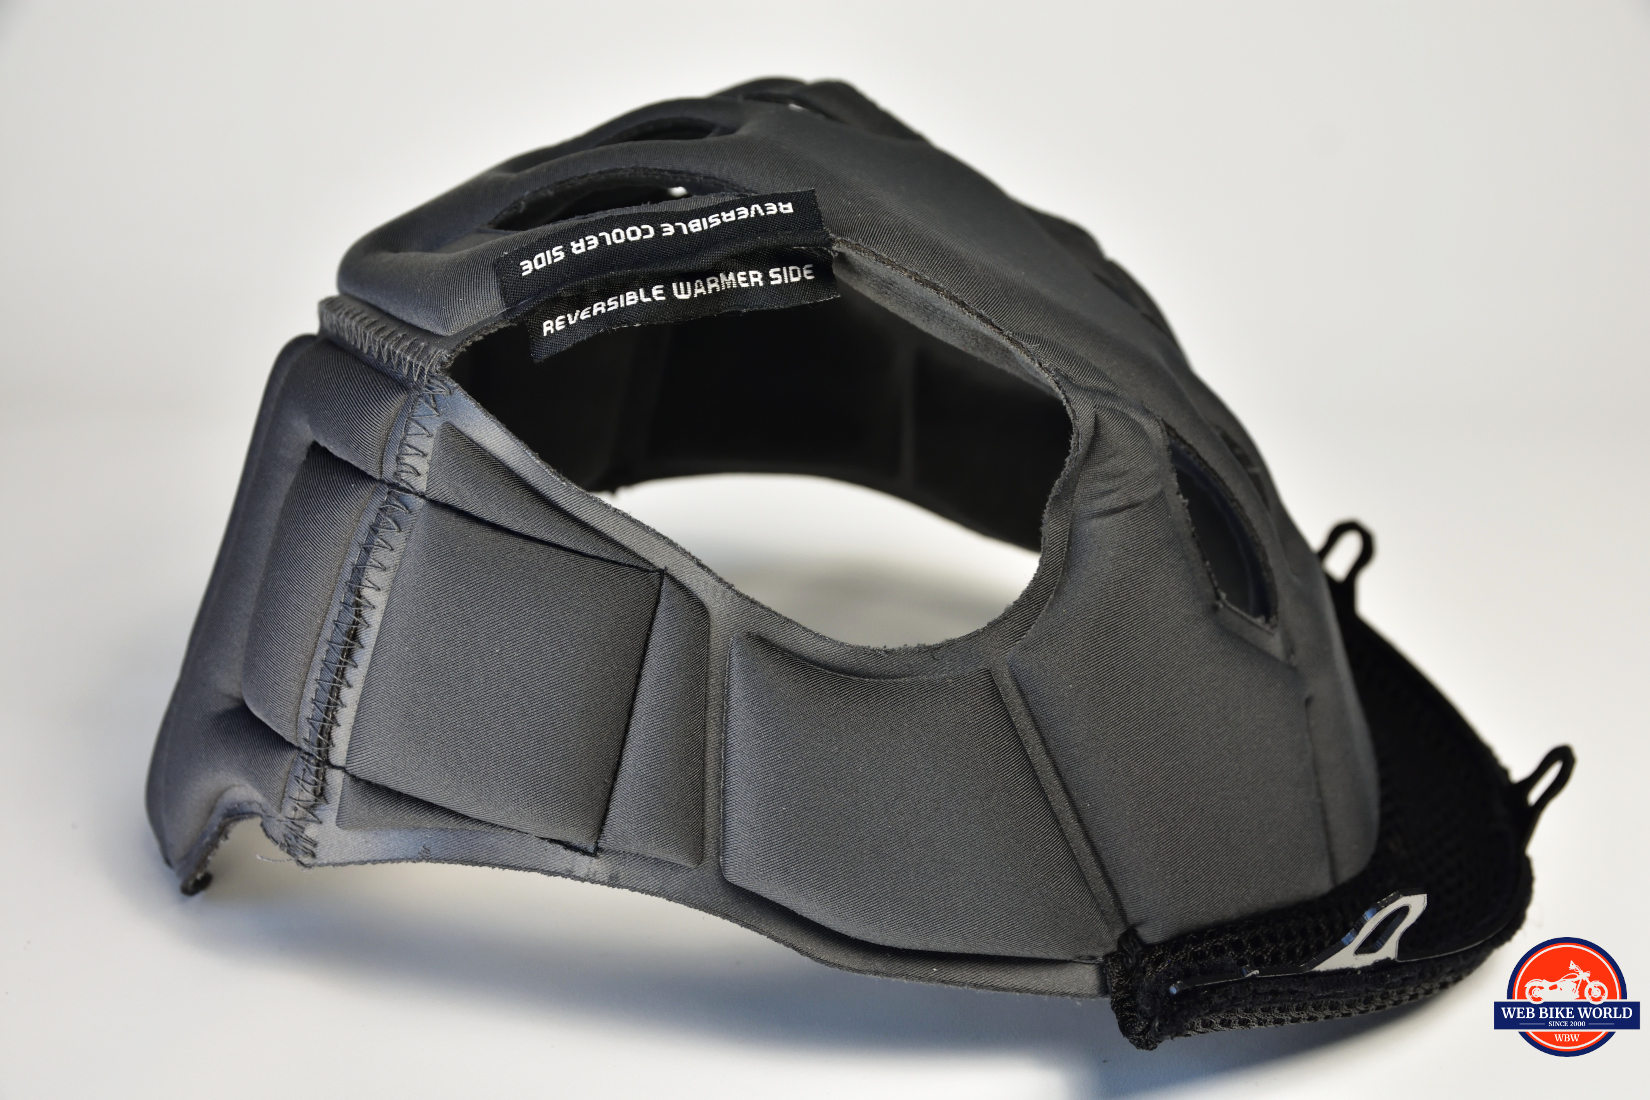
The liner located in the crown area is reversible. One side is a fuzzy microsuede to help keep you warm in colder weather and called Shalimar. The opposite side is the smooth Ritmo that stays cooler for hot weather riding.
Don’t worry about remembering what Ritmo and Shalimar mean since there’s a labeled tag on each side of the liner to remind you what side is for hot weather and vice versa.
I didn’t notice a huge difference after flipping the crown liner myself. I found the helmet warm in cool weather and cool in warm weather regardless of which way the liner was installed. Other reviewers who are bald have reported noticing a considerable difference, however, from what I’ve read about it online.
Wind and Road Noise
Ahh, here’s the big question on everyone’s mind, especially about any modular helmet.
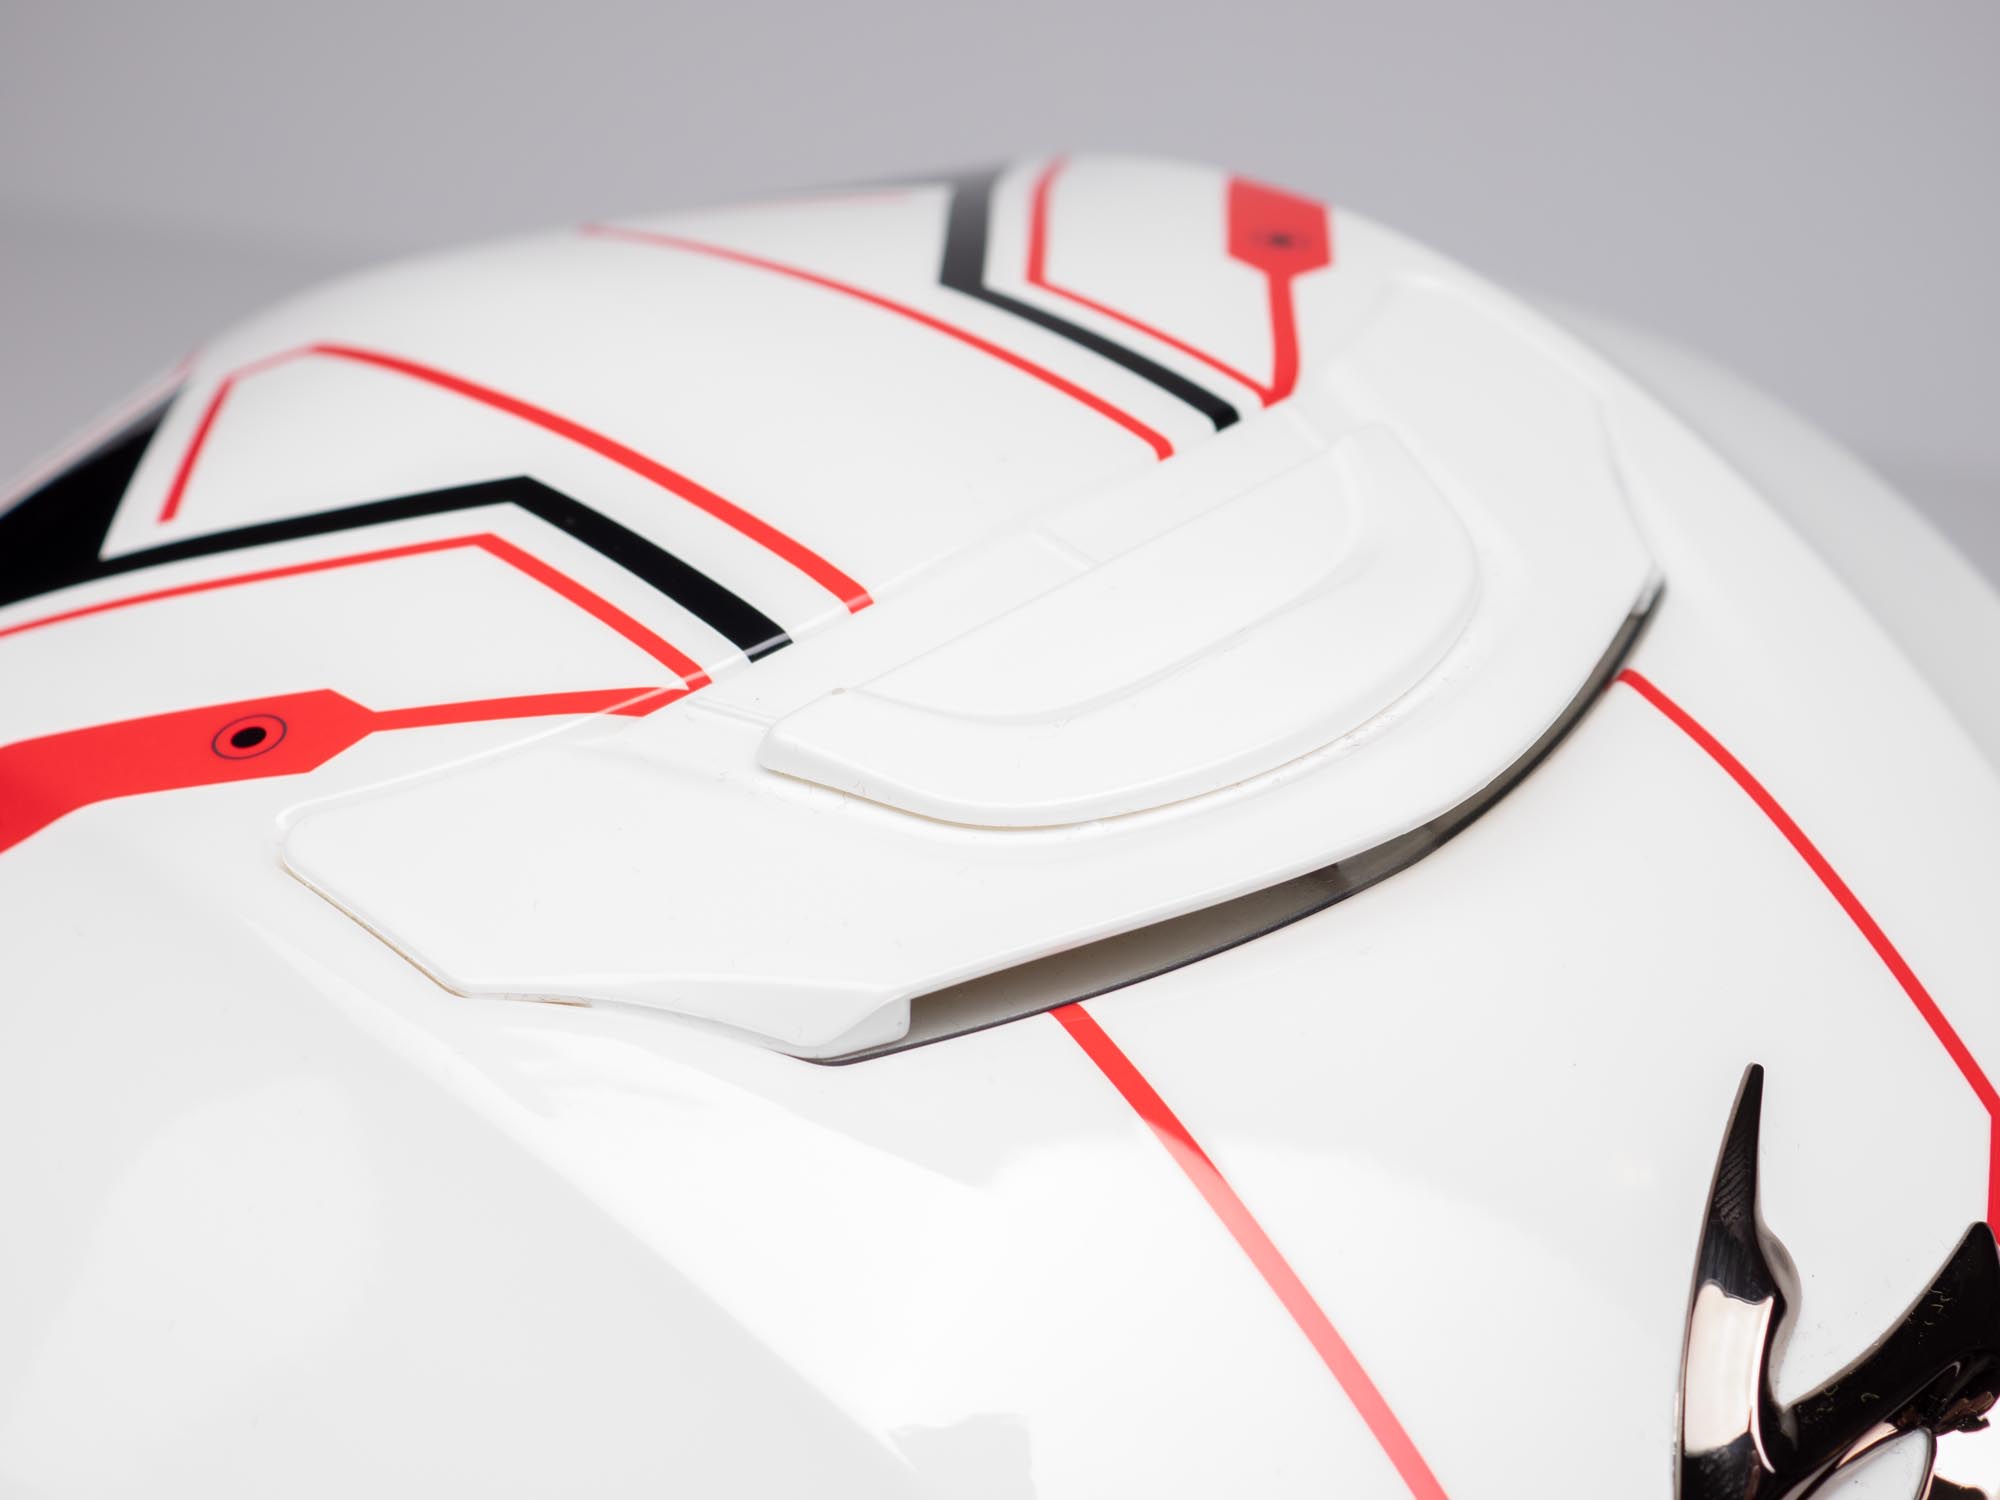
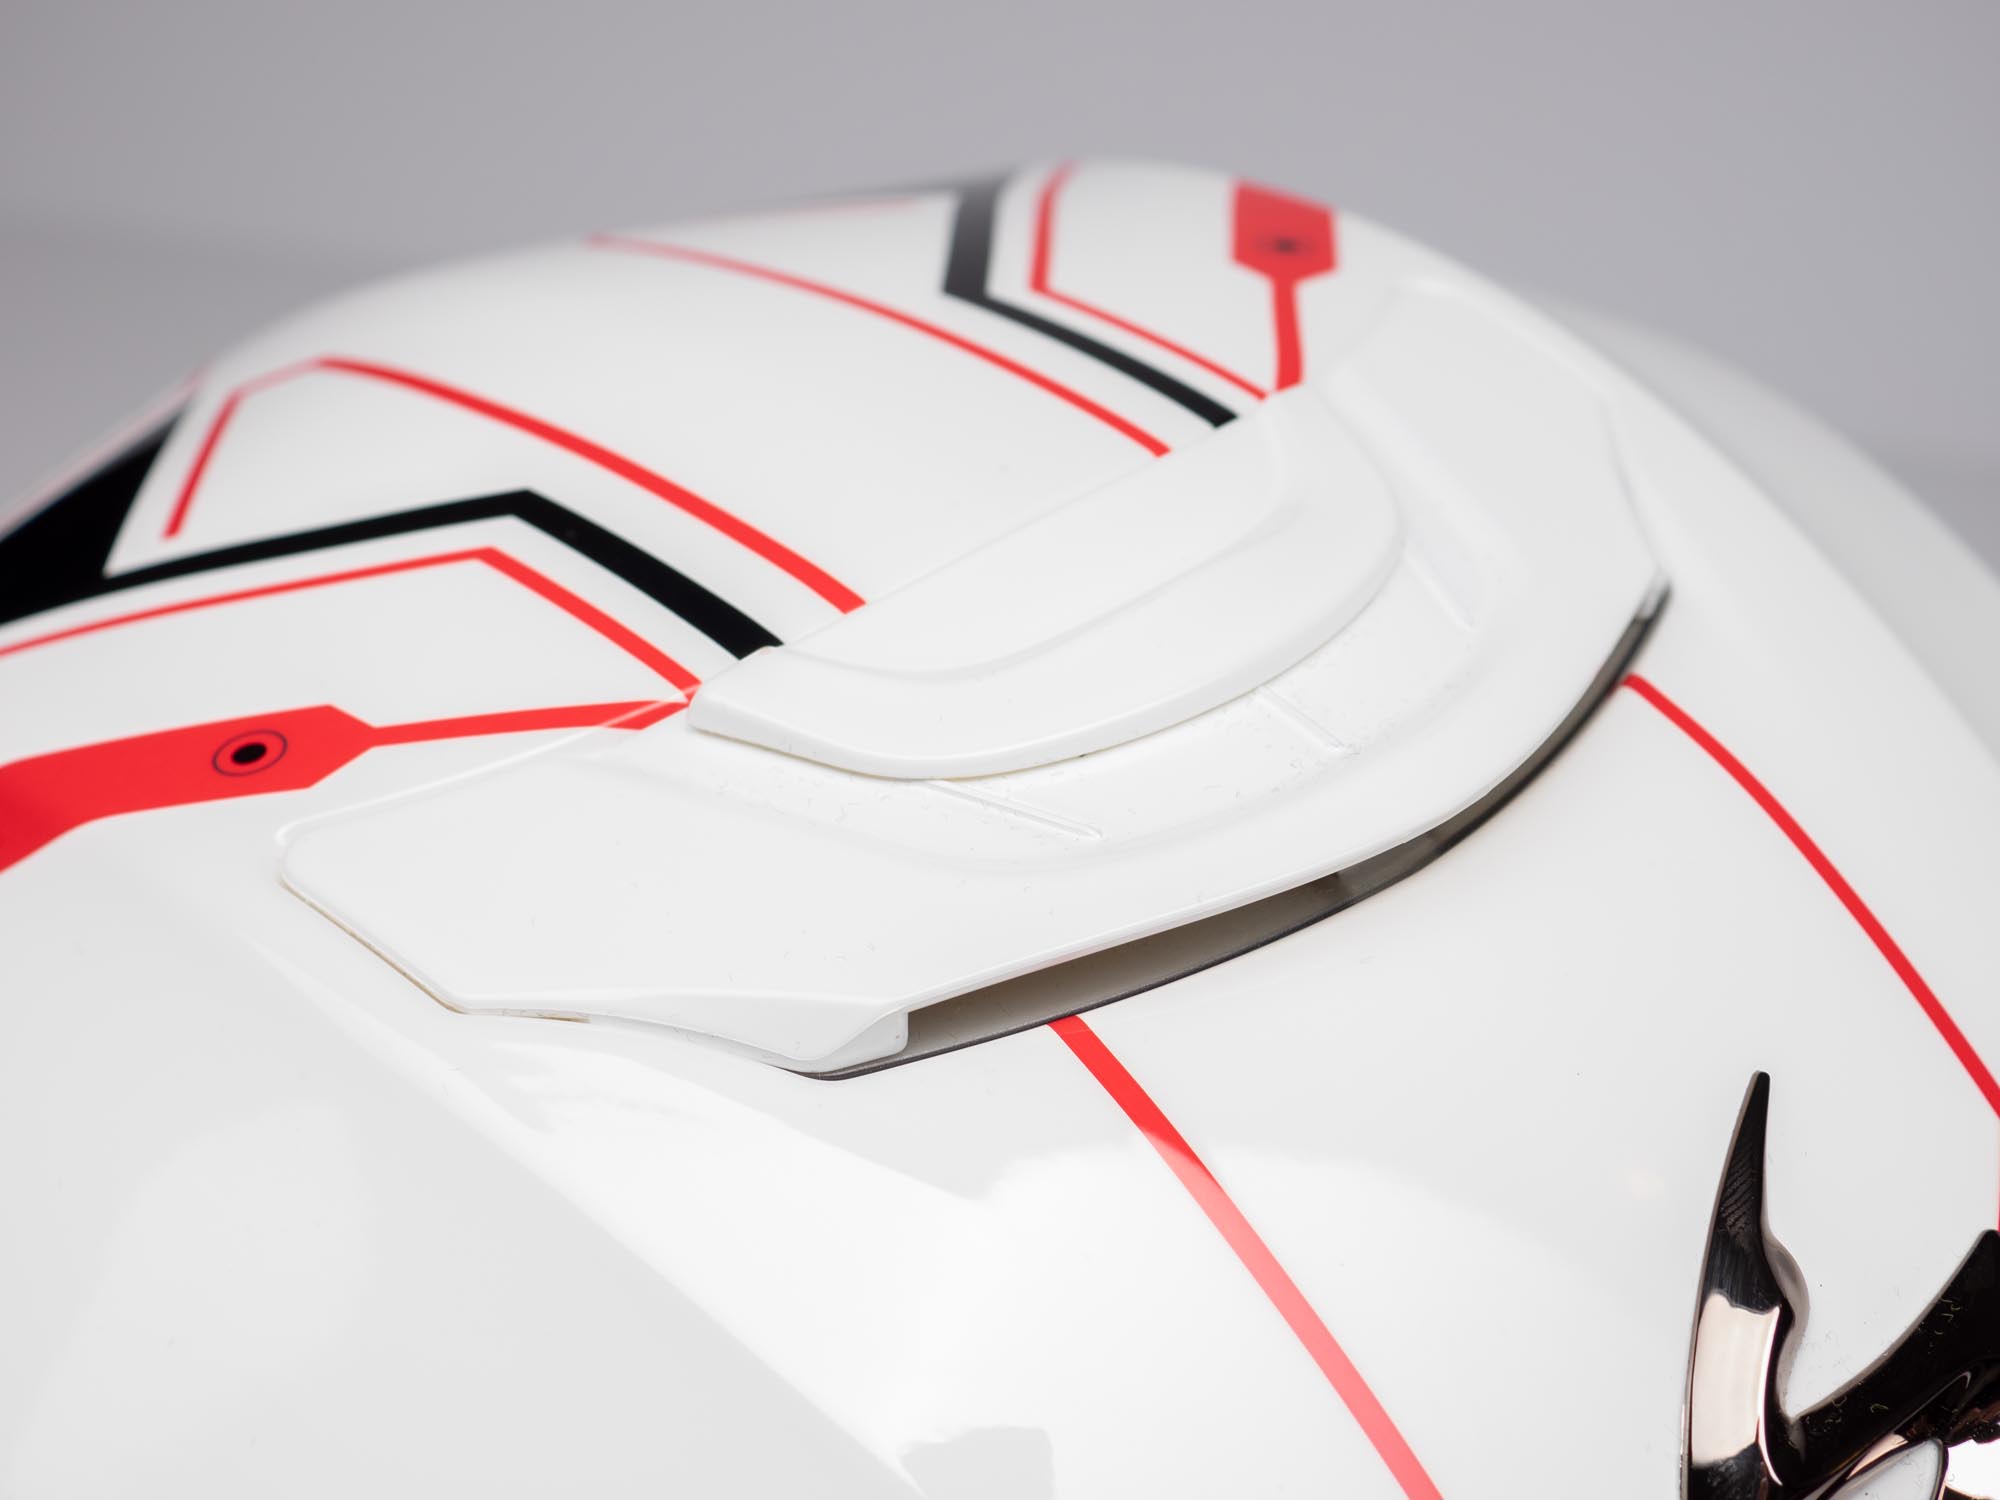
This helmet is basically the modular version of the AGV Pista GP R race track helmet of proven protective and performance quality. Meaning optimized aerodynamic grooves, lines shapes and even an adjustable spoiler for calming turbulence at speeds above 80 mph. In my testing, I didn’t notice any difference while fiddling with the spoiler, to be honest.
As Quiet As Any Other Modular
The padding situated around my ears seal tightly and wearing this helmet makes me feel like I’m wearing earmuff style hearing protection. I’m sure I was speaking too loudly to everyone around me while wearing the helmet as a result. Kind of like an elderly person having a hearing aid issue.
That feature makes the helmet quite quiet at highway speed and for me, it’s equally as quiet as other premier modulars including the Schuberth C4. I would say it’s quieter than the Neotec II as well.
It’s definitely more comfortable than both of those two helmets in my experience because both of them have tight spots and pressure points pressing on my head while the AGV doesn’t.
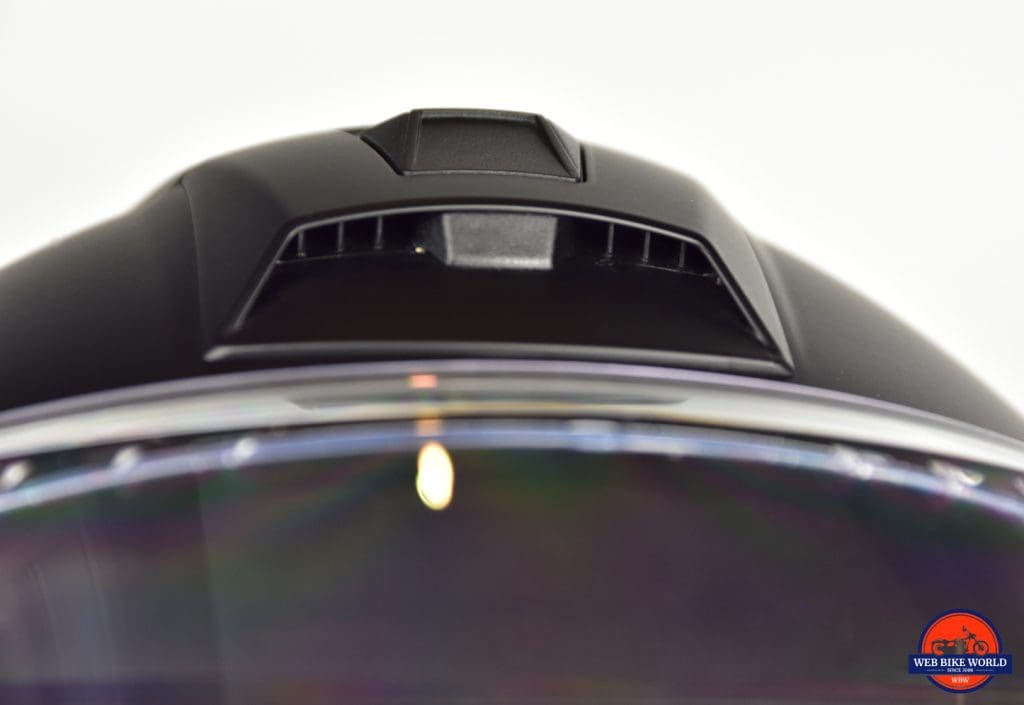
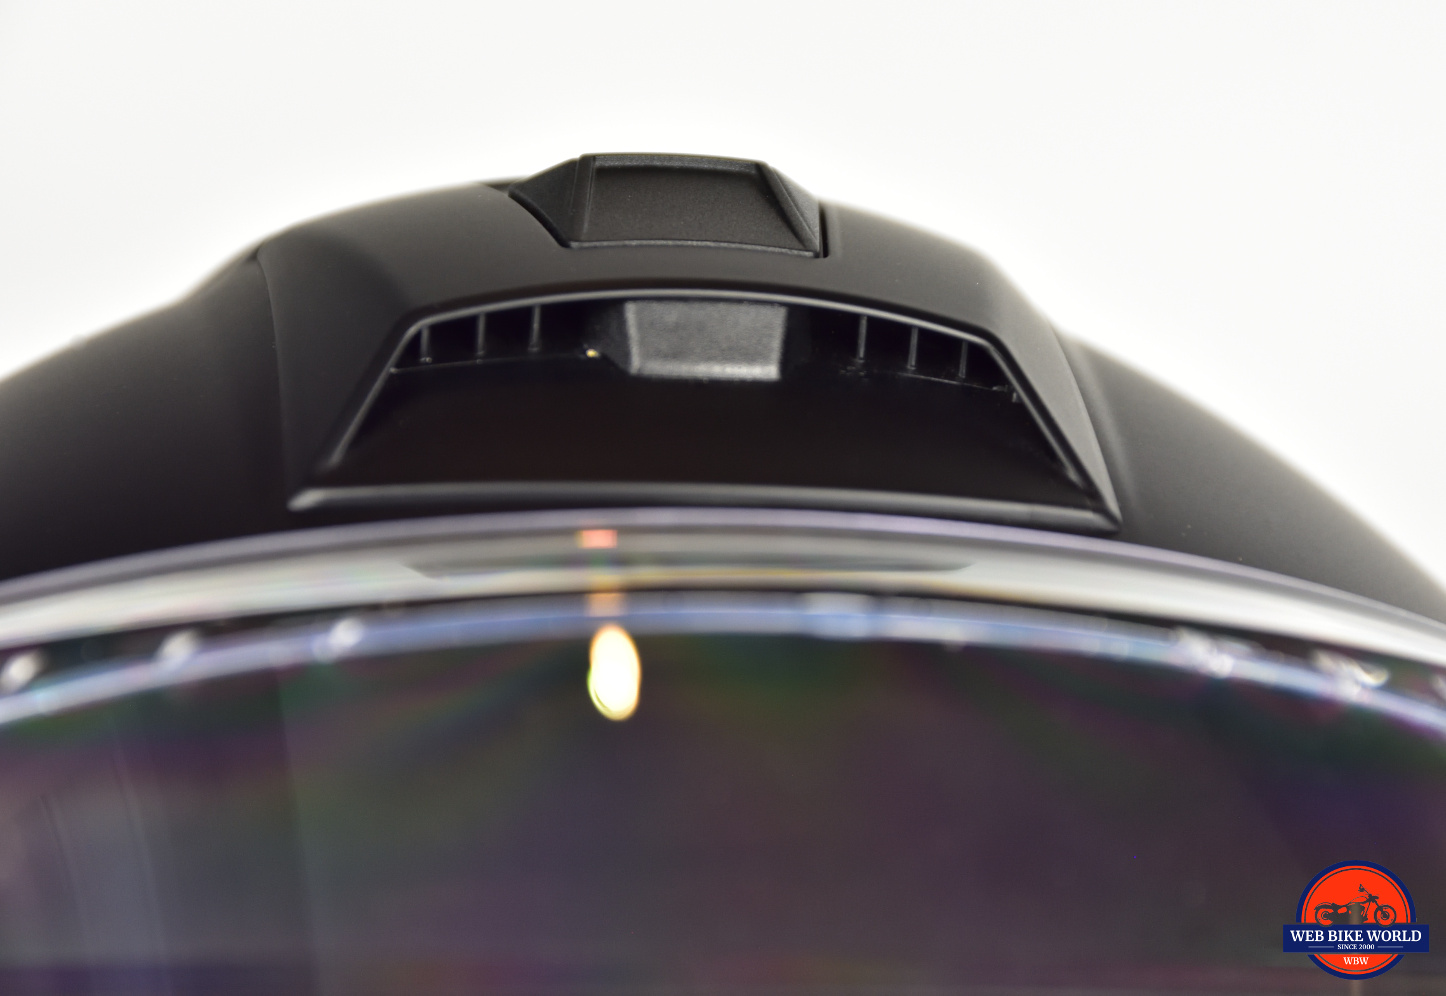
Ventilation
All I can say is WOW when it comes to airflow in this helmet. AGV prioritizes rider comfort and it shows.
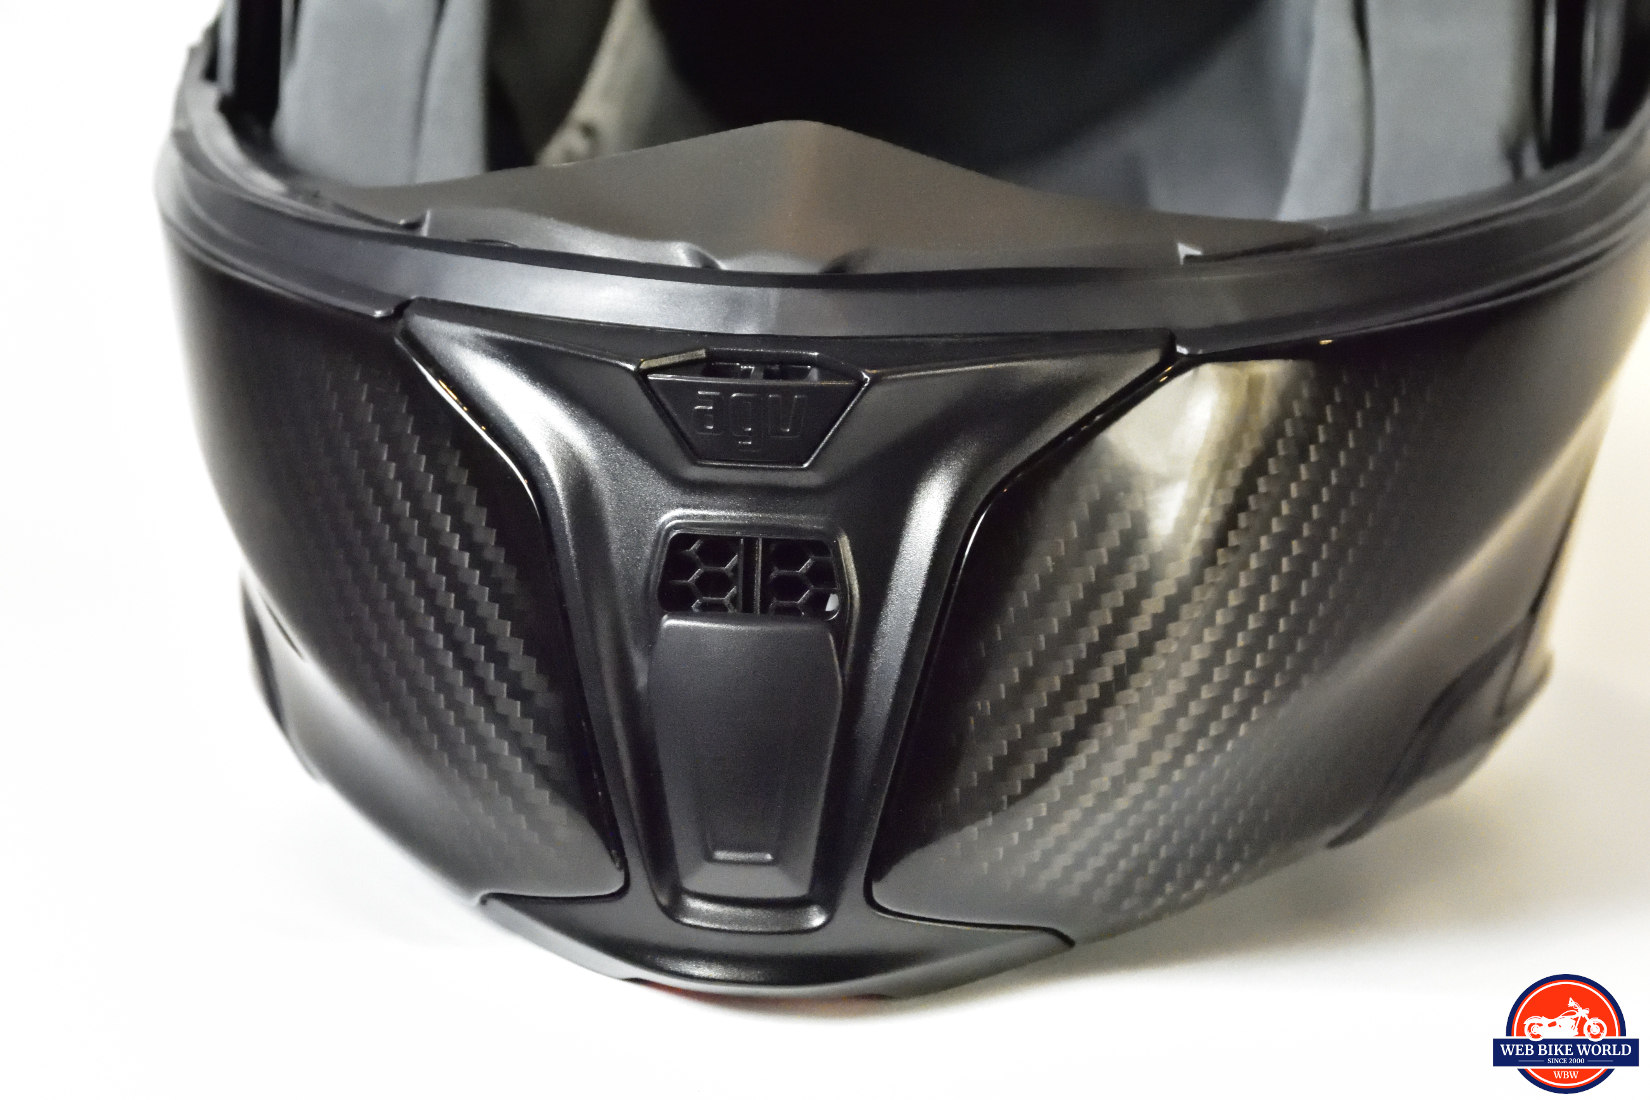
Chinbar Vent
When I open the vent on the chin bar the air hits just below my bottom lip and in the fully open position sends in so much air I can develop a cold spot if the mercury is low. It has two positions to choose from.
There’s no buffer other than a large honeycomb of plastic in this vent which explains the massive amount of air coming through, but the downside is that when it rains water comes flying through it equally well unlike other helmets I’ve worn.
Bug guts from exploding insect thorax and abdomen can also enter through it. It could really use a layer of foam to cut this down, but I don’t mind just closing it when it rains to cope.
Other Vents
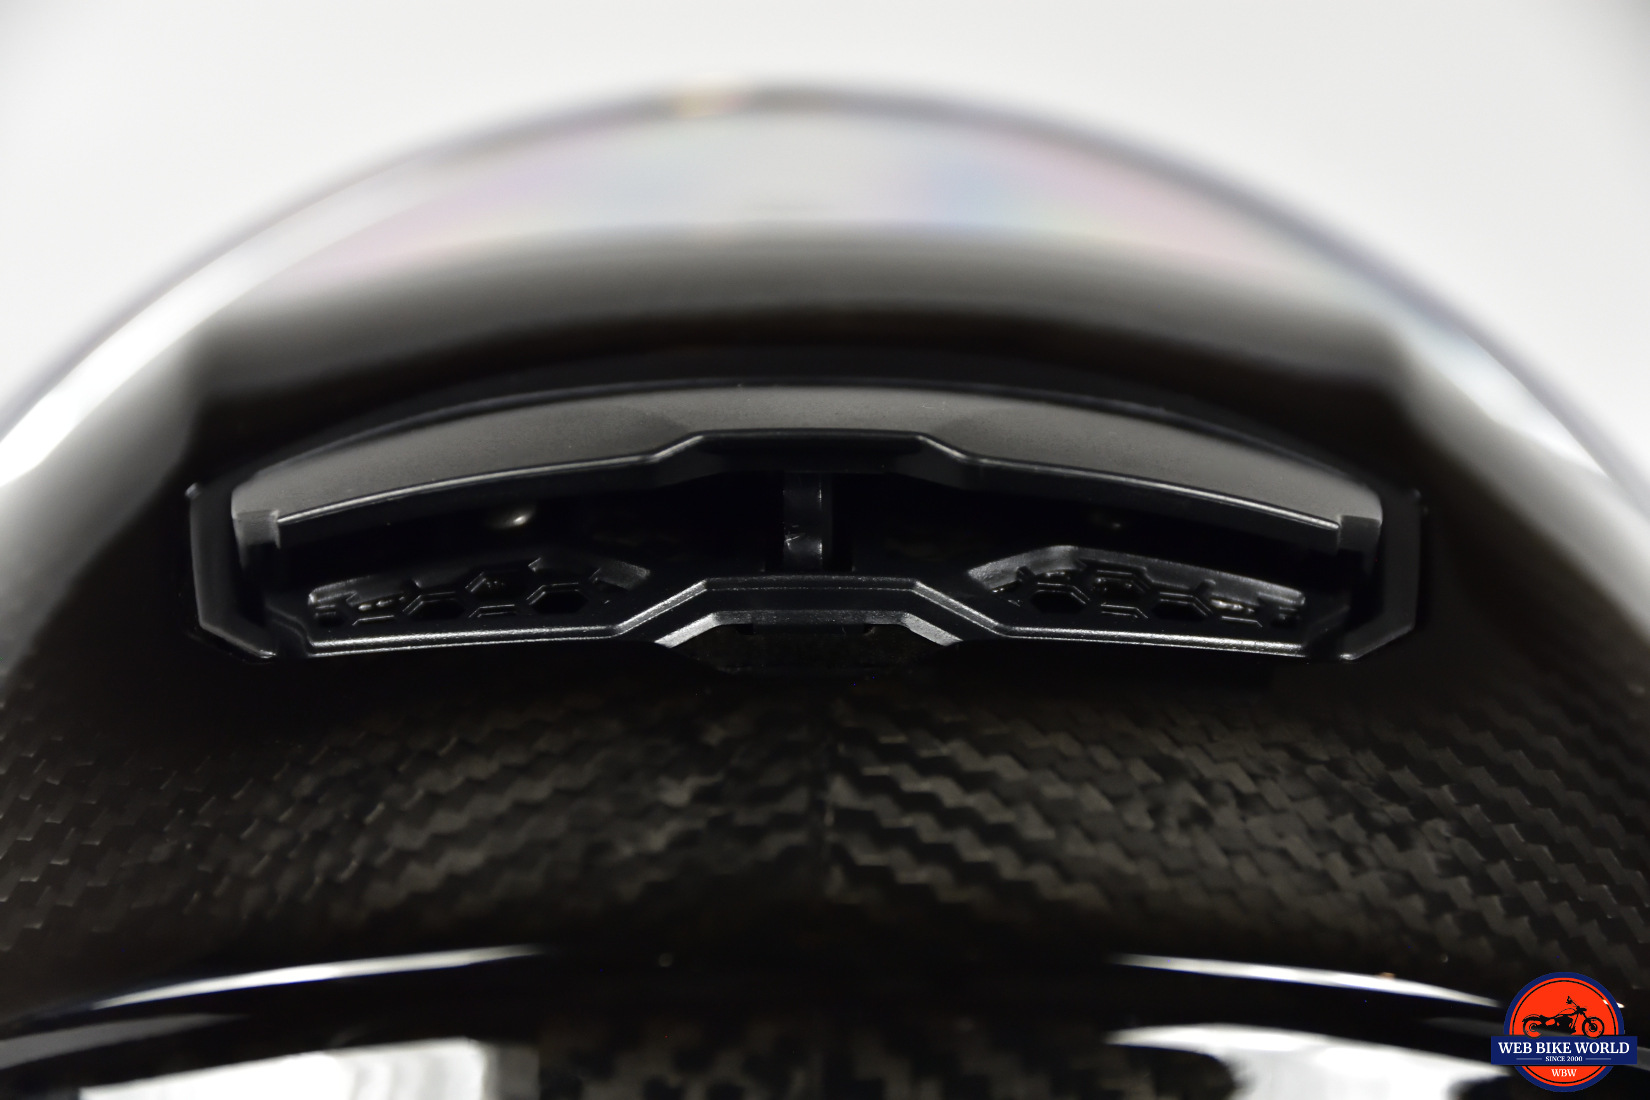
The upper vent flows nearly as much air and no water/bug gore along the top of my head perfectly.
The spoiler on the rear has two open positions to modulate exiting hot air from around my head and as I mentioned is intended to help smooth out turbulence. It worked well as an exhaust for me.
The Stubborn Chinbar
The all carbon fiber chin bar weighs virtually nothing, so there’s little force gained through momentum when you lower it using a standard hand motion. I find being gentle with it often ends in it not actually latching closed and I have to either slap the chin bar inward to lock it or open it up again and slam it shut.
It’s a bit disappointing and perplexing to me having to strongarm such a premium piece of headgear, but not the end of the world.
Final Verdict
I really love the strength, protection, fit, ventilation and weightless qualities of this AGV helmet.
If those are your top wants in a modular helmet then I predict you’ll be very happy buying and owning it, with an asterisk being whether the chinstrap fits you without causing problems.
Now that I’ve ridden about 400 miles in this helmet I’m convinced I was right about it being the modular helmet I would buy if I was looking to buy one today. It works for me on every level although I would like AGV to make a few tweaks for next year.
Some Minor Changes For Next Year
Improve the padding on the chinstrap, move it further forward, add a ratcheting closure and an integrated BlueTooth system to the shell. Maybe they can do something to make the latch grab easier on the chin bar when lowering it as well?
Those are small improvements on an otherwise perfect helmet in my books. The danger in using the word “perfect” is that everyone’s head shape is unique like their fingerprint pattern. What’s perfect for me might be all wrong for you.
One thing I’m sure of is the Sportmodular is most definitely worth your time to test drive when helmet shopping.
Pros
Lightest modular available at a claimed 1295 grams or 2.85 lbs
3 shell sizes available keeps this helmet compact and close fitting around the head
Same aerodynamic design as the racing Pista GP R helmet
Quiet on the road, ultra comfortable padding, and material
Cool or warm to wear thanks to Ritmo or Shalimar reversible crown liner
Terrific ventilation and equipped with a rear spoiler to deal with turbulence
Carbon fiber makes it stronger and lighter than usual
Visor comes on or goes off with little effort
Pinlock anti-fog lens included with the helmet
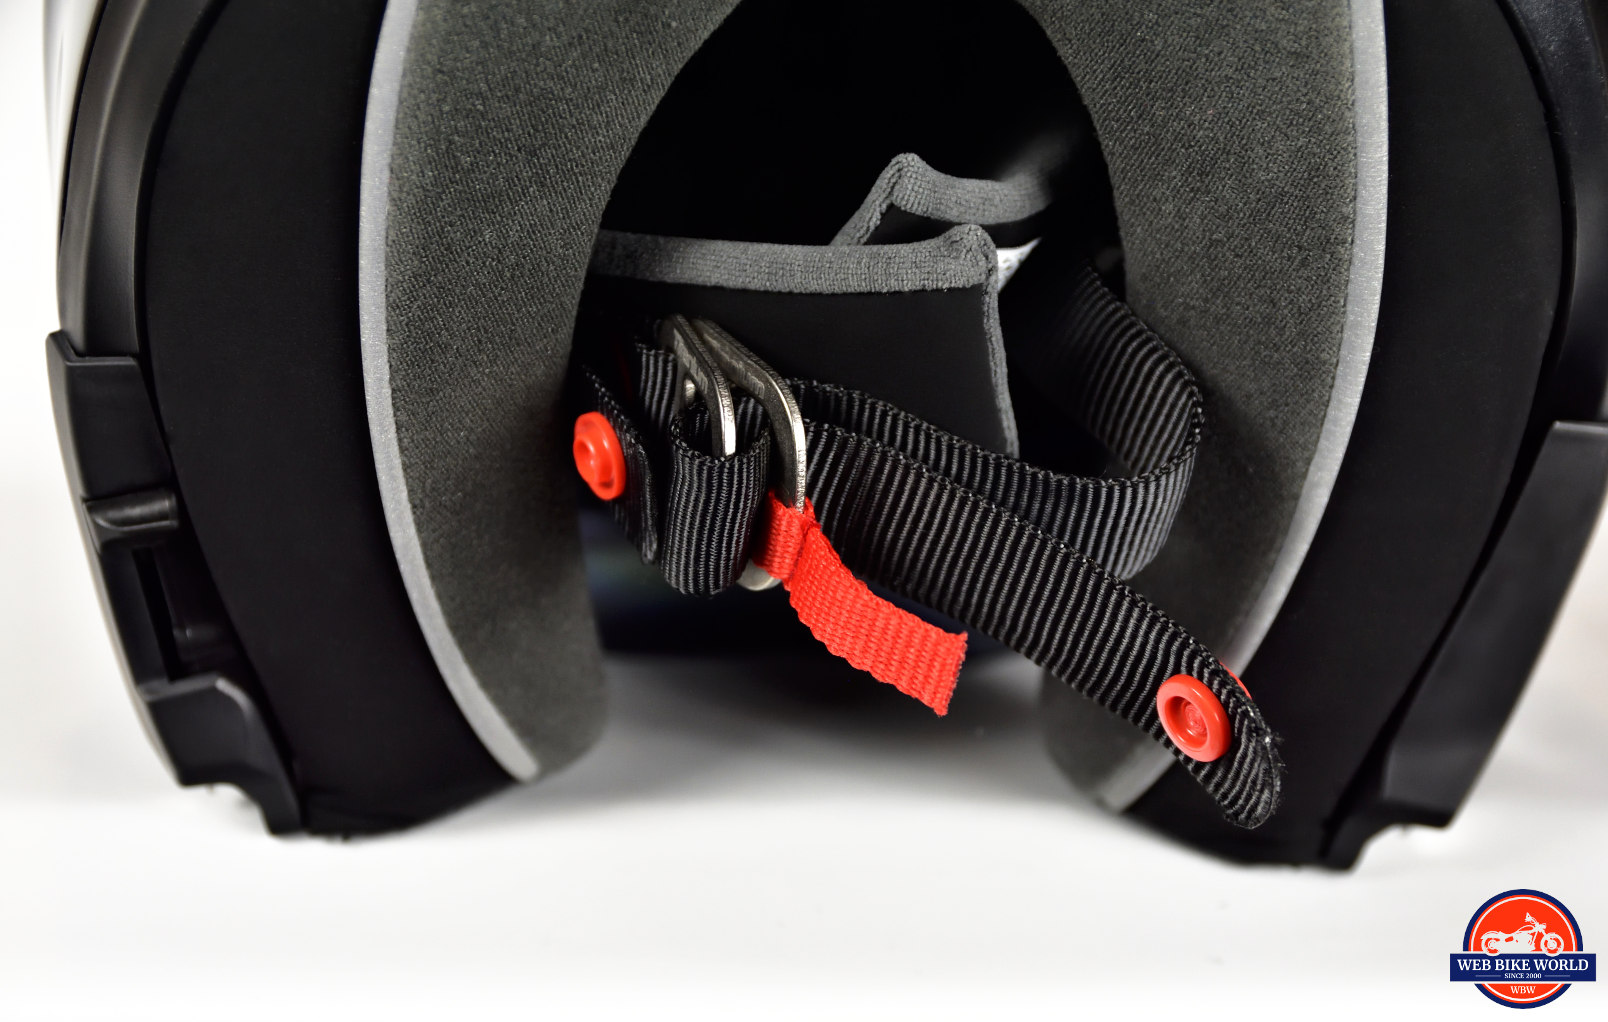
Titanium D-rings
DOT and ECE 22.05 compliant
Cons
Expensive $749
Rain comes through the front vent when open
Chin strap is set far back and padding moves off it leading to some chafing at times
webBikeWorld has worked closely with RevZilla over the years to provide our testers with products to review. In addition to being a great site to shop from, they’re also a great partner.
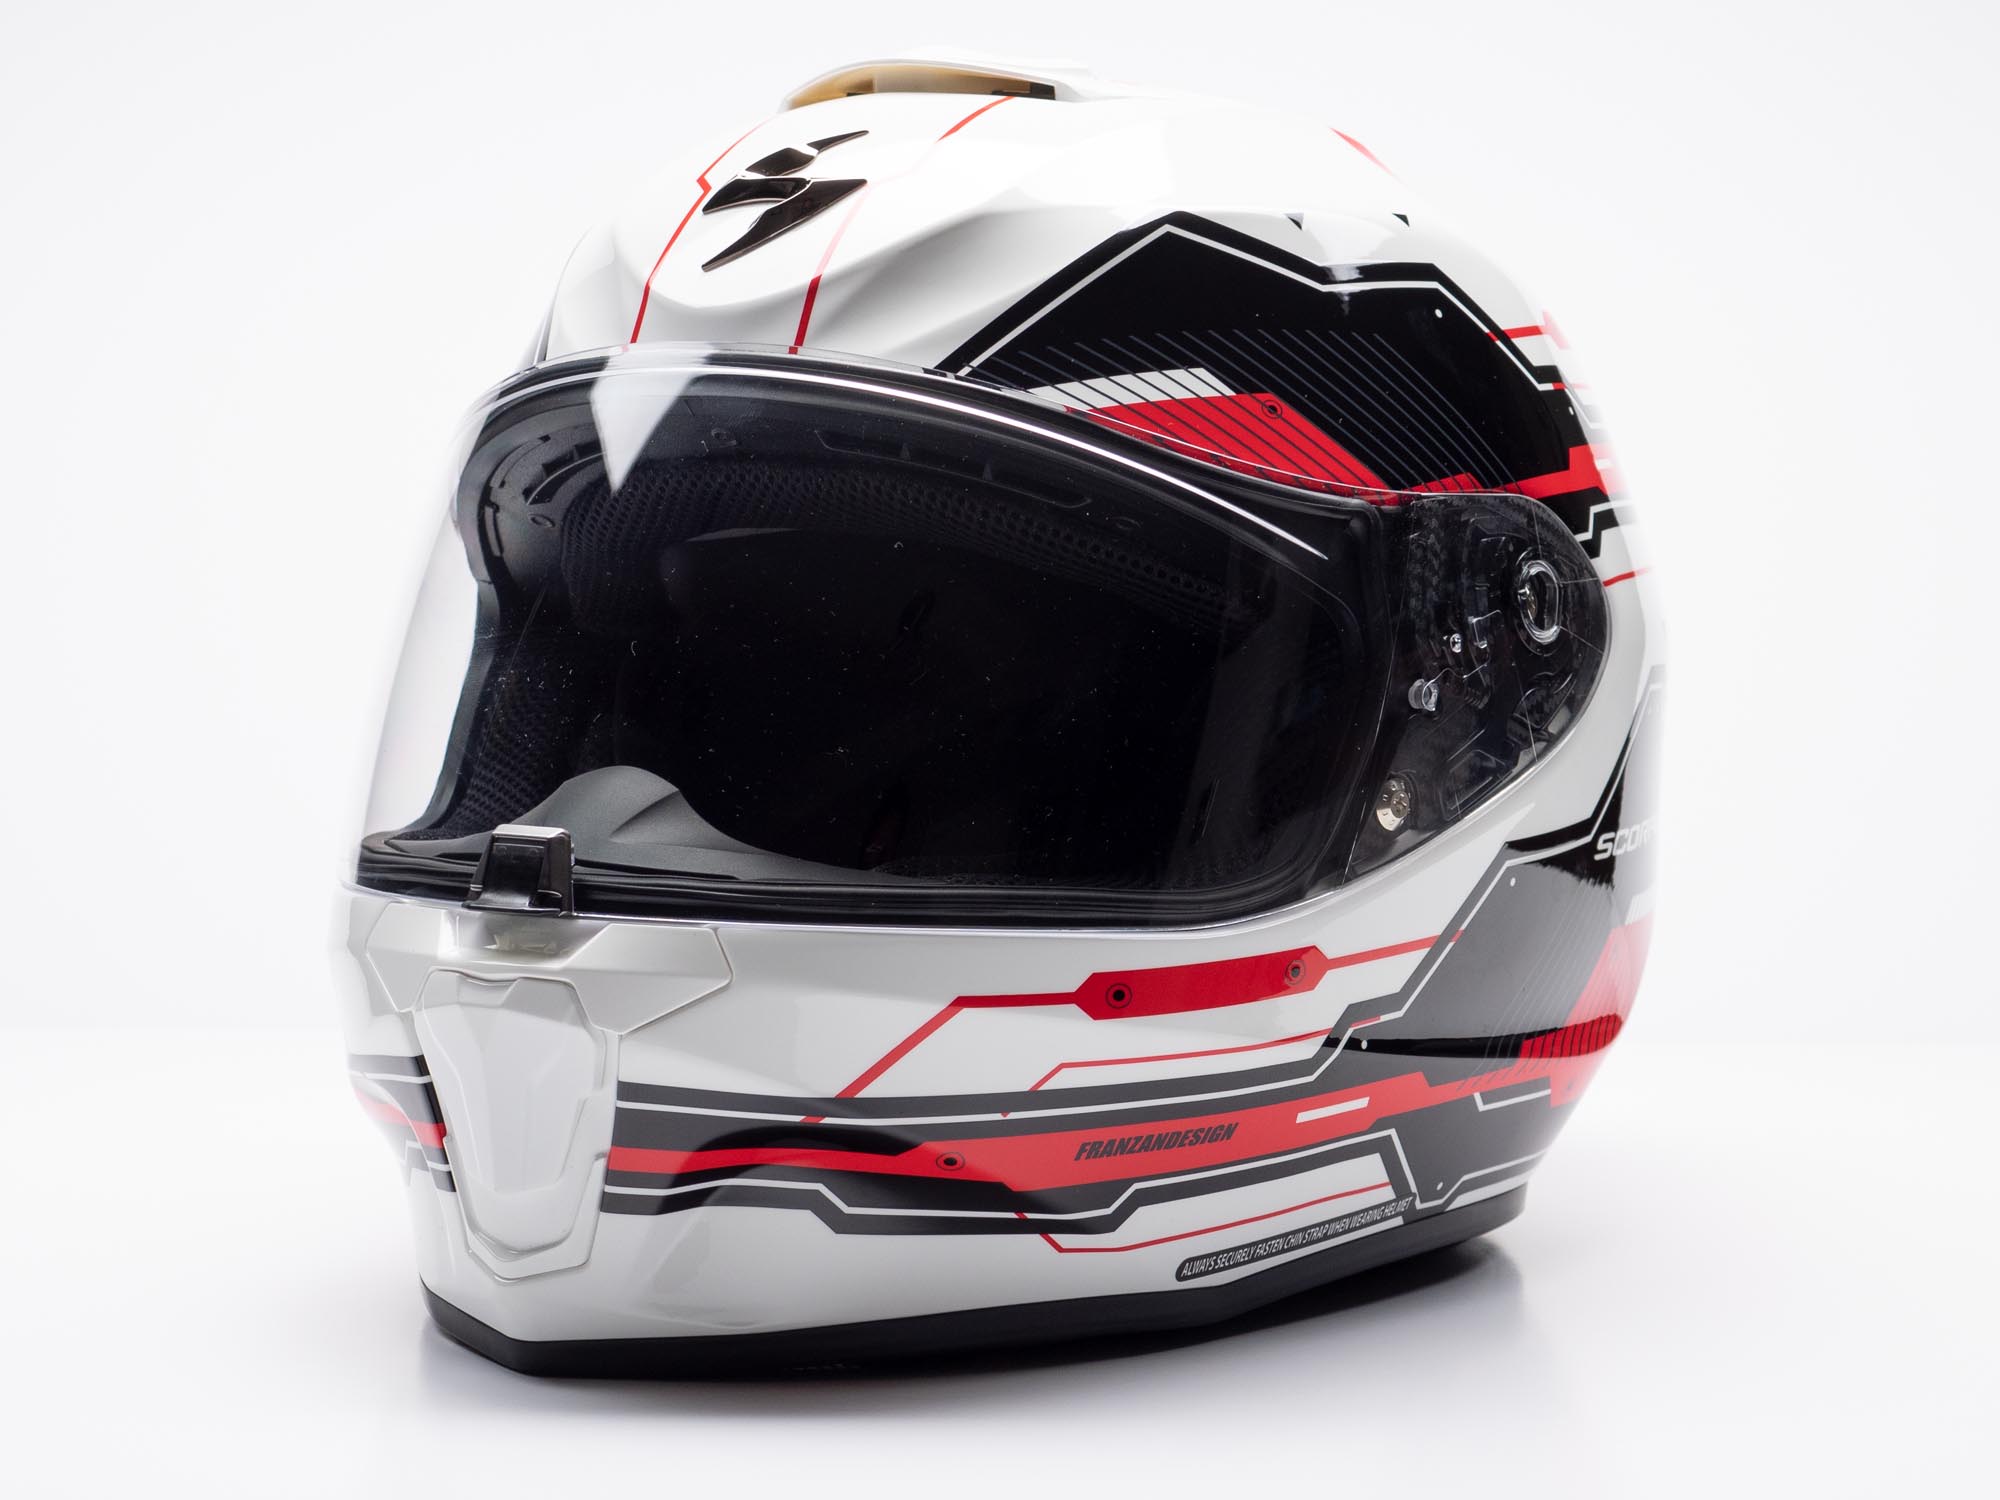
I have to admit that Scorpion helmets and the 400 series, in particular, are a bit special to me. Around ten years ago I was returning to motorcycling riding after a few years away from riding.
When I purchased my new-to-me bike (a 2001 Kawasaki ZR-7s) I, of course, needed a new helmet. Around that time there was a new player in the helmet market and that was Scorpion.
I purchased a black EXO-400 helmet back then based on the price and the fact it was available right there at the shop. As it turns out, webBikeWorld had recently reviewed the EXO-400 at that time and found it to be quite a good value. I had yet to discover wBW reviews but looking back makes me feel even better about that choice.
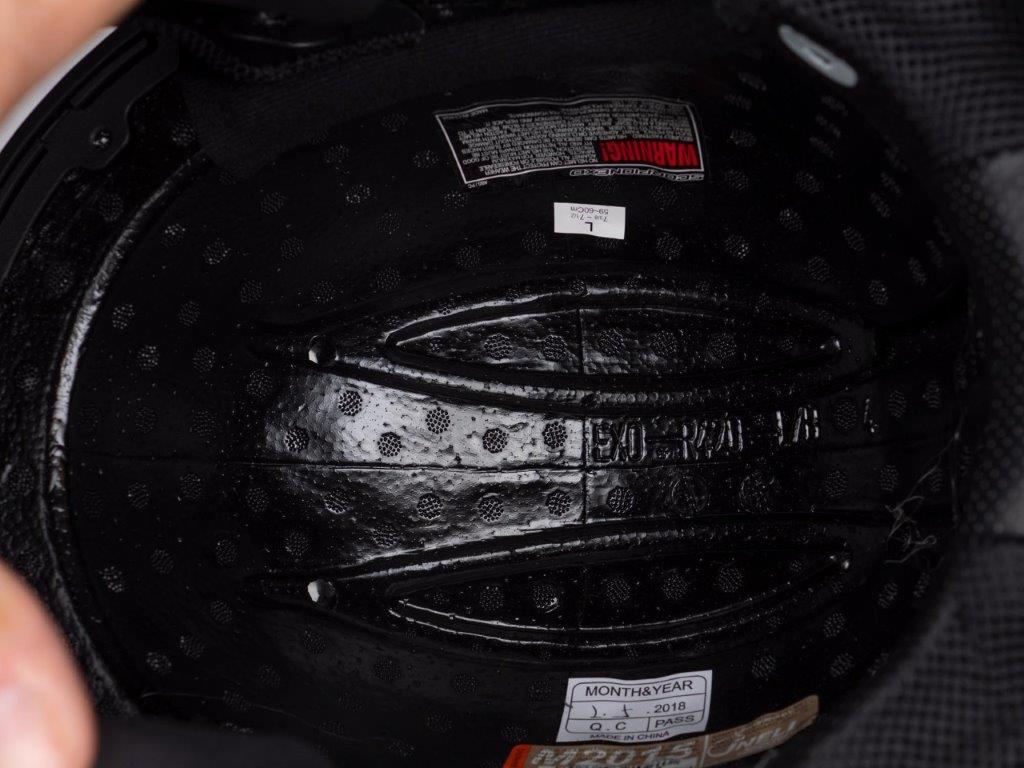
So the new EXO R420 is now tasked with taking up the reins of the 400 series. Eleven years after that initial wBW review, how does the third generation of this helmet hold up? Let’s see.
Shopping Now? We Recommend:
webBikeWorld has worked closely with RevZilla over the years to provide our testers with products to review. In addition to being a great site to shop from, they’re also a great partner.
The EXO-R420 has a lot to live up to with the EXO-400 series helmets offering very good value as well as fit and finish that bests many helmets costing significantly more. My initial impression when handling and examining the helmet out of the box is that the EXO-R420 might very well be a worthy successor.
What’s more is that somehow Scorpion has managed to update and improve on the previous version while still maintaining the previous version’s $149.95 price for solid colors. That is only $10.00 more than I paid for a new EXO-400 back in 2007.
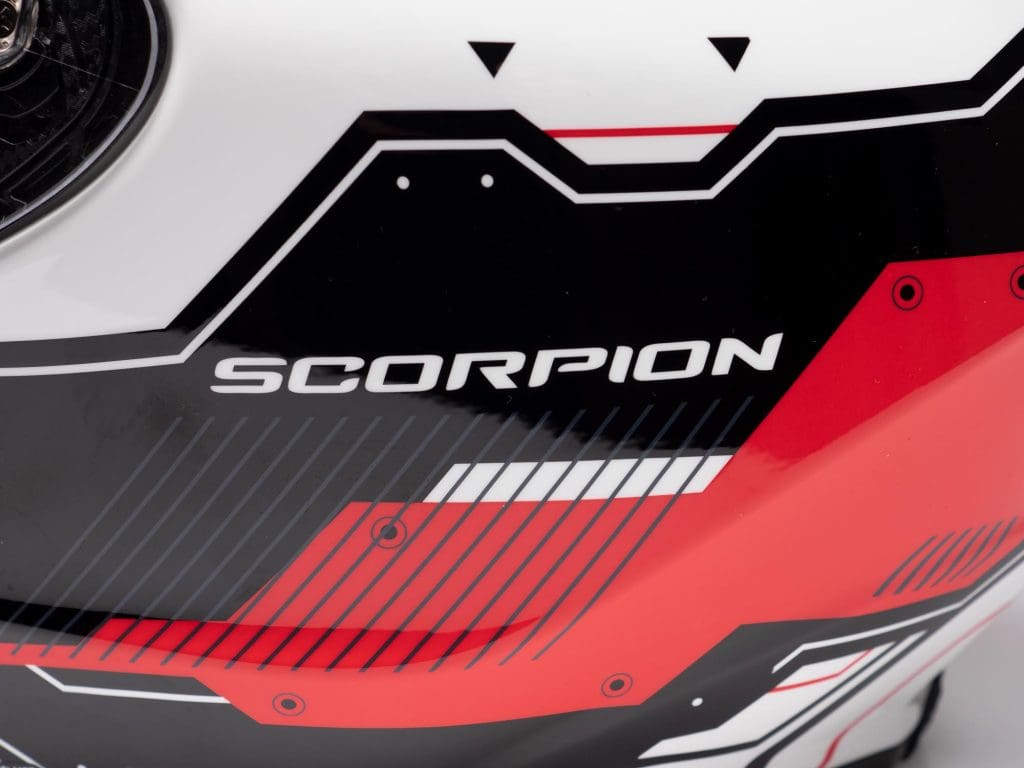
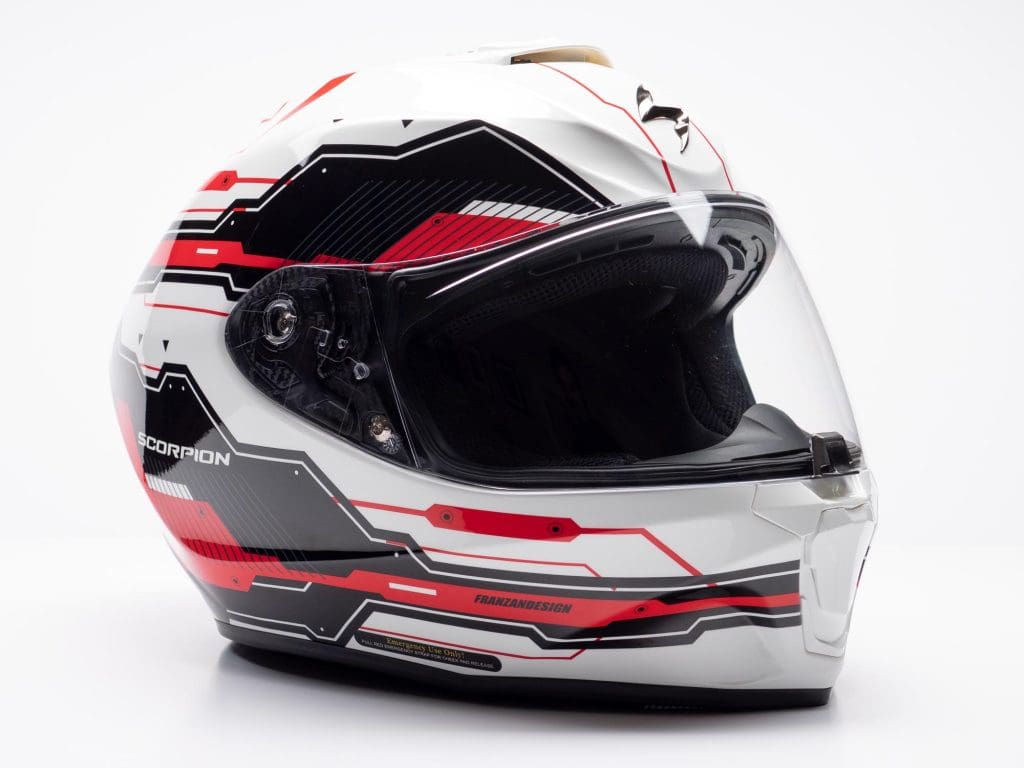
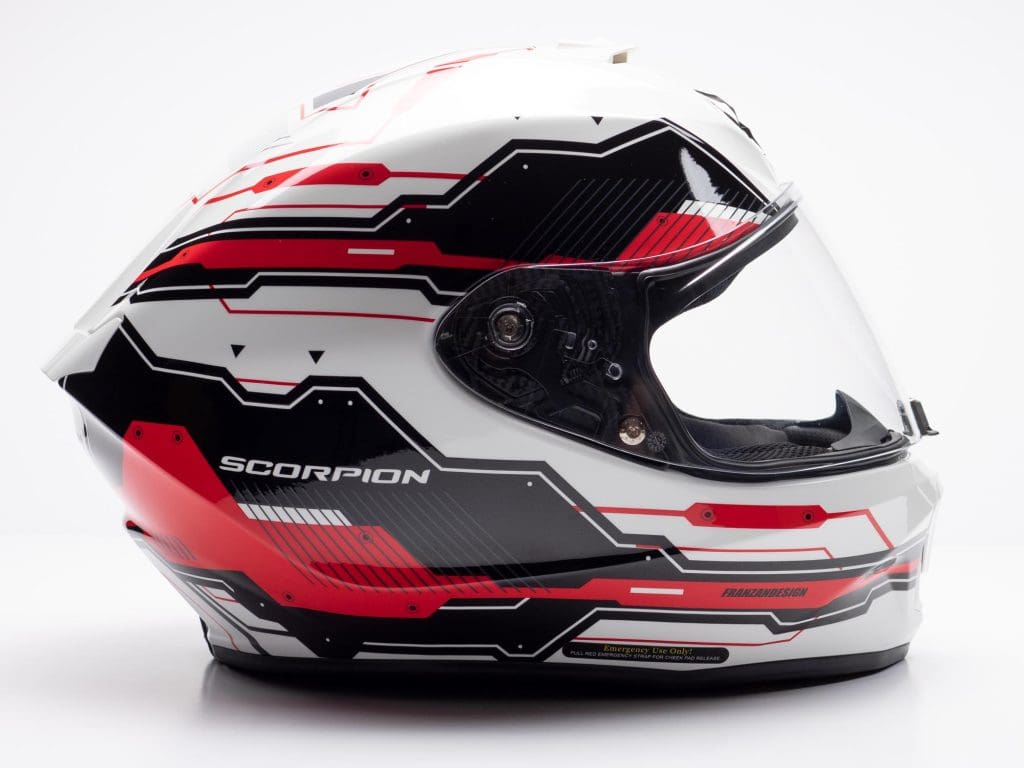
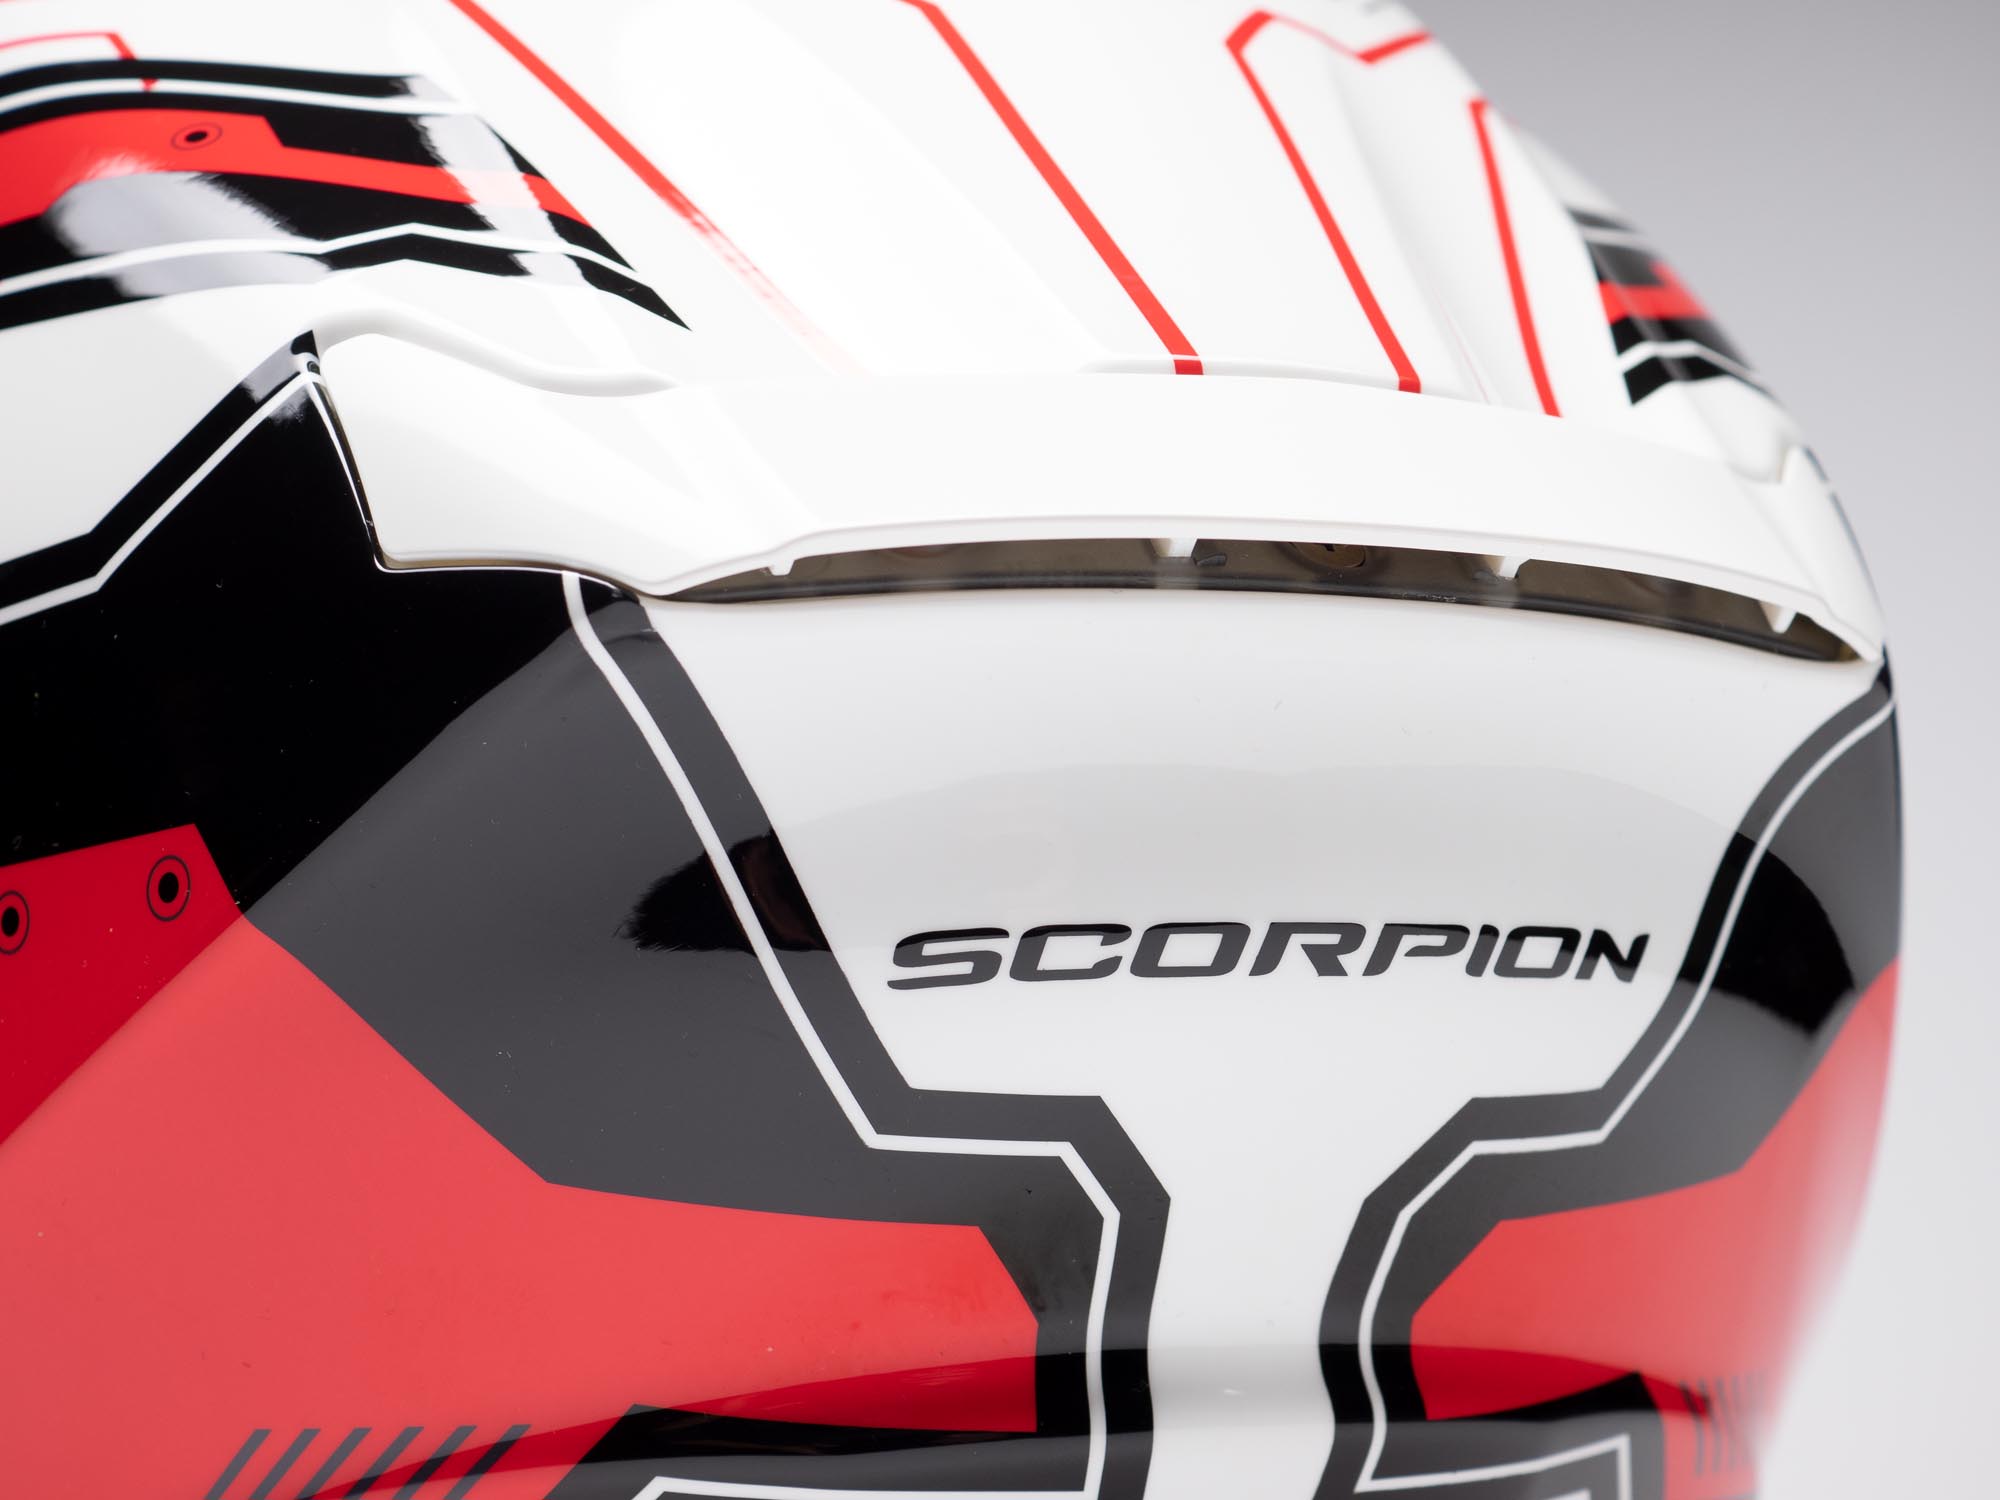
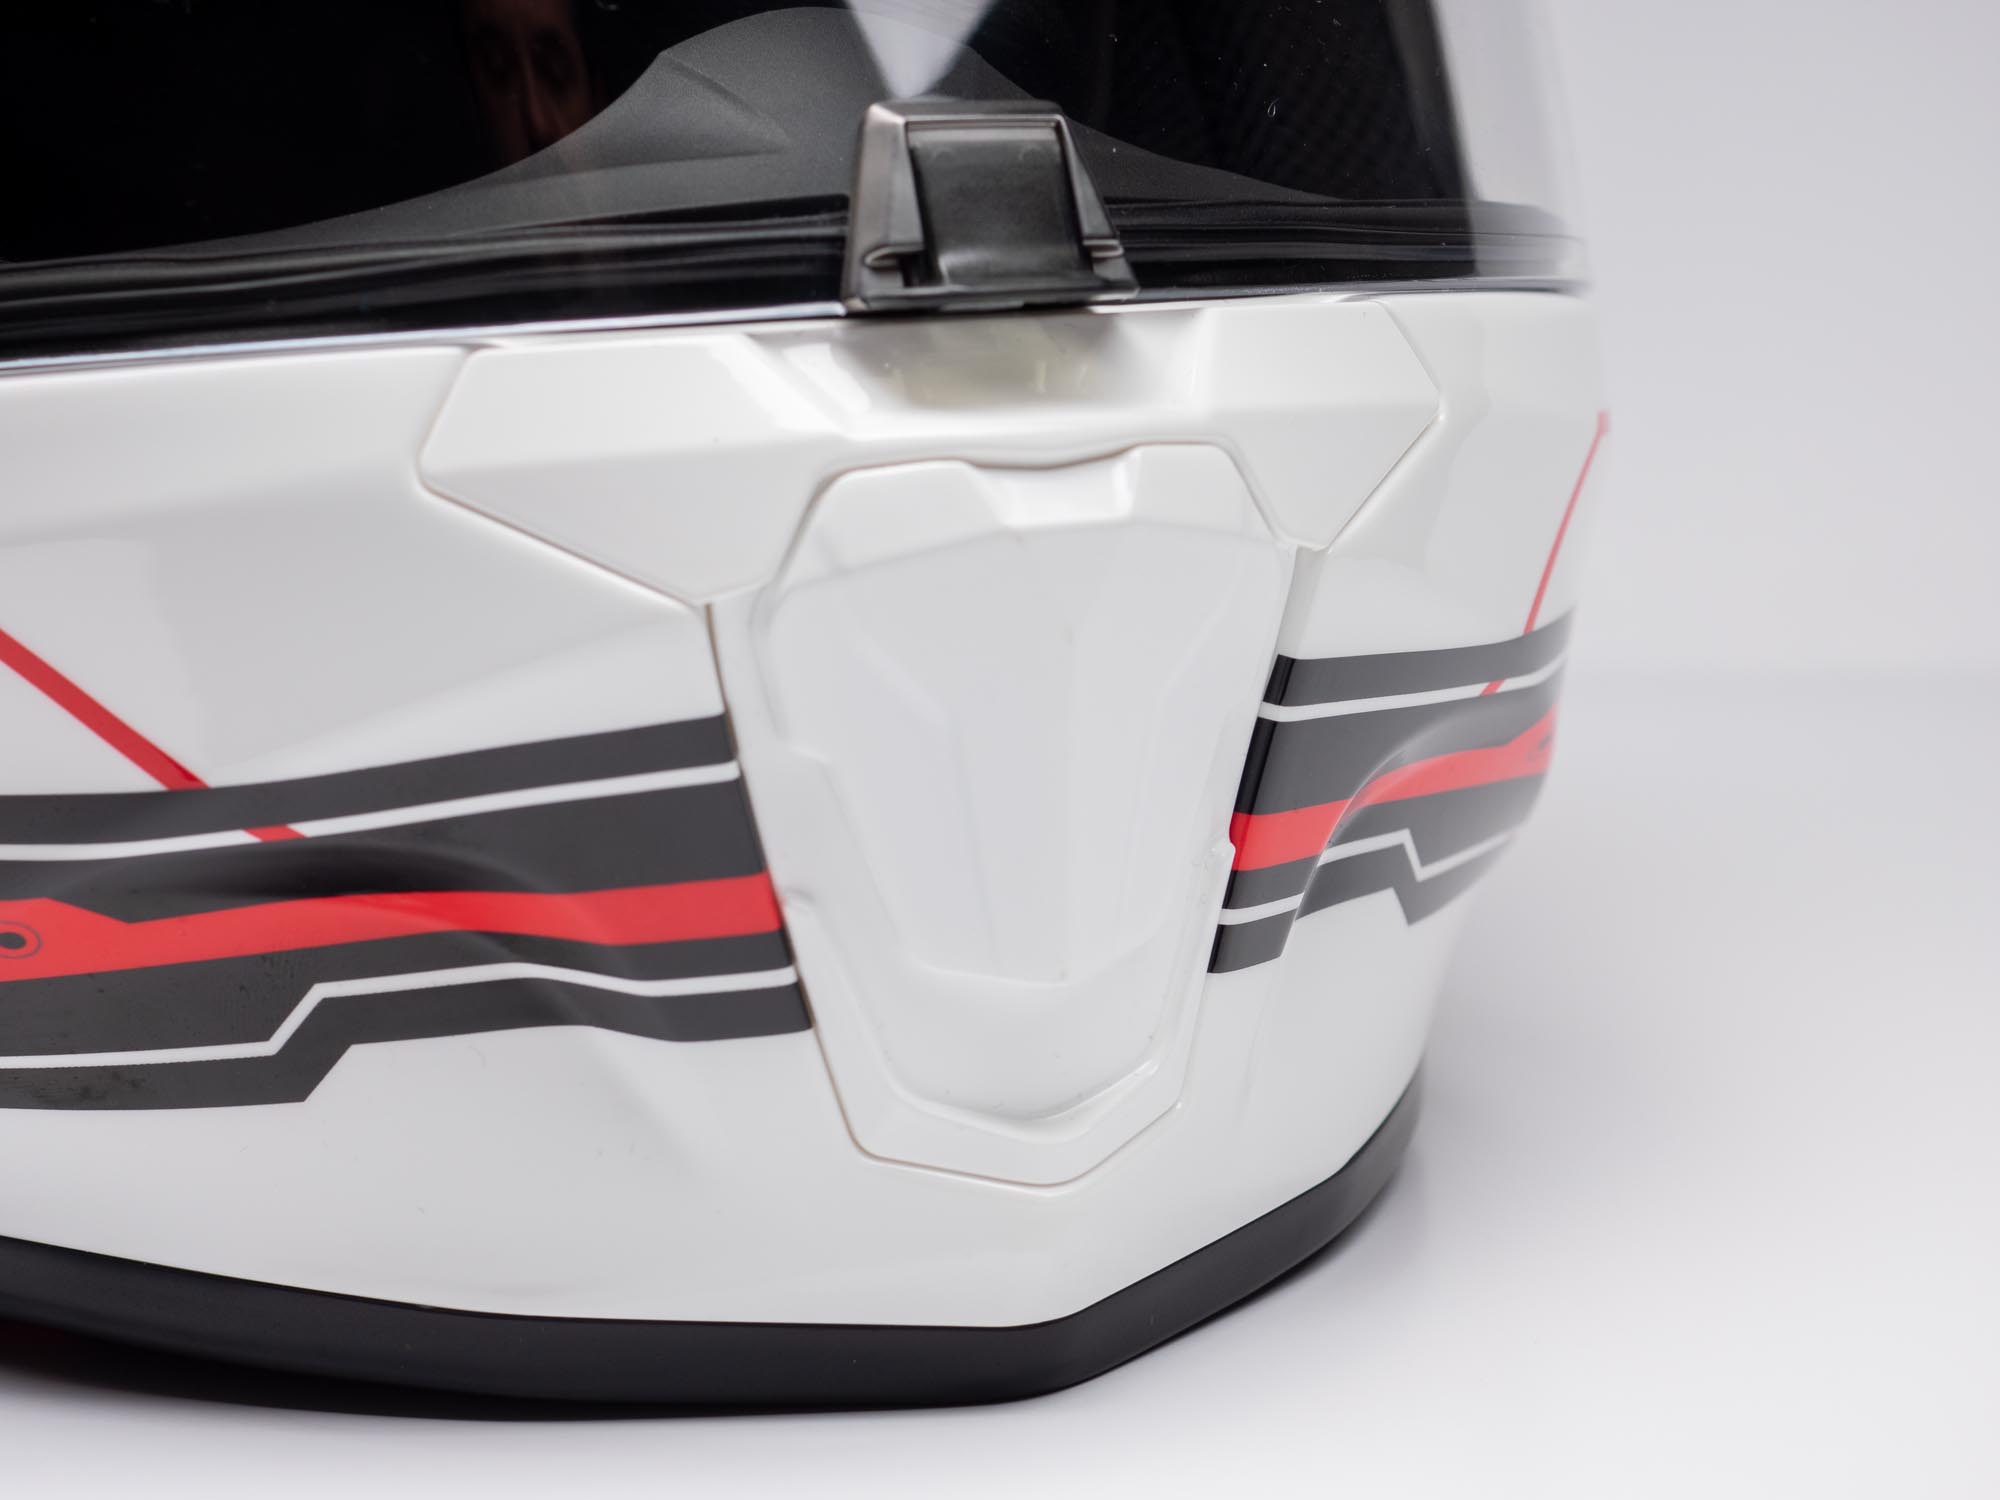
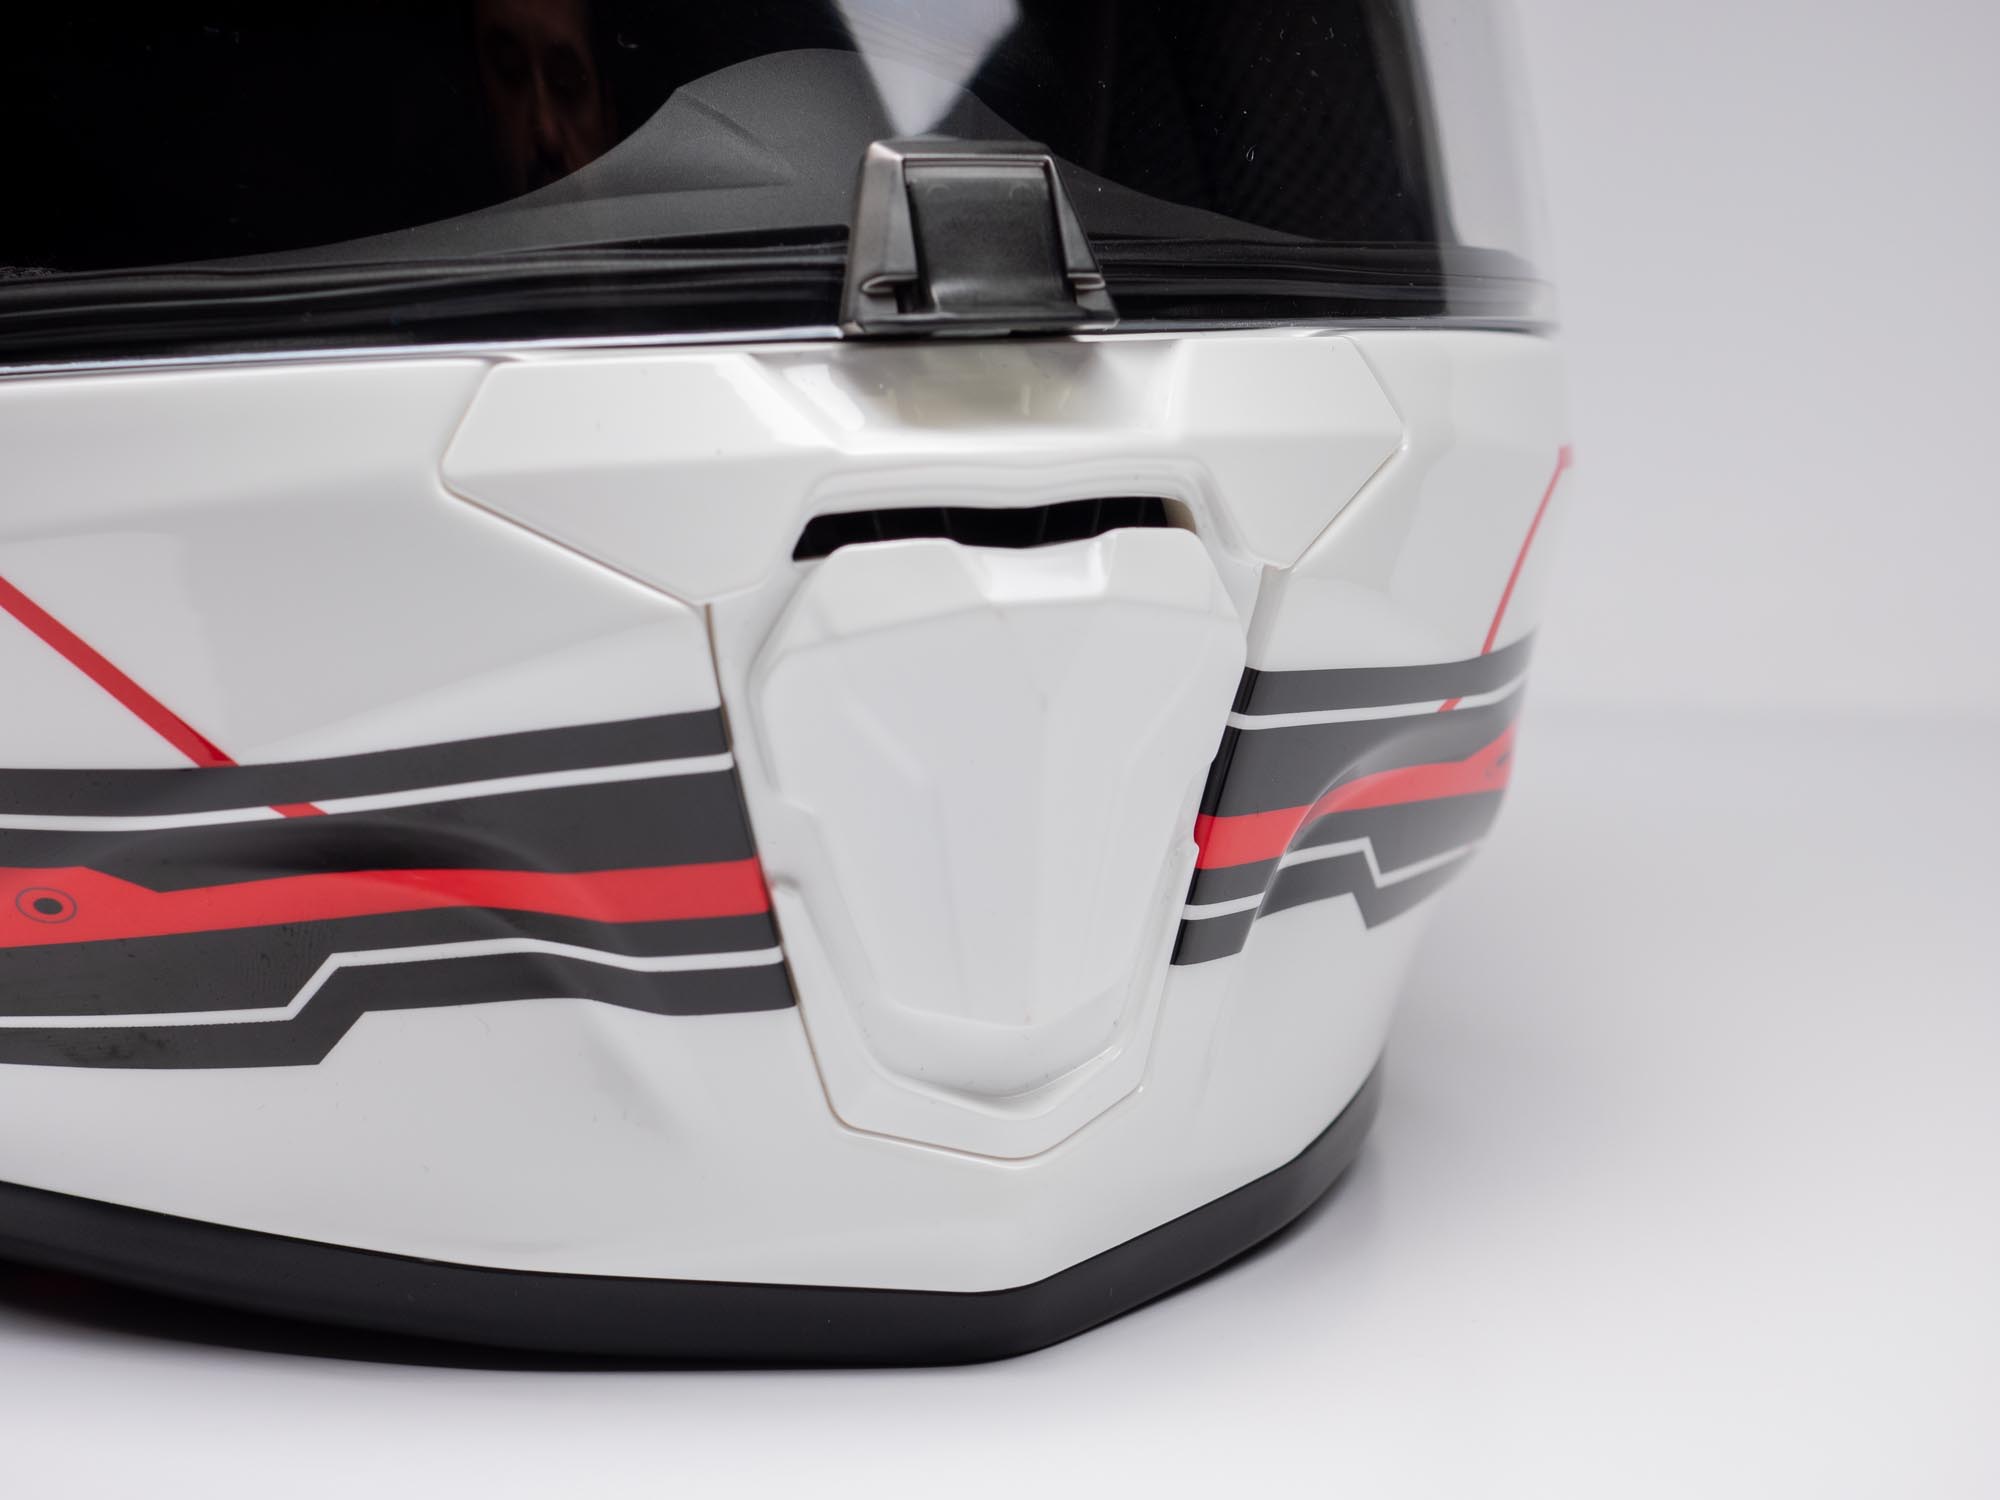
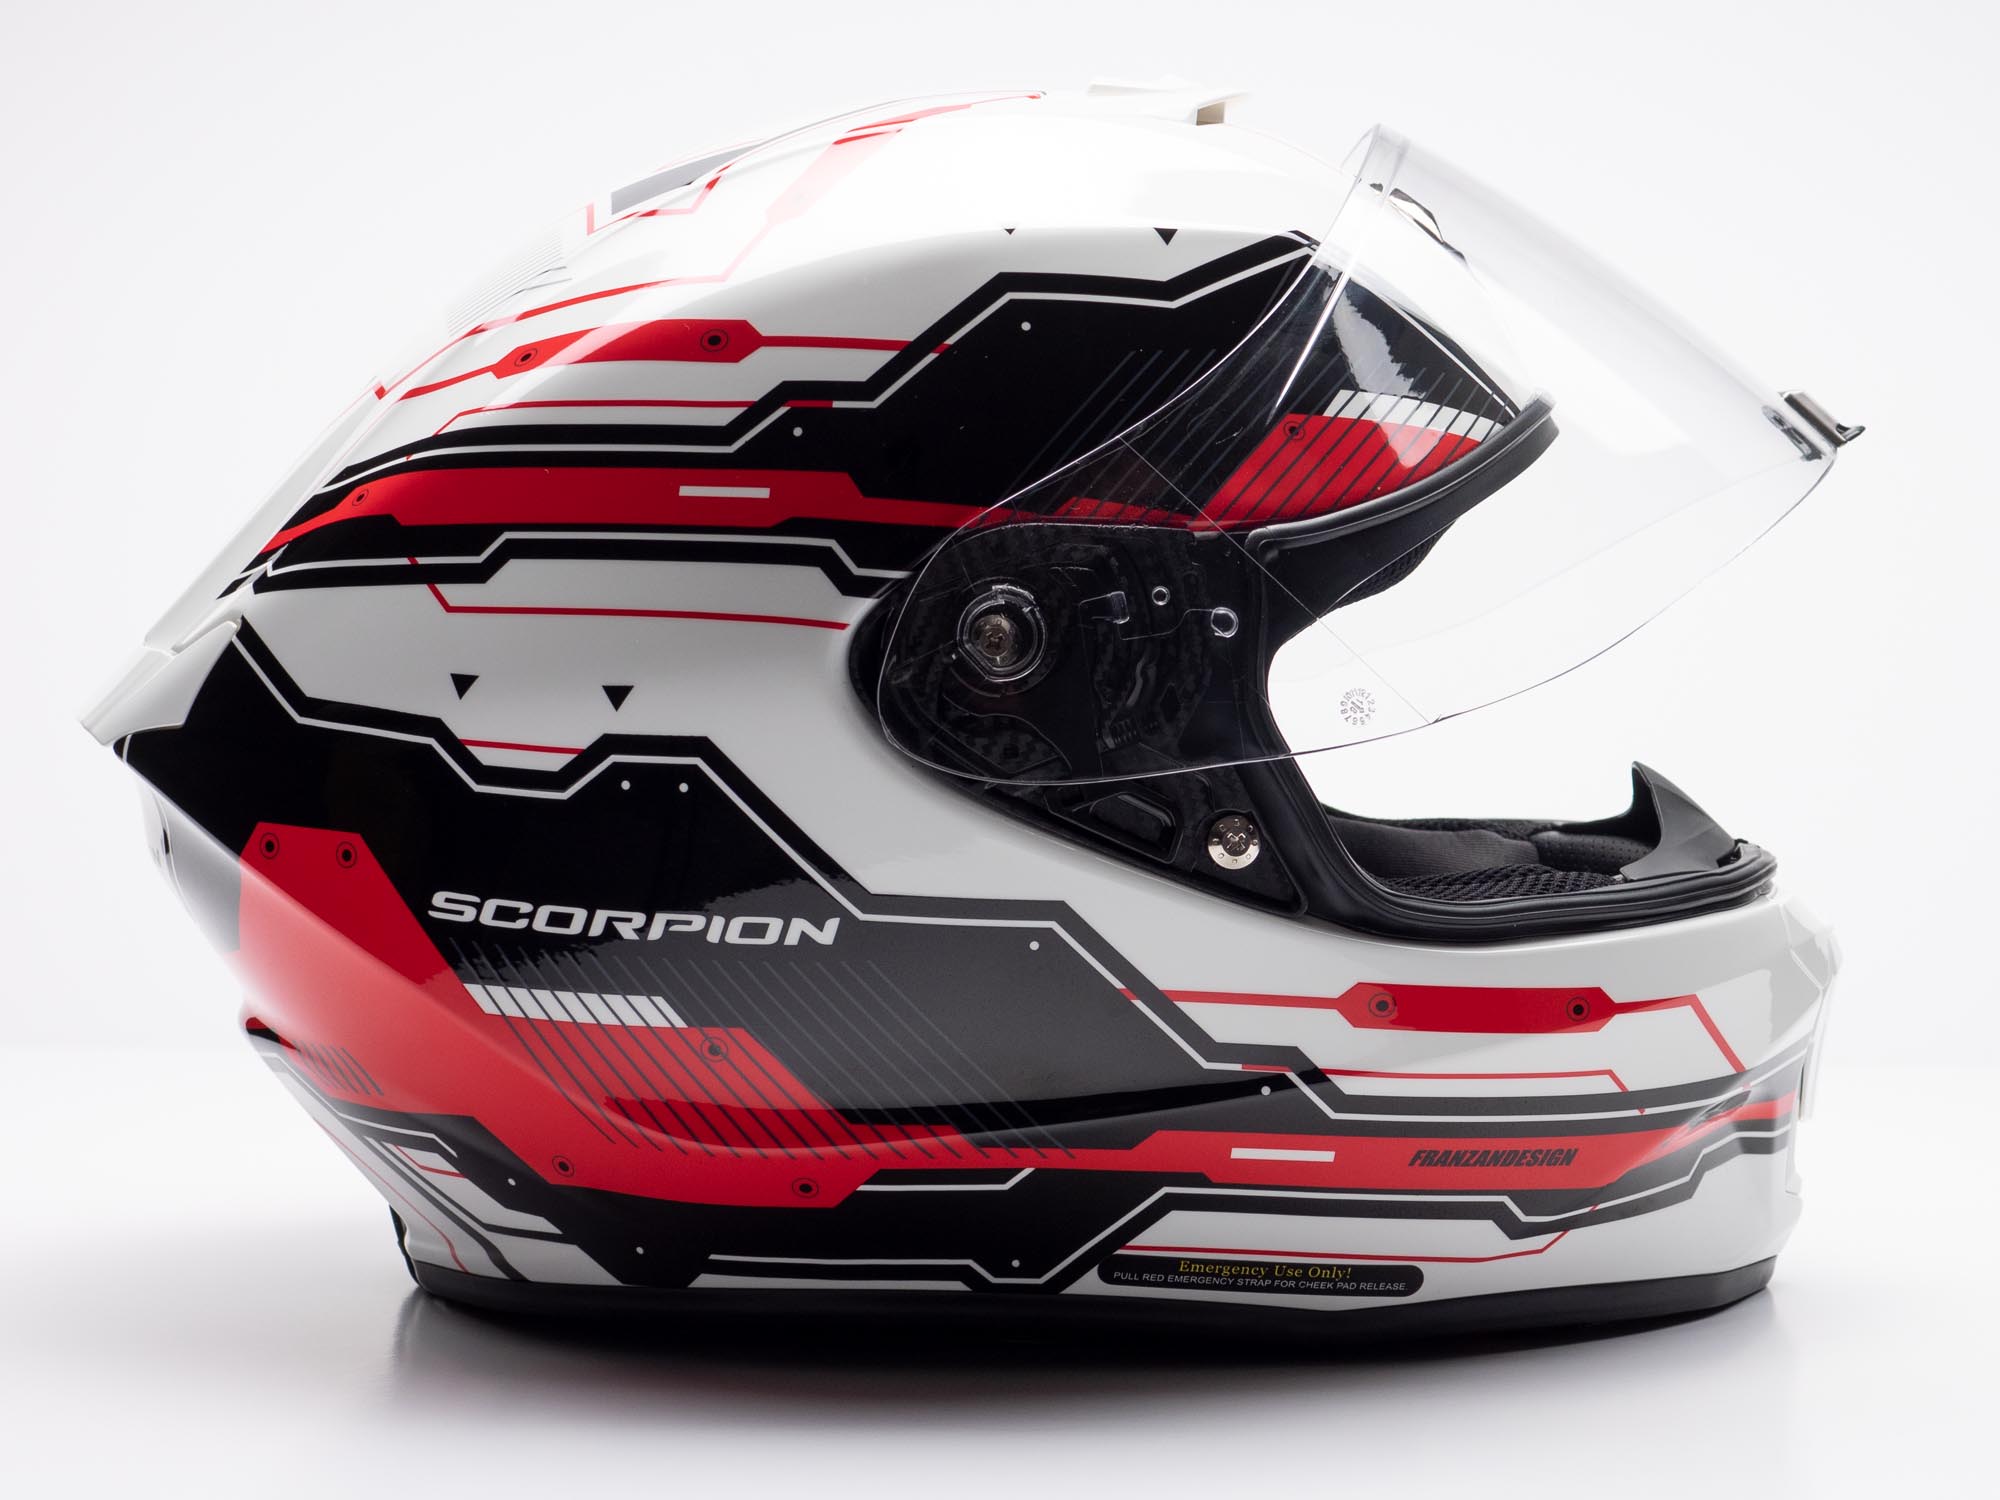
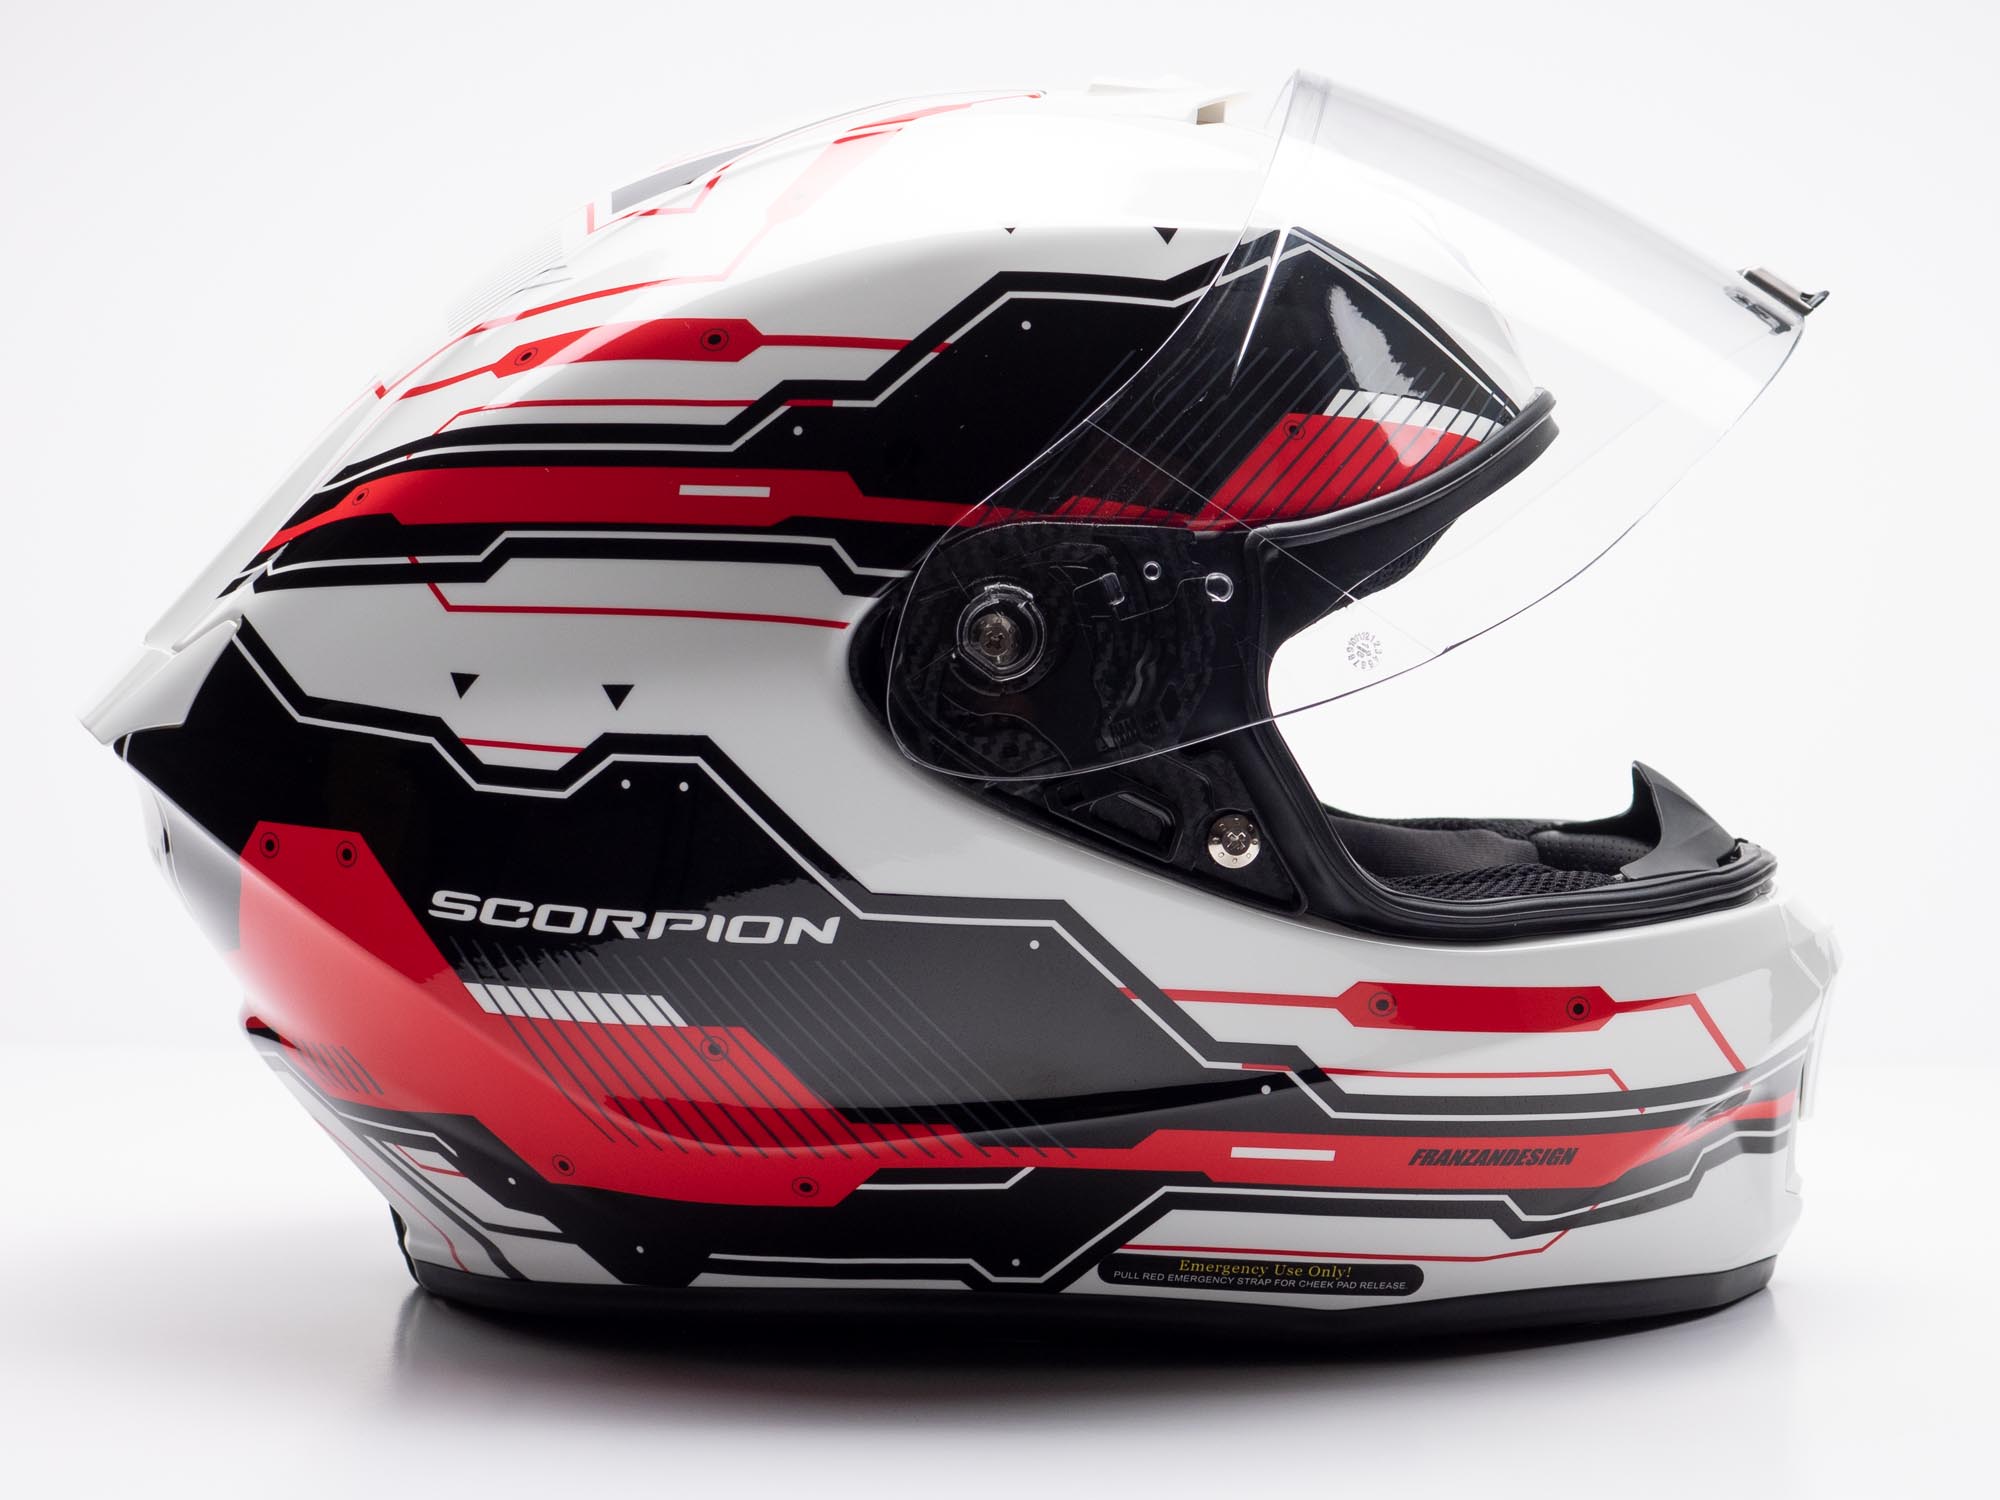
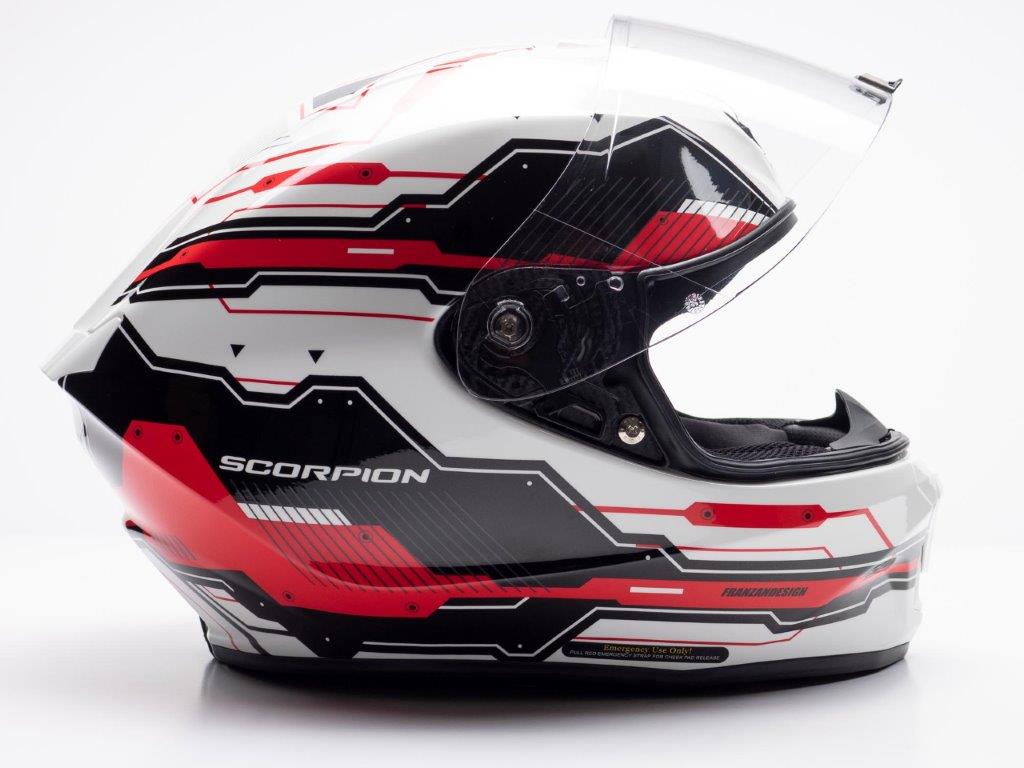
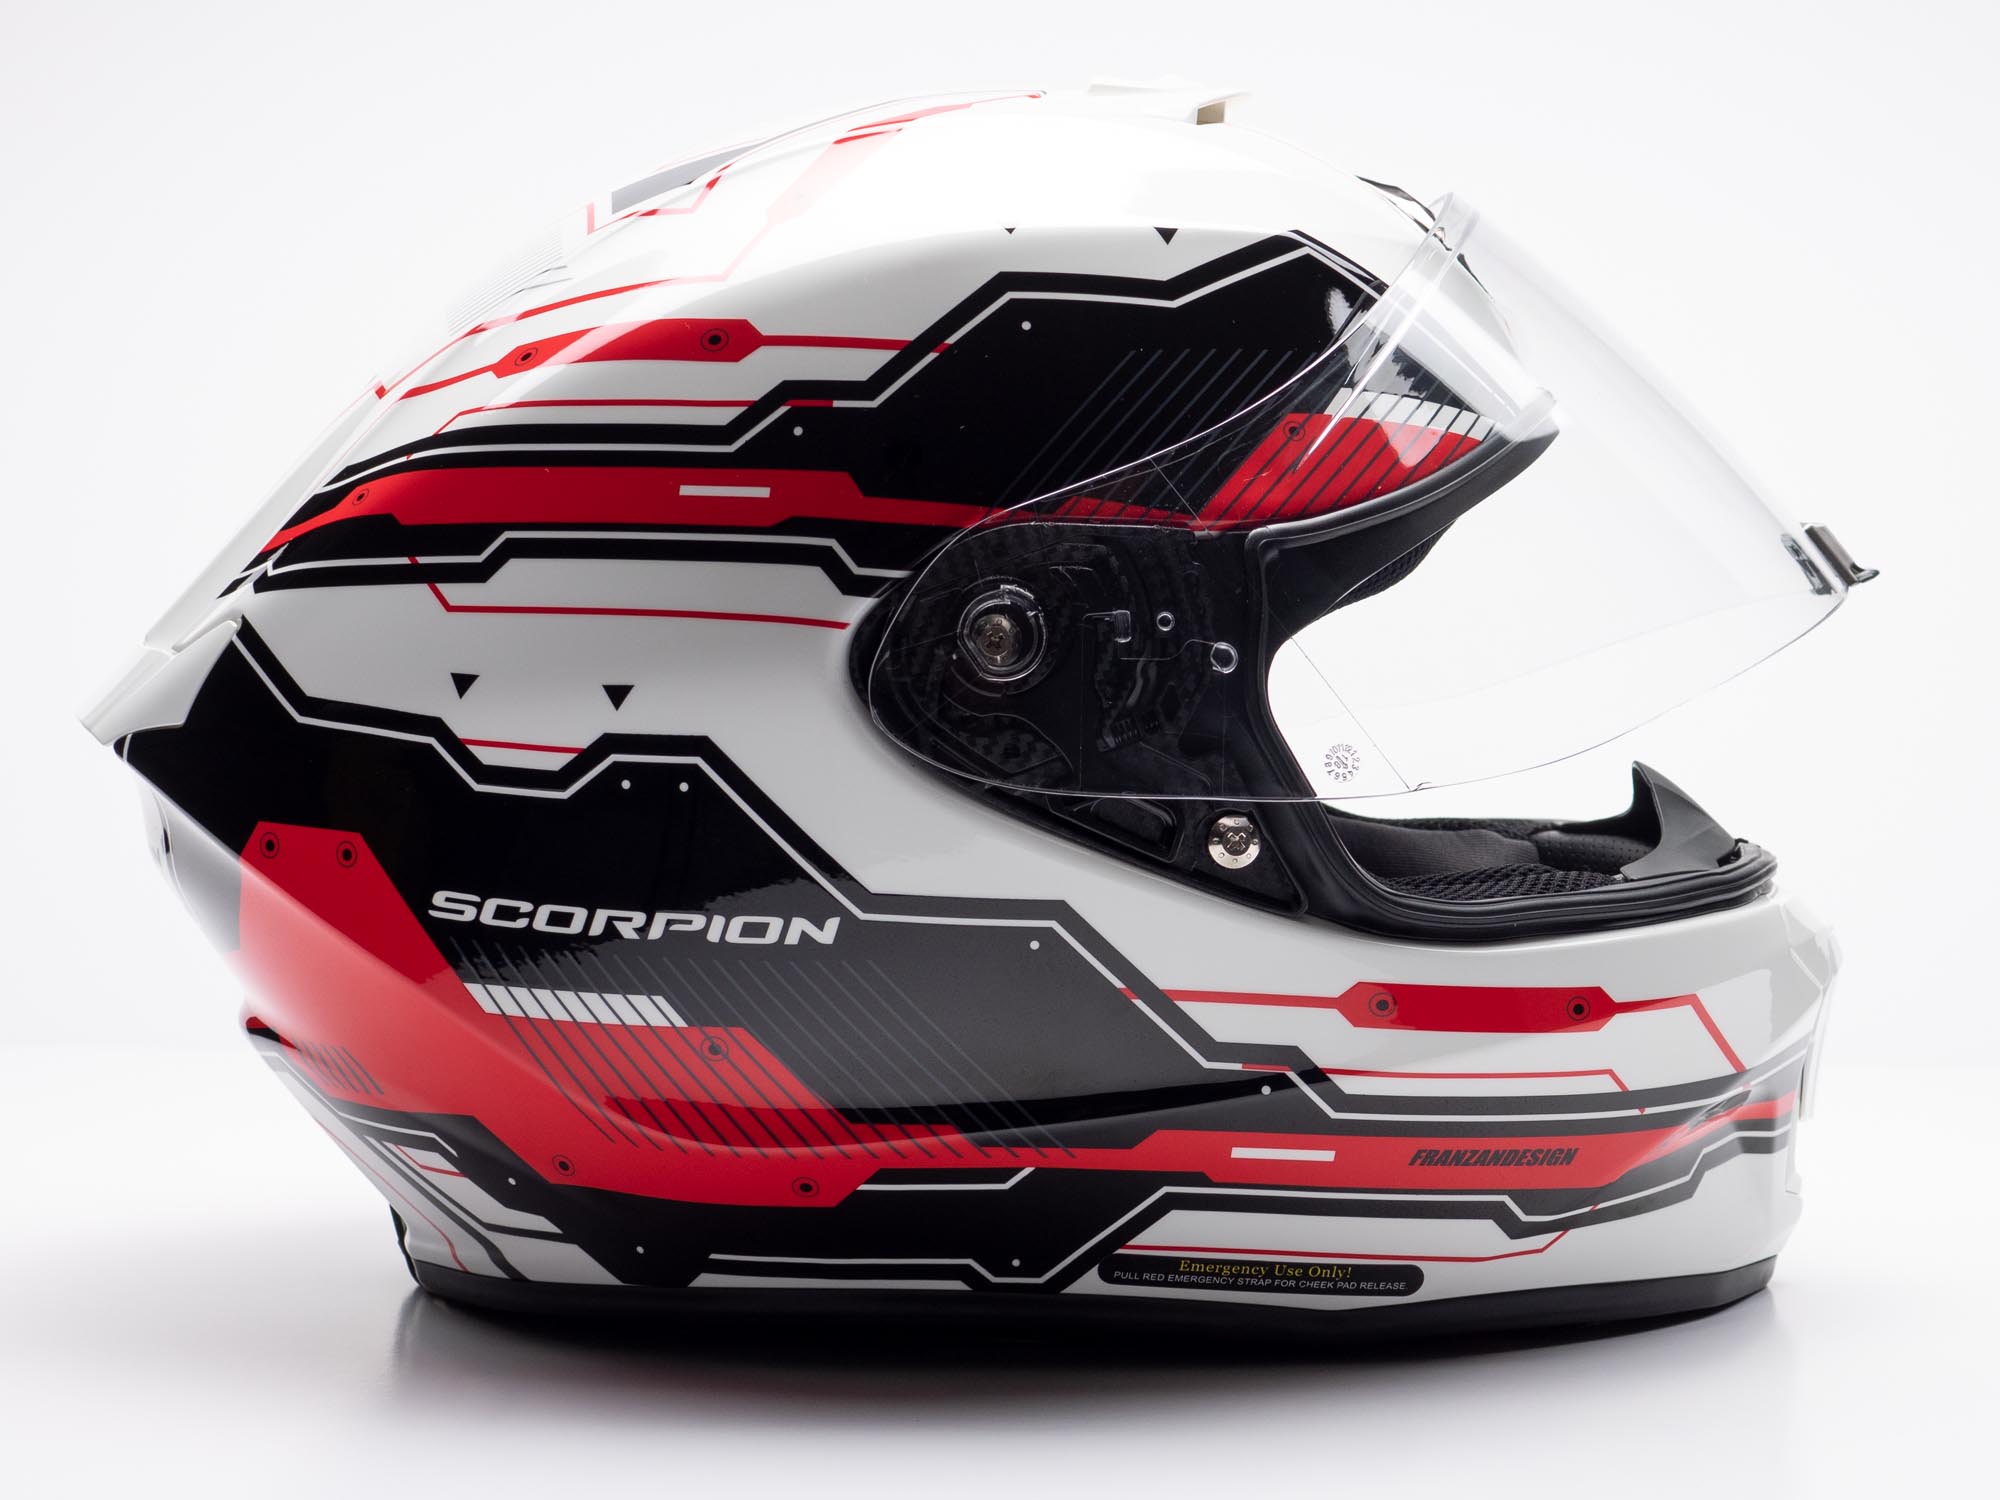
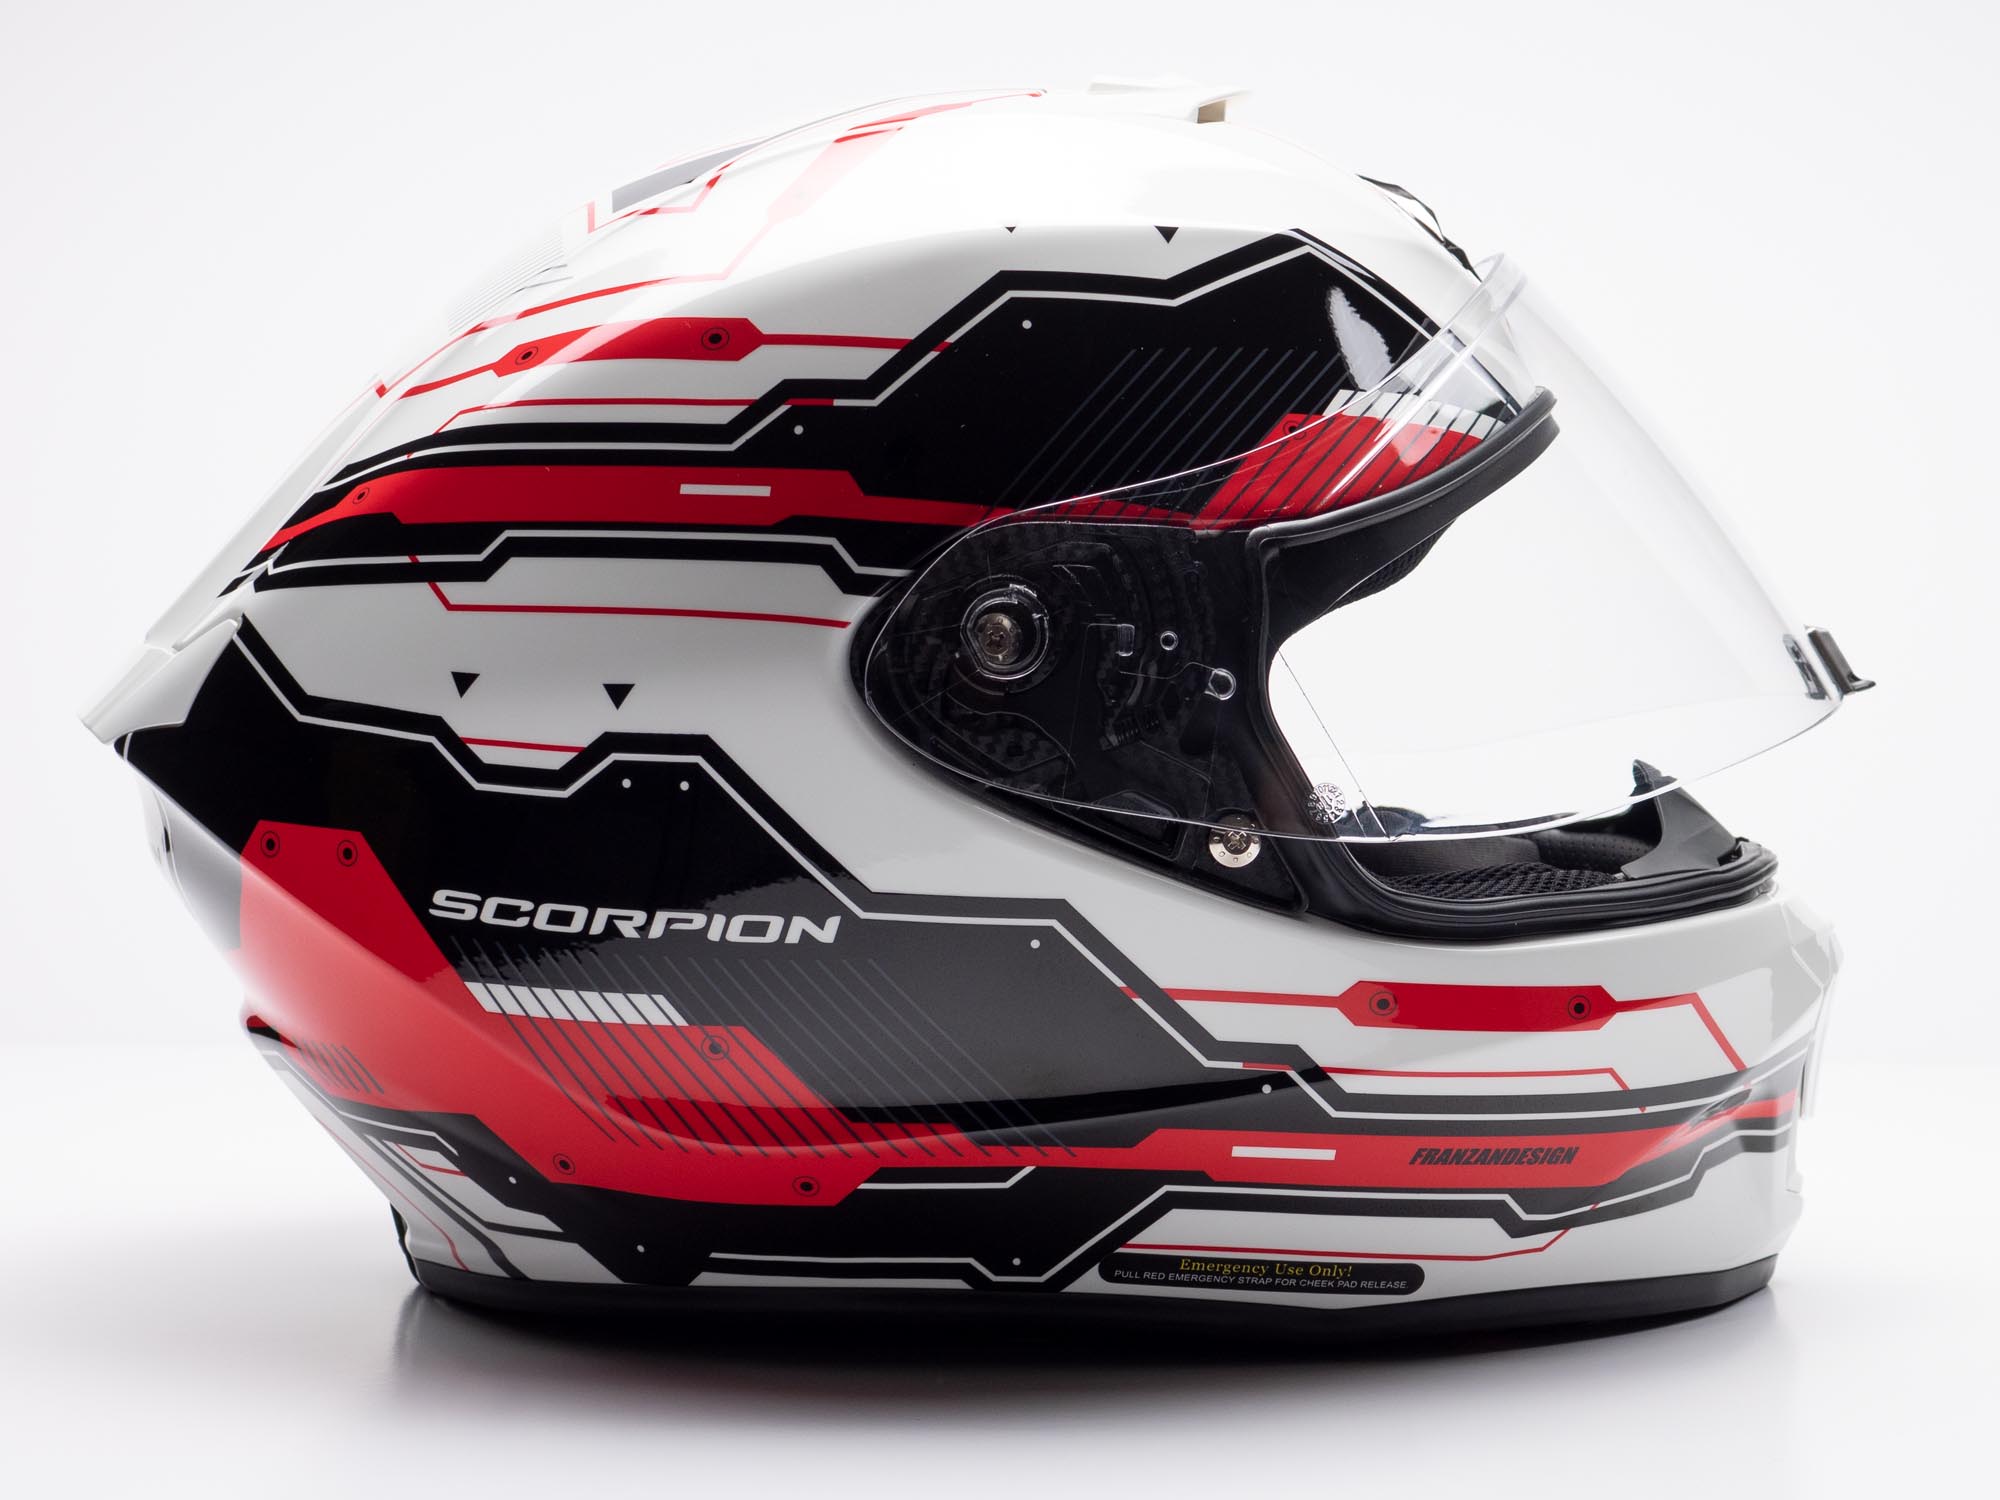
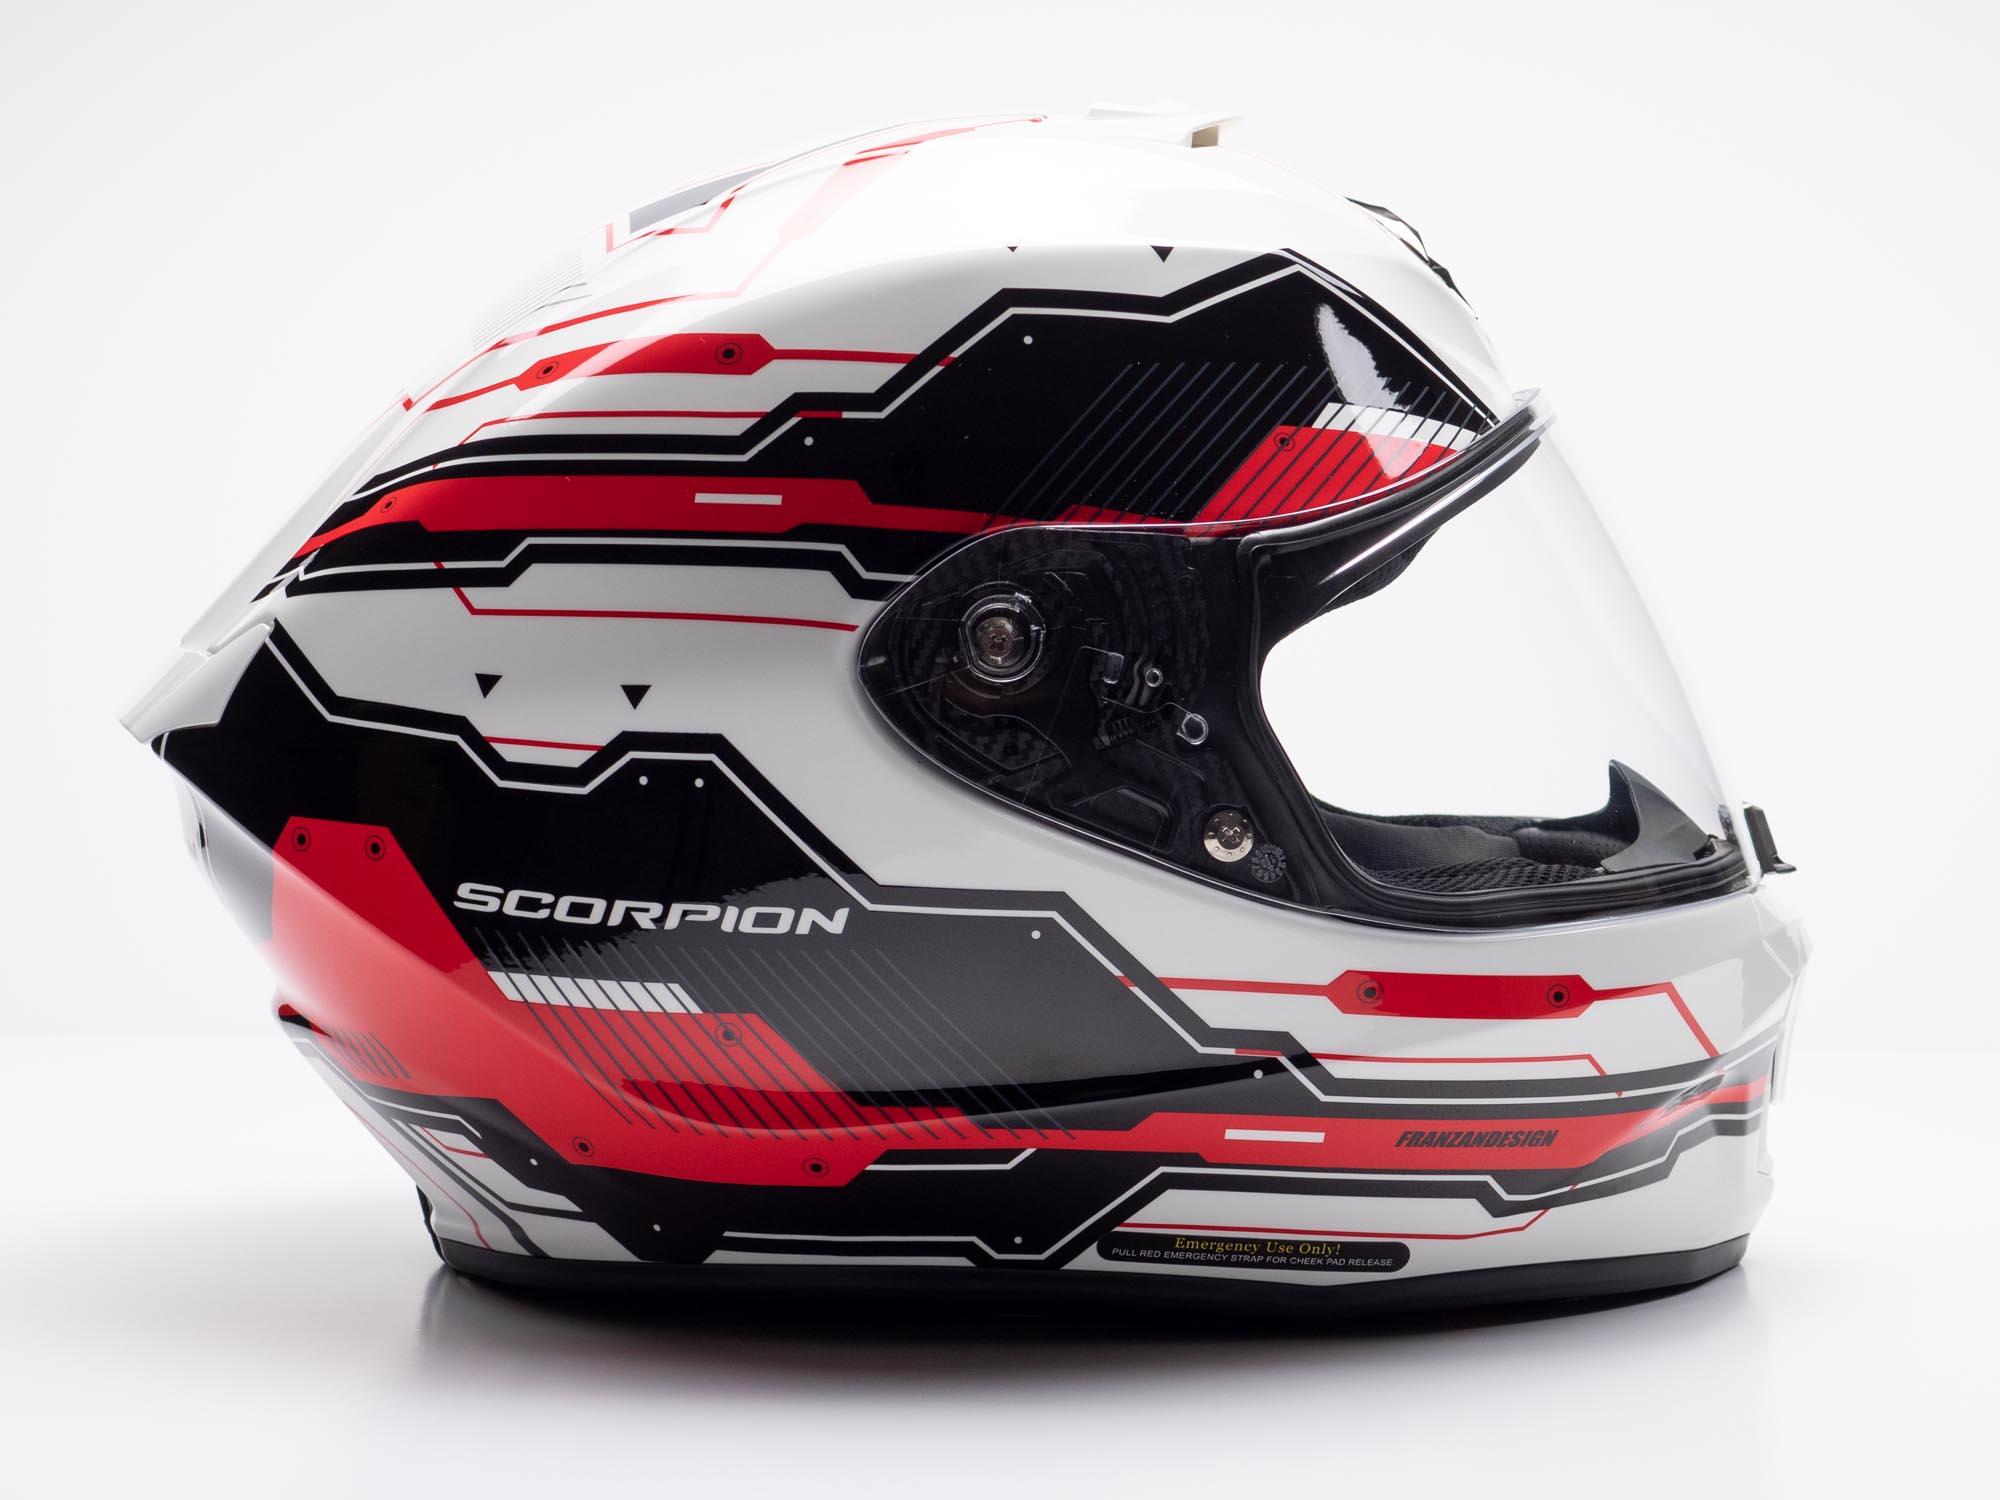
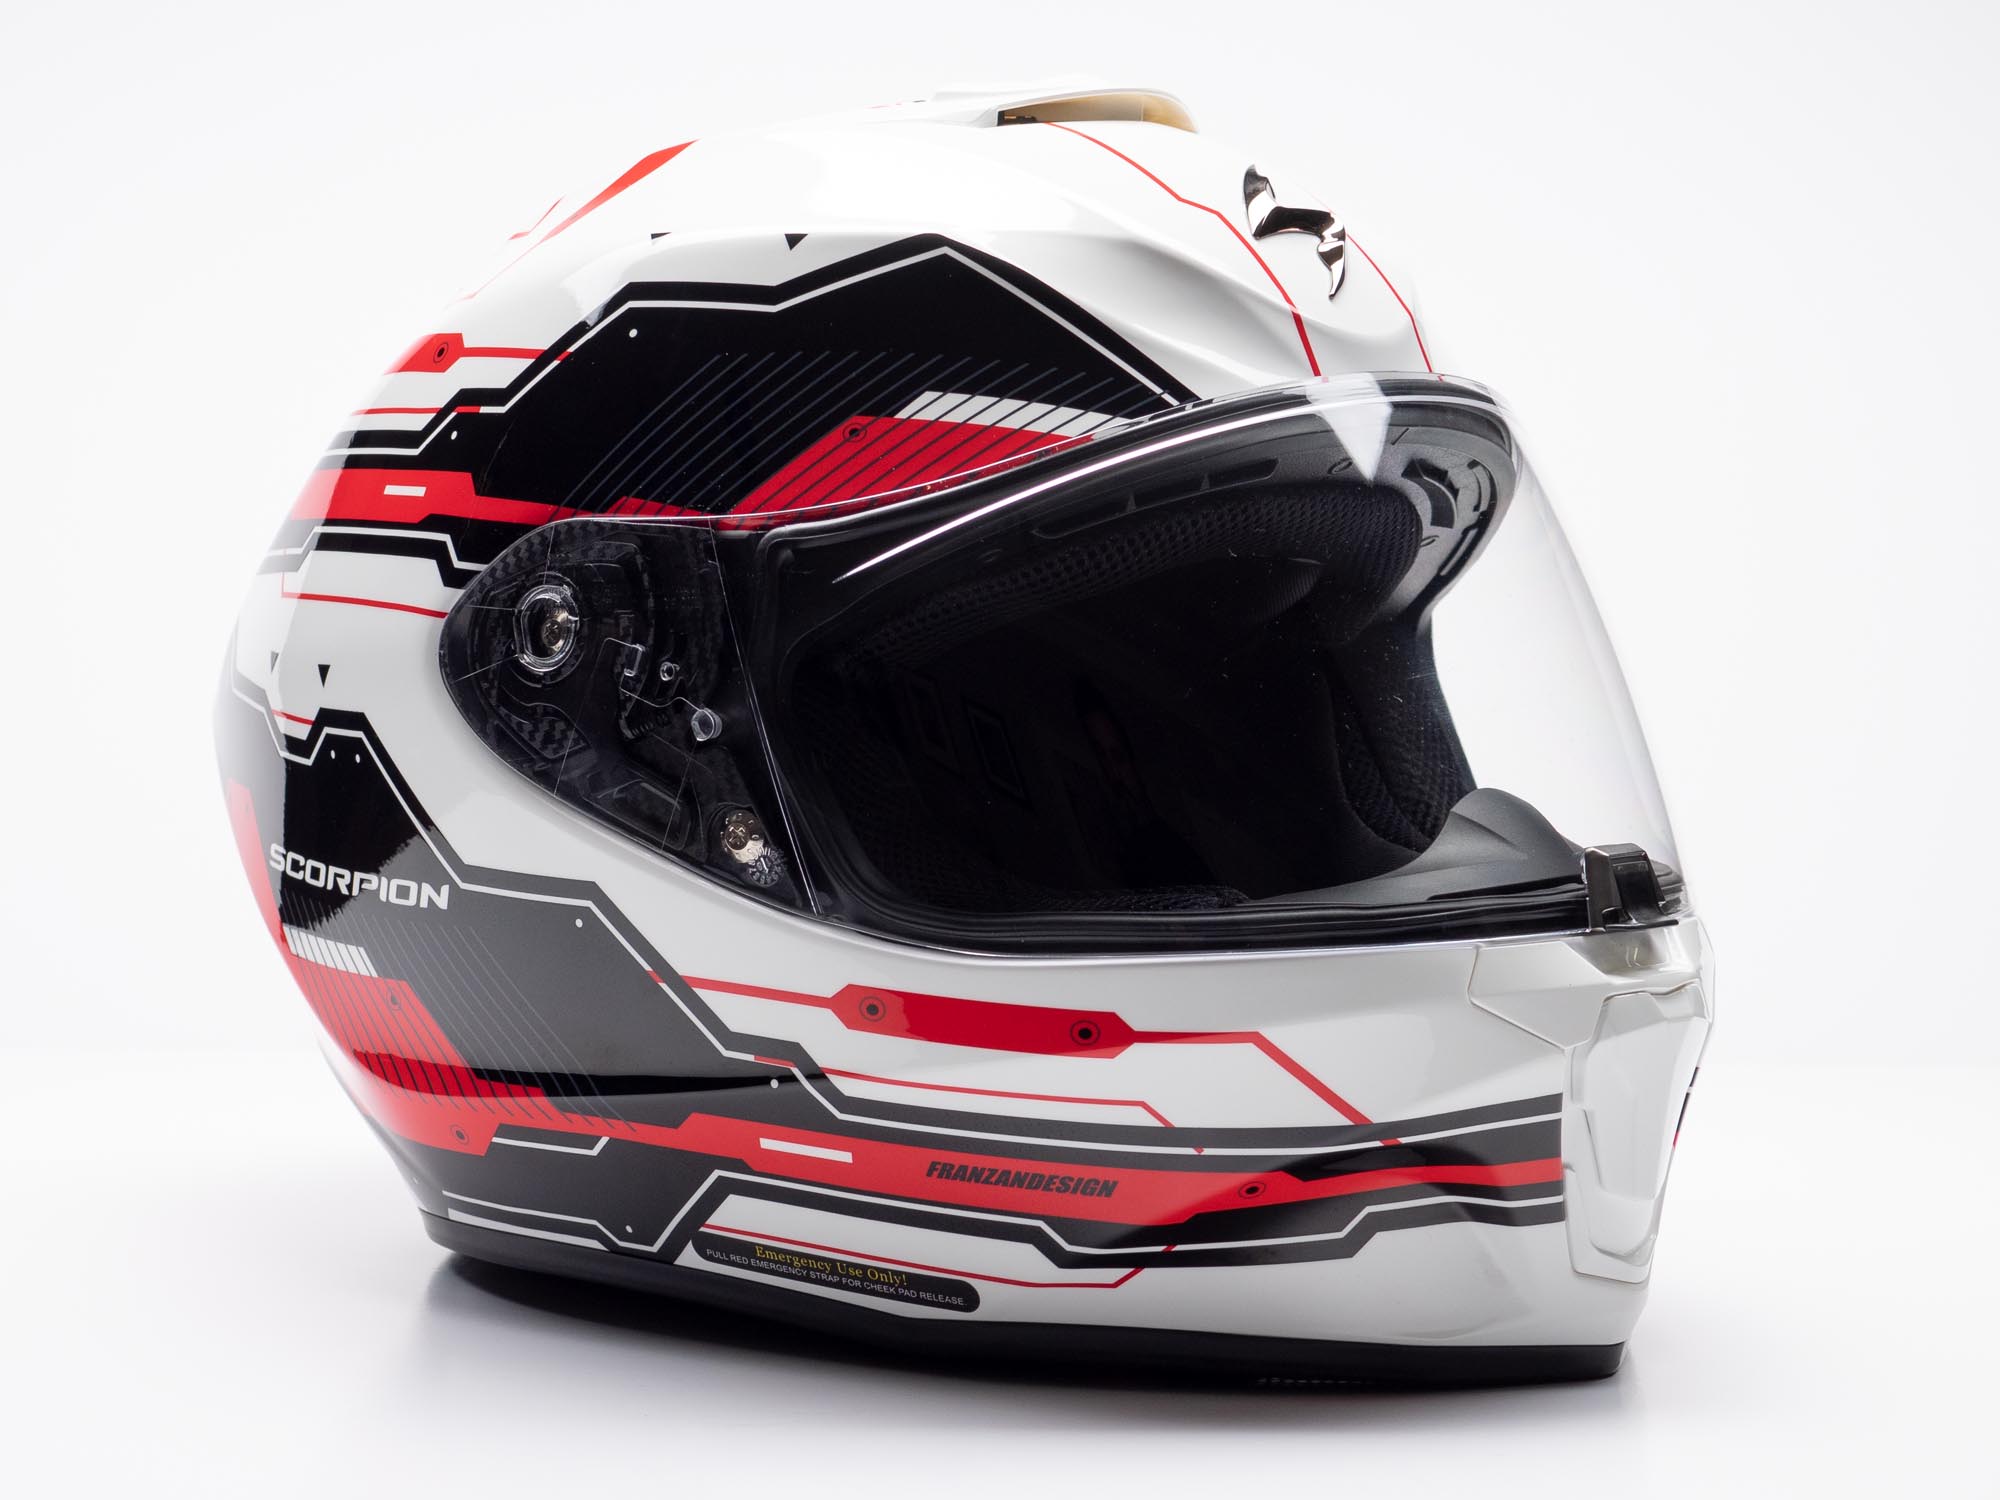
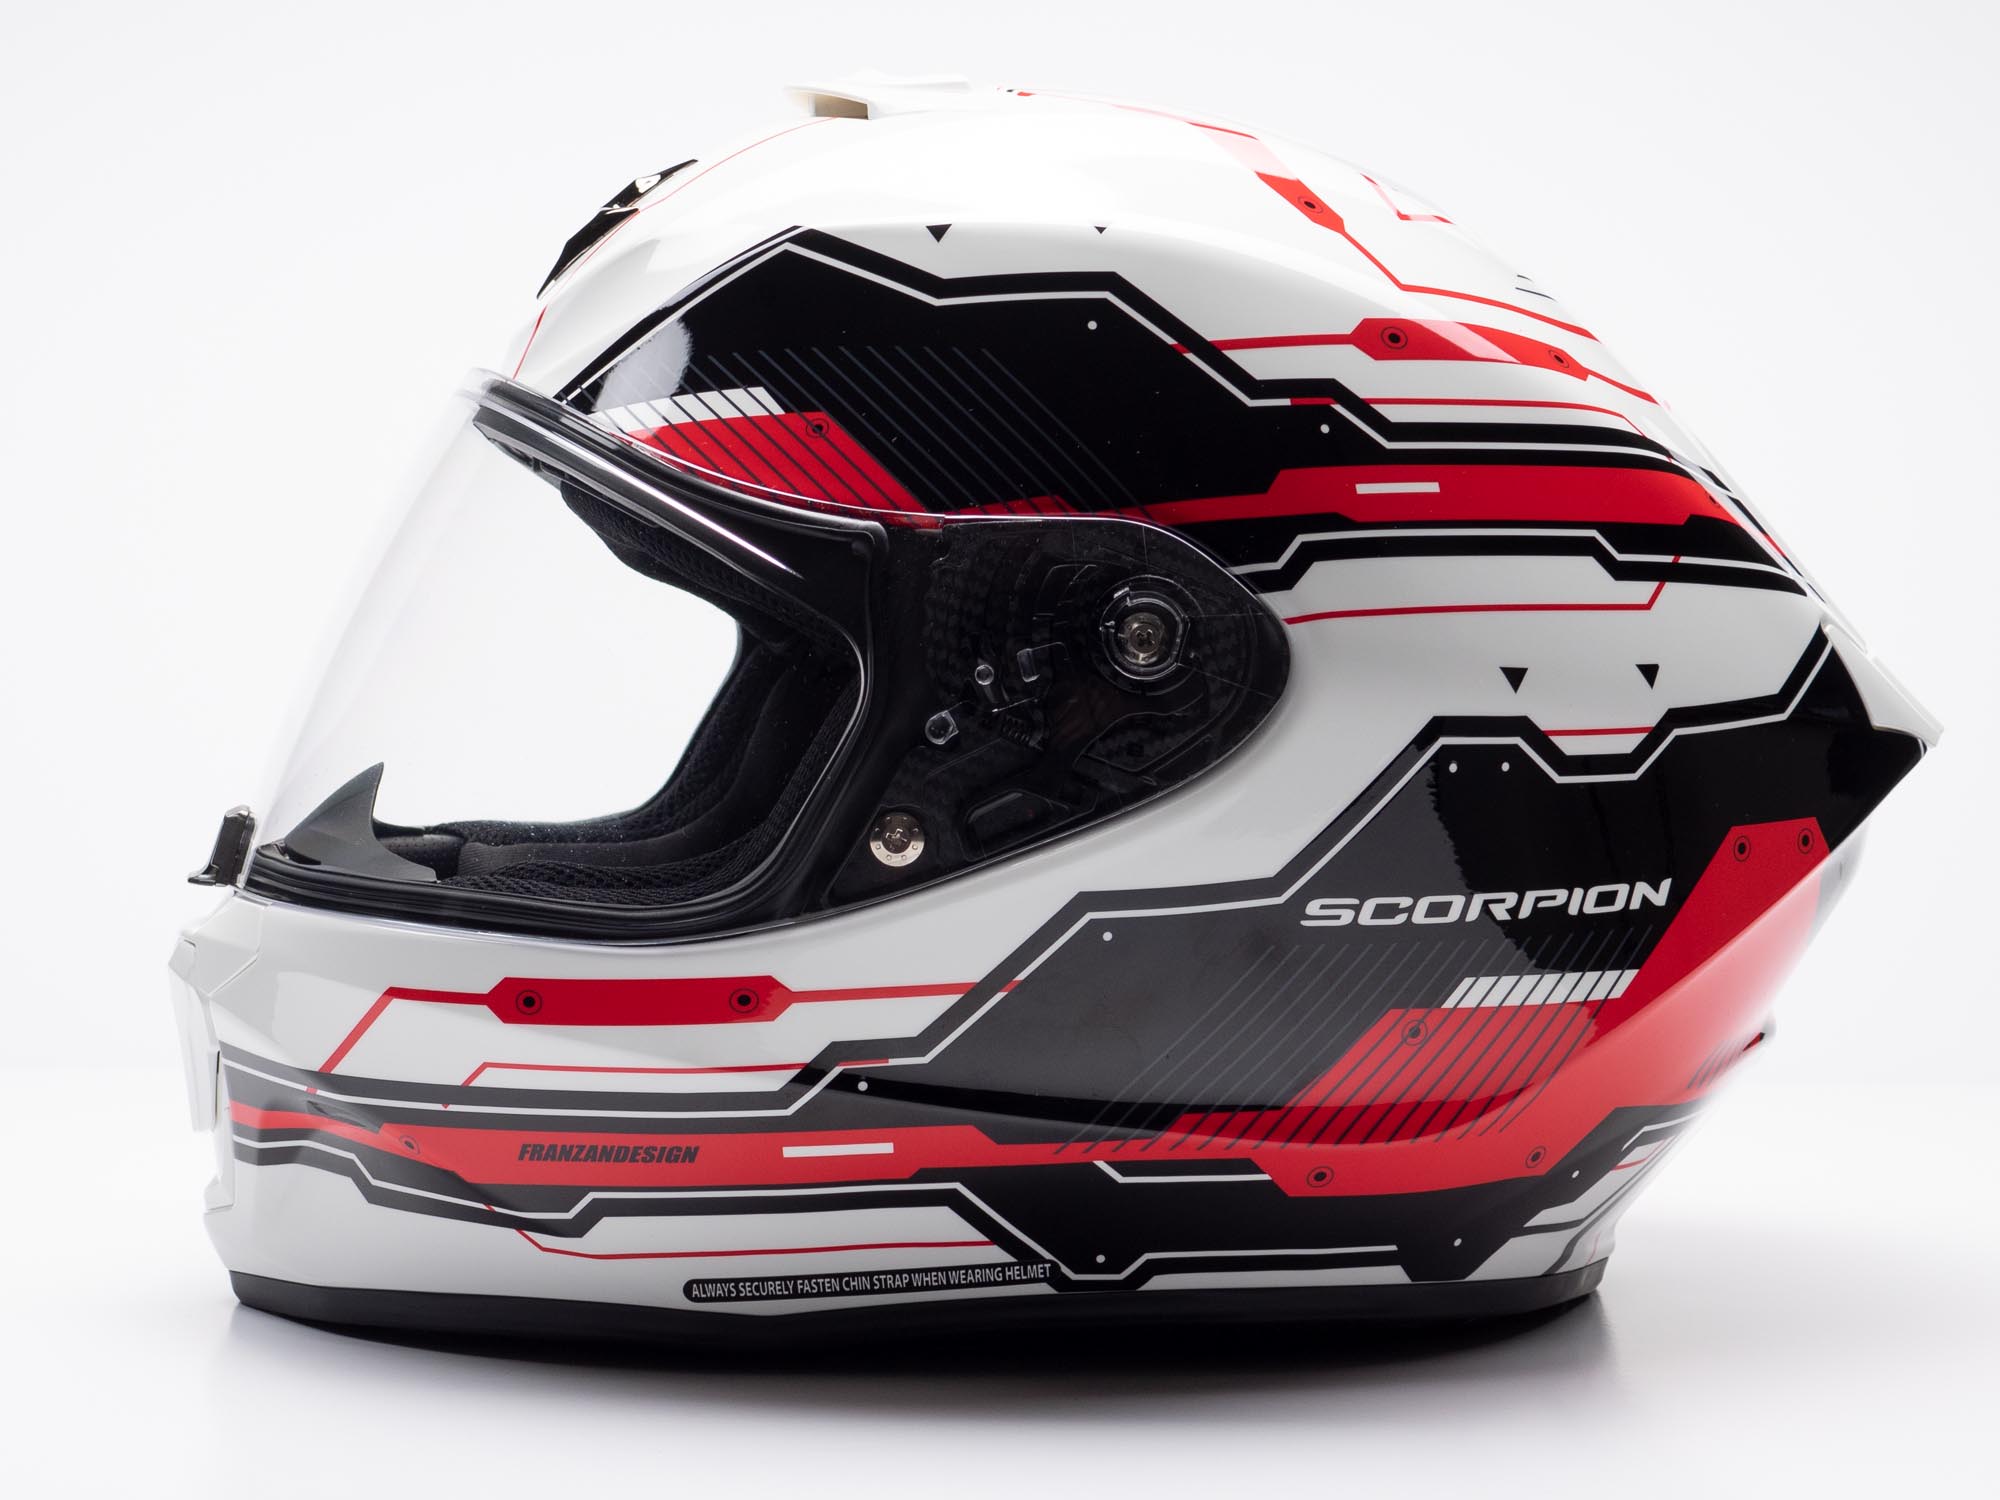
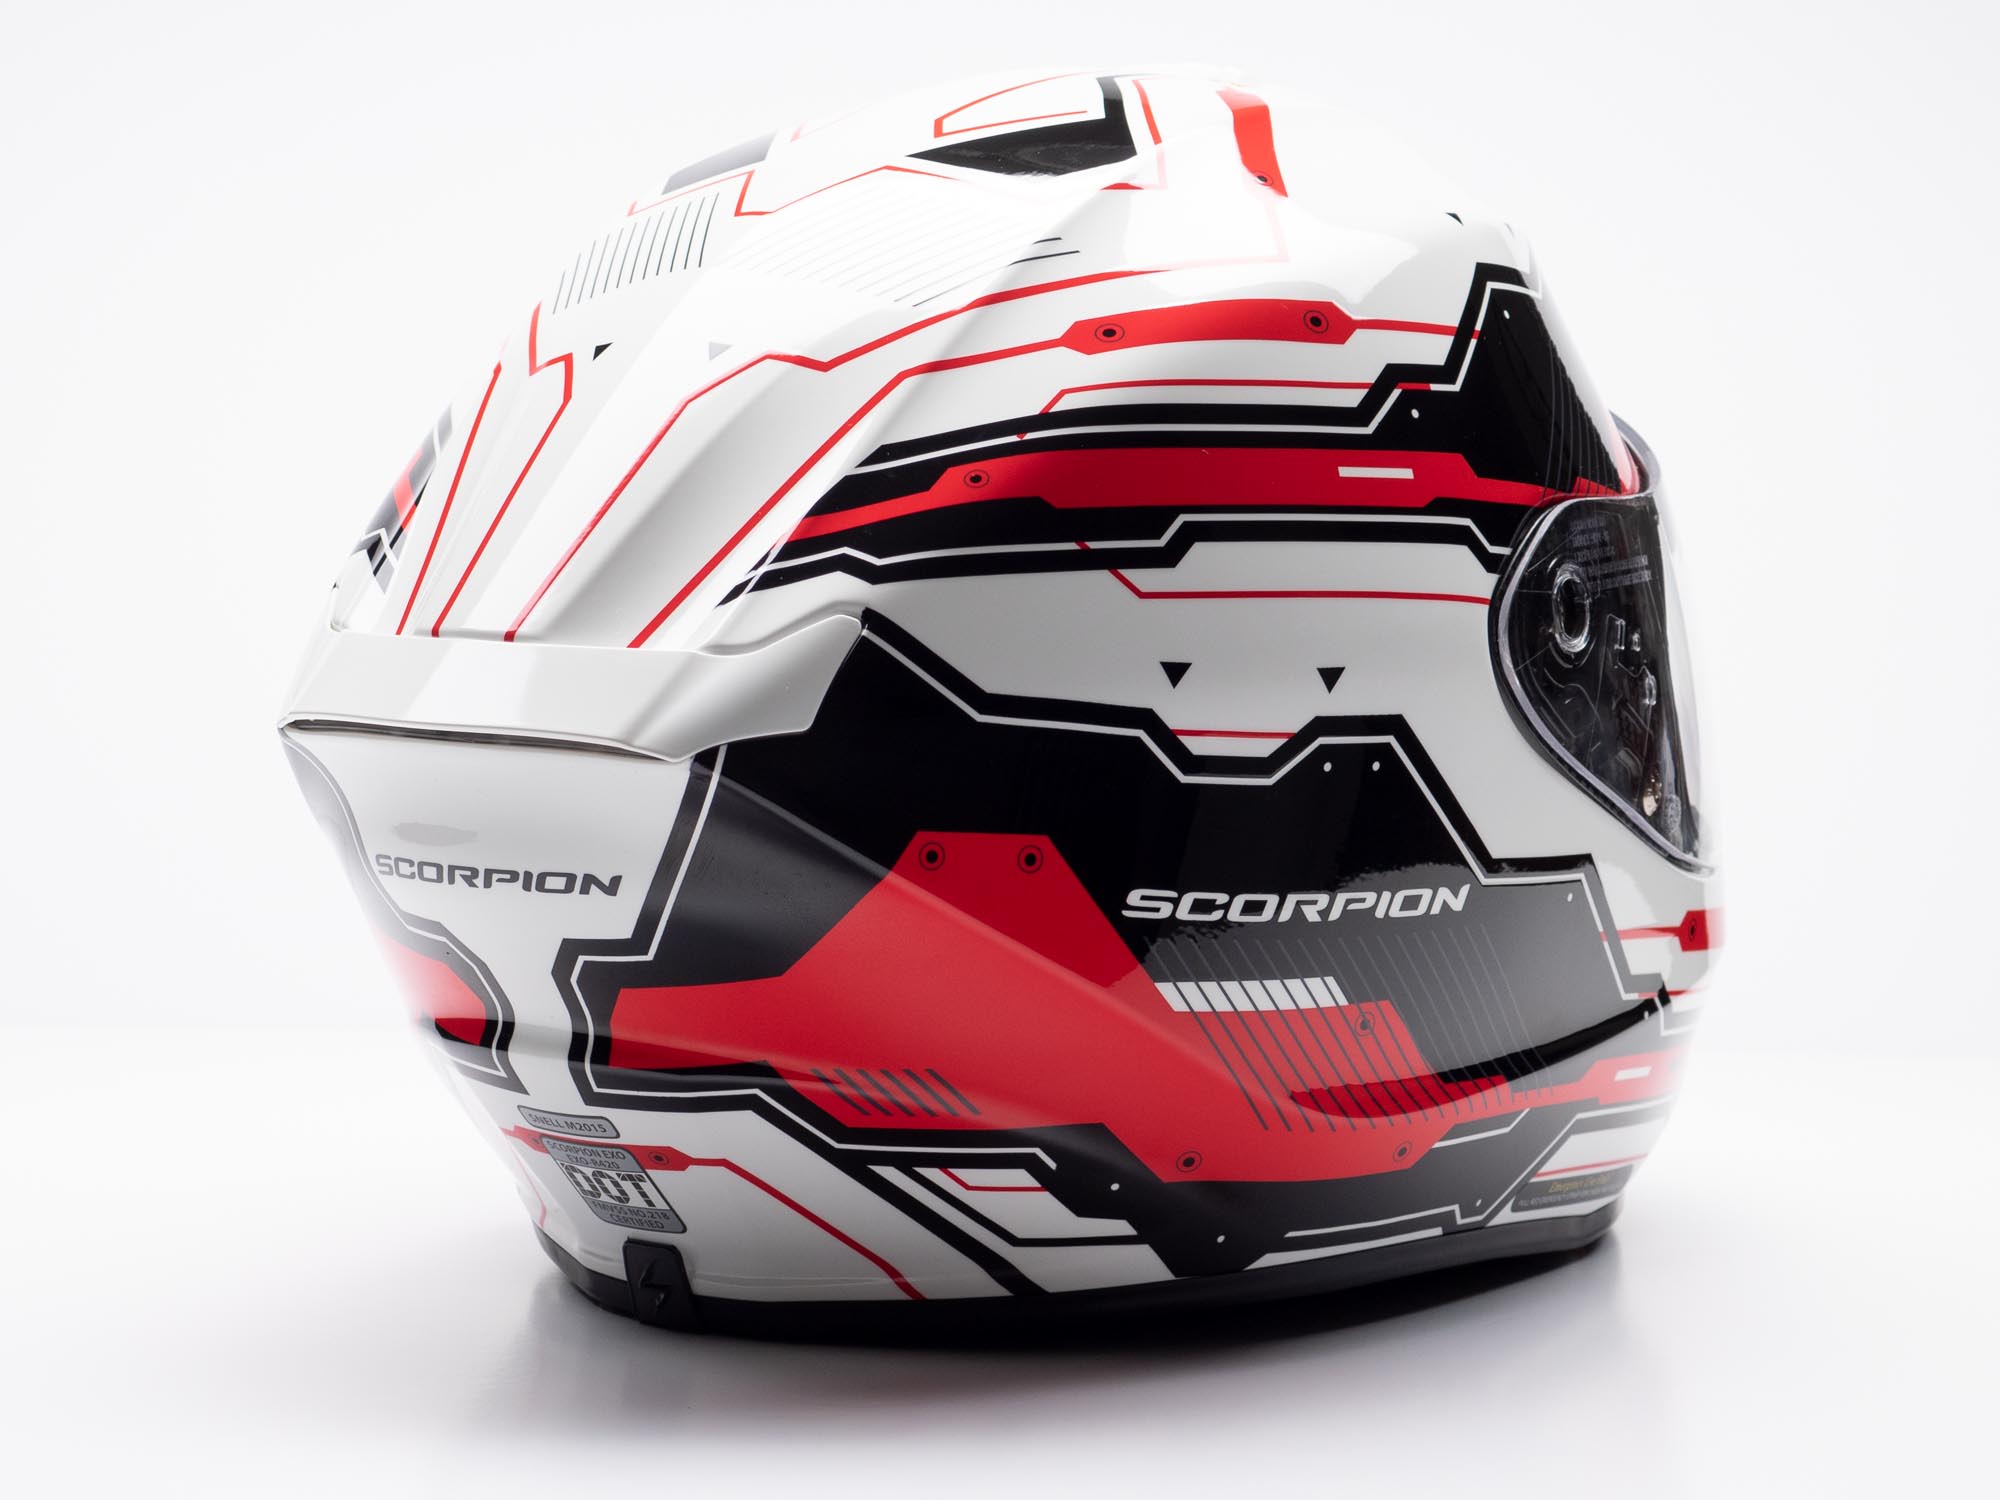
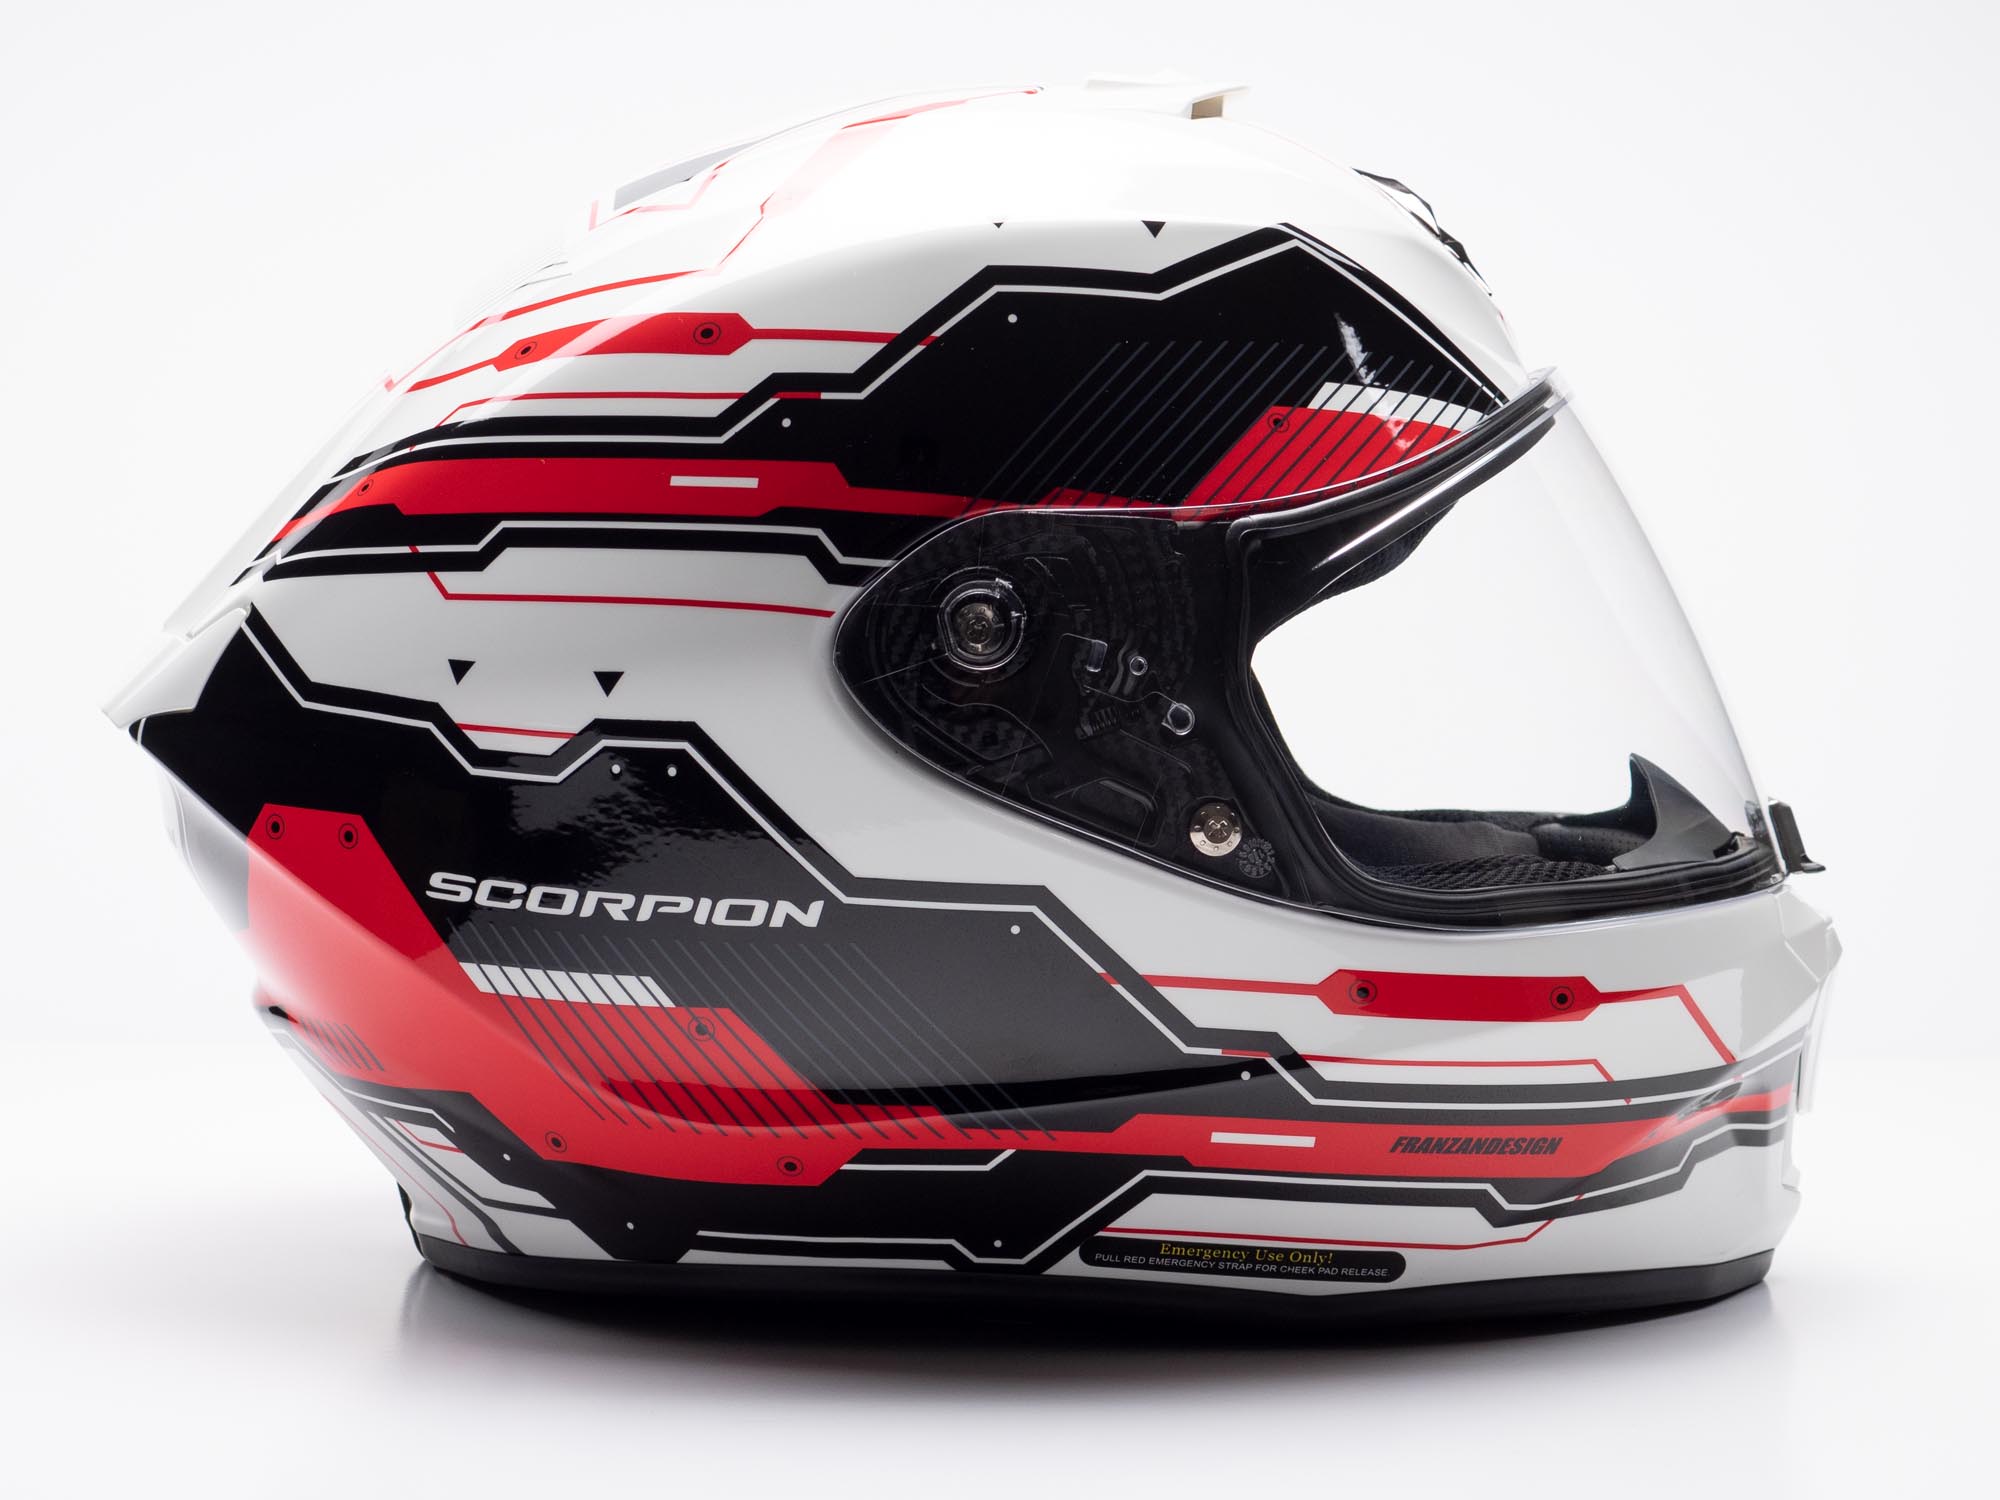
The EXO-R420 is available in four graphics options and four solid color options. The latter includes black, matte black, white, and matte titanium. The graphics options are sort of “across the board” as far as style goes with the four options covering a wide range of tastes. I chose the Techno graphic in red/white both for the visibility and because I like the overall look. Pricing for graphics models is only $10.00 more than the solid color versions.
Fastening the chin strap is done via a Double D-Ring closure which is found in most helmets on the USA side of the pond. Micro-ratcheting buckles and similar closures seem more popular over in Europe and I admit I like them myself but I imagine they are more costly to produce than D-Rings. It makes sense to keep it simple and less expensive by implementing the tried and true Double D-Ring setup.
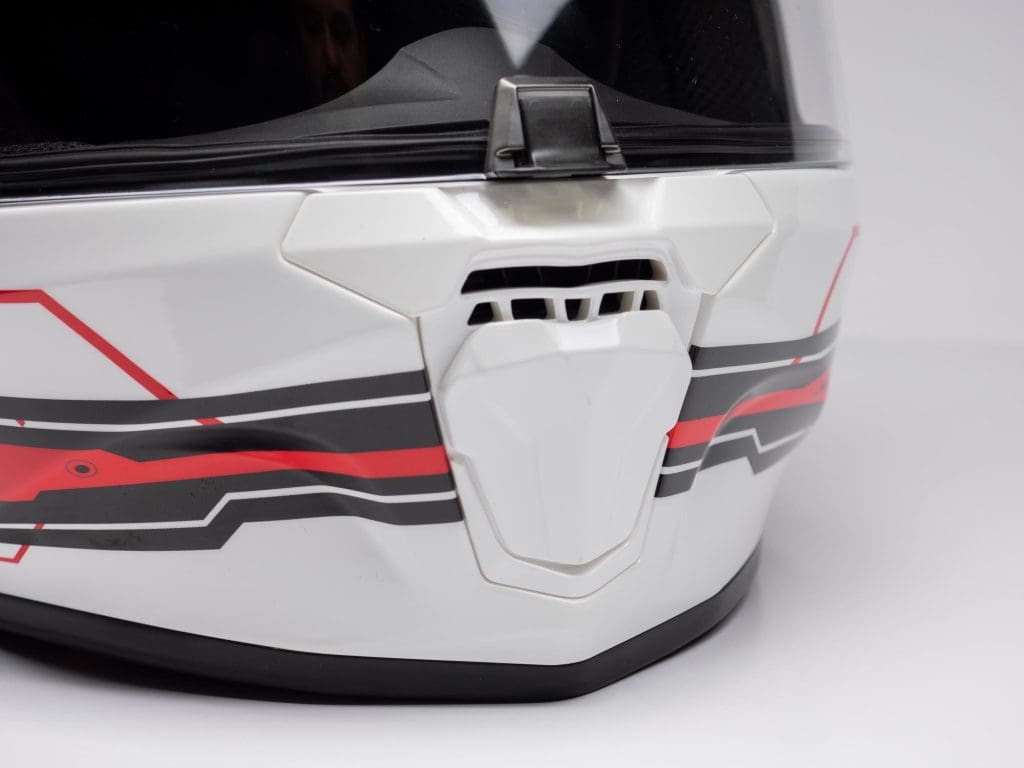
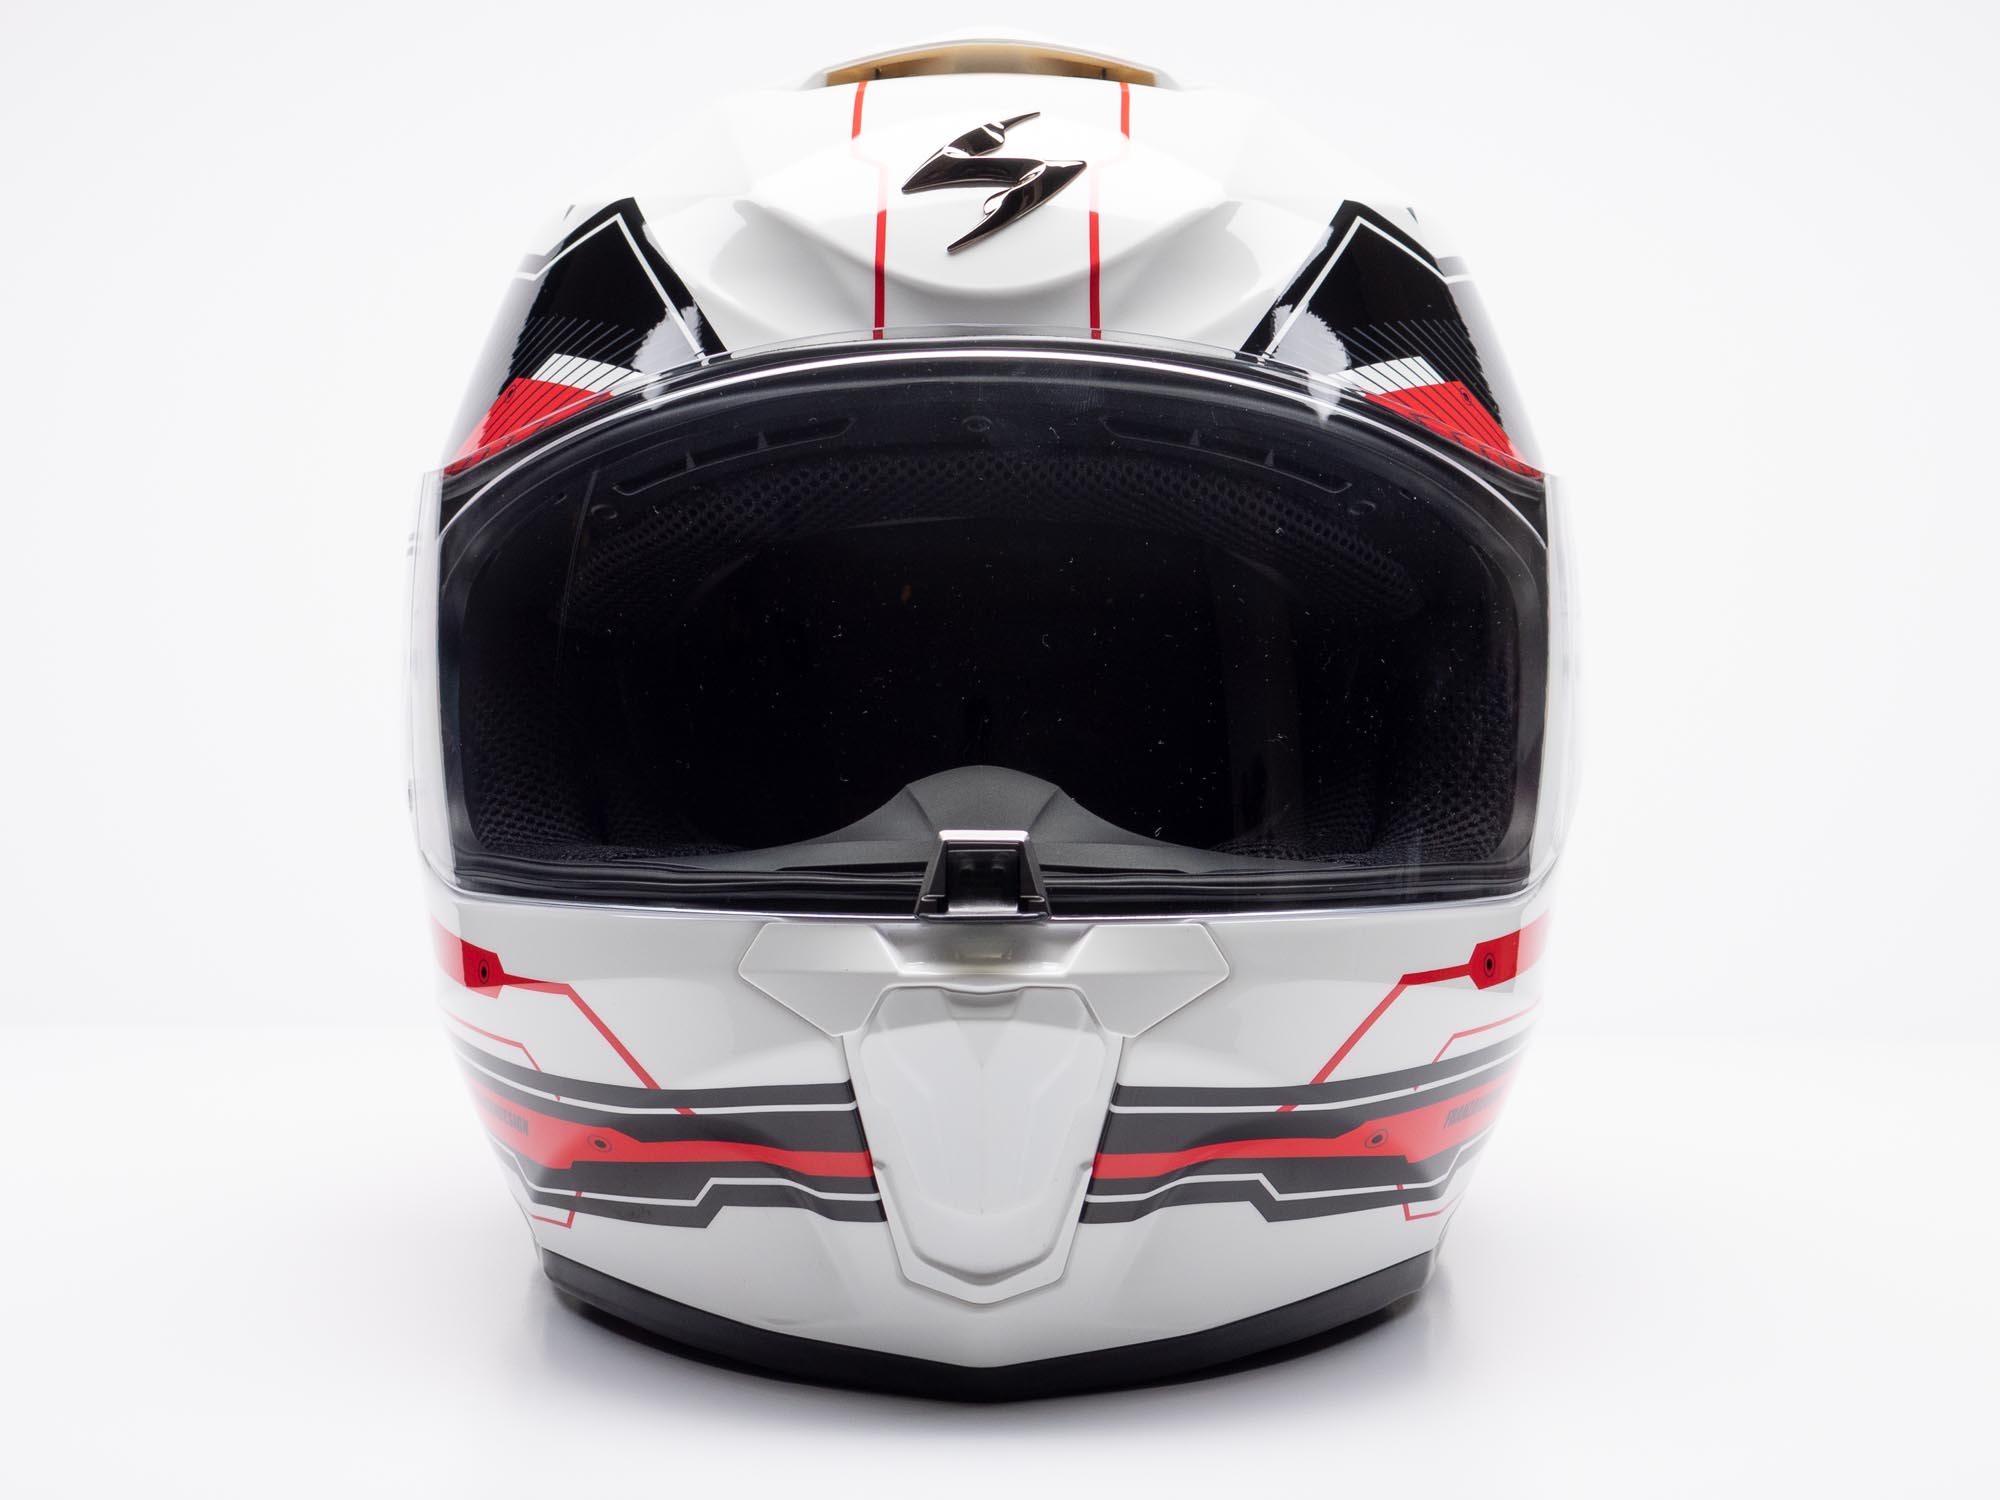
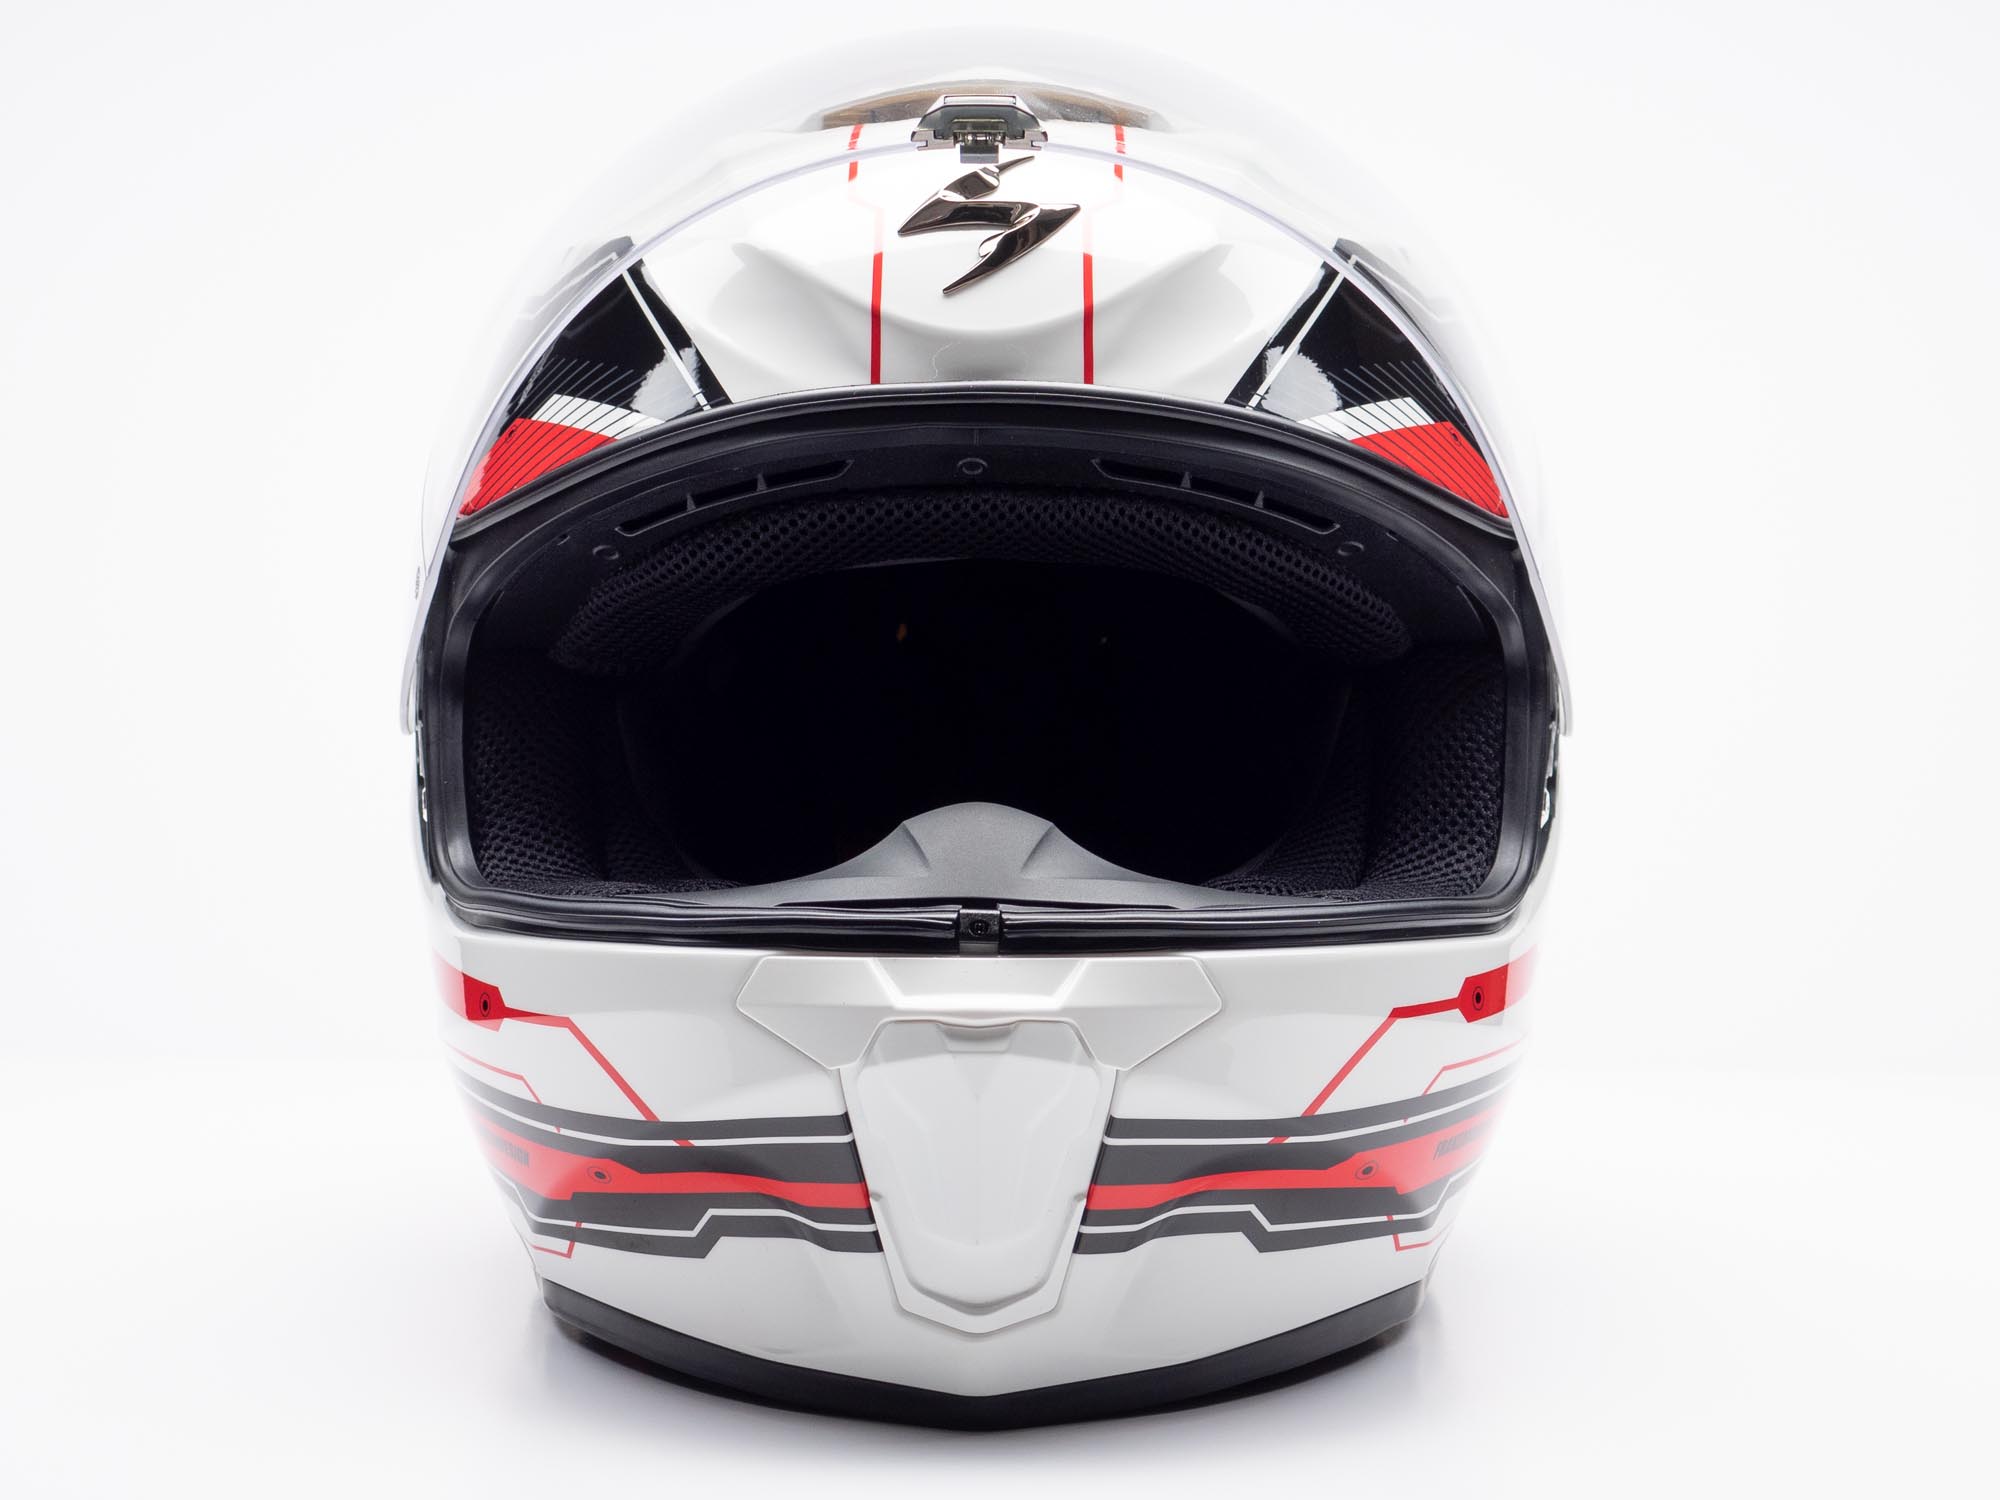
Venting on the EXO-R420 is handled by two intake vents, one at the chin and one at the forehead while an always open exhaust vent is in place at the rear of the helmet. Right above the chin vent is the visor latch. Centrally locating this latch makes it easy to use either hand to lift the visor but it also reduces the chance of flex as the visor is opened and closed.
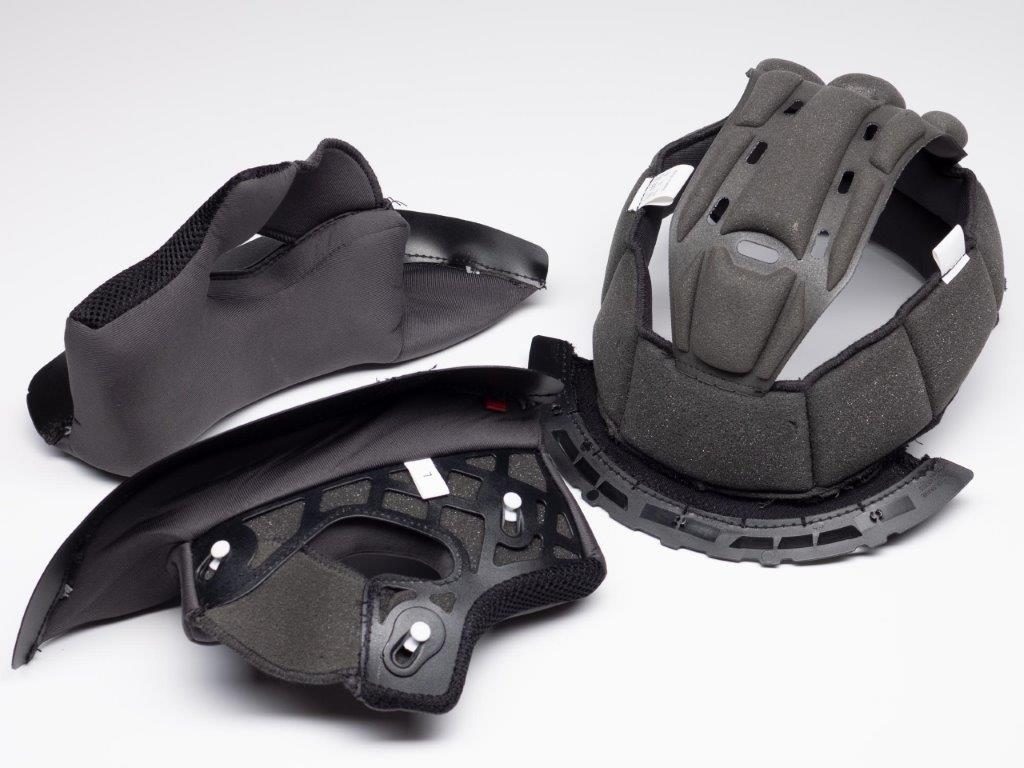
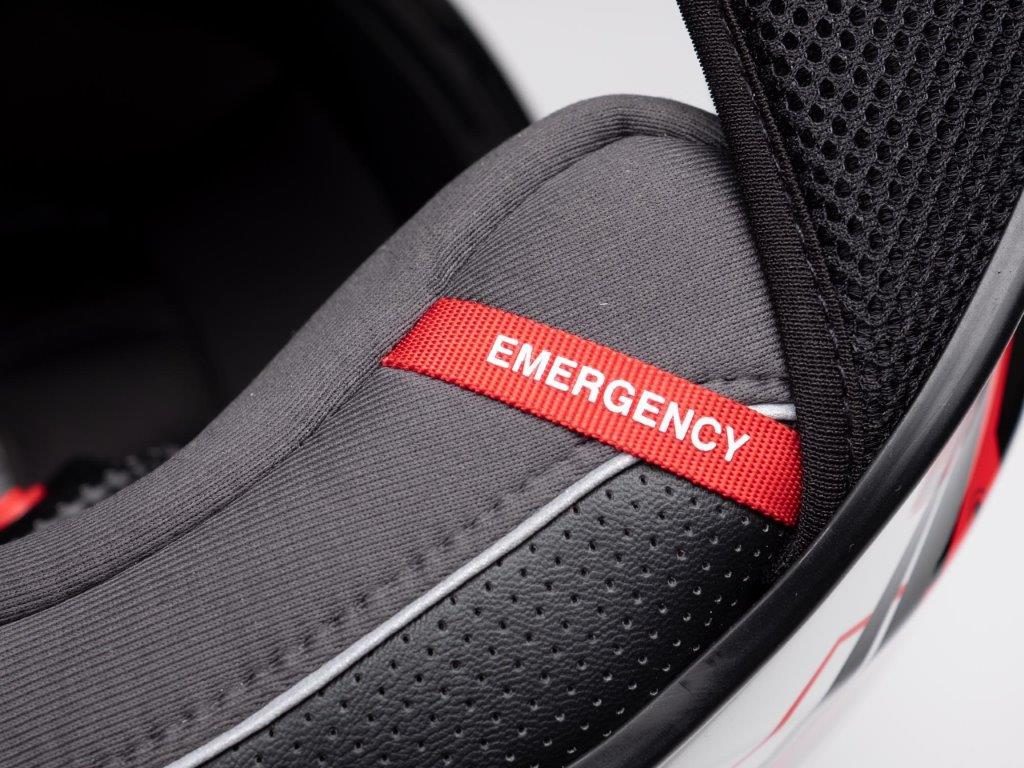
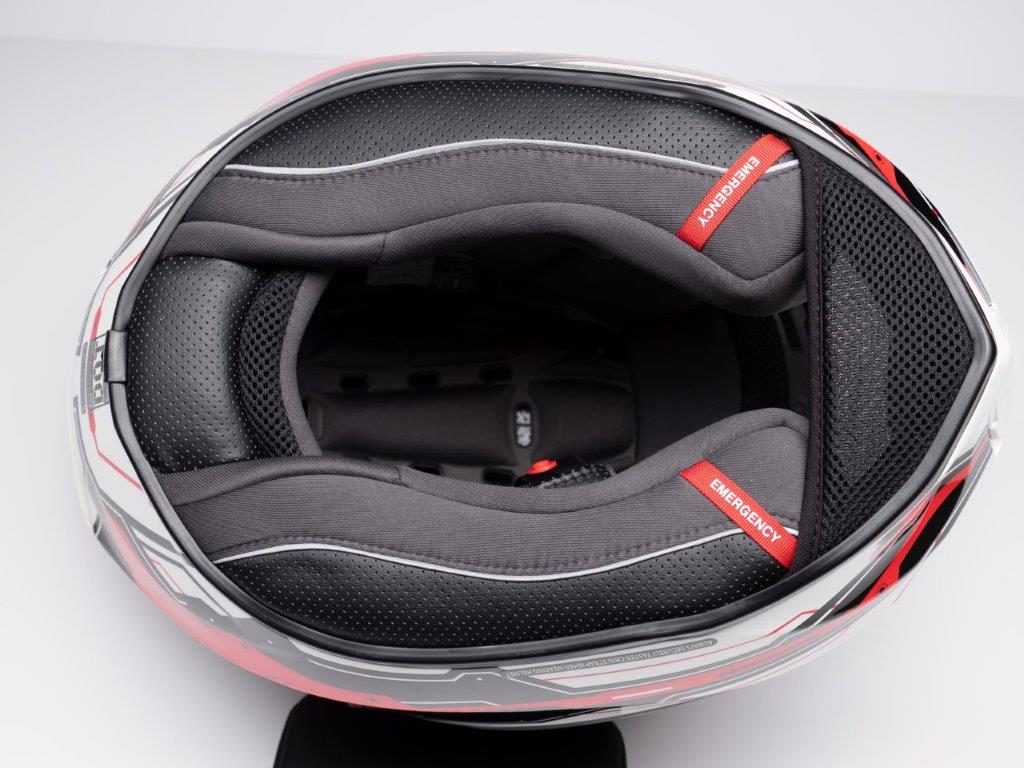
Looking at the interior, Scorpion has included their KwikWick® II moisture wicking liner. The liners are removable for washing and even include emergency pull tabs which are a nice touch, especially at this price point. Speaking of price point, let’s delve in a bit deeper into the helmet construction and see if how this helmet manages to keep the price steady into its third generation.
Construction
Shell Material
The shell of the EXO-R420 is made from polycarbonate which is expected at this price. Polycarbonate isn’t really a liability as far as safety is concerned but it tends to be heavier than fiberglass or composite shells. Some people feel polycarbonate is better at energy absorption thanks to the material’s inherent flexibility.
Squeezing and pulling on the shell does demonstrate some flexibility but it is well controlled as would be expected for an M2015 Snell helmet. When testing this out the shell made very little noise in the way of creaks and squeaks
Paint, Graphics, And Overall Quality
Excellent.
I could just “drop the mic” right there. It essentially answers the question of quality as far as the finish and overall quality.
What? More details?
Fair enough.
The decals on the Techno graphic on this particular example are applied straight and are well aligned. The paint and decals are covered in a very nice layer of clear coat that is smooth and well polished. The finish has a very subtle “wave” to it but I find this is typical across a broad range of helmet finishes and I don’t feel it takes away from the look even if one gets their eye up close to see it.
The sliding covers for the two vents operate smoothly and provide good tactile feedback. They feel nice and solid with a quality feel to them. They operate as nice if not better than some helmets costing twice as much..
Is any of this a surprise? Judging by the value/performance ratio of the R410, and even the original 400, I suppose it shouldn’t be. Considering the price has remained the same since the R410 and only $10.00 (USD) more than the EXO 400 back in 2007 the ratio only improves.
Star result: 4.5
Helmet Fit And Internal Shape
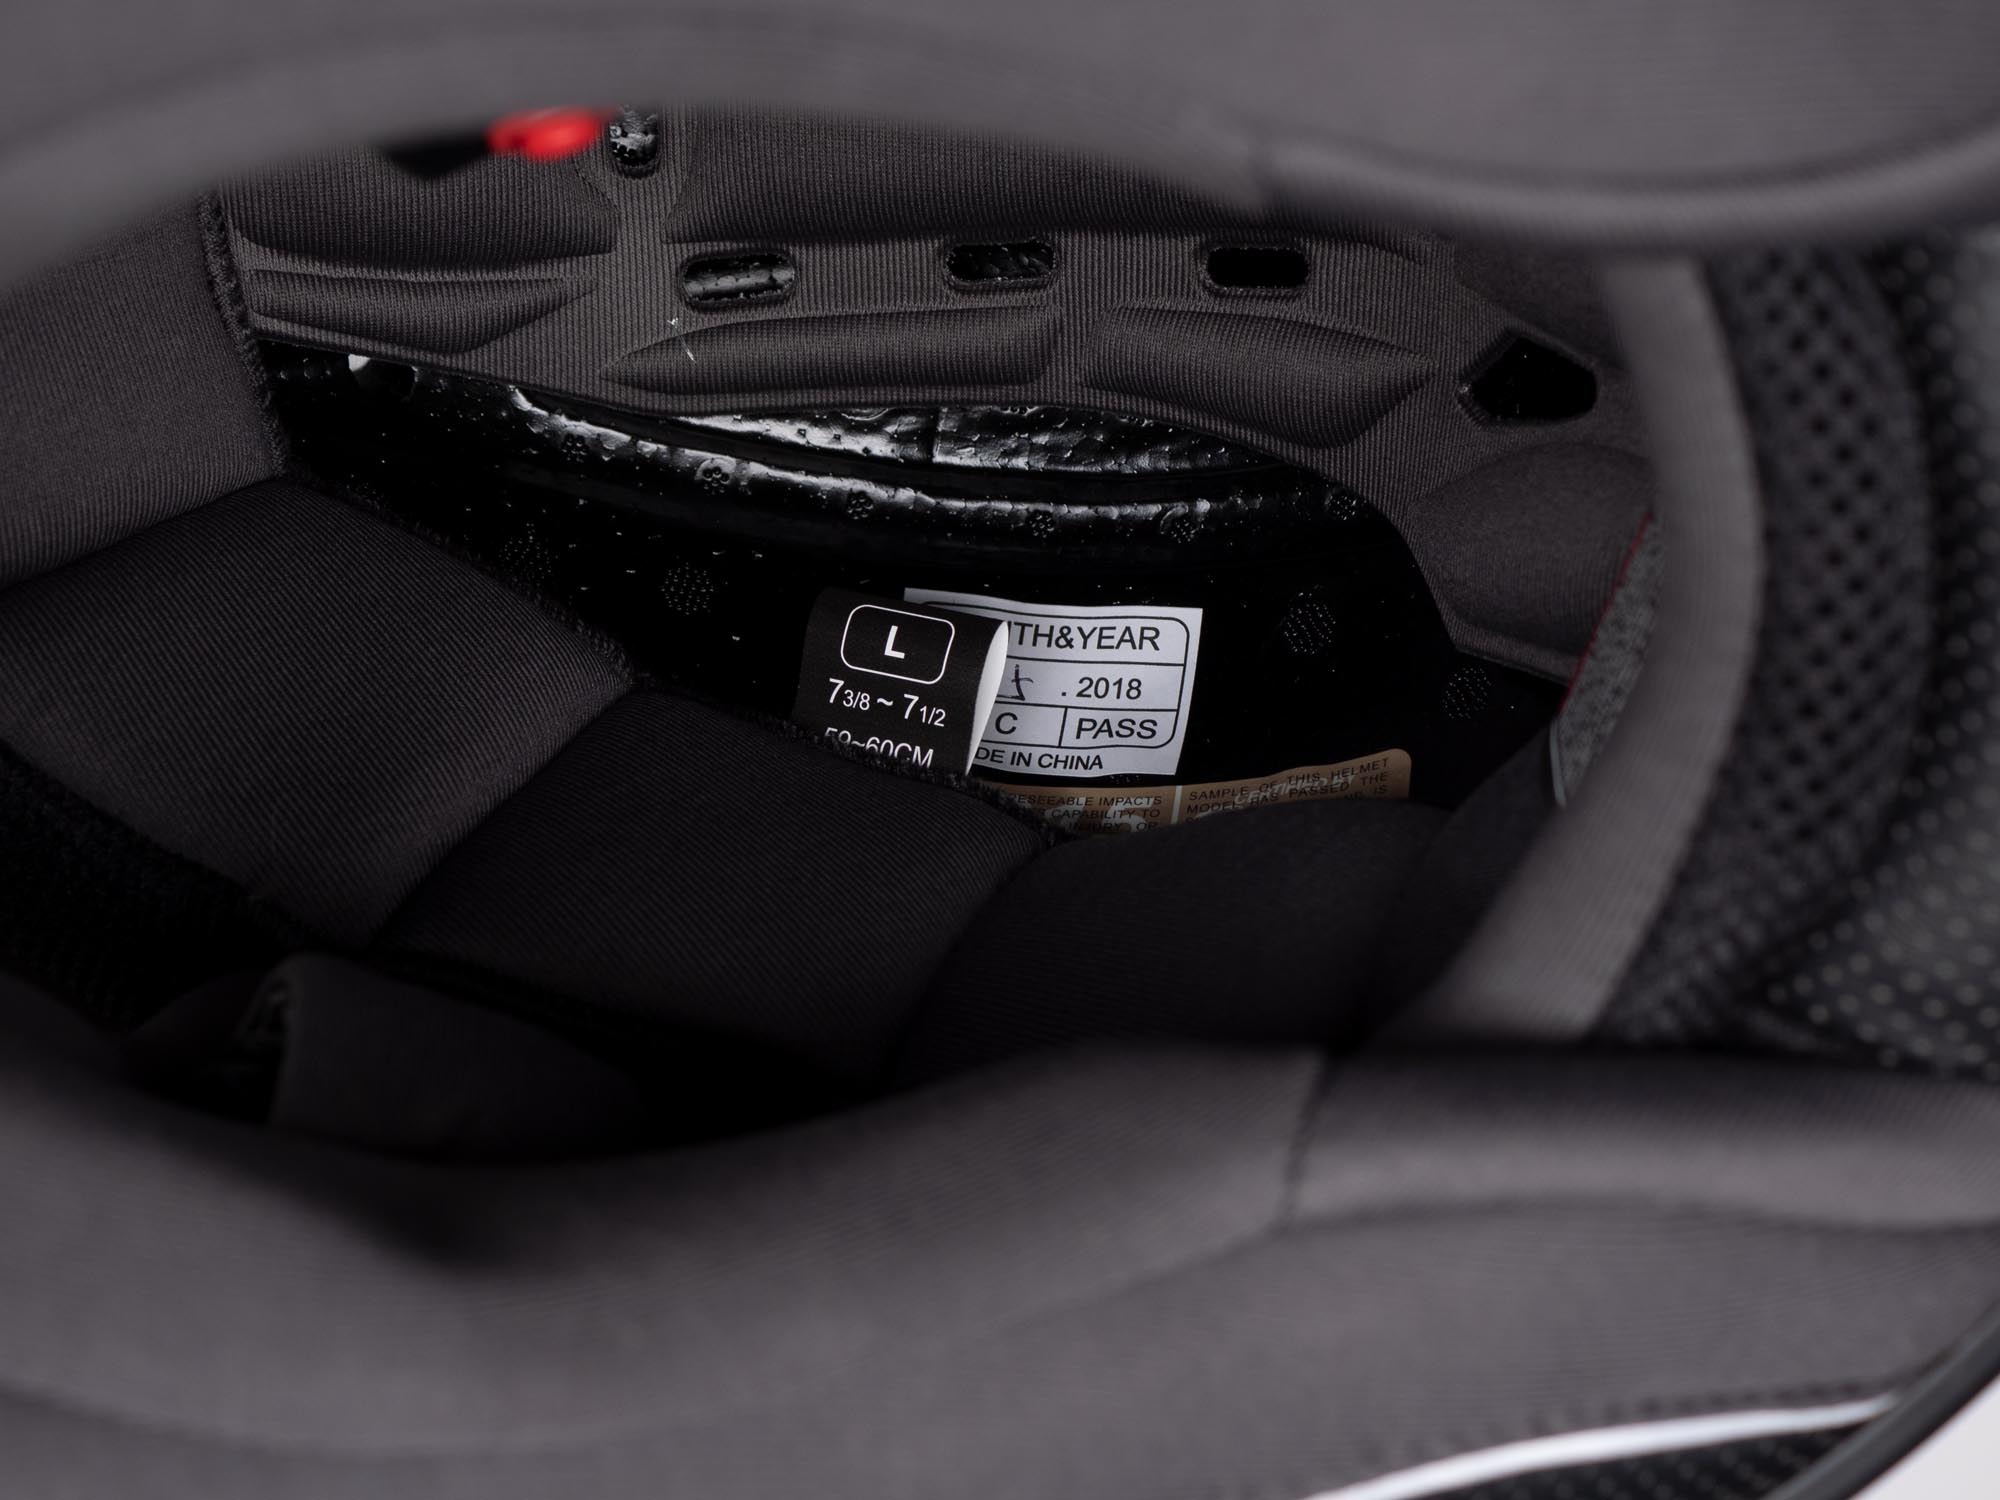
Fit for this size large (59cm to 60cm) EXO R420 I received is very similar to what I would expect most major helmet manufacturers, if maybe a bit on the snug side. It is important to keep in mind though that I believe the size large uses the larger of the two shell sizes used for this helmet. As such, the padding is going to be very thick so it may start off a bit snug but will break in and provide a good fit after a few hours of wearing.
As it comes out of the box, the fit is similar to my recently reviewed HJC RPHA 70STafter it had broken in. I still feel the HJC is a bit snug now so the EXO R420 should break in just fine. This is much better than the EXO 400 I had back in 2007. Back then the 400 series ran almost a full size small.
Internal shape is somewhere between an intermediate oval and neutral meaning it falls between the EXO 400 and EXO R410 helmet shapes where the R410 was more neutral to round and the 400 was more oval in shape. For my intermediate oval head shape, pressure against my melon was pretty consistent with less pressure only at the five and seven o’clock positions.
Some of the helmets I’ve been wearing and reviewing lately seem to be moving the chin straps closer to the neck. This is something I am not a fan of so I’m pleased to report that the chin strap is in a more traditional position where it rests under my jaw and not applying pressure rearward. This is a personal thing and everyone will have a different fit.
Star result: 4
Eye Port and Visibility
Side to side visibility is a bit above average compared to most helmets I’ve tried with very good peripheral vision available. This is always helpful for staying aware of hazards and dangers around the rider.
The top to bottom view is a bit more restrictive with what I would consider just an average field of view. The lower end has a bit more view than the top, at least for me with my head shape. This makes the helmet well suited to a more upright riding position such as standard, touring, and sport touring riding.
Riding in a full tuck can restrict vision a bit. When laying down on the tank of my Ninja 1000, the top edge of the eyeport took up more of the forward view than I would like. It might be ok depending on individual fit and head shape so not everyone will share my specific experience.
Face Shield
The face shield is mostly optically excellent presenting very little (if any) distortion to most of the field of view. I do need to point out that when I tested field of view at full tuck, I noticed the top edge of the visor did show noticeable distortion. This happens at roughly .5 inches ( 12mm) from the very top edge.
This wasn’t a problem for my sport touring riding position on the Ninja 1000 but for those planning on taking this helmet to the track, I would suggest making sure this doesn’t bother you on your particular bike.
The extreme sides appeared pretty much free of distortion which is great but I would have preferred the situation reversed for optical quality between the top edge and the sides. I want to be clear that this is a pretty minor issue overall and in most cases would not even be noticed.
Scorpion has their own EverClear ® anti-fog coating that they apply to their face shields and my testing showed it to be pretty effective. If I really went after the visor with some repeated fogging attempts I could start to see a brief bit of quickly clearing fog but nothing that would obscure one’s vision.
I can say from experience with previous Scorpion helmets that this coating, like similar coatings from other manufacturers, will eventually fade. One should avoid cleaning the interior side of the visor as this will accelerate the deterioration. Fortunately, there is a Pinlock visor available for those looking for that solution. I prefer Pinlock shields myself but I’m not surprised that a Pinlock visor isn’t included for the price.
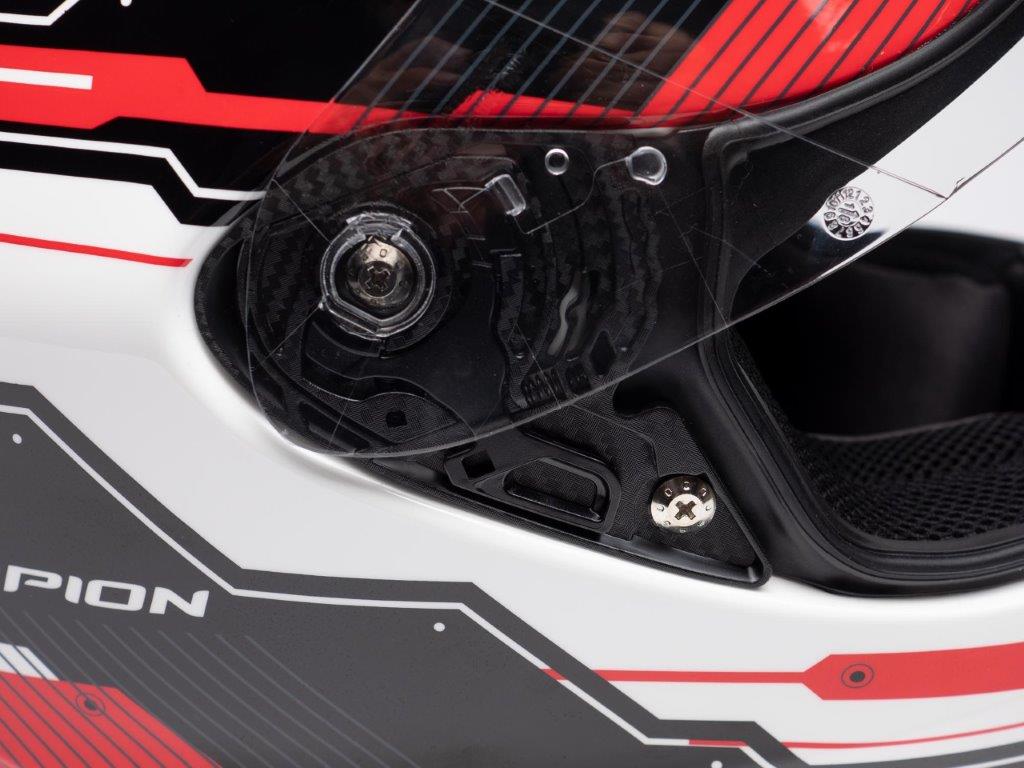
There are seven positions for the visor from closed and locked to fully raised. When fully closed and locked, unlocking the visor will allow it to open about 5mm making for a good demisting position or to add some extra airflow on a hot day.
Raising from the unlocked position to the next one up takes a solid lift as it has to overcome the Ellip-Tec® II system’s spring-loaded gasket sealing mechanism (more on that in a minute). From there, the rest of the positions are pretty easy to select with the top position having some extra pressure on it to hold it in place.
Face Shield Removal
Like most modern motorcycle helmets, the EXO R420 uses a toolless visor removal system consisting of levers that are accessed when the shield is in the fully raised position. Once full raised one pulls a lever up (one for each side) and then pulls the visor forward and up to release it from the pivot point. This takes a bit of a tug to get the ratchet pin out from behind the ratchet position and then the visor will pop free on that side. Repeat on the other side to completely remove the visor.
Re-installation requires one to hook the ratchet pin in the top position and then pushing the visor in towards the pivot to get the pivot point to pop back into position. It’s not the most graceful system as it often results in a bit of a “snap” sound but I have done this several times and it doesn’t appear to be anything that will damage the visor or mechanism.
Eyeport Gasket
The Ellip-Tec® II ratchet system mentioned earlier assists in making for a good seal of the eyeport. This spring-loaded system “pulls” the visor closer to the eyeport as the face shield is completely lowered.
This forces the shield up against the gasket which helps maintain a good seal even after the gasket material ages. Testing the shield by running water over the eyeport confirms that the seal is strong and complete.
Star result: 3.5
Shopping Now? We Recommend:
webBikeWorld has worked closely with RevZilla over the years to provide our testers with products to review. In addition to being a great site to shop from, they’re also a great partner.
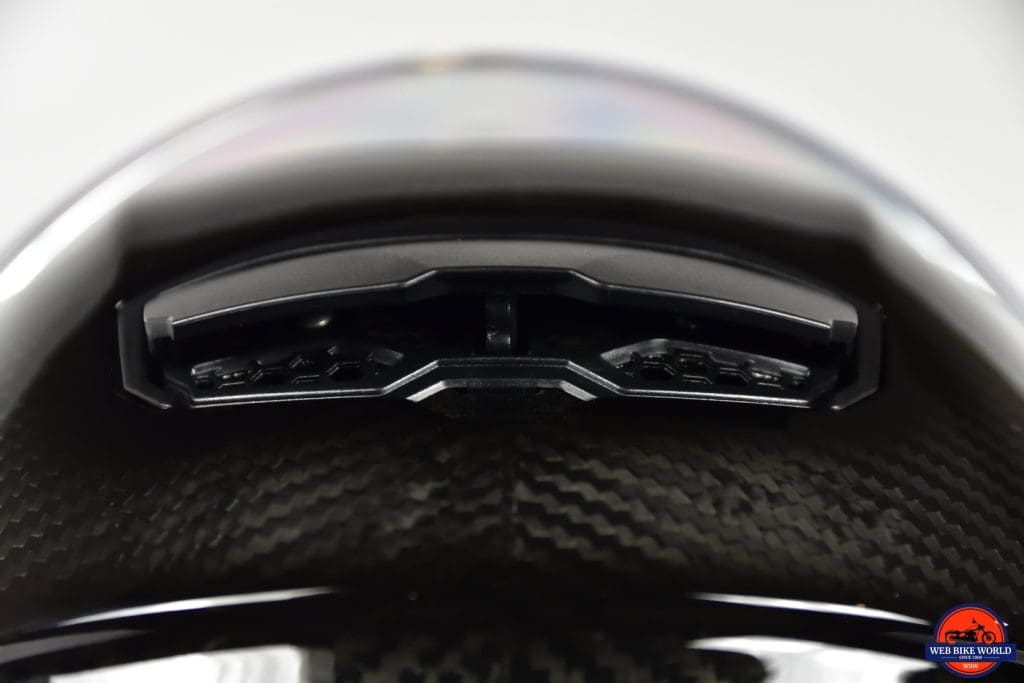
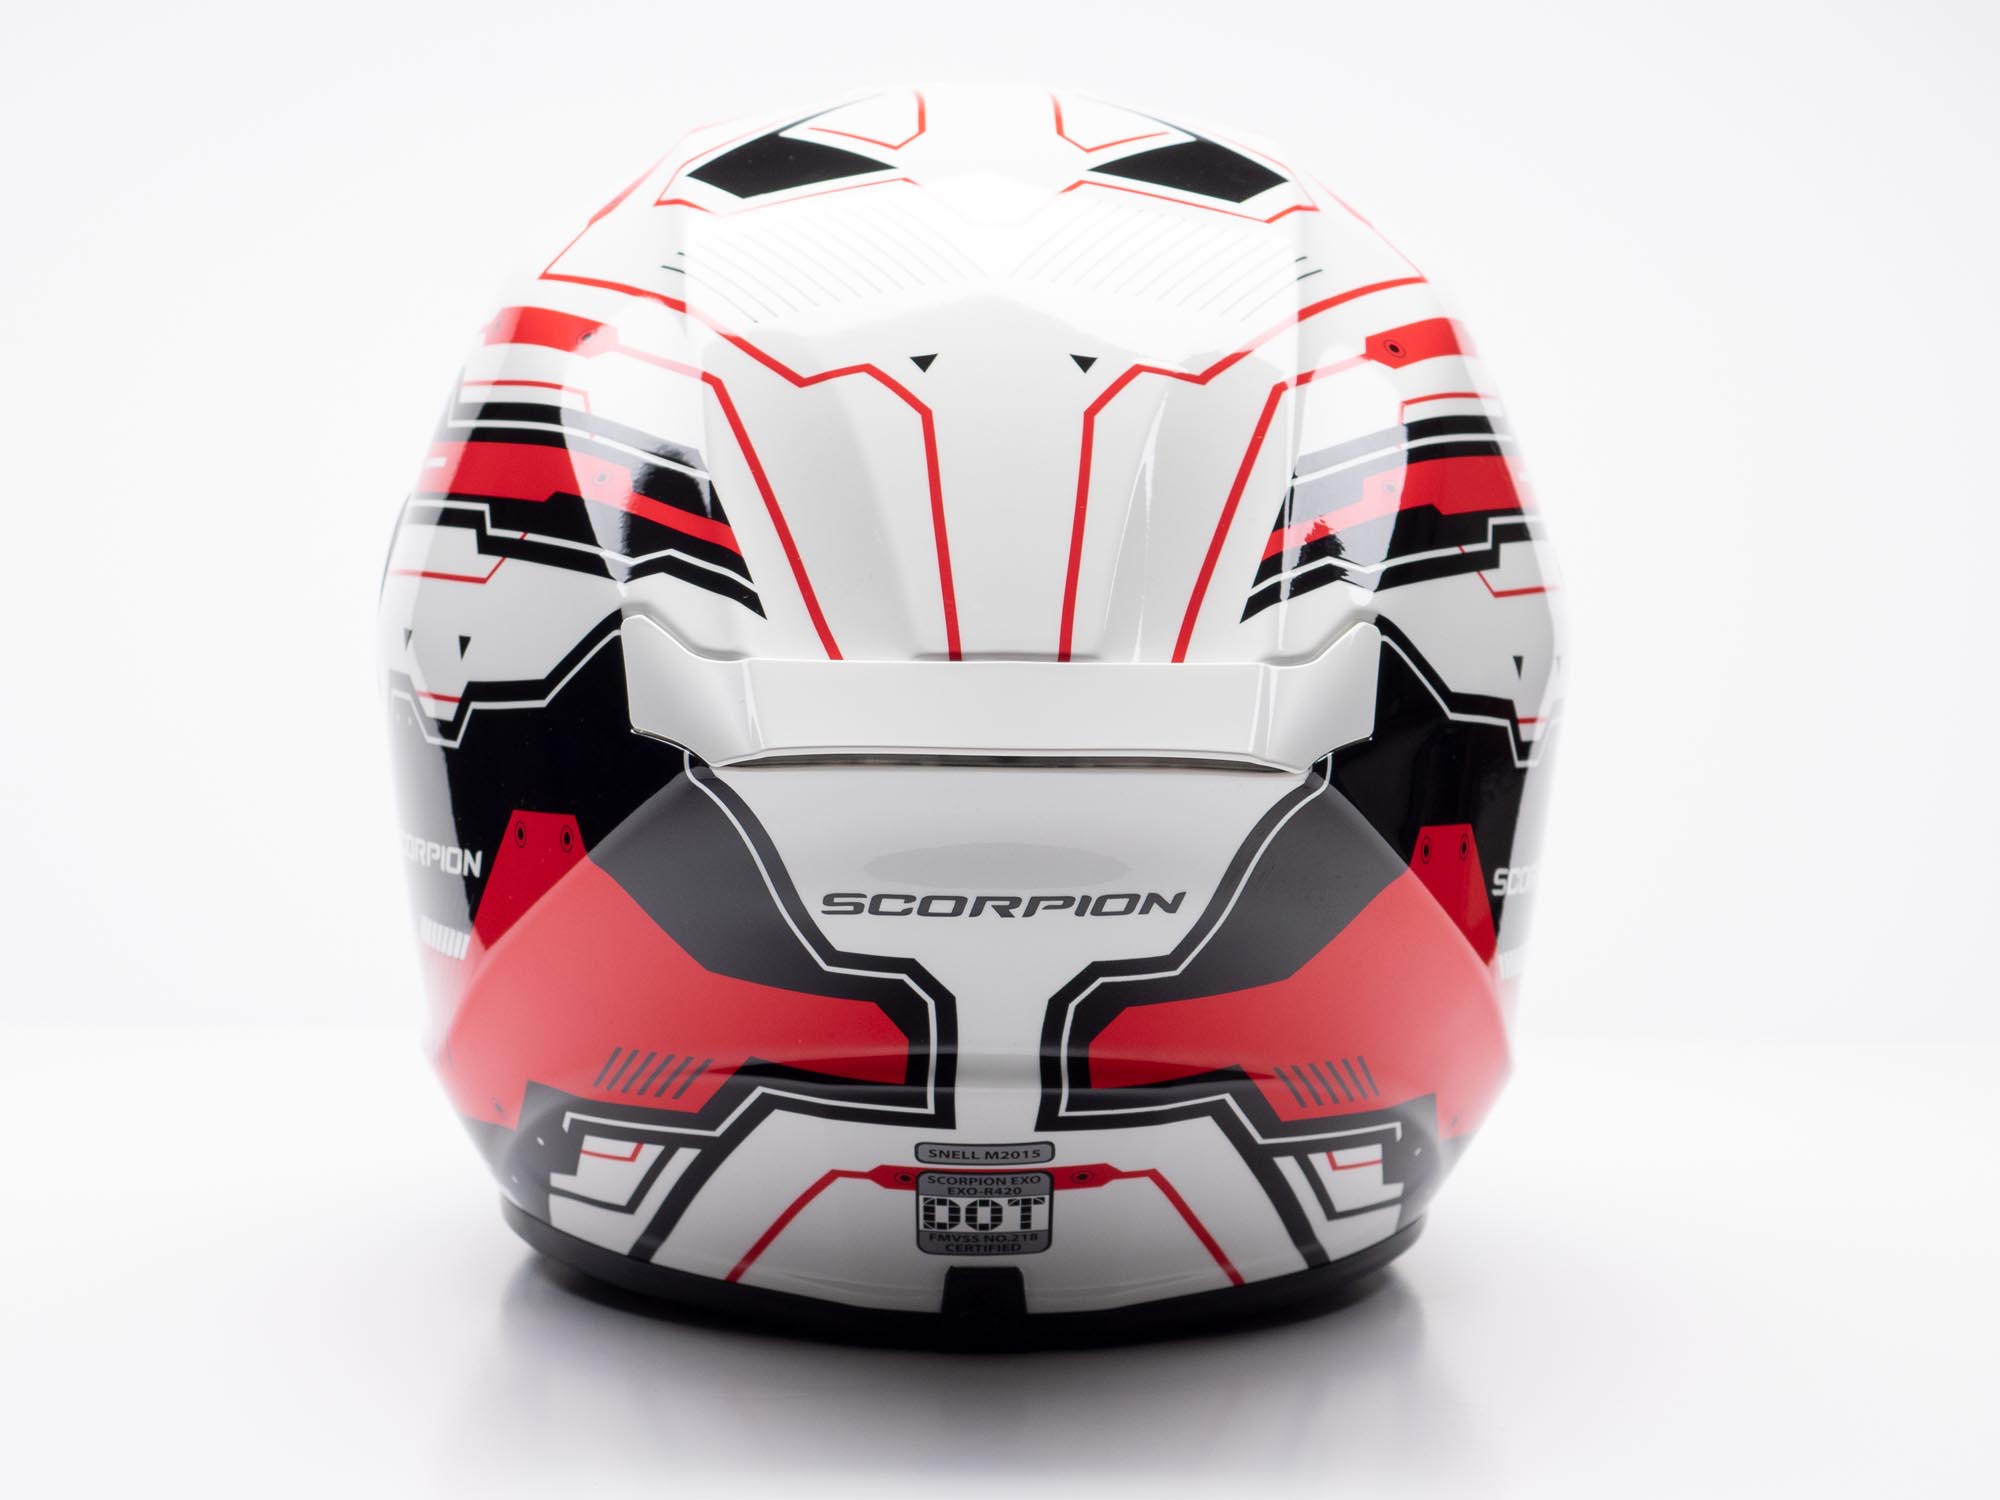
Venting is handled by three vents, a chin vent, top vent, and an exhaust vent. The chin vent has three positions including closed. Sliding the cover down one “click” reveals a vent that directs air towards the face shield for defogging. One more click down opens a direct path through the chin bar.
Up top we have a closeable dual scoop that opens to two holes in the shell that go through the EPS liner. These are pretty straight shots through and one can easily see light from a flashlight through these holes inside. The rear exhaust “spoiler” covers to small ports through the liner that, like the top vent, appear to be paths from the interior to the outside.
The actual ventilation performance is a mixed bag. The top vent works “OK” and once I’m going around 40mph (65kph) I can feel a little airflow. I would say it is about average compared with other helmets. However, similar to what I have found on most helmets, the top vents just don’t do much so when I say “average” here it’s not exactly an accolade.
The chin vent is the exact opposite of the top vent as far as performance goes. Once open it flows copious air at the chin. It’s almost too much. By using the middle position. designed to direct air at the visor only. actually serves as a happy medium since some air still flows through the chin bar vent in this position.
Star result 4.0
Noise Levels
Wind noise on the R420 is well controlled and better than many helmets in any price range. For instance, it is quieter than my HJC RPHA 70 ST, as well as my previous Shoei GT Air, and the Arai Vector 2 I recently reviewed.
At speeds around 40-50 mph (65-80 kmh) the noise is very low and consists of just rushing wind noise with no low end booming being perceived by me. Moving to highway speeds noise levels do pick up but are still lower than average. Very slight low-frequency noise starts to become audible but it remains well controlled.
Size of the helmet will likely make some difference here as the padding thickness will have an effect on noise reduction. Overall, I found the R420 is a nice quiet place with it working well at any of the three positions offered by the windscreen.
Star result: 4.5
Helmet Weight and Feel
At 1750 grams (3 lbs 13.7oz) this size large R420 lands on the heavier side of the scale and it feels it when wearing. It’s well balanced enough but it’s a bit surprising to have a new helmet weigh so much. One might assume the polycarbonate shell is responsible but this is likely due instead to the Snell M2015 rating the helmet was designed to meet.
Even high-end helmets with composite shells, like the Shoei X-Fourteen, come in on the heavy side. The size XL Shoei X-Fourteen we reviewed weighed exactly the same. Yes, it is one size larger but this still heavy for a helmet in this range and the Snell rating is likely the culprit in both cases.
Once underway I found the weight never really disappears. This could be not only from the actual mass of the helmet but also the fact the size large uses the largest shell size. This can make the helmet “feel” heavier as the mass sits a little further out from the rider’s head. In all fairness, the R420 weighs about 200+ more grams than the last two helmets I’ve been wearing on a regular basis so I’m a bit spoiled.
Riding around on secondary roads the heavy feel doesn’t really intrude on the joy that that is motorcycle riding. Getting up to speed on the highway can be a different story. I found that once I reached about 60 mph I could feel the helmet wanting to lift. I tried all three windshield height settings the Ninja 1000 offers and none of them changed this behavior.
It should be noted that the Ninja 1000’s windscreen is still pretty modest even at its highest setting. Taller and/or differently shaped windshields may change this behavior. A rider’s height and head shape can also affect this so as they say, your mileage may vary.
Head checks when changing lanes are a bit fussy with the helmet taking on some minor buffeting when turning the head at highway speeds. Part of this is likely due to the large shell of the helmet but there are also some areas where the shape is a bit complex. These shaped spaces could also create some turbulence if the helmet is turned in certain ways at speed.
Star result: 3.0
Intercom And Speaker Fit
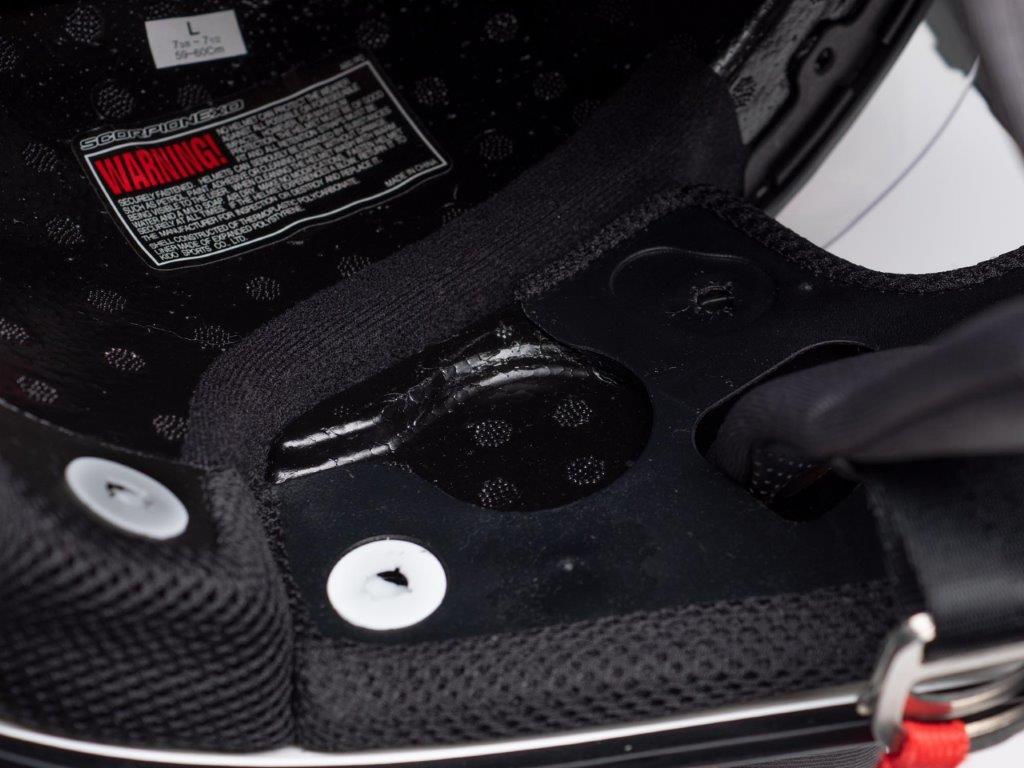
Scorpion has included cut-outs in the EPS liner (and internal plastic covering) for speakers and associated wires. The holes are about .25 inches (6mm) deep and 1.75 inches (44mm) in diameter.
These should accommodate many helmet communications system speakers but certain systems like my Sena 3s or the larger speakers on some UClear systems might not fit so well. The bottom surround of the helmet opening uses a pretty standard setup making it easy to insert clip style intercom holders between the shell and EPS.
Safety Standards And Warranty
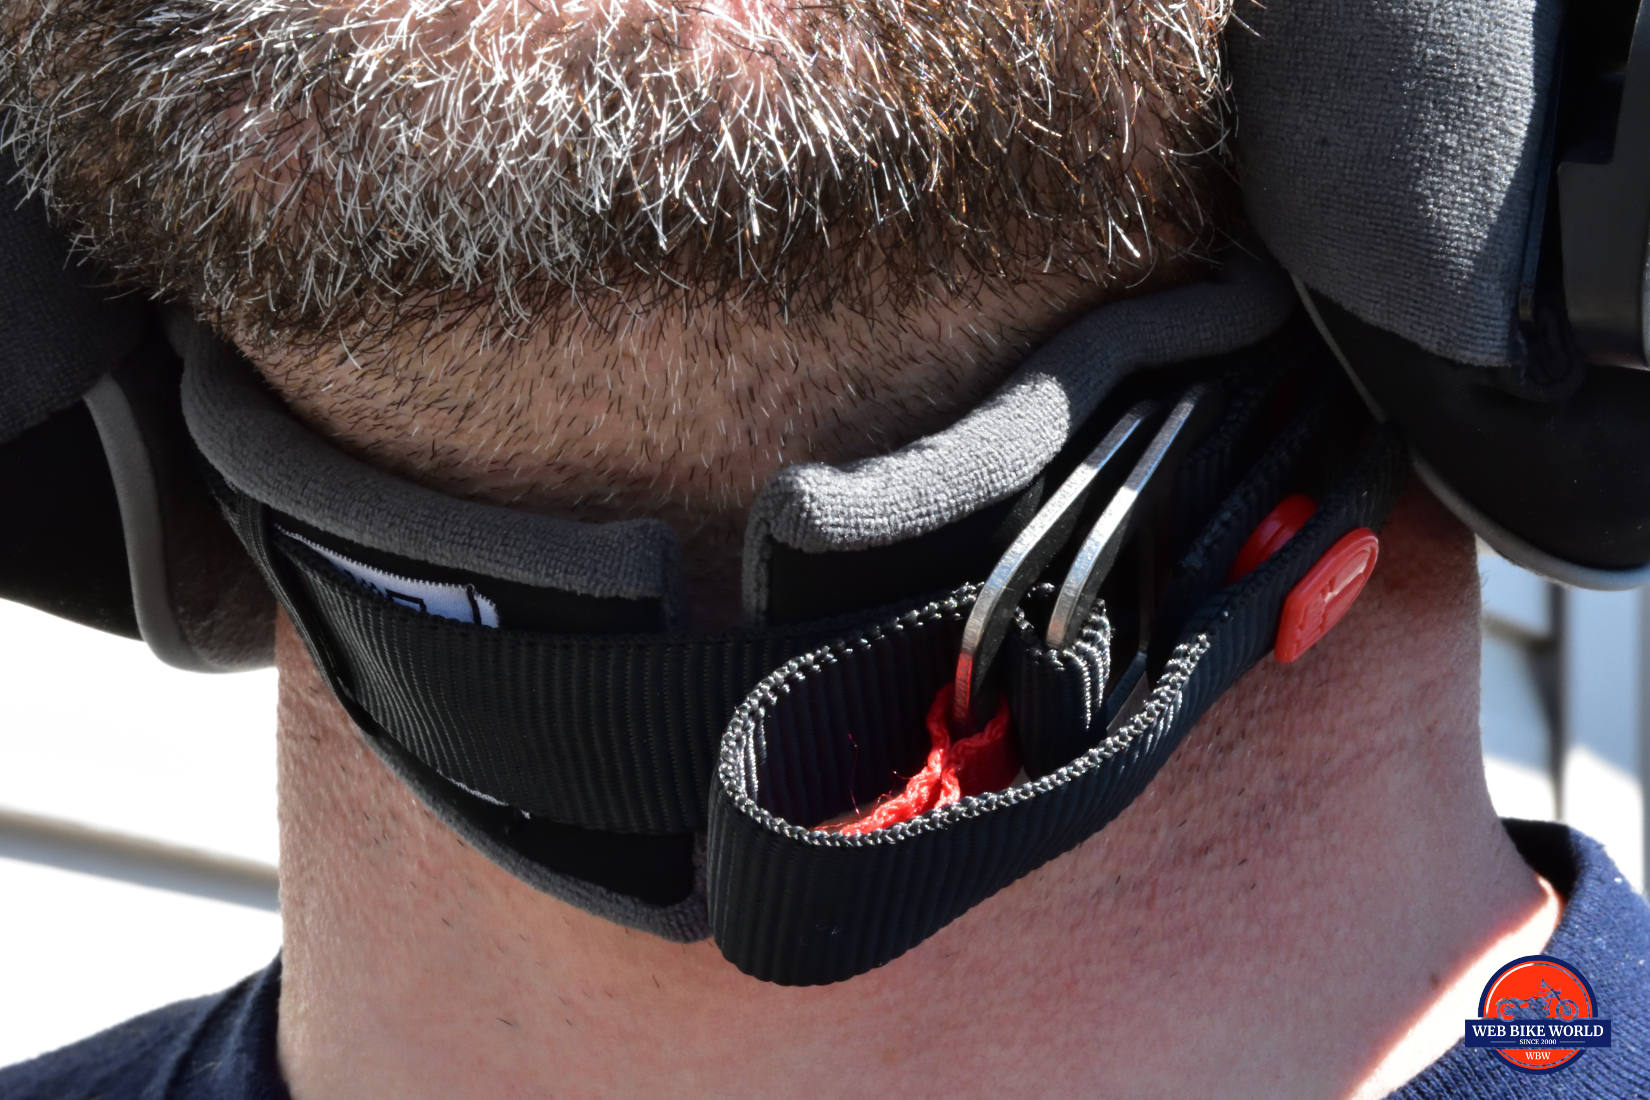
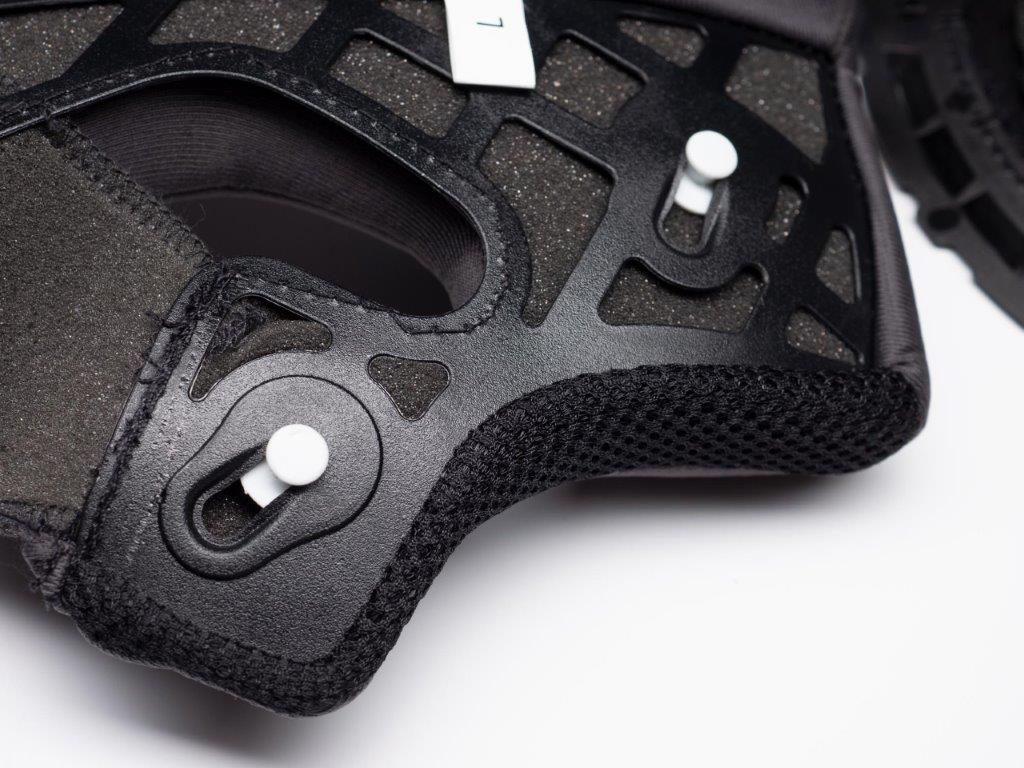
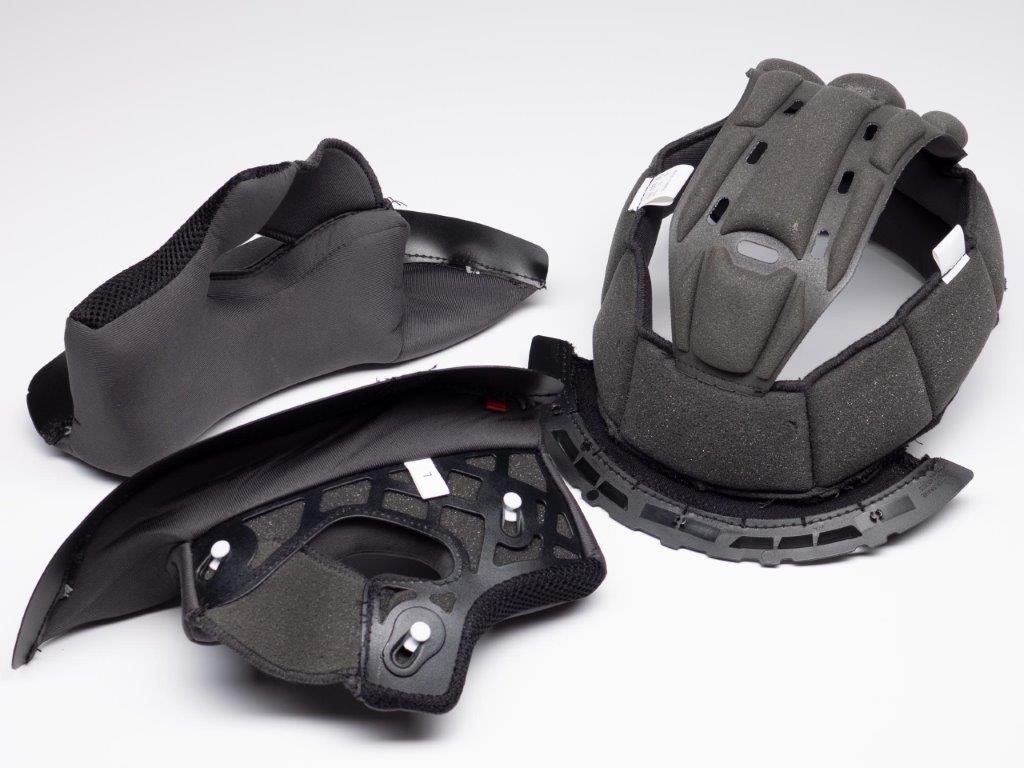
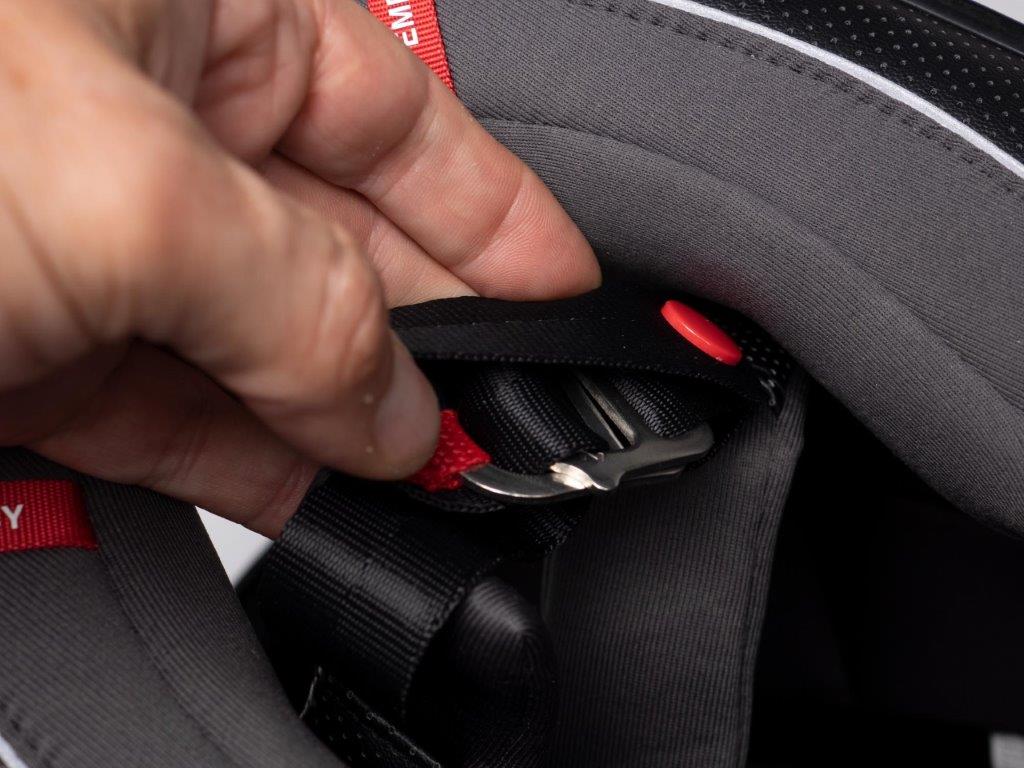
I greatly appreciate seeing emergency pulls on the cheek pads carried over from the EXO-R410 to the new EXO-R420. Looking at the underside of the helmet, there are two red fabric loops. These can be used by first responders to safely remove the helmet in the event of a crash without causing further trauma to the neck or head.
Pulling the red tabs will remove the cheek pads without the need to unsnap the connections. The plastic pins in the liner are set in a sliding holder that “pulls” the pins out of their connection when pulled in the removal direction.
I feel emergency release systems like this should be included on every motorcycle helmet regardless of price and it’s great seeing this important safety feature on what might be considered a “value” priced helmet.
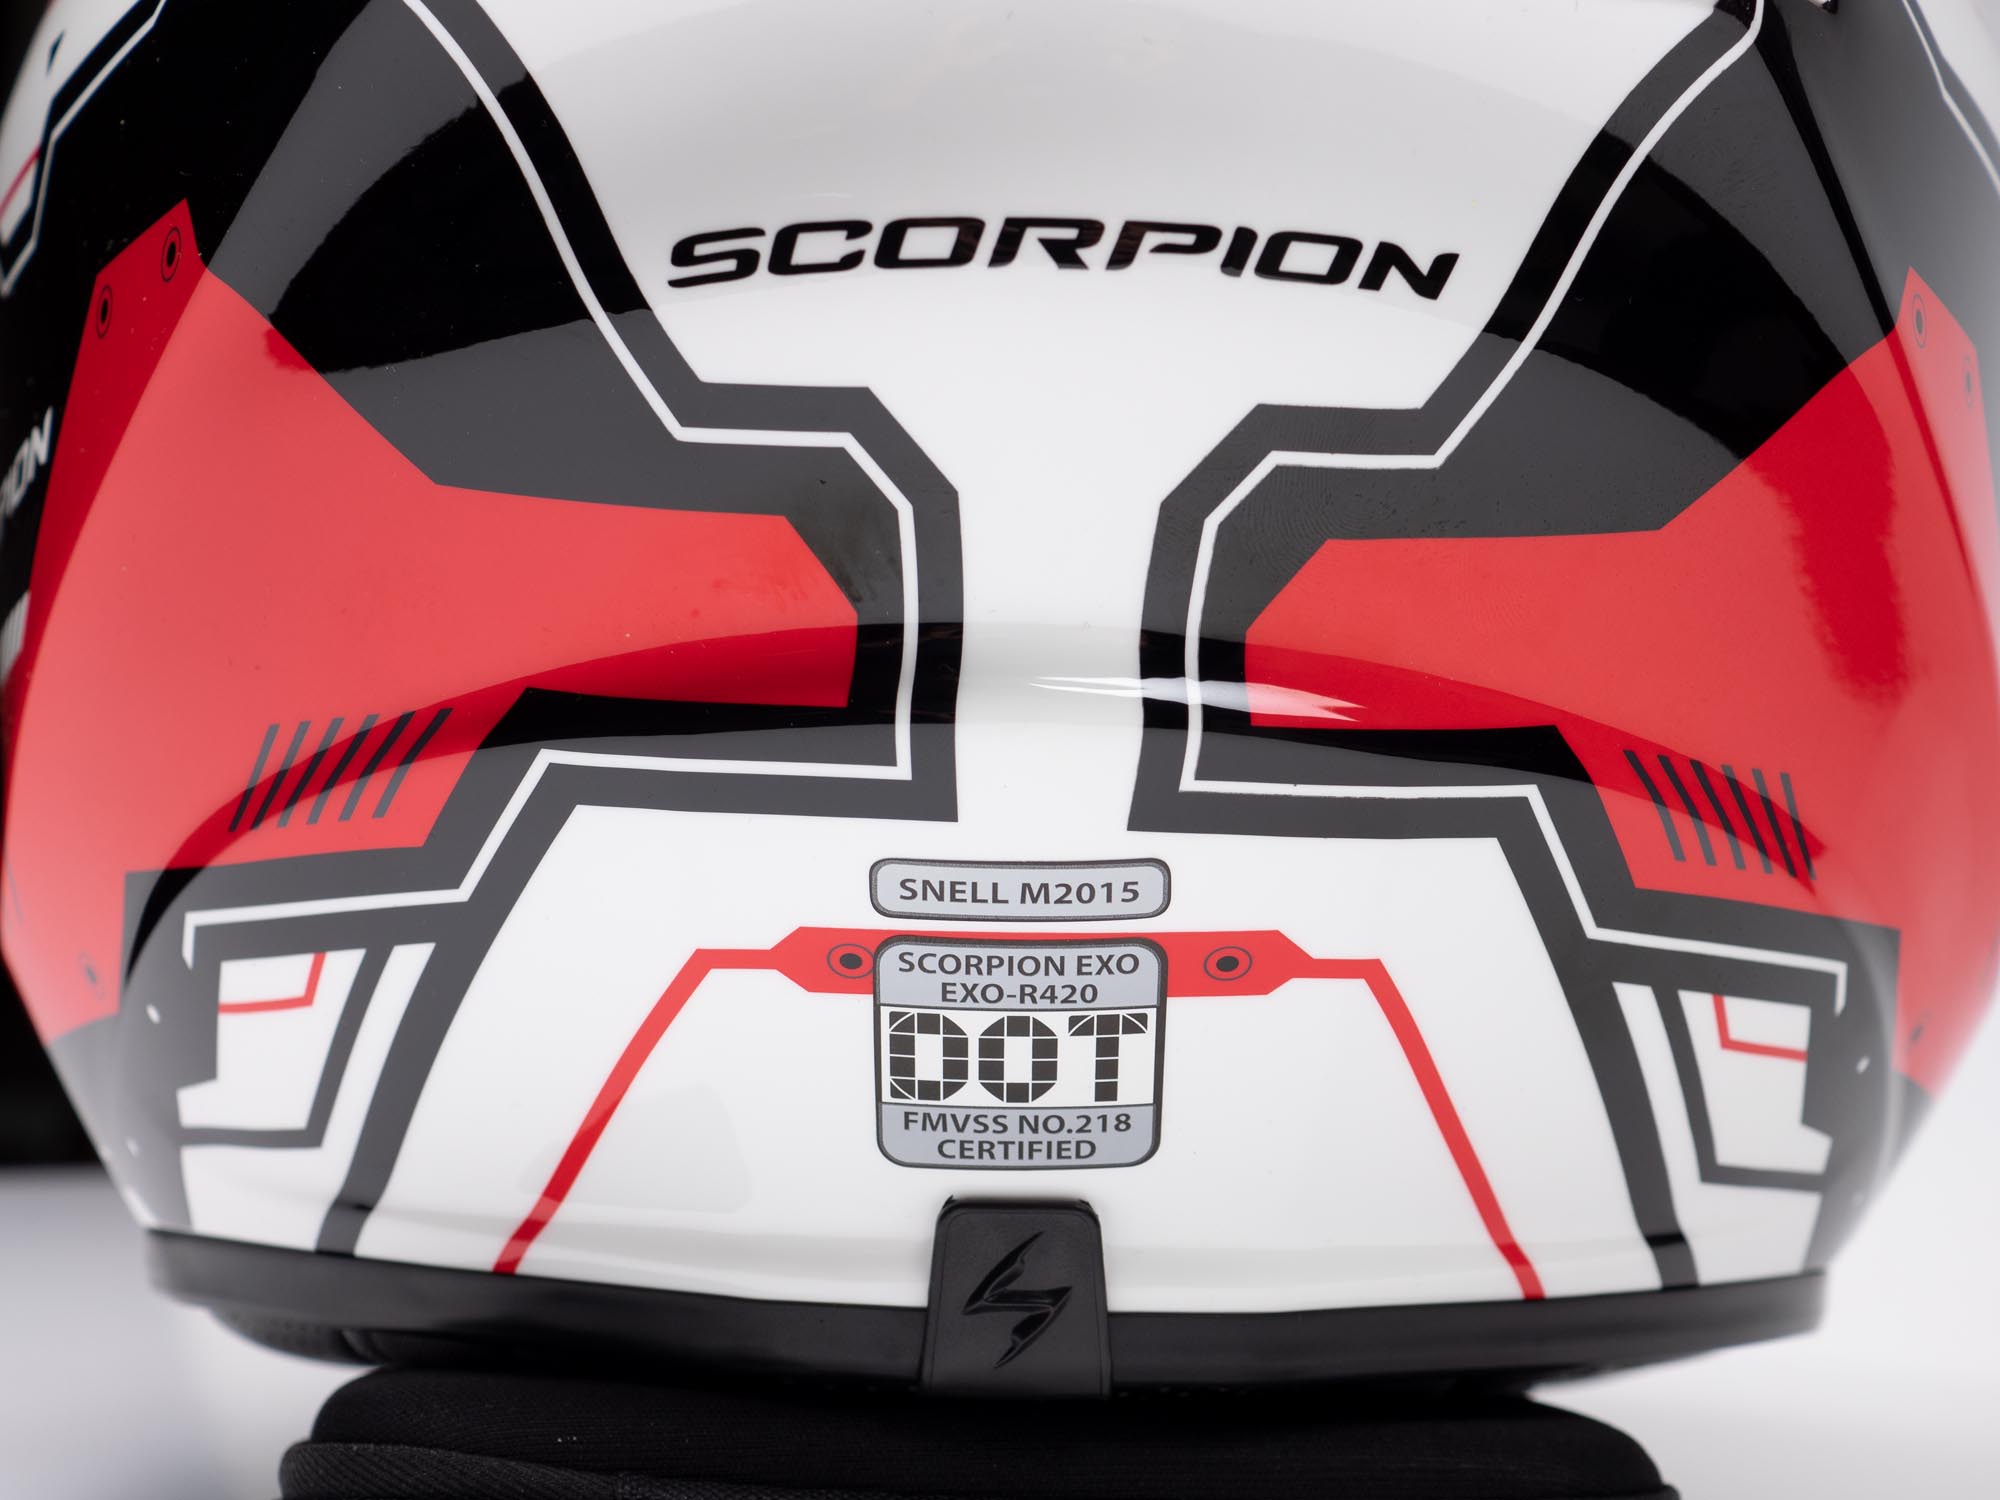
The EXO-R420 meets both the DOT and the Snell M2015 standards and comes with one of the longest warranties in the business. Five years from the date of purchase or seven years from the date of manufacture, whichever comes first.
Star result 5.0
Conclusion
The 400 series helmets from Scorpion should be well served by the EXO R420. While it departs a bit from the more simple shell shape of the previous versions, it remains true to the spirit of providing good value and protection.
There are just enough styles and colors to satisfy most riders and they are finished with a quality clear coat and good attention to detail. Of course, style isn’t likely the most important factor when looking at sub-200 dollar helmets but the available offerings at this price point are welcome.
There are many nice things that can be said about the EXO-R420 but weight and the way the weight is carried can still be a show stopper for some riders. For me, the worst part is the tendency to lift at highway speeds which is pretty much a non-starter. Not everyone will necessarily experience the same behavior depending on their head shape, motorcycle, and riding style.
In all, the EXO-R420 is a very well put together piece of kit and it’s hard to think of other helmets in this price range that can match it for safety and build quality.
webBikeWorld has worked closely with RevZilla over the years to provide our testers with products to review. In addition to being a great site to shop from, they’re also a great partner.
I remember as a kid, my friends and I would always be “tinkering” with our BMZ bikes. Taking things off, putting things on, getting it just right… Then came motocross, the same thing would happen… Change this, change that, all in the interest of getting what you wanted. I remember installing a CR80 front end on my XR80 and lowering the rear. I loved the way it looked and felt and more importantly, I was the only one in town with that setup. It was original and it was cool.
Flash forward to the future and that passion for customizing and having things my way has never gone completely away… Sure, it was perhaps repressed to a certain extent because of life and conformity, but there is something about modifying your machine that is just so satisfying, I had to do it again.
The Search for the Perfect Project Bike
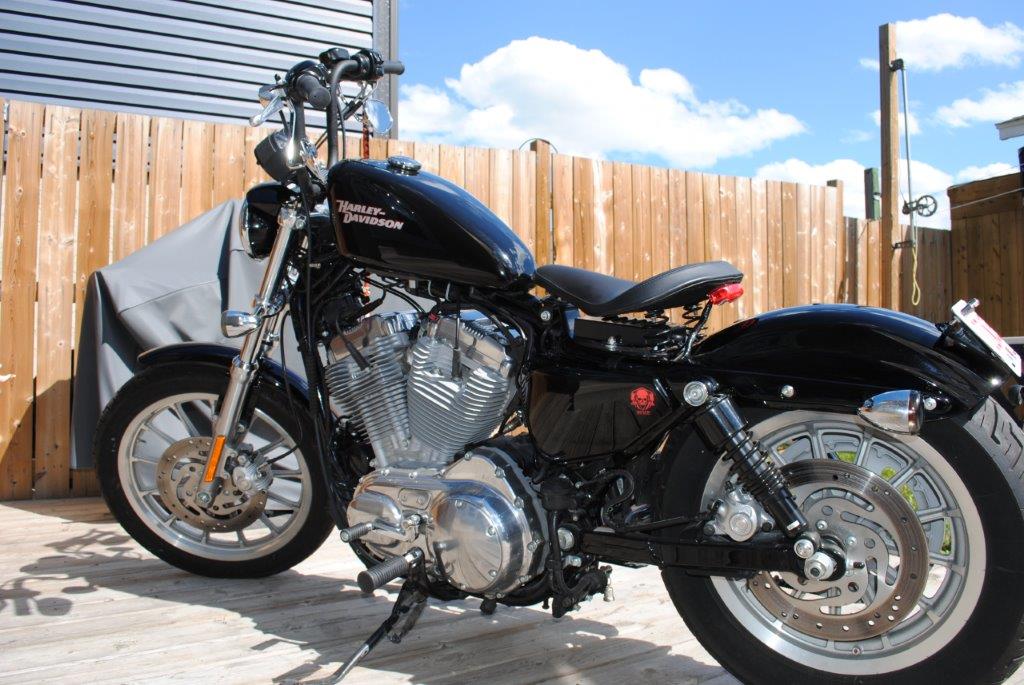
I set out to find a project and found a 2008 Harley Davidson Sportster for sale at my local Harley Davidson Dealership. I had sold my 2004 Sportster earlier in the year to purchase a 2007 Harley Davidson FLHTCU. I love my touring bike, but I missed my Sporty… The price on the 2008 was right and I know that this would make an excellent platform for a bobber.
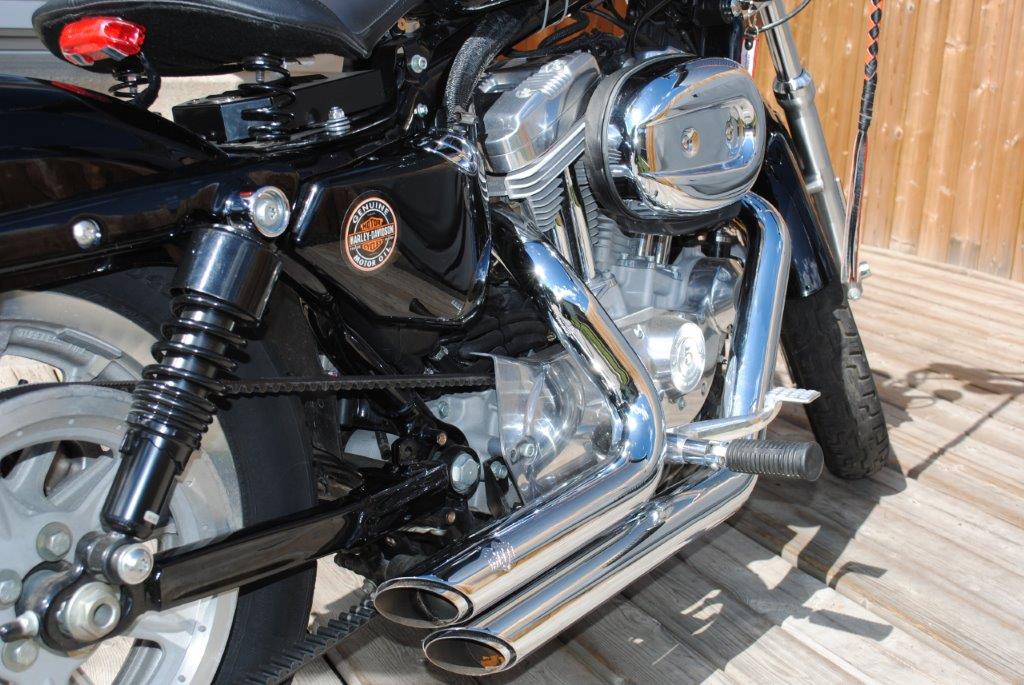
I had the dealership install a set of Vance and Hines Short Shot pipes and brought it home. My winter project was starting and I was excited at my first attempt at modifying a motorcycle in a long time.
The Platform
A 2008 Harley Davidson XL883. A bare-bones, black, solo seat, completely stock bike (With a new set of very loud pipes).
Sportsters have been around since 1957 and have proven to be a very versatile platform that is still in production today. They are an awesome city bike. They have good power, they handle well, they are quite nimble to navigate potholes and manhole covers and they have the classic Harley Davidson V-twin rumble.
The 2008 Harley Davidson XL 883 features a fuel injected 883 cc (54 ci) v-twin with 2 valves per cylinder, a 5-speed transmission and a final belt drive.
Riding The Sportster Stock
I took the Sporty out for a test drive and realized right away why everyone should have one in their collection. Compared to my 2004 that had bar risers, forward controls, and a carburetor, the 2008 had no risers, had mid-mounted controls and is fuel injected.
I instantly remembered how nice it is to ride a Sportster in the city. You can lean on this bike, it’s incredibly nimble. The power to weight ratio of the Sportster is just right. In its stock form, it is not a speed demon by any means, but it gets around without any trouble especially with fuel injection as opposed to the carburetor.
The bike is very well balanced and does not give you the feeling of instability. I honestly did not think that I would like having mid-mount controls and was thinking of changing them right away. I am glad I didn’t. Having the controls right under your legs allows you to tuck in your knees and exert even more control on the bike.
The seat felt high and the handlebars felt low, the stock exhaust was almost silent… This would not do.
First Modifications
The very first modification that was done to the bike was to get the dealer to install a set of Vance and Hines Short Shots to the bike. What a difference that made. I took the Sporty home once they were installed and there was no mistake that this bike had a new voice, and it was loud!
I was almost regretting installing the short shots as the sound coming out of them was actually hurting my ears with a half helmet on.
The Fun Begins
My friend Rob at Divita Auto Designs in Calgary was gracious enough to offer me a section of his shop to work on my project during the winter as i do not have a heated shop at home.
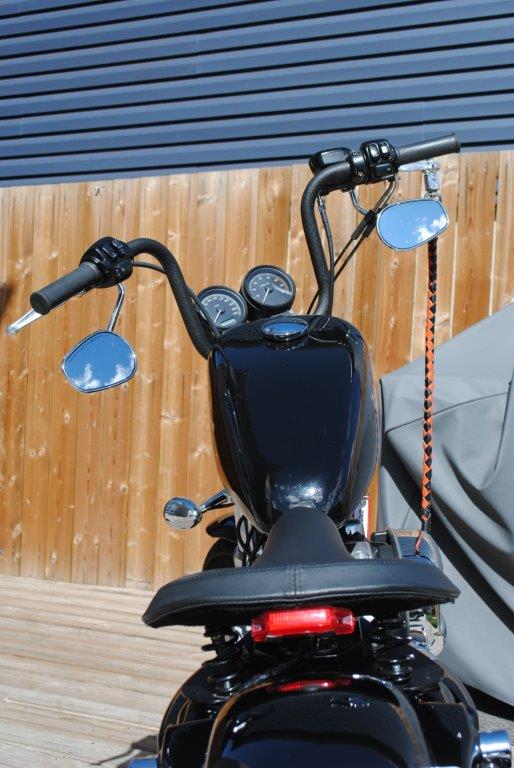
The first thing was to dismantle the bike and start working on the modifications. I started by removing the seat, the rear fender, the rear shocks, the handlebars, the front brake line, the front clutch cable, the ECM and the cover on the belt.
With everything removed, the first thing to get replaced was the handlebars. I installed a set of mini apes off of a Harley Davidson Street Bob. The height was just high enough to raise the profile of the bike and low enough to ensure that I still had circulation in my arms and hands when riding. This required changing out the front brake line and replacing the wiring to the handlebar controls. The clutch cable was long enough and did not need to be replaced.
I removed the chrome visor on the headlight and got it painted black.
The next thing was to re-route all of the cables and tuck them under the tank. This required a set of tank rising brackets to be installed. Finally, I relocated the front signal lights using a relocation kit and mounted the mirrors upside down.
With the front of the bike set up the way I liked it, It was time to move on to the rear. The cover for the belt was removed to expose the belt, at this time the rear passenger footpegs and brackets were also removed.
The next step was to remove the factory rear shocks and replace them with a set of progressives. This lowered the rear of the bike by 3 inches. A fresh coat of black paint was applied to the factory chrome rear trim.
The rear fender was removed to make way for a chopped rear fender. It got a coat of black paint and the wiring for the rear lights was rerouted. A new set of arms for the signal lights with embedded LEDs for the running lights were installed. The stock rear tail light was completely eliminated and a lean down license plate mount was installed on the newly painted fender. A set of LED light screws were installed to light up and retain the license plate.
Last but not least was the issue with relocating the ECM. The stock fender had a hole cut in it with a plastic holder for the ECM. The new one did not. I did not want to cut a hole in the fender and have the ECM exposed, so I went with a La Rosa spring seat with a built-in box for the ECM. This created a simple yet elegant solution for the unusually large ECM for this motorcycle.
Riding After The Mods
With all of the mods done, I was longing to take this bad boy out and enjoy the fruits of my labor. I was delighted when the weather got warm enough and the snow was gone down enough to take my new bobber for a spin.
The difference was night and day in the way that this bike feels. I love the fact that the bike is much lower and the bars are much higher. It looks amazing and rides even better. The lower center of gravity makes the bike handle even better.
The only disadvantages to a lowered motorcycle are when you turn a sharp corner, leaning into the turn may create an issue with the pegs rubbing on the pavement. Also, when parking, the stock kickstand is a little too long and the bike does not sit as it should. Modifying the kickstand is not a big deal, I will eventually cut the foot off of the stand, shorten the stand and reweld the foot. This will eliminate the problem. As for the sparks that shoot up from the footpegs when turning a sharp corner, unfortunately, this is the reality of riding a lowered motorcycle.
I found that the pipes were still too loud, so I installed a set of baffles in the Short Shots and the exhaust is now almost perfect. It still has the Harley Growl and the aftermarket pipes no longer hurt my ears when riding. Not to mention, it also means that I won’t get a ticket for riding with an excessively loud exhaust.
When it comes to modifying a stock bike to make a bobber, here are the pros and cons in my opinion:
Pros
It looks cool
It is unique and personalized
it performs better
It has a lower center of gravity
The ape hangers are comfortable and the weight is reduced
Cons
It reduces the ability of highway riding
Riding with a passenger is all but impossible
The louder pipes draw attention and modifications may affect the warranty
Would I Do It Again?
Absolutely!
This was my first attempt at customizing a motorcycle and it was an awesome experience. It feels wonderful to have a bike that is unique and to know that I had the pleasure to work on my own ride.
The experience I gained by doing it myself is invaluable. I am confident that I can take the bike apart and put it back together without wondering if it will work when I am done. This means that I can troubleshoot problems and fix them myself.
The handling of the bike is amazing, the lower center of gravity means that it is very stable on the road. I am not keen on long trips with this bike.
It does not have the suspension to sustain long rides and the lack of a windshield also means that the bugs and gravel come to a stop when they connect with your face; however, In town and on less busy roads, the wind on your face is awesome.
Bobbers are often referred to as bar hoppers. They are perfect for going from one meeting spot to another and shooting the breeze with your buddies, or going to a bike night to mingle with other like-minded individuals with custom machines.
I love taking my bobber out for a romp and the experience of wrenching on your own scoot is one that I cherish.
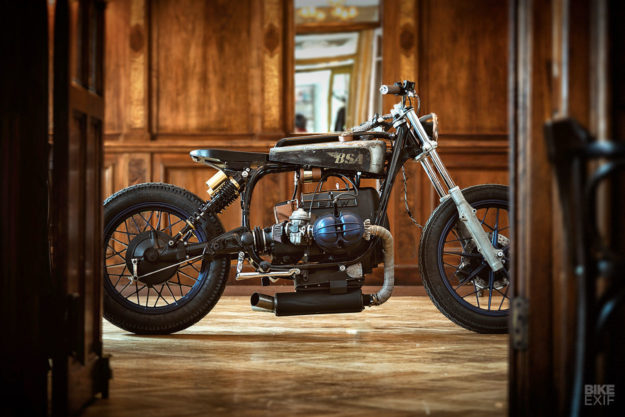
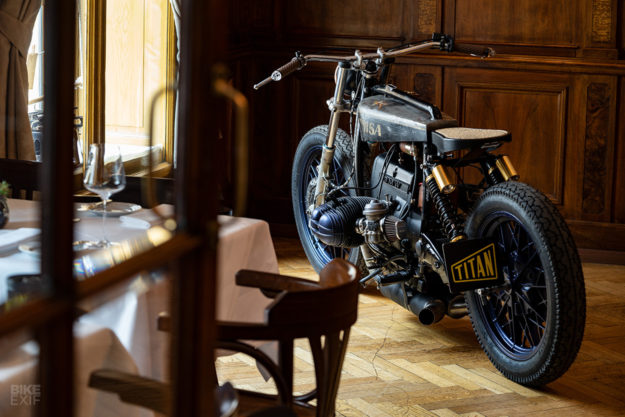
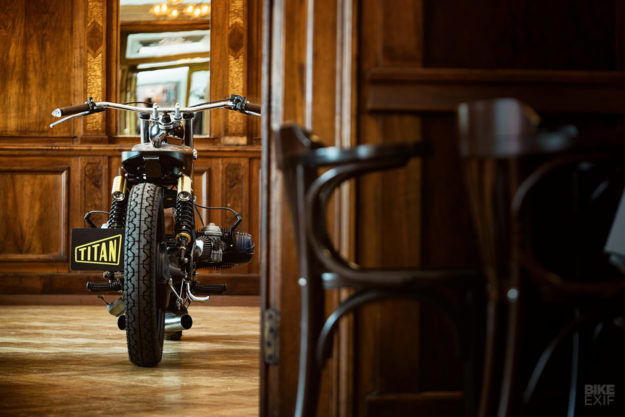
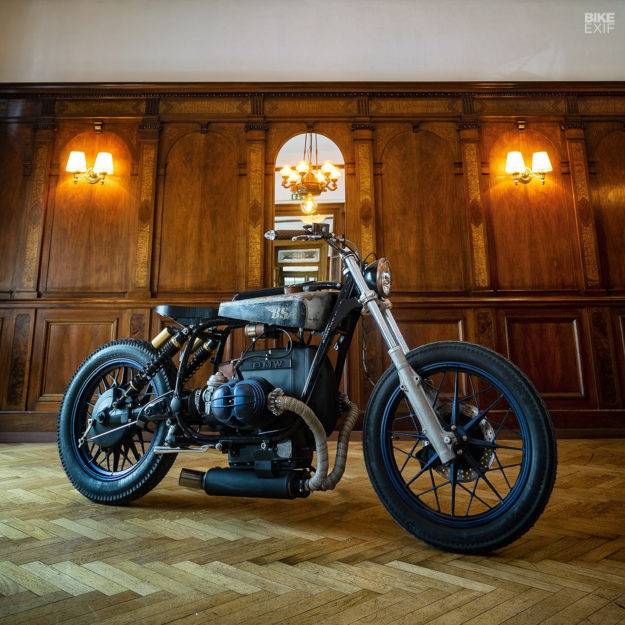
There’s a downside to the current popularity of BMW customs: a certain ‘sameness’ creeping in. After all, there are only so many ways you can tweak that familiar frame and boxer engine.
This new build from Austria’s Titan Motorcycles is very different, though—and unlike many builds that try to be different, it works beautifully. You’d never guess, but it’s based on an R90/6 from the 1970s, which means it has the 898 cc version of the venerable air-cooled motor.
Titan’s Michael Siebenhofer came across the R90/6 while browsing an Austrian online classifieds site. “It was was offered as ‘individual parts’,” he recalls. “The bike was not complete at all.”
Michael was primarily looking for an engine, because two-valve airhead motors are becoming rare in Europe. So he met up with the retired gentleman selling the BMW, in a carpentry workshop in the middle of nowhere.
Moments later Michael was the new owner of a very old engine, as well as a frame, a set of forks, and a few other ancillary parts.
Back in Graz, Austria’s second largest city after Vienna, Michael debated whether to resell some of the parts on eBay, to earn back a few Euros—or to invest many more hundreds to make the R90/6 a functioning motorcycle again.
He decided to rebuild. After tracking down as many missing parts as he could, he tore down the engine and the Bing carbs in the basement of his house. “Out of public view,” he explains. “If a man works hard during the week, he’s got the right to have a hobby in his leisure time, okay?”
An R75/5 gearbox was grafted onto the engine, and an R45 swingarm to accentuate the vintage vibe. Michael didn’t want to take any chances with the shaft drive though, so he’s installed a newer R80/7 kardan setup.
As the months passed by, the old BMW started to take shape. Michael pillaged the shelves at Titan for what he couldn’t find online, and also stocked up on maintenance and repair items from a local BMW dealer. “It’s a good thing that the German spare parts network is almost at 100%, even for 1970s machines.”
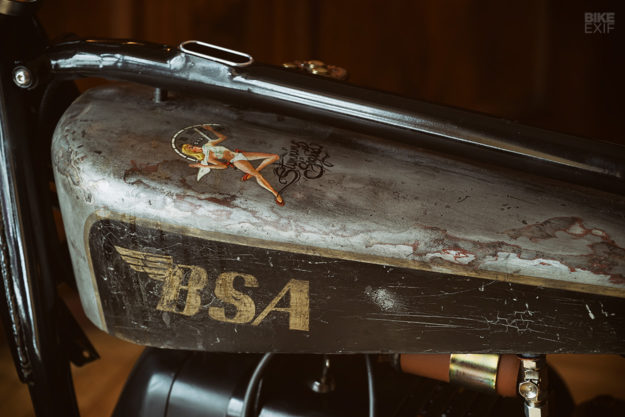
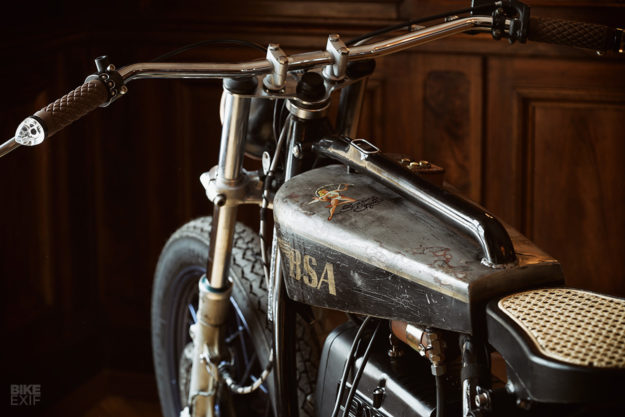
A concept started to form in Michael’s mind. “I had a 1920s tank concept, like a museum piece, or a racing bike from pre-war times,” he recalls. “But that style was not really feasible, due to the high frame beam of the BMW.”
Then Michael got his hands on an old tin tank from the 1930s, which he modified to fit—and then gave a subversive twist with BSA branding.
The seat support is welded directly onto the tank, with the original subframe brackets bearing the weight of the rider. It’s a neat arrangement, not least because Michael didn’t want to cut into the valuable R90/6 frame (which, incidentally, is homologated for sidecar use as well).
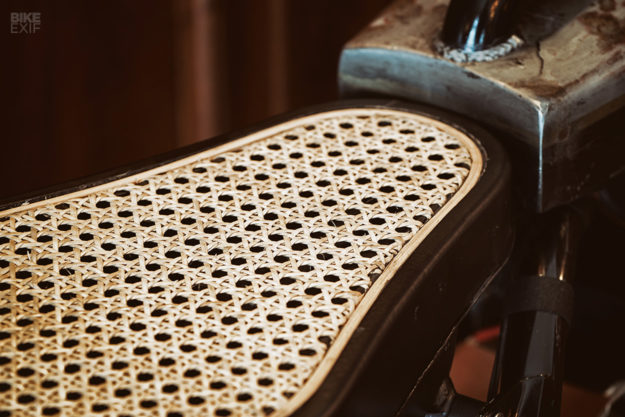
The Art Nouveau-style seat itself is a real highlight. It’s crafted in the style of the classic ‘Thonet’ Vienna coffee house chair, with contours cut out of a 50mm thick piece of oak plank.
Michael calls it ‘the real Austrian coffeehouse racer look,’ with milled grooves and an original Wiener Geflecht Viennese mesh insert. We’re told it’s very comfortable too.
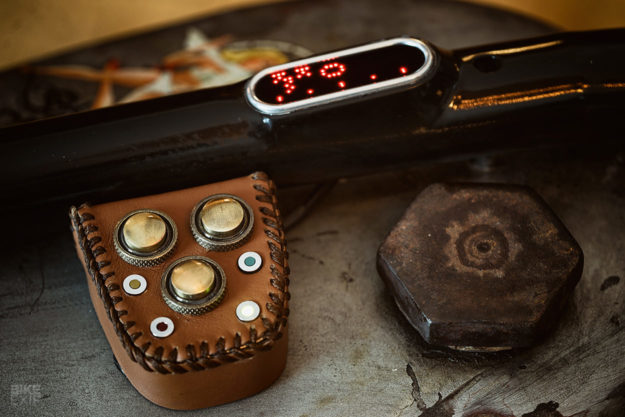
The electrics, we’re glad to note, are straight out of the 21st century. A fresh loom is plugged into the latest version of the Motogadget m.unit control box, which feeds a Motoscope Mini speedo and m.switch pushbuttons. The turn signals are a mix of Motogadget and Kellermann, and the bars are LSL’s 22mm Drag Bars.
‘Stunning Sigrid’ was finished just in time for June’s famous Club of Newchurch Festival, which attracts 15,000 bikers every year to the beautiful Austrian Alps.
We’re not surprised to hear that the R90/6 won the Professional trophy in the festival’s Custom Bikes show.
And yes, it’s sacrilegious to sit a BSA tank on a BMW frame. But it’s also a much-needed touch of humor in the homogenous world of airhead customs.