Categories
Gear Reviews Motorcycle Glove Reviews Other Motorcycle Blogs review reviews Waterproof Glove Reviews Web Bike World

ICON Patrol Waterproof Gloves Hands-On Review

Introduction

For those of you who follow my articles, you may remember my review on the Ninja 1000 abs that I wrote last month.

I found myself reviewing a 2018 Ninja 1000 abs as well as an X Moto 2 jacket and pants. It was raining and right around freezing when I did this review. The jacket and pants worked excellently and I was not cold or wet – however, the leather riding gloves I was wearing were awful. After less than an hour on the bike, my left index finger started to feel weird. I stopped and checked my hand and my finger was actually starting to turn blue.

I decided to get a new pair of gloves. I decided to purchase a pair of ICON Patrol Waterproof Gloves. Here is my impression of these gloves after testing at home as well as on the road on my 2018 Aprilia Shiver 900. Keep an eye out for the upcoming review at Web Bike World.

ICON was founded in 2002 in Portland Oregon. They list their core mission as protecting riders whenever and however they can.

Please note: I purchased these gloves and they were not provided for review.

First Impressions

I received my parcel containing the ICON Patrol Gloves and was quite eager to open it. At first glance, I immediately noticed how well constructed these gloves are. They are also very stylish. I loved the mix of waterproof textile along with the leather palm. The small reflective strip on the glove looks very smart and serves a purpose during low light riding.

ICON Patrol Waterproof Gloves closeup of wrist and gauntlet design

Construction

The ICON Patrol Waterproof Gloves are constructed of very good quality materials from the premium goatskin palms to the waterproof textile, These gloves are very high quality. Small features have been incorporated into the gloves to increase the comfort and performance.

For example, these gloves come with injected thermoplastic knuckles for hand protection, a shield wipe on the left index finger as well as a pre-curved palm and finger design to reduce hand fatigue as well as blisters.

ICON Patrol Waterproof Gloves injected thermoplastic knuckles

One of the main reasons I purchased these gloves was the fact that my trusty leather gloves I normally wear left me with a touch of frostbite from riding in the rain at cold temperature. I wanted to make sure that the gloves were indeed waterproof.

I donned the gloves and headed to the sink. I ran the cold water and put my hands under the tap for a good 4 minutes. The water did not permeate the glove and I was very satisfied with the waterproofing claim that these gloves provided.

ICON Patrol Waterproof Gloves are really waterproof

Protection

The ICON Patrol provides amazing protection against the elements. They are a level 3 waterproof glove which means that they feature a Hipora ® waterproof liner, taped seams and a cinch at the wrist.

In addition to protection in inclement weather, the Patrol gloves offer excellent hand protection. A co-molded knuckle offers protection to the back of the hand as well as leather fingertips will provide protection against abrasion in the event of a fall.

ICON Patrol Waterproof Gloves leather fingertips

Finally, the gloves being gauntlet offers protection against the wind and the rain. As far as protection against the weather, the ICON Patrol gloves are constructed of superior heat retaining materials to keep the wearer comfortable in colder weather.

Sizing, Fit, & Retention

The ICON Patrol Glove fits small. I usually wear a medium glove, but with the Patrol, I was glad I ordered a large as a medium would have been a bit snug on my hand. I followed ICON’s sizing chart that prompted me to measure the width of my hand. I was surprised to see that the chart recommended a large glove but I was happy I did when I received the parcel.

All sizing aside, the gloves fit well… like a glove. I am quite happy at the fitment. The gloves have a natural curve in the palm and fingers. This is a nice feature as it already has the broken-in feel. The gloves feature a strap around the wrist as well as velcro straps to cinch up the cuff.

ICON Patrol Waterproof Gloves wrist velcro strap

Once the glove is adjusted, the retention factor is excellent. It feels great on the hand and does not become a hindrance to tactile responsiveness.

My only complaint on the fit is that they feel a bit bulky. This may be because It is the first pair of gauntlet gloves I have ever purchased and I may need to adapt from a short glove to a glove that is designed to go over my riding jacket.

Road Testing

I wore the ICON Patrol Waterproof Gloves on a cold day. It was 0 degrees Celsius (32 degrees Fahrenheit) but I did not care, I needed to get out for a ride. It was early in the fall for a snowstorm, but nonetheless, Mother nature had her mindset and we got 18 inches of snow.

I was sure that my riding season was done. A week went by and the snow that was still very present on the front lawn of my house and the roof of my shed was nowhere to be found on the streets of Calgary… as mentioned earlier, I just purchased my 2018 Aprilia Shiver 900 and I wanted to go out for a rip… I got geared up and headed out for a ride.

The gloves were great. I did not feel like I was wearing a new pair of gloves. Although they were new, they felt like they were broken in from the factory. The gloves were very warm, even in this cold weather. I installed a set of aftermarket heated grips on my bike and I did not turn them on once during my ride.

I met up with fellow writers and riders Jim Pruner and Jennifer Angelina for a meeting and then off I went. I rode for a better part of the afternoon. I tried out the gloves in the city and on the highway. They performed very well. My hands did not get cold and did not get fatigued. I was able to use the controls on the bike without any issues and the grip from the goatskin in the palm of the glove really gave me the feeling of being in control.

ICON Patrol Waterproof Gloves goatskin palm

A few days before finishing this article, the weather in Calgary changed again and it warmed up considerably. I rode into work at my regular job on Monday morning. It was 7 degrees Celsius (45 degrees Fahrenheit) in the morning and it went up to 15 degrees Celsius (59 degrees Fahrenheit) in the afternoon for my commute home.

The gloves still felt comfortable; however, they were a bit warm. My commute is about 30 minutes, I rode a bit more because it was a very nice afternoon, so about 50 minutes on the bike from my work to my home. At the end of the ride, my hands were quite warm and were just starting to sweat.

Conclusion

I have very few negative things to say about these gloves.

They are very well constructed, very well priced, and they are made of good quality materials.

The ICON Patrol features construction choices that make it a worthy pair of gloves. The co-molded knuckles, the goatskin palm with added grip are a start. It also includes the shield wipe on the left index finger as well as the pre-curved design. All this comes with a 1-year warranty.

ICON Patrol Waterproof Gloves palm side up full view

The gloves look amazing. I love the aggressive styling and the use of different materials in the manufacturing process. They are available in multiple sizes from small to XXXL.

In colder weather, these gloves are amazing. They are designed to keep your hands warm and they do so very well. In warmer weather, they are a bit warm. I would not wear these gloves in the heat of summer. I believe that this would not be very comfortable.

The fitment of the gloves is good; however, make sure that you check the ICON website and check out the size chart before ordering. They fit a bit small, so be cognizant of that. I recommend these gloves. They are good solid gloves and you do get a lot for you money.

Pros

  • Comfortable
  • Stylish
  • Waterproof
  • Well Constructed
  • Affordable

Cons

  • Bulky
  • Cold climate use only

Specifications

  • Manufacturer: ICON
  • List Price (2018): US $75.00
  • Colors: Black
  • Sizes: S, M, L, XL, 2XL, 3XL
  • Review Date: October 2018

ICON Patrol Waterproof Gloves Image Gallery

The post ICON Patrol Waterproof Gloves Hands-On Review appeared first on Web Bike World.

Categories
Gear Reviews Motorcycle Tires Reviews Other Motorcycle Blogs review reviews Web Bike World

Michelin Road 5 Tires Hands-On Review: Super Sticky & Long Lasting

My Bike Needs New Sneakers

2018 Kawasaki Ninja H2SX SE.

My 2018 Kawasaki Ninja H2SX SE eats its own feet, so to speak.

A worn out Bridgestone Battlax rear tire.

Worn out Bridgestone Battlax rear tire

These 200 horsepower and supercharged Ninjas are renowned for wearing out rear tires in less than 2500 miles regularly. By keeping my bike in medium power mode I was able to get 5600 miles out of the stock Bridgestone Battlax tires, but now it’s time for something better when switching to full power.

Shopping Now? We Recommend:

webBikeWorld has worked closely with RevZilla over the years to provide our testers with products to review. In addition to being a great site to shop from, they’re also a great partner.

RevZilla

Free shipping on orders over $40
30-day no-nonsense return policy
Excellent selection of all major brands
Awesome pricing

Buy These Boots on RevZilla

Amazon

Free shipping (with Amazon Prime)
30-day return policy
Excellent selection
Competitive pricing

Buy These Boots on Amazon

Michelin Pilot Road 4?

Michelin Pilot Road 4 tires

Michelin Pilot Road 4

My friend Steve has forgotten more about motorcycles than I know and is the first person I talk to when looking for good advice. He’s been running Michelin Pilot Road 4 tires on his Kawasaki Ninja ZX-14 for years and highly recommended them. He regularly gets over 6000 miles out of a rear even on that behemoth bike of his so I was leaning that way for sure.

Michelin Road 5

Michelin Road 5 tires.

Michelin Road 5

Then I heard about the newest improvement on the PR4 tires and decided that was the way to go instead because these tires are supposed to be longer lasting AND get better traction than the PR4 especially on wet roads.

You can see from the photos above the tread grooves in the center are fewer in number, shorter in length and project outward in straight lines. They’re also about twice as large across giving the tire almost a dual sport tread like on an 80/20 adventure offering.

Michelin PR4 on the left and Road 5 on the right.Michelin PR4 on the left and Road 5 on the right.

Sipes

New Michelin Road 5 installed on the front of a Ninja H2SX SE.

A new Road 5 tire installed on the rear of a Kawasaki H2SX SE.

A KTM duke leans into a right turn.

Photo Michelin

The extra large gaps allow these tires to retain good traction in wet conditions longer as it wears down while the smaller treads won’t. It all comes down to the tapered sipes coming off the large openings wearing away more quickly on narrow openings compared to these larger ones.

Michelin might be onto something here.

Michelin claims even after 3000 miles a new Road 5 tire will perform just like a brand new PR4.

That’s saying a lot and the kind of bragging that demands a WBW hands-on review.

More Bragging

Michelin Road 5 tires being tested on a very wet road.

Photo Michelin

Michelin produced this test video at their track on wet pavement to showcase just how good the new tires are compared to other big competitor ones. It creamed the others in this video from YouTube.

The Continental Contiroad Attack 3, Pirelli Angel GT and Metzeler RoadTec 01 were distant seconds behind the Road 5 tires. These are all very good tires that plenty of people will argue are the best, so my gut tells me they’re not mistaken and it will come down to each individual’s personal preference in choosing one tire over another.

I haven’t personally tested all those tires and so I can only speak to what I’ve found with the Road 5 in this review.

First Impressions

Michelin Road 5 tires installed on a Ninja H2SX SE.

Riding away from the shop after having the new rubber installed back and front I immediately noted how much more insulated I felt from the road compared to the Bridgestone Battlax tires I had spent 5600 miles on.

It was downright lovely! The harsh rigidity of the Battlax was glaringly different compared to how these Michelins smoothed out all the cracks and bumps in the road. It really added to the bike’s suspension noticeably.

Unlike sections of the Dempster Highway, I rode back in June which was so soft I had no feedback from the road I could still feel connected solidly to the blacktop despite the Michelin cushions I was now on.

I’m smiling already and I’m not even home yet. A good sign.

Michelin Road 5 tires are made in Spain.

Shopping Now? We Recommend:

webBikeWorld has worked closely with RevZilla over the years to provide our testers with products to review. In addition to being a great site to shop from, they’re also a great partner.

RevZilla

Free shipping on orders over $40
30-day no-nonsense return policy
Excellent selection of all major brands
Awesome pricing

Buy These Boots on RevZilla

Amazon

Free shipping (with Amazon Prime)
30-day return policy
Excellent selection
Competitive pricing

Buy These Boots on Amazon

My Experience On Wet Road

After putting the Ninja in full power mode and taking some photos I headed for the mountains with their twisty roads and unpredictable weather. The secondary highway leading to Canmore, Alberta called the 1A is my favorite local road to ride because of the view and the variety of road surface. Great for testing out new tires!

Michelin Road 5 rear tire.

Mother Nature certainly obliged by dumping rain on me most of the way there.

I was very impressed with the wet road and dry road grip. As advertised the Ninja held beautifully in corners or straightaways. I even got to try it on some gravel which had been pulled out from side roads onto the 1A. A typical and expected hazard out in the mountains.

Zero grip issues to report. These Road 5 tires made the Ninja feel like it was on rails.

Let’s See What She Can Do…

What about high-speed performance you may ask? No problem.

Without divulging exactly what speeds I attained on the bike I can tell you these tires are perfectly stable right up to the last 20% of this Ninja’s top speed when a slight vibration starts to show up but is never scary.

My rims took a pounding riding up to Dawson City through numerous construction zones and may have taken some damage so that may be part of the vibration problem. Bear in mind that the vibration doesn’t show up until the bike reaches… how shall I put this? Supersonic speeds?

Even what is universally considered high speeds feel very ordinary on these tires and motorcycle. Again, I’m smiling and congratulating myself on making a wise purchase.

The Downside?

Do I have any complaints about the Michelin Road 5 tires? A couple.

Michelin Road 5 rear tire installed on a Ninja H2SX SE.

I took them on a 2000 mile ride through the Rockies with a riding club I belong to in order to see whether Michelin’s claims were justified about longevity. That’s when I found two things I’m not crazy about in these tires.

Rock Chucker

I encountered a lot of construction as expected during the short Canadian summer on the trip, and so I was riding through patches of pea gravel and dirt often. There weren’t any traction issues through that mess, just the opposite in fact.

That grippiness is part of the problem. The larger openings in the tread are adept at picking up gravel and tossing it indiscriminately at my friends behind me.

The boys didn’t enjoy being pelted with hundreds of paint-pounding projectiles, and so, gave me lots of room anytime we encountered a road crew.

Cornering Wiggle

We rode some amazing routes in Southern/Central British Columbia. The roads near Kaslo and Ainsworth are nearly the Canadian equivalent to the Tail of the Dragon in the US for all the sharp twists, switchbacks and turns found thereabouts. Man, was it fun on a performance oriented machine like the H2SX is when wearing grippy tires like these.

In a few extremely sharp corners I noticed that when I really leaned hard the friction patch shifted from the harder center section of these tires fully onto the much softer sides and gave me a noticeable “wiggle”. It’s only natural I suppose that would happen when shifting the weight around, but it’s unnerving the first few times.

The stock Battlax tires didn’t do this until they were already worn out, and at that point, it wasn’t so much a wiggle as it was a wild transfer from the flat center portion over some tall ridges built in then down onto the worn edges.

Michelin Road 5 tire where you can see the softer side rubber contrasted with harder centre rubber.

In the photo above you can see the softer side rubber contrasted with the harder center layer rubber.

Smooth Edge

You’ll also notice the edge of these Michelin tires distinctly lack any grooves and tread. This is the softer rubber layer that sits in a cradle of harder rubber extending from the middle section down underneath the soft layer right to the bead. It keeps everything stiff underneath, but race tire sticky on the edges when you lean further than 35 degrees.

Michelin feels most riders won’t lean further than that when the road is wet, so there’s no need to tread out on the edges. That’s accurate about me for sure. Smart design! You can spot the change in compounds in the photos I took of the tires quite easily. It’s layered like a cake.

Shopping Now? We Recommend:

webBikeWorld has worked closely with RevZilla over the years to provide our testers with products to review. In addition to being a great site to shop from, they’re also a great partner.

RevZilla

Free shipping on orders over $40
30-day no-nonsense return policy
Excellent selection of all major brands
Awesome pricing

Buy These Boots on RevZilla

Amazon

Free shipping (with Amazon Prime)
30-day return policy
Excellent selection
Competitive pricing

Buy These Boots on Amazon

Longevity

So how are the tires wearing now that I’m rapidly approaching the 3000-mile mark? Absolutely as advertised even with a savage, tire-hating H2SX working them over.

There’s very little wear on them on the whole. Even some of the rubber hairs are still hanging around at this point most surprisingly.

A photo of a brand new Michelin Road 5 rear tire after installation on the Ninja H2SX SE.

Photo above is of the brand new Road 5 tire after installation on the Ninja.

A close up photo above of the rear Michelin Road 5 tire after nearly 3000 miles.

Close up photo above of the rear tire after nearly 3000 miles.

Only the very center of the tire is beginning to flatten out very slightly, but it can’t be any more than maybe a few millimeters total that’s rubbed off. This is a stark contrast to the Battlax ones that came with the bike from the factory which were easily twice as worn at only the 600-mile mark!

The Final Verdict?

2018 Kawasaki Ninja H2SX SE.

I’m sold on these Michelin Road 5 tires and grin about them like a cat who ate the canary. I’m not sure there’s much more to say about them. I wish I had 5000 miles on them to really know the whole story, but I can’t see anything changing much from here on out.

Michelin has done it again! I fully recommend these Road 5 tires.

Unfortunately, if you ride a really heavy touring bike like a Gold Wing or Harley you’ll need the Road 5 GT tires which aren’t going to be on the market until 2019. Until then, Michelin suggests buying the Pilot Road 4 GT tires which are awesome in their own right and don’t give up too much to the Road 5 tires in reality.

Plus you won’t be winging any stones at your buddies with the PR4s.

Don’t Take Just My Word For It

Revzilla’s Lemmy does a great video presentation about the Road 5 and talks about all the important features here.

Pros

  • Terrific grip on wet or dry terrain
  • Reasonably priced based on longevity
  • Absorbs undesirable road vibration without removing desirable feedback
  • Available in 9 different sizes
  • 2CT and 2CT+ technology/design built in creates a stable tire that performs at any speed

Cons

  • Larger tread openings throw small stones frequently
  • Road 5 GT tires for heavier bikes not available until 2019
  • In hard cornering, there is a “wiggle” sensation

Specs


  • Price (When Tested): Front $151.50 to $234 Rear $148 to $326
  • Made In: Spain
  • Alternative models: Road 5 GT (coming in 2019)
  • Sizes: 190/50 ZR17 (73W)
    180/55 ZR17 (73W)
    190/55 ZR17 (75W)
    120/60 ZR17 (55W)
    160/60 ZR17 (69W)
    120/70 ZR17 (58W)
    150/70 ZR17 (69W)
    150/70 R17 69V (Trail)
    110/80 R19 59V (Trail)
  • Review Date: August 7, 2018


Shopping Now? We Recommend:

webBikeWorld has worked closely with RevZilla over the years to provide our testers with products to review. In addition to being a great site to shop from, they’re also a great partner.

RevZilla

Free shipping on orders over $40
30-day no-nonsense return policy
Excellent selection of all major brands
Awesome pricing

Buy These Boots on RevZilla

Amazon

Free shipping (with Amazon Prime)
30-day return policy
Excellent selection
Competitive pricing

Buy These Boots on Amazon

Michelin Road 5 Tires Image Gallery

The post Michelin Road 5 Tires Hands-On Review: Super Sticky & Long Lasting appeared first on Web Bike World.

Categories
Gear Reviews Husqvarna Husqvarna Pilen Helmet Motorcycle Helmet Reviews Other Motorcycle Blogs review reviews Web Bike World

Husqvarna Pilen Helmet Hands On Review

The Shark In Swedish Clothing

The Black and White Arrow Bikes

The Husqvarna Pilen Helmet isn’t available in North America yet, but it’s coming soon. I figured I should let the cat out of the bag right away before you rush off looking to buy it straight away.

I first learned of it about a month ago while drooling over news of the two, very sexy, naked street bikes Husqvarna is releasing this year in the 701 and 401 Svartpilen and Vitpilen. The bikes were featured on Jay Leno’s Garage TV show in February. You can see it here:

Svart is Swedish for black, while Vit means white. Pilen? Arrow.

Husky seems a tad obsessed with archery for some reason… I thought they were more into chainsaws?

That’s fine though and the name still hits the bullseye with me. Pilen is pronounced “PEE-LYNN”.

Husqvarna Pilen Helmet
Photos from Husqvarna

The Arrow Helmet

Husqvarna Pilen Helmet

Excited as I am to try out these two bikes, I’m more hot for the matching Pilen helmet Husqvarna conspired with Shark Helmets to produce.

The cranium-conforming fit and stark, two-tone paint job of the helmet really call out to me. It smacks of fighter jet pilot meets Star Wars stormtrooper design and I unapologetically dig that look. I faintly see the Punisher skull logo there somewhere or is it more a Casey Jones-esque hockey goalie mask? Either way, it’s very fetching and draws plenty of looks.

I unbelievably managed to get my hands on one of these Pilen helmets through pure, dumb luck last week and have spent some time getting to know it since.

Husqvarna Pilen Helmet

Design Features

Husqvarna Pilen Helmet

If the Pilen looks familiar to you there’s a good reason for that. It’s really just a Shark Vancore helmet with a different paint scheme and the Husqvarna logo stamped on it.

WebBikeWorld didn’t review the Shark Vancore when it first became available in 2017, so this is two birds with one stone, hands-on review. You can watch Revzilla gear guru Anthony in this video go over the Vancore features, along with his likes and dislikes:

Outer Shell

Husqvarna Pilen Helmet

This Round Oval shaped helmet has an all fiberglass shell making it impressively light. It weighs in at just a smidge over 3 lbs. I swear it feels lighter on my head than even my shorty open face helmet does.

It comes available in several sizes: XS, S, M, L, XL, and XXL.

Husqvarna Pilen Helmet

There’s a seam separating the chin bar section and the main helmet portion that screams modular design, but it’s only an illusion. This is a static design helmet with no pivoting chin bar assembly.

Husqvarna Pilen Helmet

Full Face Helmet?

Even though the Pilen is advertised as full face, the chin bar area has only very thin foam on it and I doubt would pass any kind of serious stress test from what I can tell handling and examining it. It’s not flimsy or cheap feeling but just doesn’t seem overly beefy compared to typical chin bars.

Protective ability is better than a ¾ helmet design would be without a doubt because the chin bar is anchored to the helmet’s main frame, but I don’t see it being a legitimate face protector when the fiberglass hits the road if you know what I mean.

Husqvarna Pilen Helmet

This helmet is ECE 22.05 and DOT approved of course, regardless. You can wear it confident in its ability to protect up to those excellent standards.

Fit and Comfort Factor

Husqvarna Pilen Helmet

My head shape is more suited to an intermediate oval design but this Pilen feels perfectly snug and comfy once I get my noggin seated in it. The size and shape really follow the jawline and base of the skull closely making it feel almost at one with my head. It’s the most comfortable helmet I’ve ever worn to this point.

My head measures 23 inches around above the ears and eyebrows. That puts me just between Medium and Large in most helmet sizes. Most often I choose to go with the smaller size of the two. The Pilen is no different and the Medium fits me perfectly with no pinching or hot spots to talk about.

Husqvarna Pilen Helmet

The close fit which I love also can be a bit of a pain when donning it if you are blessed with a super-sized snotlocker as I am. I find when I pull the helmet on, the chin bar unavoidably gives my nose a bit of a flick in passing and the padding around the ear area catches my listeners and folds them up like a lawn chair, flat against my head. Happily, there’s enough give in the foam liner to get my fingers in to sort things out with little trouble.

If you are claustrophobic then you may not care for this close-fitting Pilen.

Peripheral Vision

The goggles do cut off a bit of my peripheral vision, but not enough to be a problem doing shoulder checks or watching for suicidal deer coming up out of the ditch to say hello.

Liner Material

The EPS foam layer is just over an inch thick and grooved deeply for airflow from the top vent over the crown of the head and down the back of the skull where it then exits out the bottom.

Husqvarna Pilen Helmet

There is soft, felt material on the brow and cheek areas along with bamboo fiber, mesh textile everywhere else that naturally wicks moisture away and resists bacteria and mold growth.

The washable liner and cheek pads are held in place with velcro strips and plastic tabs. Both are fairly easily removed and installed although when I pulled out the main liner from my helmet one of the velcro pieces that is supposed to stay attached to the shell appeared along with the liner.

I spent some time carefully unfolding it and reinstalling it back in the small gap between the outer shell and the foam.

Air Flow

There’s a large vent on top of the helmet that can be opened by sliding the whole piece backward. The 2” x 5” vent is easily opened and closed with a gloved hand compared to the small switches found on many other helmets. This vent does seem to flow air quite well despite the lack of openings at the center of the outer shell at the back of the helmet.

Husqvarna Pilen Helmet

The Pilen was surprisingly warm despite the frigid temperature I tested it in. A small amount of air came up from under the chin bar and ever so slightly around the goggles despite the flexible rubber liner they seat against.

On warmer days I’m sure this would be welcomed, but short of trading the goggles for sunglasses, I don’t see a way to increase airflow through the helmet if you’re a really sweaty individual. I’m not, so I think I will get along just fine with the Pilen in the summer.

Wind Noise

It’s not a superbly quiet helmet, but it’s also not what I would label noisy. I found it quite good, but I’m not the best judge since wind noise has never bothered me from helmets others have complained about. My Harley Davidson FXRG modular helmet which I would call noisy (built by HJC) creates a noticeable wind roar at highway speed others would avoid, but I still wear it.

The Pilen has more of a swish sound to it at the same speed comparatively.

I think I may have bumped the goggles out of line at one point while playing with the air vent and caused a faint whistling noise to appear suddenly. I noticed that when I tilted my head down I heard it, but when I held my head straight on it would disappear. It may have actually been coming from the air vent not being completely closed, I’m not totally certain.

Quick Release Goggles

Husqvarna Pilen Helmet

The goggles are excellent quality and other than the uber cool overall look (reminiscent of Jason from Friday the 13th?) are the best thing about this helmet.

Made by Zeiss, the double-panel, scratch and impact resistant lens is beautifully distortion free, flexible and coated with a fog resistant chemical I found highly effective.

I wore them on about a 40-minute ride in below freezing temps (26 degrees F) just standing around, riding in traffic and at highway speed without even a hint of fogging.

Husqvarna Pilen Helmet

Foam and Seal

The foam and rubber around the lens stayed flexible even in the cold and as I mentioned only leaked a tiny amount of air.

I would like to test them again in rain to see whether water would leak through, but at this time of year, we’re more likely to get snow so that’ll have to wait for a further review. They likely would seal much better when used in typically warmer motorcycle weather.

It’s worth noting that another reviewer of the Shark Vancore on the Revzilla site didn’t mention any rain leaking through but did find after extended use the goggle foam deteriorated badly, so fussy owners will likely be replacing the goggles yearly to keep them fresh. See their review at the bottom of this page.

Glasses Friendly Design

There’s plenty of room to wear prescription glasses in this helmet and the goggles will isolate them from your breath perfectly to keep from fogging up too.

Lens Tinting

Husqvarna Pilen Helmet

The tint of the lens didn’t bother me even on an overcast day, but in the owner’s manual, it says it’s too dark and not suitable for night, dusk or fog riding situations.

Clear lenses are available from Husqvarna/Shark from what I’ve read.

Weakening Latches

Husqvarna Pilen Helmet

The quick release lever is on the left side latch and works well to put on or take off the goggles. Undoing the left side leaves the goggles dangling from the right side anchor point and it might be better to leave both sides connected and lift them up to the forehead area instead.

Husqvarna Pilen Helmet

The reviewer on Revzilla I mentioned earlier found that with age the quick release would let go with less and less effort or hand contact, but never opened up while riding the bike thankfully.

There is an adjustment on each side to loosen or tighten the elastic material if desired.

Microlock Ratcheting Chinstrap

Husqvarna Pilen Helmet

This is such a great selling feature for me and endears me to the Pilen design.

The double D ring chin strap system works great but is irritating for me to buckle and unbuckle while in comparison the Microlock system literally can be cycled ten times faster. When taking the helmet off you only need one hand to undo the latch and that is a big feature in this helmet.

I know some people feel strongly that D rings are the only way to go in order to feel a helmet is on securely, but there’s no evidence to suggest the Micolock ratcheting style chin straps are inferior.

SHARKTOOTH Bluetooth Entertainment System

Husqvarna Pilen Helmet

The Pilen has three cavities built into the EPS tailor-made to install the SHARKTOOTH entertainment system.

SHARKTOOTH isn’t packed with as many fancy features as say the SENA 30K is, but if you just want a basic system to let you listen to music, answer your phone calls, communicate with another motorcycle or passenger and follow your GPS this is a good one. It will fit perfectly in the helmet other than the exterior control unit, but even that is built with a very low profile and less bulky than many other systems are.

It’s somewhat more affordable too at $250 new.

Other Bluetooth systems can be used with the Pilen as with any other helmet.

The Verdict?

Husqvarna Pilen Helmet

The Pilen is a compactly designed, handsomely simple and straightforward helmet complete with some appreciably nice features. The ultra lightweight, bamboo mesh liner, microlock chin strap and Zeiss goggles are a big draw. It’s original, has the panache of a Cobra Commander helmet and who can deny that character’s sense of style?

Husqvarna Pilen Helmet

It could possibly use better rear exhaust venting, a sturdier chin bar, better quality foam seal around the goggles with a clear lens, but there isn’t really a whole lot to be unhappy with from the field testing I did with it.

If you’re a big Husqvarna fan celebrating the arrival of the new street bikes then you might be willing to pay more for the brand name helmet the Pilen is. Pricing in North America hasn’t been released yet, but you can expect it to be close to the $400 mark based on European pricing.

If you don’t desire the matching Husqvarna helmet to complete an ensemble with your new Husky 701 or 401 bike, there is, of course, the Shark Vancore option. I would definitely point you towards it instead of the Pilen since you’ll get what amounts to the same helmet for $100 to $150 less.


The post Husqvarna Pilen Helmet Hands On Review appeared first on Web Bike World.

Categories
ADVmonster AGV Gear Reviews Headlight Upgrade Reviews lights Motorcycle Light Reviews Other Motorcycle Blogs review reviews Web Bike World

ADVmonster LED Lights Review

ADVMonster LED Lights

Is seven years long enough to accurately assess a product or group of products?  Or just an excuse for a long (long) overdue review? Use of many ADVmonster LED products over this extended period has proven many things, including the fact that while appearing deceptively lightweight and (thus) fragile, they really aren’t and, their versatility for a wide range of requirements and applications.

Whether using M-series LEDs as single trail lights or in combination sets to point the way ahead and help define what is usually lurking on the edges the lights provide seamless reliable performance on a daily, monthly or yearly basis. Other than one new LED that had a stretched wired inside the protective sheathing, none of the lights, no matter the form factor, have failed in any way over time, distance and a few motorcycles.

The non-functioning LED was quickly replaced by ADVmonster – a support approach that has been evident over the years. With highly efficient LEDs, white light output, typical low power consumption, long life, robustness and low cost the ADVmonster LEDs are the real deal although often overlooked as a viable solution.

Background

Why this long term review of ADVmonster LED lights?  Its actually a cleverly disguised excuse seeing as how this submission was originally supposed to have been done about three years ago!

But there is nothing like taking the long-term view of a product or products – the information and opinions formed over years rather than a month or two can be very enlightening, especially related to performance, flexibility, reliability and of course, durability.

Since somewhere around 2010, multiple ADVmonster LED products as singles, matched pairs or combination sets have been and are installed on virtually every motorcycle in the home fleet.

Over the years, I have installed more than a few more ADVmonster LEDs onto other motorcycles and four wheelers for fellow riders and power sports enthusiasts.

Needless to say the ADVmonster LED products have been joined by other related products available on the market, all installed for short and long term evaluation and of course, personal use.

I first saw the ADVmonster LED lights at a rally attended one summer long ago and after discussing their attributes with the users, visited a few forums that had related posts and then the company website.

ADVmonster is a company based in southern Florida.  They carry a small but comprehensive line of LED lighting, mounts, wiring and related products…and one or two unique pieces as well.

Some of the products, like the original M-series LEDs have remained as offerings through the years while other form factor products have been introduced or shuffled out to broaden the overall line and keep things fresh.

And shortly after returning home from our travels that summer long ago, two sets of LEDs were ordered from www.ADVmonster.com, beginning a longstanding relationship regarding use of their LEDs and related products that continues to this day.


Where to Buy LED Lights

Check Reviews & Prices on Amazon

Also Shop for: LED Lights and BulbsAuxiliary Driving LightsMotorcycle LED Headlights


Overview

The current list of ADVmonster products include the F11 Fog Light (single or pairs); M5 LED Spot for Tail Tech X2 adaptation; the M20 LED as a single or pair (with or without harness); and, the M30 – M44 – M55 and M60 series.

The F40 lightbar that was procured when it was first released has since been replaced by the smaller but more effective SS25 lightbar – more on that later.

And there are other LED and lighting related products available on the website along with technical resource information, etc.

This review covers most of the M-Series LEDs and the two lightbars, all of which were procured, installed, tested and generally abused on a wide variety of motorcycle over a number of years for on and off-road use; all have survived to this day.

M-Series – the original M-series lights, including the M30, M44 and M60 LEDs sets, are housed in identical black round housings measuring 70mm long and 55mm in diameter.

The only discerning feature is the number of LEDs in the housing and (perhaps) lens appearance.

Principle differences, other than the number of LEDs used are output and power consumption.

Like most modern LED components and based on typical Wiki ratings, the LEDs will last 35,000 to 50,000 hours or over four years of continual use!

An O-ring provides a solid seal between the housing and the threaded lens section with its shatter resistant lens.  A 100cm (39in) lead and flat mount pivoting stainless steel bracket are standard.

Heavy duty brackets are available as an option, along with Clear, Amber and Red replacement lenses and for added protection, Xpel Light Protection Covers in Clear and Blue.

Basic performance specifications for utilized products:

  • M30 – three Cree XP-G LEDs, 10-degree Spot beam, 1500 lumen output, 5500K colour temperature, consumption of 0.85A (10.2W) each
  • M44 – four LEDs, 30-degree Wide beam, 2000 lumens output, consumption of 1.8A (22 watts) each
  • M60 – four Cree XM-L T6 LEDs, 30-degree Wide beam, 3600 lumens output, consumption of 2.4A (28 watts) per unit

A later offering that is not longer listed was the M62 featuring dual Cree XML-T6 5500K (cool white/vertical daylight range) LEDs in a rectangular cast aluminum housing measuring 108 x 63.5 x 63.5 mm (xx x xx x xx).

It had 15- degree Spot beams and 1800 lumen output with power consumption rated at 1.2A (14.4W) per unit.

An appreciated feature of the M62 is that small modular joiner pieces provided in the kit allowed multiple units to be joined similar to the Denali LED modules…but I never did buy another one before it disappeared from the website.

F11 LED Fog Light Set – the module features a single Cree XML-U2 LED rated at 1100 lumens output with consumption listed at 1.0A.

Its 15-degree beam is a great compromise between Spot and Wide, providing an elliptical shaped pattern with an upper and lower cut-off unlike the normal more conical beam; amber or clear lens are available.

The small square black aluminum housing is O-ring sealed and (IP67) water and dust proof rated.  A PMMA shatter-proof lens is used.  Each module has a 100cm (39in) lead, mount and mounting hardware.  Typically sold in pairs.

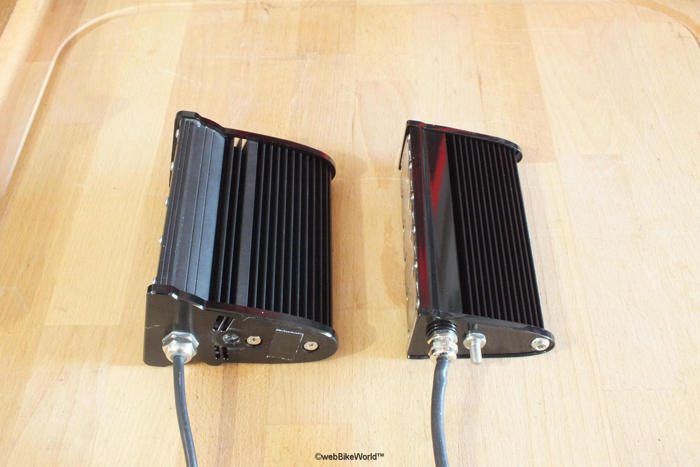
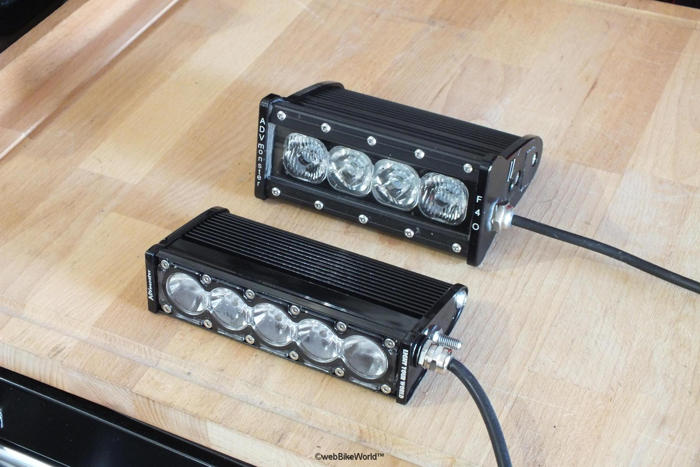
F40 LED Light Bar – no longer available, this four Cree XM-L2 LED light bar was the first light bar purchased from ADVmonster, but not the last.

Featuring a heavy-duty heat sink oriented aluminum housing (IP68 rated) and AR-1 coated polycarbonate lens it made for an outstanding single product for those ‘night into day’ lighting solutions.

Output was listed at 4000 lumens and 5500k colour temperature, with power consumption identified as 38W.  The light bar came with lightweight side mount bracketry to aid in its installation.

Two variants were available – one with four 10-degree spot beams and the other featuring two centre two LEDs spot beams and two outer 30 degree flood beams for very bright and very broad coverage – this is the configuration I now having residing on the shelf.

Although I never tested the straight 10-degree Spot configuration it seems to have been a popular choice while available.

The second variant option was and remains my preferred solution; the two inner Spot and two outer Flood/Wide lens configuration is truly an outstanding full coverage light.


Where to Buy LED Lights

Check Reviews & Prices on Amazon

Also Shop for: LED Lights and BulbsAuxiliary Driving LightsMotorcycle LED Headlights


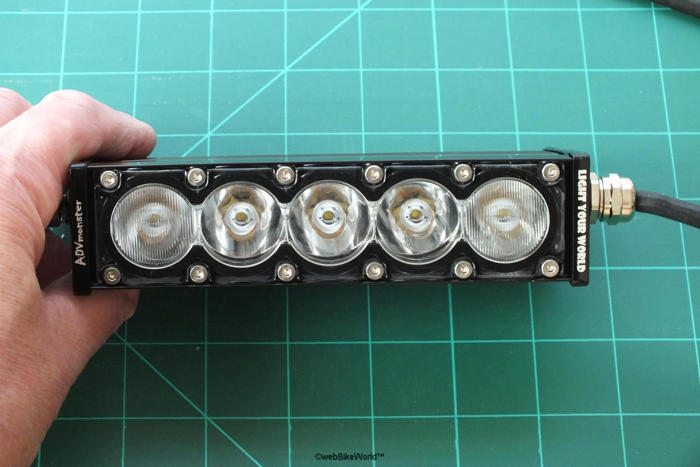
SS25 LED Light Bar – literally half the size of the F40 lightbar, the newer smaller lower profile form factor SS25 is powered by five XP G2 Cree LEDs at 5500K colour temperature.

Featuring a lightweight but tough (ask me how I know) aluminum shell, the unit is IP68 rated.  Output is listed at 2300 Lumens and power consumption at 2.0A or ~27 watts.

The lead terminates in a two-wire Deutsch connector with a mating connector and wire lead pigtail section provided to facilitate hook-up.

Outside of its size, the next best feature is the ability to tailor output using any combination of the 15-degree Spot or 30-degree Wide lenses.

My favourite has a Wide or flood lens on each of the outer positions and three inner Spot lenses for a long reach focus beam in the middle and wide lateral white light for the perimeters; thankfully I got extra lenses to play with…

In now having two of these little gems the first one procured will stay mounted between the forks on the 1998 R1100R sitting just above the lower Telelever assembly.  Many riders don’t even notice it is there – until its turned on.

The newest one, purchased at half-price, is being added to the 2017 R1200GSW Rallye, installed in the same basic position as on the R1100R using a set of ADVmonster sourced brackets.

Light Mounts – while other third-party brackets are available, along with the previously identified economical stainless steel clamps, ADVmonster has a few mounting solutions available.

Two of my favourite are the (very) heavy duty clamp mounts with 49-54, 66-71 and 76-81mm diameter options or the more versatile lighter-weight flexible fork clamp mount pieces available in 35-43, 42-50 and 48-55mm diameters.

Where space and clearances are at a premium, the flexible fork clamps work extremely well, especially around the lower fork legs and their ability to conform to the fork shape allows an absolute perfect fit.

Rotary LED Dimmer with Hi-Beam Bypass – this small, easy to mount, and easy to use digital dimmer, detailed in the wBW LED Dimmer Feasibility Study is a perfect companion for managing one or two sets of ADVmonster LEDs.

I have also used the dimmers with their integrated easy to use harnesses with other brands of LEDs, – all successfully and with minimal PWM modulation issues.

Typical Installations

Over the years there have been far too many separate installations and varied configurations used to go into detail here so a general description of the what and the how is provided for the following motorcycles (some present, some replaced).

1998 R1100R – a length of 0.75in square aluminum was custom cut and drilled to provide a horizontal light bar, attached to the fork legs just above the front fender with two Five Star 200-63 (1.94 to 2.18 in) stainless steel clamps.

This homemade cost effective solution supported an M30 (Spot) beam unit on the right and an M44 (Flood) beam unit on the left wired in as a combination set.

The pivoting brackets secure directly to the top surface of the light bar providing vertical and horizontal adjustment.

Switched power was originally supplied from a V1 Rowe Electronics PDM-60 module residing under the seat with a ADVmonster dimmer mounted on the left handlebar nacelle for output management.

Two years ago the light bar was removed and the LED modules moved down lower on the fork legs, held in place with a set of the lightweight conforming stainless steel mounts identified in the Light Mounts section.

At the same time, the reliable PDM60 was replaced with an Arboreal Systems Neutrino ‘Black Box’system with its PWM modulated circuits, so the digital dimmer was no longer needed.

The Neutrino Black Box system, well covered in previous wBW reviews, allows the user to interact with and manage connected accessories using the Bluetooth link and smart-device app (iOS and Android).

2012GS and 2015 GSW – while the 2012 has been superceded by the 2015 model, both GS machines utilized the same LED lighting albeit with minor changes regarding mounting approaches and output management.

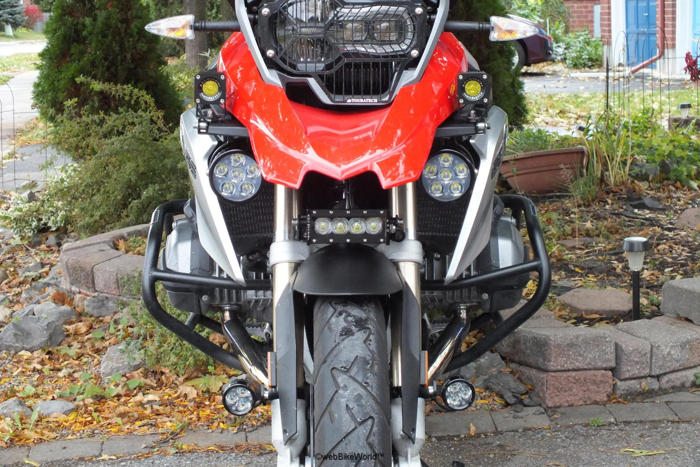
The favoured and enduring set-up utilizes a set of the venerable Denali DM1 LEDs mounted on the front forks, used primarily as always-on DRLs while an ADVmonster M30/M44 combination is mounted on the right and left sides of the Wunderlich and Touratech Upper (tank) Bar kits.

The 2012GS utilized the original Arboreal Systems Dispatch 1 along with an ADVmonster dimmer on the left handlebar tied in for output modulation.

Once the newer Arboreal Systems Neutrino systems came along, the whole set-up, including installation and management became far simpler with the BB systems providing PWM output over all circuits, just right for modulating output of front and rear-facing LED lighting.

2014 F800GS Adventure – originally brought home late summer of 2013 as a Launch Release rendition, this is now the most enduring and personally coveted machine in the home fleet – its longevity in occupying space in the garage is a BIG clue as to how good it really is…

Lighting-wise, a single M44 Wide beam LED is mounted to the left fork leg as a trail light, held in place with an bargain-priced stainless steel Five Star 200-66 (2.13 to 2.37in) clamp and the usual ADVmonster pivot bracket.

The bracket keeps its alignment even with some hard pounding but has enough flexibility to move if hit (strange thing that) rather than breaking.  Checking on and tightening the hardware is on the weekly checklist although adjustments are seldom required

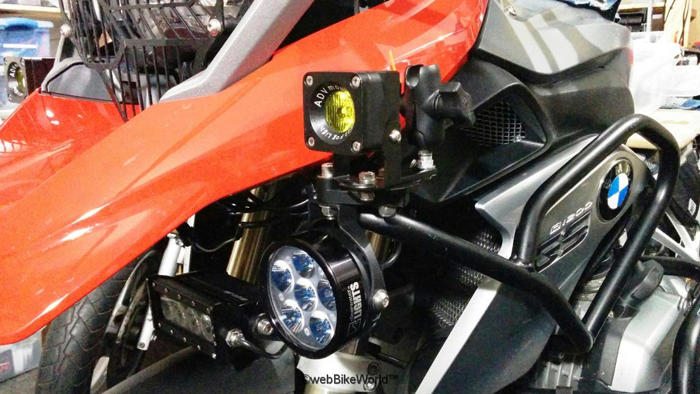
Higher up, the smaller GS Adv with the big fuel cell sports an M30/M60 LED (narrow/wide beam) combination.

The modules are mounted on the right and left sides using Denali ‘L’ brackets (TT SKU: TWT-00-013-001) for separation and overall adjustability.  Longer hardware for the headlight mounting points rounds out this fitment.

This high output combination provides a bright white swath of light useful for auxiliary augmentation on or off the road.  And no matter the time of day output is readily varied using the PWM output of the installed Neutrino BB V2 (now upgraded to its new ‘Element’ flavour).

2014 R1200GSW – this machine didn’t reside in the garage that long, but it was the recipient of more than a few accessories, including the ADVmonster F40 light bar, mounted just above the front fender between the fork legs, a placement that leverages BMWs Telelever design.

Rather than shelling out major $$ for a set of after-market fork brackets, the economical and expedient route was again taken in using two Five Star 200-63 (1.94 to 2.18in) stainless steel clamps and two Denali ‘L’ brackets (per above) along with stainless steel hardware (always).

A 10mm spacer on each side bridged the gap between the brackets and the LED housing with M8 socket screws and flat washers used to tighten everything together forming a very strong mount – all for around $60.00 CAD.

Purchased just before the 2014 left the fleet, a set of lightweight F11 LEDs with Amber lenses were mounted using a pair of slotted (8mm) DrySpec Siderack Accessory Mounting Brackets (TT SKU: MBK.00.806.10000.B) for great adjustability.

The brackets were secured to the SW-Motech light bar but on the upper side while the Clearwater Erica modules hung off the bottom; common mounting hardware was used which didn’t compromise individual system adjustability.

2016 S1000XR – another short term member of the family fleet, this versatile speed machine was well accessorized as featured in the wBW S10000XR Blog postings.  While specific postings regarding the lights weren’t done, the XR wore an ADVmonster M30/M60 combination for a period of time, while the slim discrete SS25 lightbar resided under the front beak.

2017 R1200GSW Rallye – coming up to the present, the newest member of the home fleet is becoming well accessorized with no shortage of systems providing power and management of five front and rear-facing auxiliary lighting systems.

The latest variant of the Clearwater Lights CANopener system runs Darla and Erica LEDs, while the HEX ezCAN accessory management system managing the Stebel horn, front and rear LEDs (with deceleration programming) and USB power outlets.

Power for everything else including a test set of rear-facing LEDs is provided by the new Arboreal Systems Neutrino Black Box Aurora that is jam packed with tried-n-true and new features and capabilities.  A review on the Aurora and its Element sibling is in the works.

And being added to this mix is the second ADVmonster SS25 lightbar – a small but powerful package; its ability to customize output using the swappable Spot and Wide lens layout is hard to beat for versatility and effectiveness.


Where to Buy LED Lights

Check Reviews & Prices on Amazon

Also Shop for: LED Lights and BulbsAuxiliary Driving LightsMotorcycle LED Headlights


Function and Performance

I long ago had initial reservations about the flat ring brackets and pivoting mounting plates that are made of lightweight stainless steel.

But in using both the standard and the thicker heavy-duty mounts over the years I haven’t discerned a real difference, less some increased piece of mind over time.

But, for mixed-use heavy-duty applications the heavy-duty brackets are a good investment.

The M-series modules mounted on the lower fork legs of the original F800GS and now the F800GSA continue to survive some pretty good poundings off road and on our local streets…

Using simple inexpensive stainless-steel clamps along with some additional 0.25 fine pitch (28) nuts) and the supplied LED brackets has proven to be a strong, expedient and cheap solution for many mounting requirements, especially the light weight ADVmonstter products.

Other than single trail mountings and the light bars, all the other LEDs are fitted as combination pairs – each having varying output and lens coverage, typically with the M30 (narrow beam) and either an M44 or M60 (both wide beam) mounted on the right and left sides respectively.

This right/left combination provides extended fill and side coverage and a focused beam ahead, similar to the output of the Cyclops Adventure Sports Optimus Prime LED lights.

While output management is now provided by the Arboreal Systems Neutrino Black Box or MotoBrain systems, the three original ADVmonster dimmers are still providing seamless reliable service on other rider’s machines, no matter how cold, how hot, how dry or how wet it may be.

Admittedly they do typically require creation of an extension harness, but the wires are clearly marked including the one for the high beam bypass connection if that feature is desired.

All the ADVmonster LED products used and in use have more than proven their value over the years and my (current) favourite is the SS25 light bar – a single component solution to so many auxiliary lighting applications.

It is usable at reduced output for DRL purposes and can be quickly modulated upwards to cope with the way ahead – the Wide/Spot combination doesn’t leave any blind spots that’s for sure.

The small reliable F11 LED set with their amber fog lenses are great for use at any time for increased conspicuity in combination with the stock LED lighting and the always-on Darla units. By themselves they provide a highly visible and highly useable beam.

Once installed none of the ADVmonster LEDs or related products have ever left us in the dark.  The only failure of sorts, discovered with a new module during pre-installation testing was found to be a strained wire inside the harness housing – the LED was quickly replaced by ADVmonster.


Where to Buy LED Lights

Check Reviews & Prices on Amazon

Also Shop for: LED Lights and BulbsAuxiliary Driving LightsMotorcycle LED Headlights


Conclusion

Outside of a couple of models now sitting on the shelf awaiting their next assignment, the rest, depending on when they entered service, have survived up to seven years.

I can’t say that about some of the other lighting, including LED products procured or supplied for testing over the years, including some with much higher prices.

Relatedly, support from the owners has always been first rate and as motorcyclists they stay involved with and in touch with the community at large including maintaining a presence on various on-line forums.

Admittedly their product line does change from time to time and a couple of my favourites have disappeared, although in the longer term, their replacements have been equal or better and that is the why it should be.

The lights can also be found, usually unmarked, on various sites, but their build and specifications will match those of the branded ADVmonster products.

Bottom line – given the typical cost of a single LED or set, with or without a harness of some sort, the ADVmonster LED products have been and remain an outstanding value, enhanced by great support from the ADVmonster team..

More webBikeWorld: Motorcycle Clothing Reviews and all wBW All Product Reviews

BUY ‘EM HERE!
▪ LED Lights and Bulbs 
▪ Auxiliary Driving Lights
▪ Motorcycle LED Headlights

At the wBW Amazon.com Store!

wBW Product Review: ADVmonster LED Lights
Manufacturer: ADVMonster List Price: varies by product, discounts and clearance pricing may apply
Warranty: One year (Confirmed) Made In: USA and China
Review Date: July 2017 (years in the making)


The post ADVmonster LED Lights Review appeared first on Web Bike World.