Categories
Deals Gear Reviews Guide Other Motorcycle Blogs review Web Bike World

2Wheel eCommerce Site Review

Introduction

So this holiday season I was presented with a request to do a review unlike I have done before. Our content editor asked if I would check out an eCommerce site that sells motorcycle, atv/utv, and snowmobile gear and accessories.

I was sort of struck a bit sideways at first as I have never really thought about reviewing a site as part of my reviews for webBikeWorld. I thought about this for a few minutes and I realized I should be able to offer some relevant insight after all. (We’ll see) 🙂

I have been purchasing motorcycle gear for myself and for reviews for over ten years and have used a variety of online stores during this time. I also manage and design websites for myself including MotorcycleWords.com, MotosportPhotos.com, and Jacksonphotoworks.com so I’m not uninformed as to what it takes to build an effective web presence.

Since this is a new genre of review I needed to determine what aspects of a website would be of most interest to our readers. Here is what I came up:

  • Overall site experience including:
    • Speed of site response
    • Mobile device display
    • Search options
  • Range of products on offer for motorcyclists and pricing
  • Ordering process
  • Customer service
  • Received product packaging and shipping speed
  • Return Policy

2Wheel.com street bike helmets

I want to encourage our readers to let us know if there are any aspects you feel got overlooked in this review that should be included in future ones.

It should be noted that 2Wheel.com was not aware I was reviewing their site and I didn’t use an email address that might tip them off. The intent here is to be treated just like any other buyer so we can get an unbiased and objective look at how they operate.

With that out of the way let’s dig in.

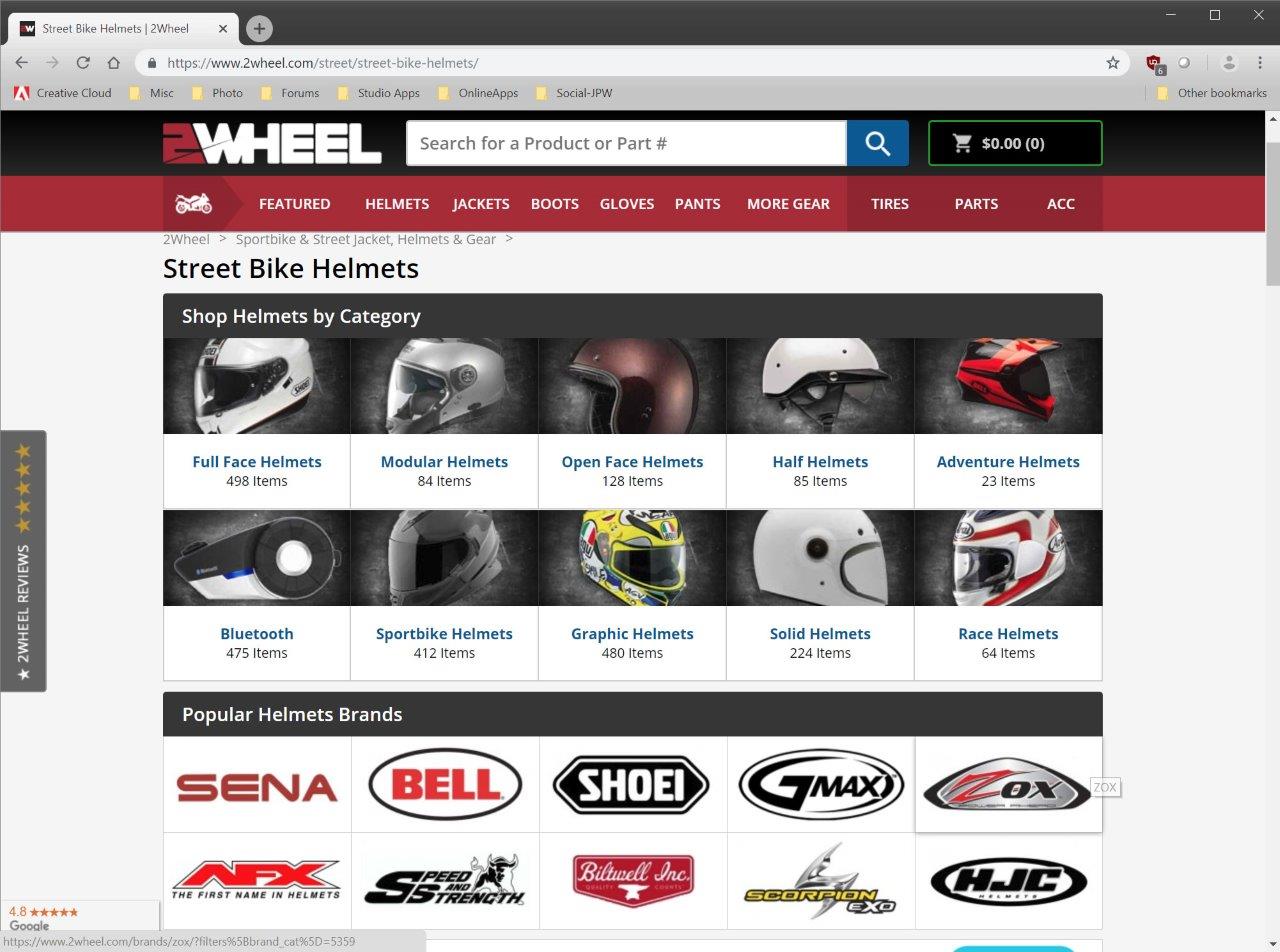
2Wheel.com Site Experience

2Wheel.com is definitely a sales vehicle. There is no mistaking this fact the moment one first pulls the site up in their browser. I suppose it’s neither good or bad since one has likely come to the site to make a purchase or at least do some price comparison.

The upper portion of the page is quite a busy space with a gray toolbar at the very top. This toolbar has links to one’s account and other personalized information as well as a brace of drop down menus with information about the company and a comprehensive list of customer service options. I have to say that placing this info in easy reach for customers is well done and certainly covers all the bases I can think of.

Under the toolbar is the 2Wheel logo sitting next to a large search box which is in turn bookended by a shopping cart image. Below this is a multilevel menu breaking their products into categories such as Street, Dirt, Snow, and more. The sub menu under each category changes color depending on which category one has chosen which is a subtle, but convenient touch.

2Wheel.com categories

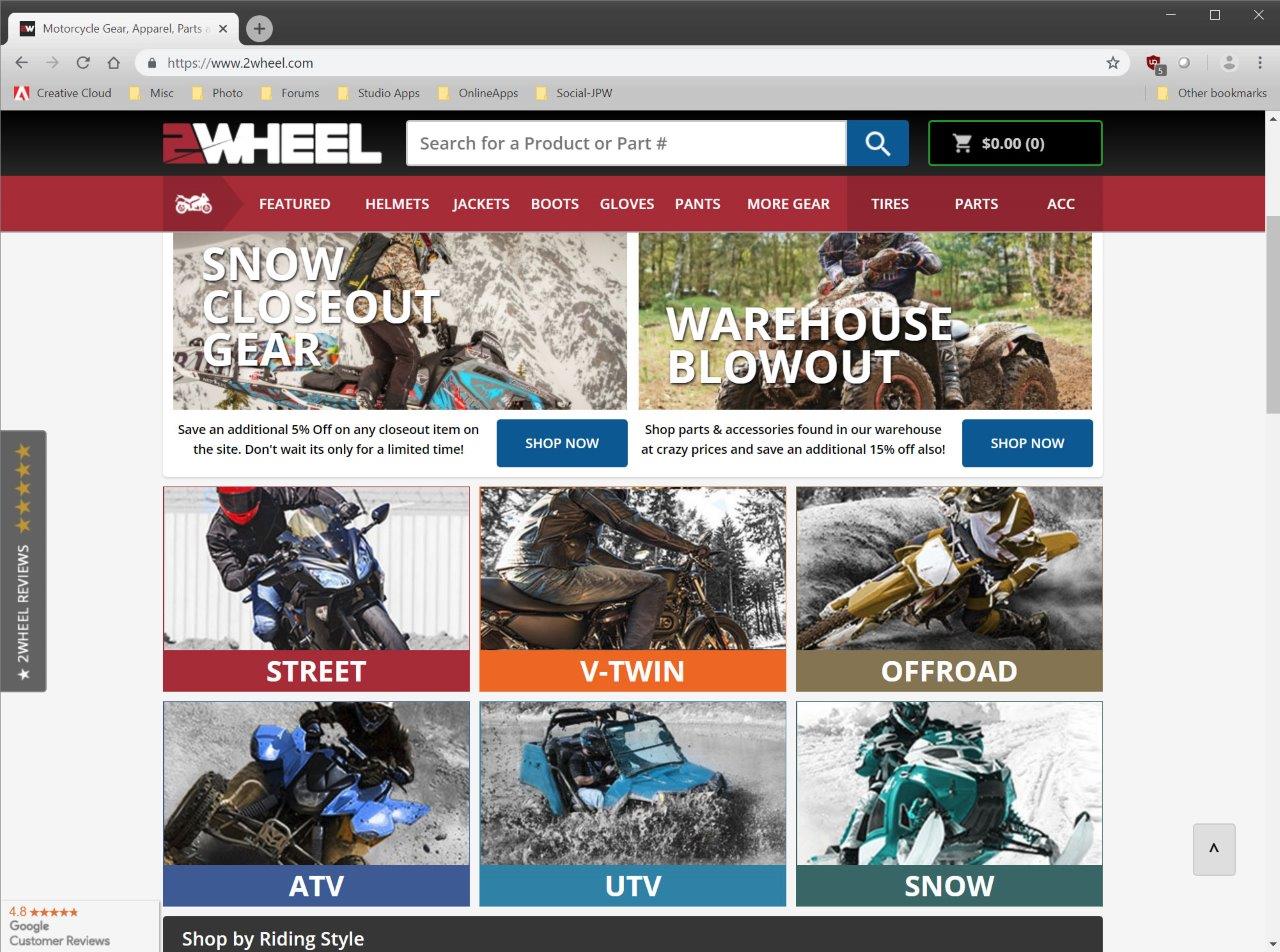
Beneath this is a banner showing a weekly “on sale” advert while underneath the banner a coupon code is displayed. I wasn’t kidding when I said this site is a sales vehicle but I’m not quite hating it for this as they have some clever design touches that I appreciate. For instance, as one scrolls down the page the top toolbar, category menu, Sale banner, and coupon code all disappear.

This rolling up of these elements allows for more browser space for perusing the site contents. One can scroll back up to the top of the page to have these elements reappear if needed. This feature does help reduce the overall sense of “clutter” I first felt when landing on the 2Wheel.com site.

Speed & Search

I found the 2Wheel.com site very responsive and quick to work with. Pages load quickly and filtering results when viewing large amounts of items is pretty quick as well. I can’t find fault with the experience as far as speed goes. Search has an issue, however.

I found if I searched for a certain item that I knew was on their site using a pair of words that should have returned this item in the results, it didn’t appear in the results. Here’s an example I was able to consistently reproduce.

I was browsing their offerings from Bell Helmets and noticed they had the Bell Star MIPS Equipped Classic helmet still in stock in a few sizes and on closeout. The next time I went back to the site I wanted to look into getting one of these and searched for “Bell Star” from the main search.

2Wheel.com Bell Helmets

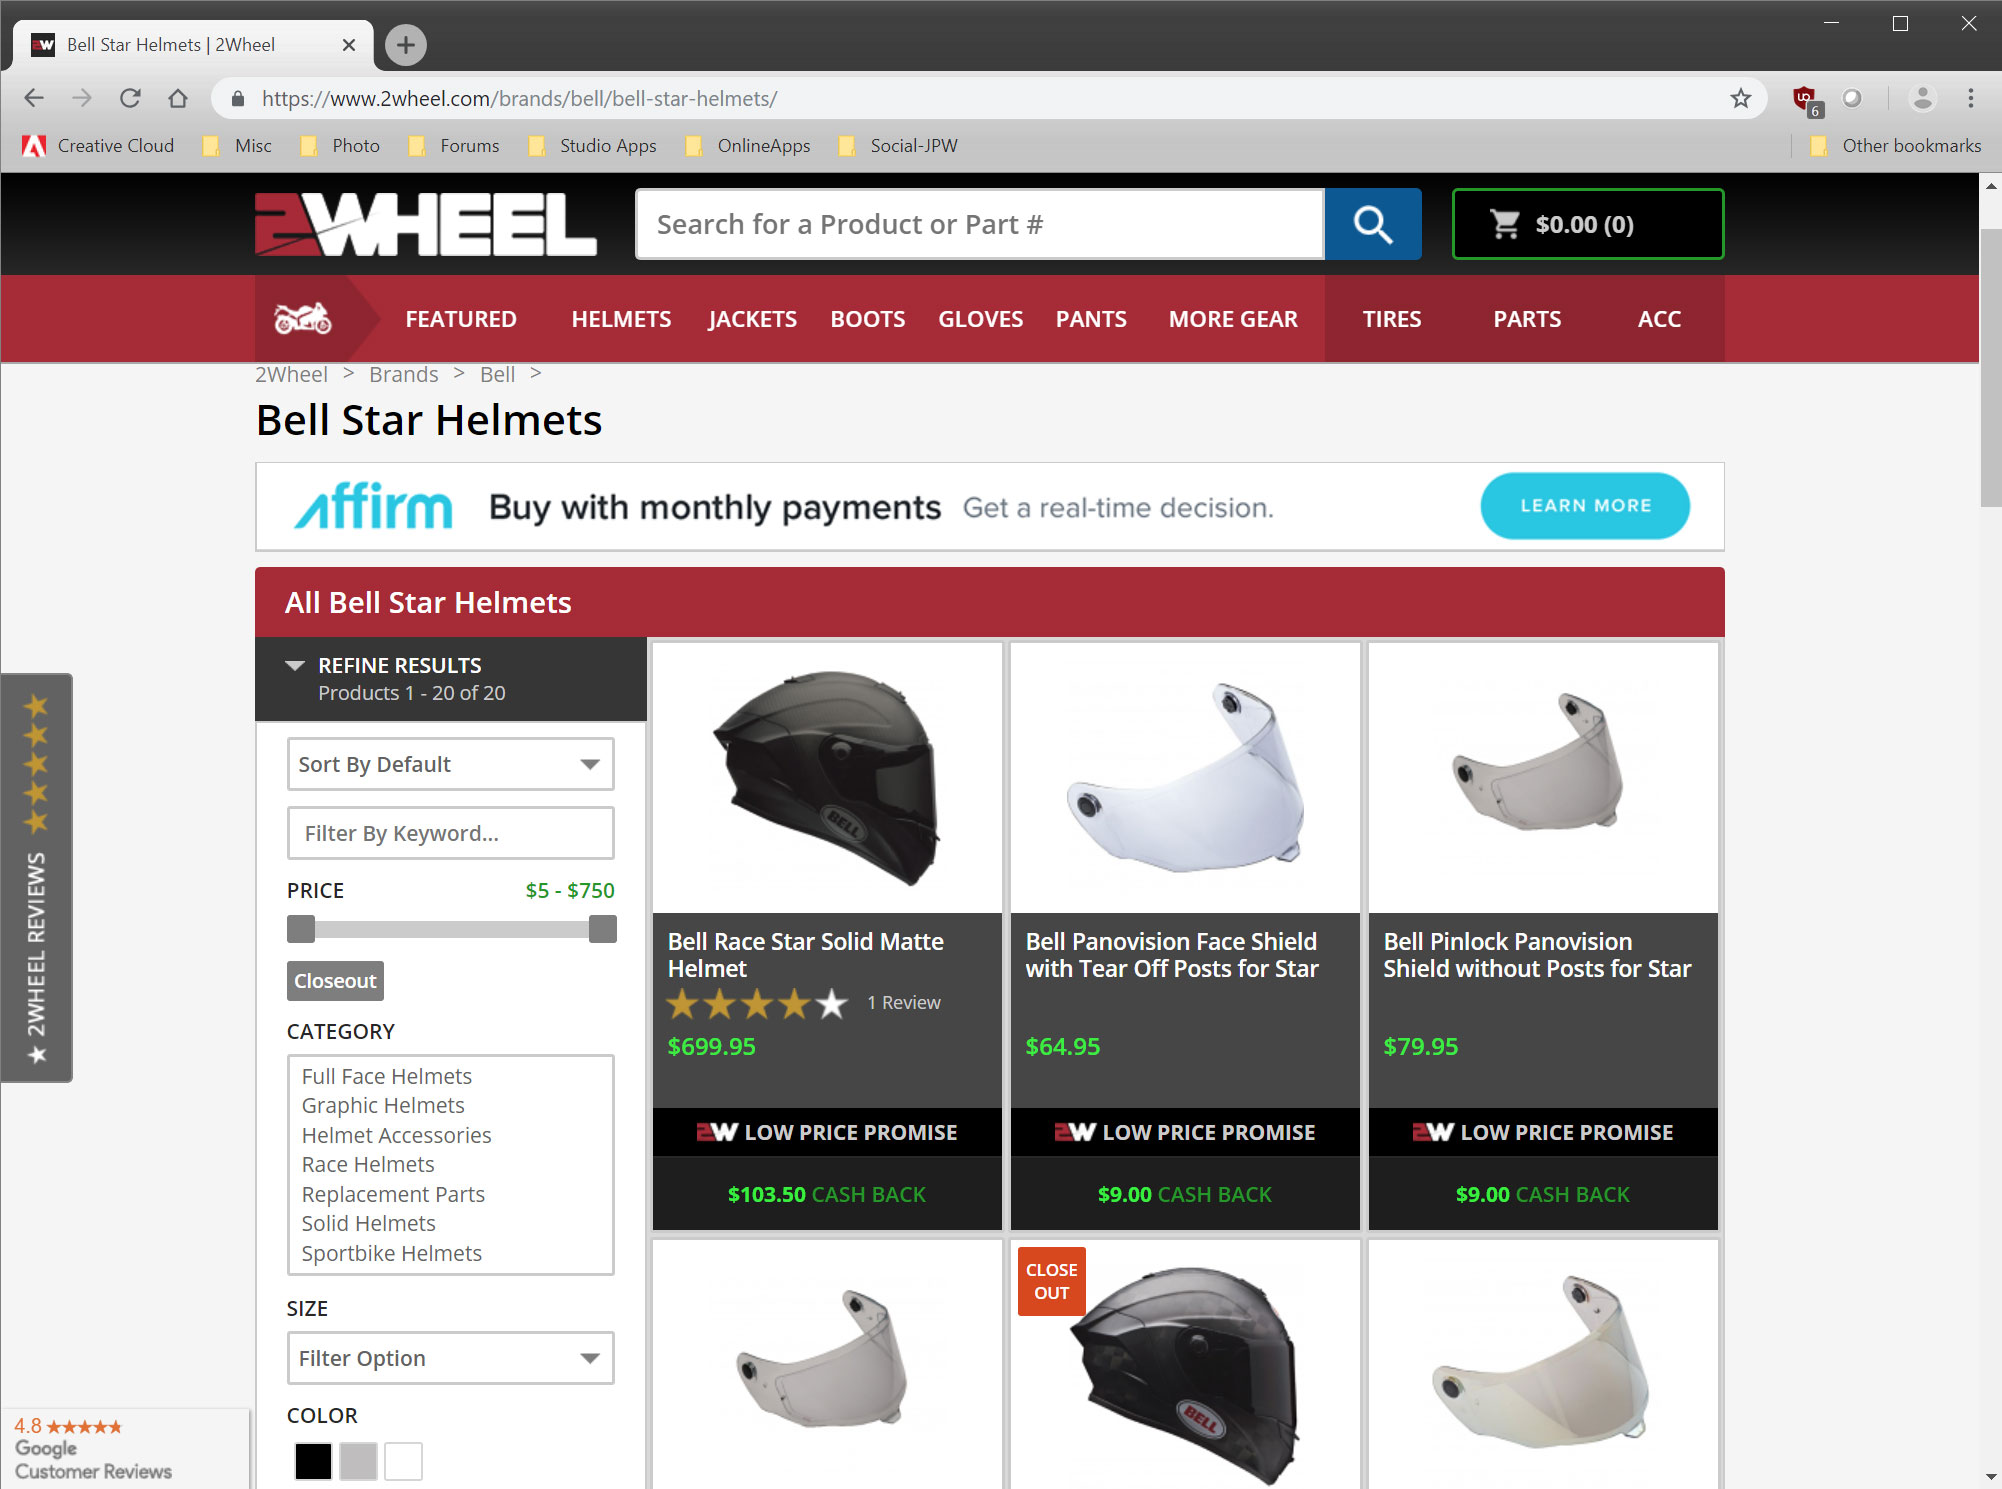
Several items were returned in the search including several other Bell Star variants (including closeouts) but the MIPS equipped Classic I saw earlier was not included. Just to make sure it was still available, I used the menu navigation and pulled up all the full face Bell helmets. Sure enough, the one I was looking for was still there and appeared available in most all sizes.

I get it that search can be a bit wonky at times but I think a top priority for a site like this should be getting accurate search results. In this case both the buyer and seller would have missed an opportunity.

Responsive Design

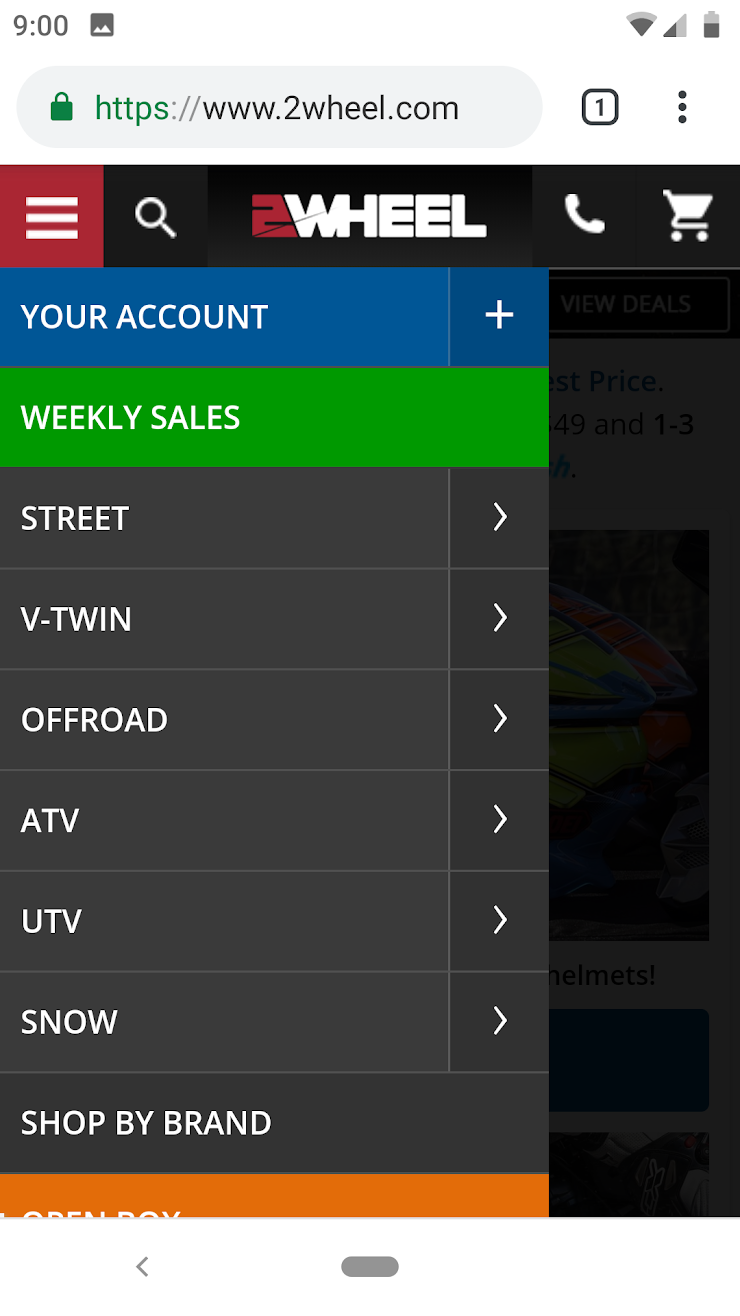
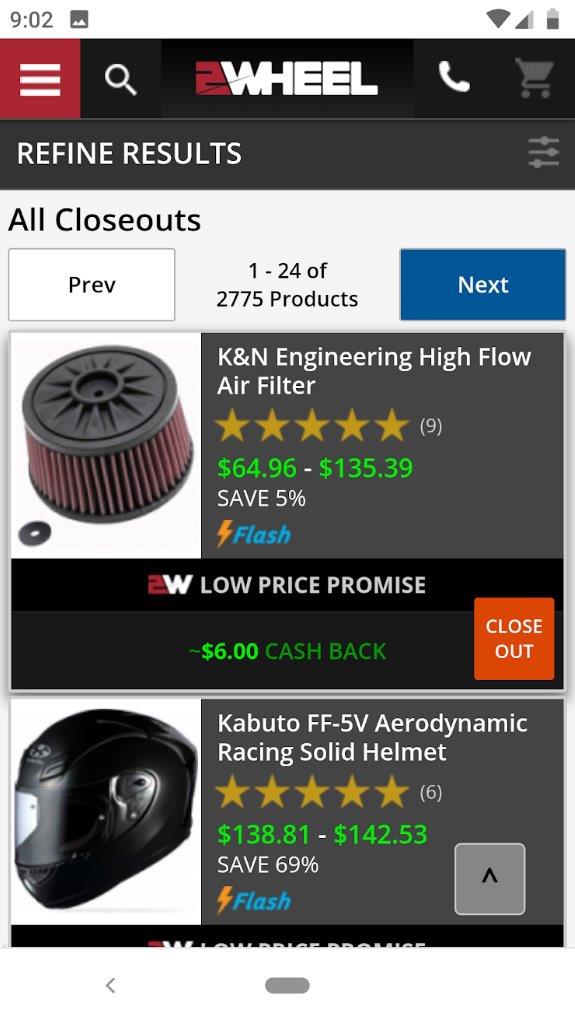
Not to be confused with site response “speed”, responsive design refers to how a website layout changes when being viewed on a mobile device. Testing on my Android phone demonstrated a nicely abbreviated version of the top bar and a the replacement of the main navigation menu with the mobile friendly “hamburger” menu. This is the type of menu that appears as three horizontal lines in the upper left corner that expands when clicked.

2Wheel.com responsive app design 2Wheel.com responsive app design 2Wheel.com responsive app design

Viewing the site on an iPad Air showed little, if any, difference from the desktop experience. All the menu elements appear to remain in place and the site reacts just as it does on a laptop or desktop screen with the same “roll-up” effect. This seems about right as the site appears a little “narrow” when viewed on a standard 1080p computer display.

Site Security

The site does have a valid security certificate issued by GoDaddy which is currently valid through 12/11/2020. When I viewed the main page there were 30 cookies in use. That may sound like a lot but it is actually less than some of the more popular motorcycle apparel and accessory sites out there.

As is typical of a lot of online retails sites, there were some external connection made to other sites such as googlecommerce.com and affirm.com. I only counted 9 in total (4 of which my ad blocker blocked) which is also much lower than some other sites offer similar goods. Overall this is a good showing in my book.

Product Range (Motorcycles)

Since this is a review for webBikeWorld.com I focused on motorcycle related items specifically for this review. Plus I wouldn’t feel qualified to pass judgement over ATV/UTV and snowmobile gear and the breadth of what one should expect to find.

The website breaks down motorcycle related products by Street, V-twin, and Dirt. While I feel “cruiser” might be a better title than v-twin I know what they mean. Still, I don’t think the gear and equipment listed in this category would be at home on the typical SV650 rider much less some Aprilia riders, and practically all Ducati sportbike riders. Just sayin’.

2Wheel.com product ranges

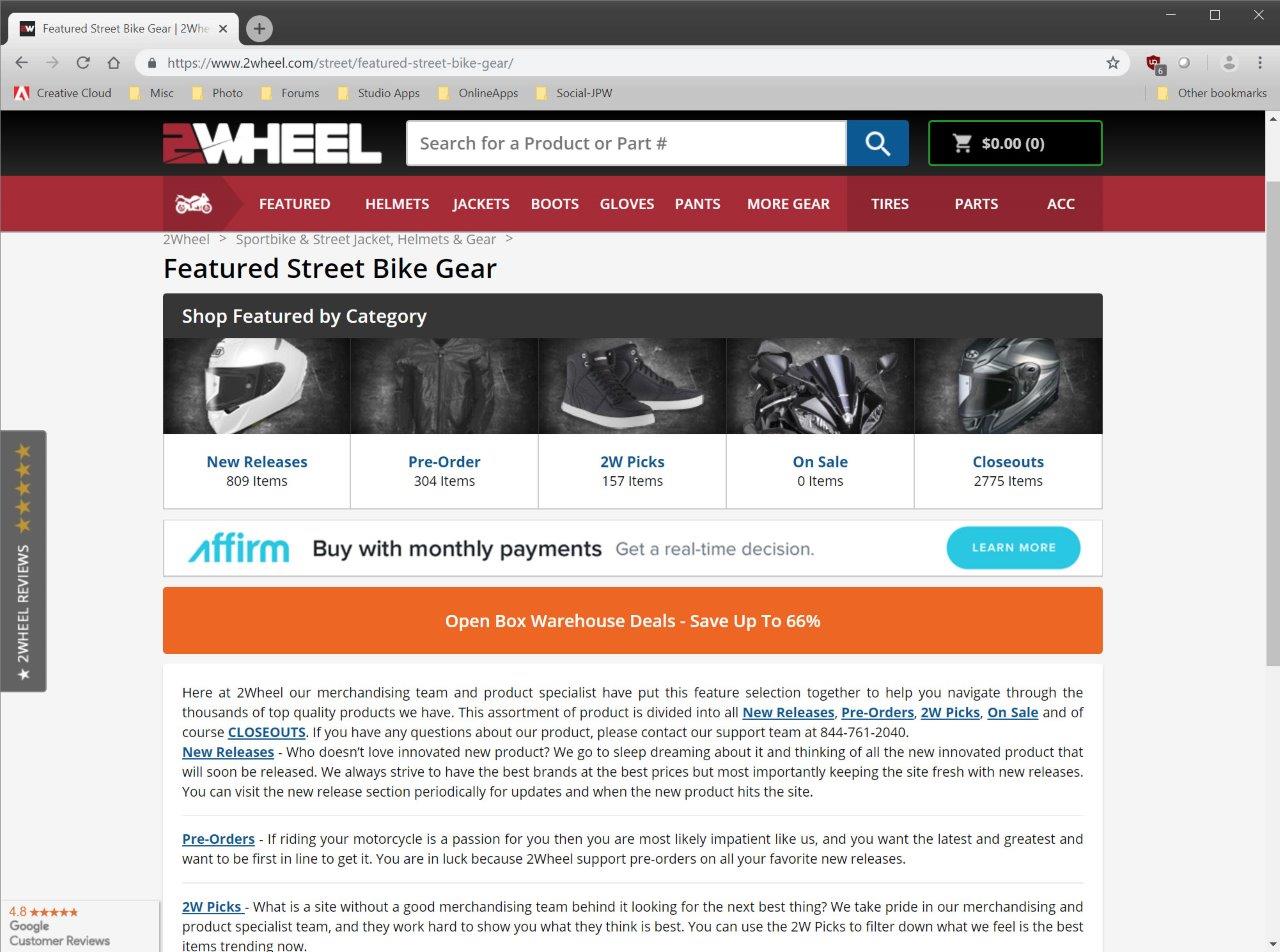
Semantics notwithstanding, the various sections have a good range of products listed. For instance, clicking “Jackets” under the Street category returns just over 500 results from over 20 manufacturers. That’s a good showing and seems on par with other online retailers.

Pricing

Pricing was very good and in line with other major online retailers. In some cases the pricing was exactly the same while some items were a little less. There were also a few that were more pricey on 2Wheel.com than say, a site with a name similar to a large radioactive lizard.

Looking at the areas where there were differences both high and low seemed to be items on closeout in one site and not in the other. This is not unsurprising. 2Wheel.com makes it clear they will price match competition so they might be able to match that lower price from other dealers.

One thing I’d like to say about pricing is I don’t feel it is the most important standard by which a retailer (online or otherwise) should be judged. Customer service is most important to me and I believe many riders will agree. Paying a few dollars more from a dealer that will stand behind their products is worth it to most of us.

Return Policy

Since it is often the case that one hasn’t had a chance to try on a new helmet or article of riding gear when ordering online there can be concerns about getting the correct fit. Since sizing can vary from manufacturer to manufacturer or even different lines within one makers’ lineup, a flexible return policy is helpful.

2Wheel.com does offer a free return policy for an item that doesn’t fit properly and will send the buyer a shipping label to return the item if that is the case. Like most sellers, the returned item must be in original condition with all the packaging and tags.

2Wheel.com return policy

Ordering Process & Customer Service

I was concerned that the ordering process might be a bit cumbersome given the “busy” first impression I had of the 2Wheel.com website. It turns out it was one of the smoothest online purchasing experiences I’ve had.

As part of the review process I was directed to make a purchase so I could evaluate the ordering and payment process. At the same time I wanted to get an item that could also be reviewed on its own so I went looking for a helmet we had not reviewed before. After reviewing the options in the price range I was given by webBikeWorld I found what I wanted and shortly after was looking at my chosen item in the shopping cart.

2Wheel.com ordering process

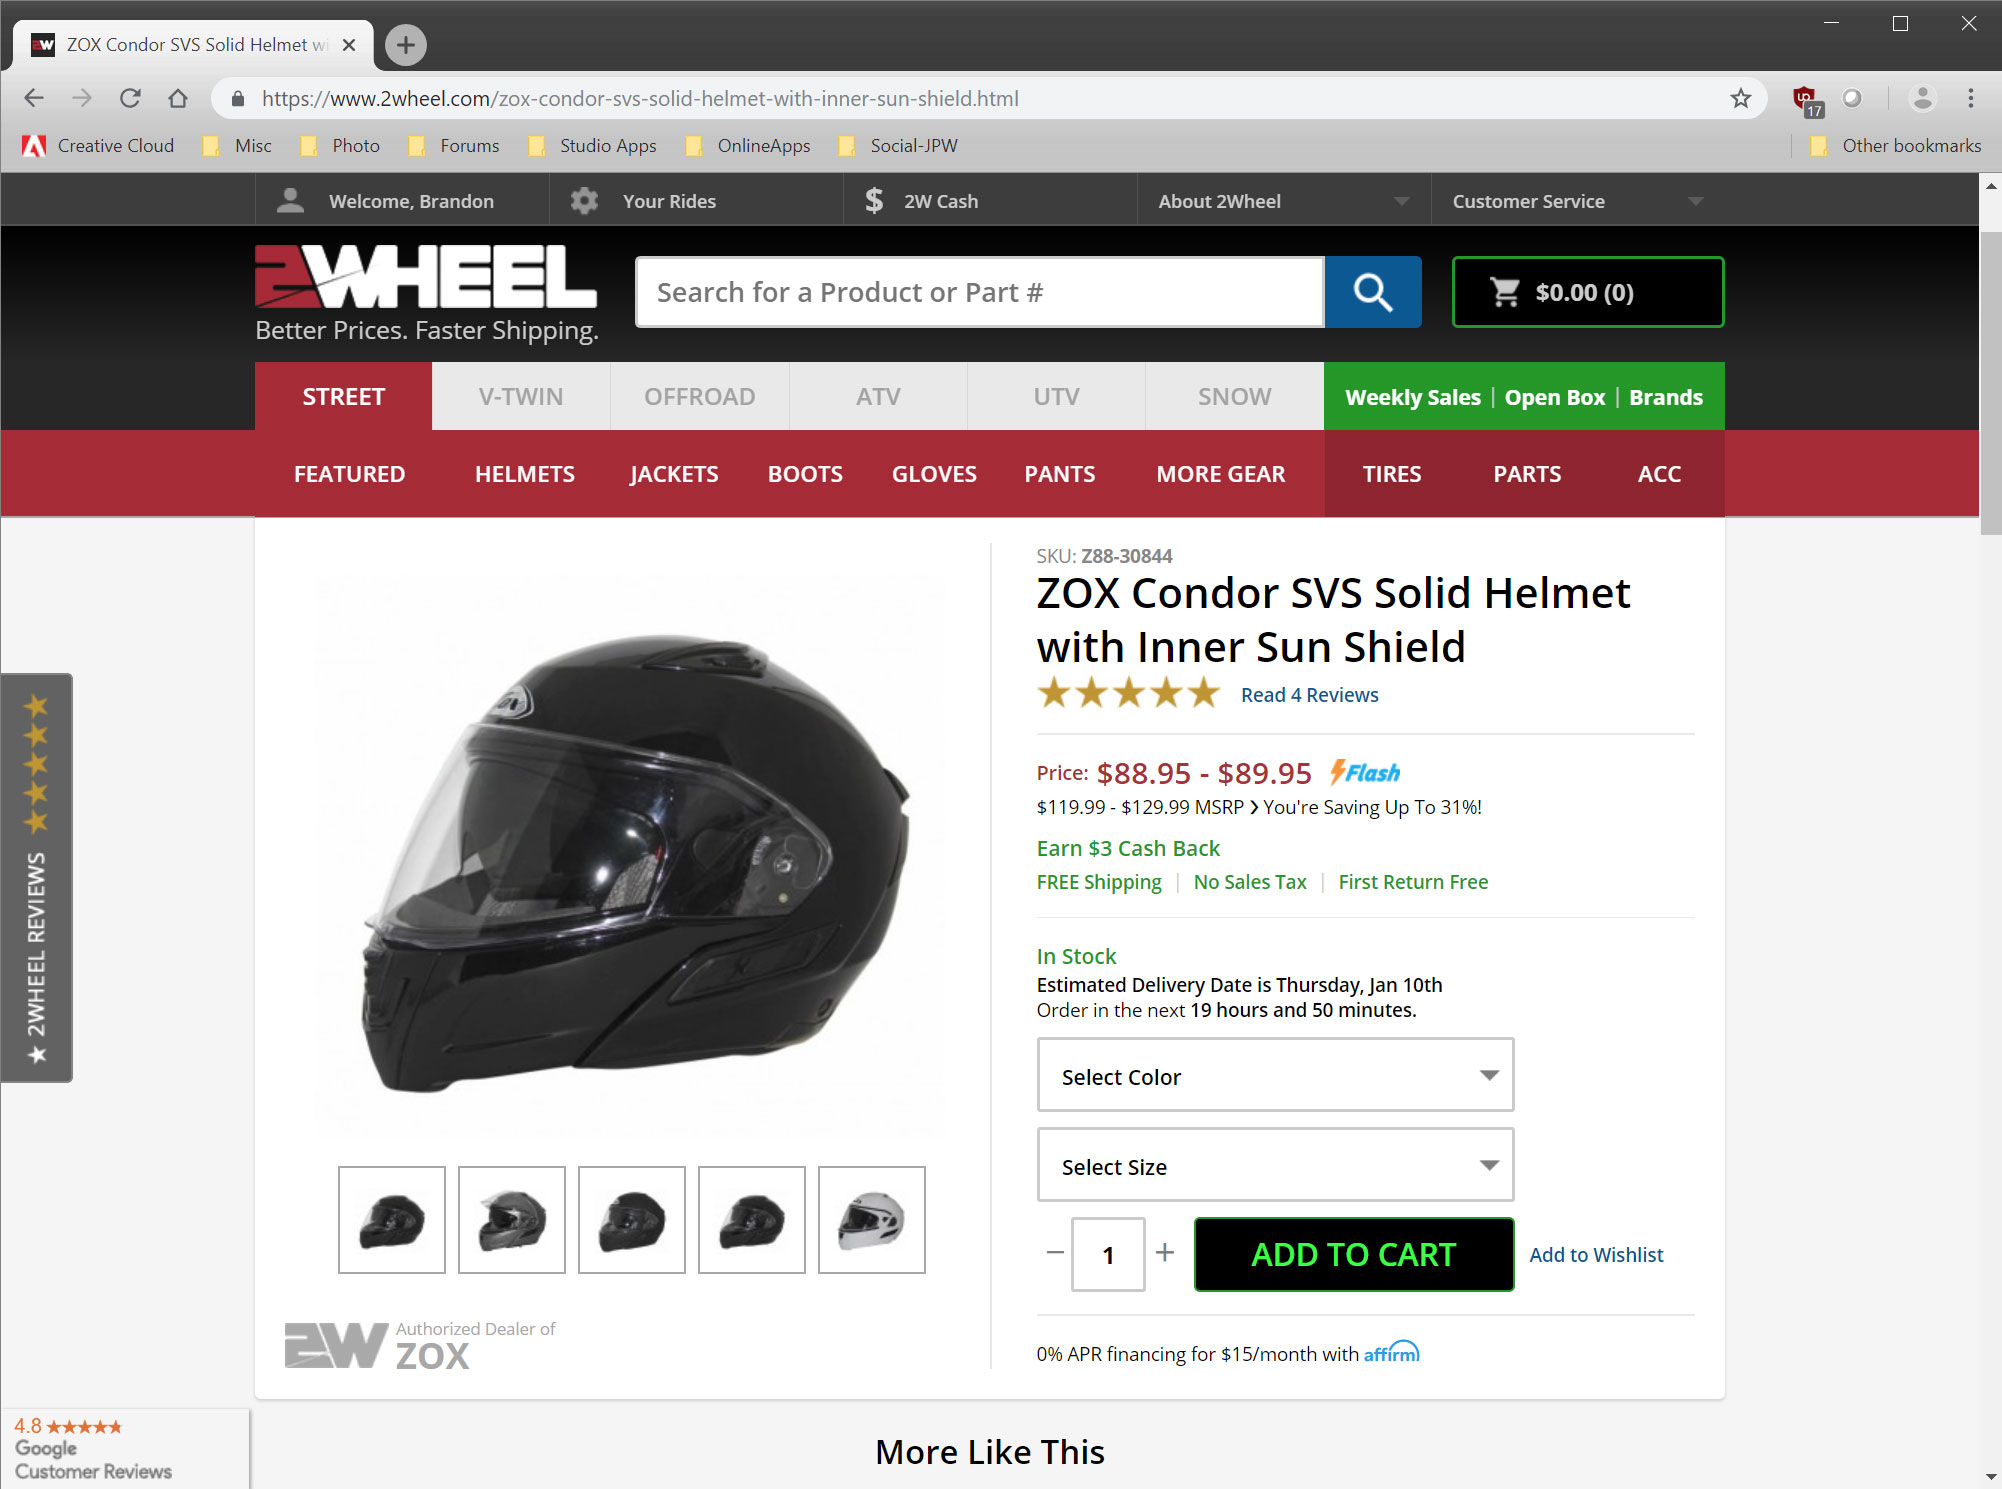
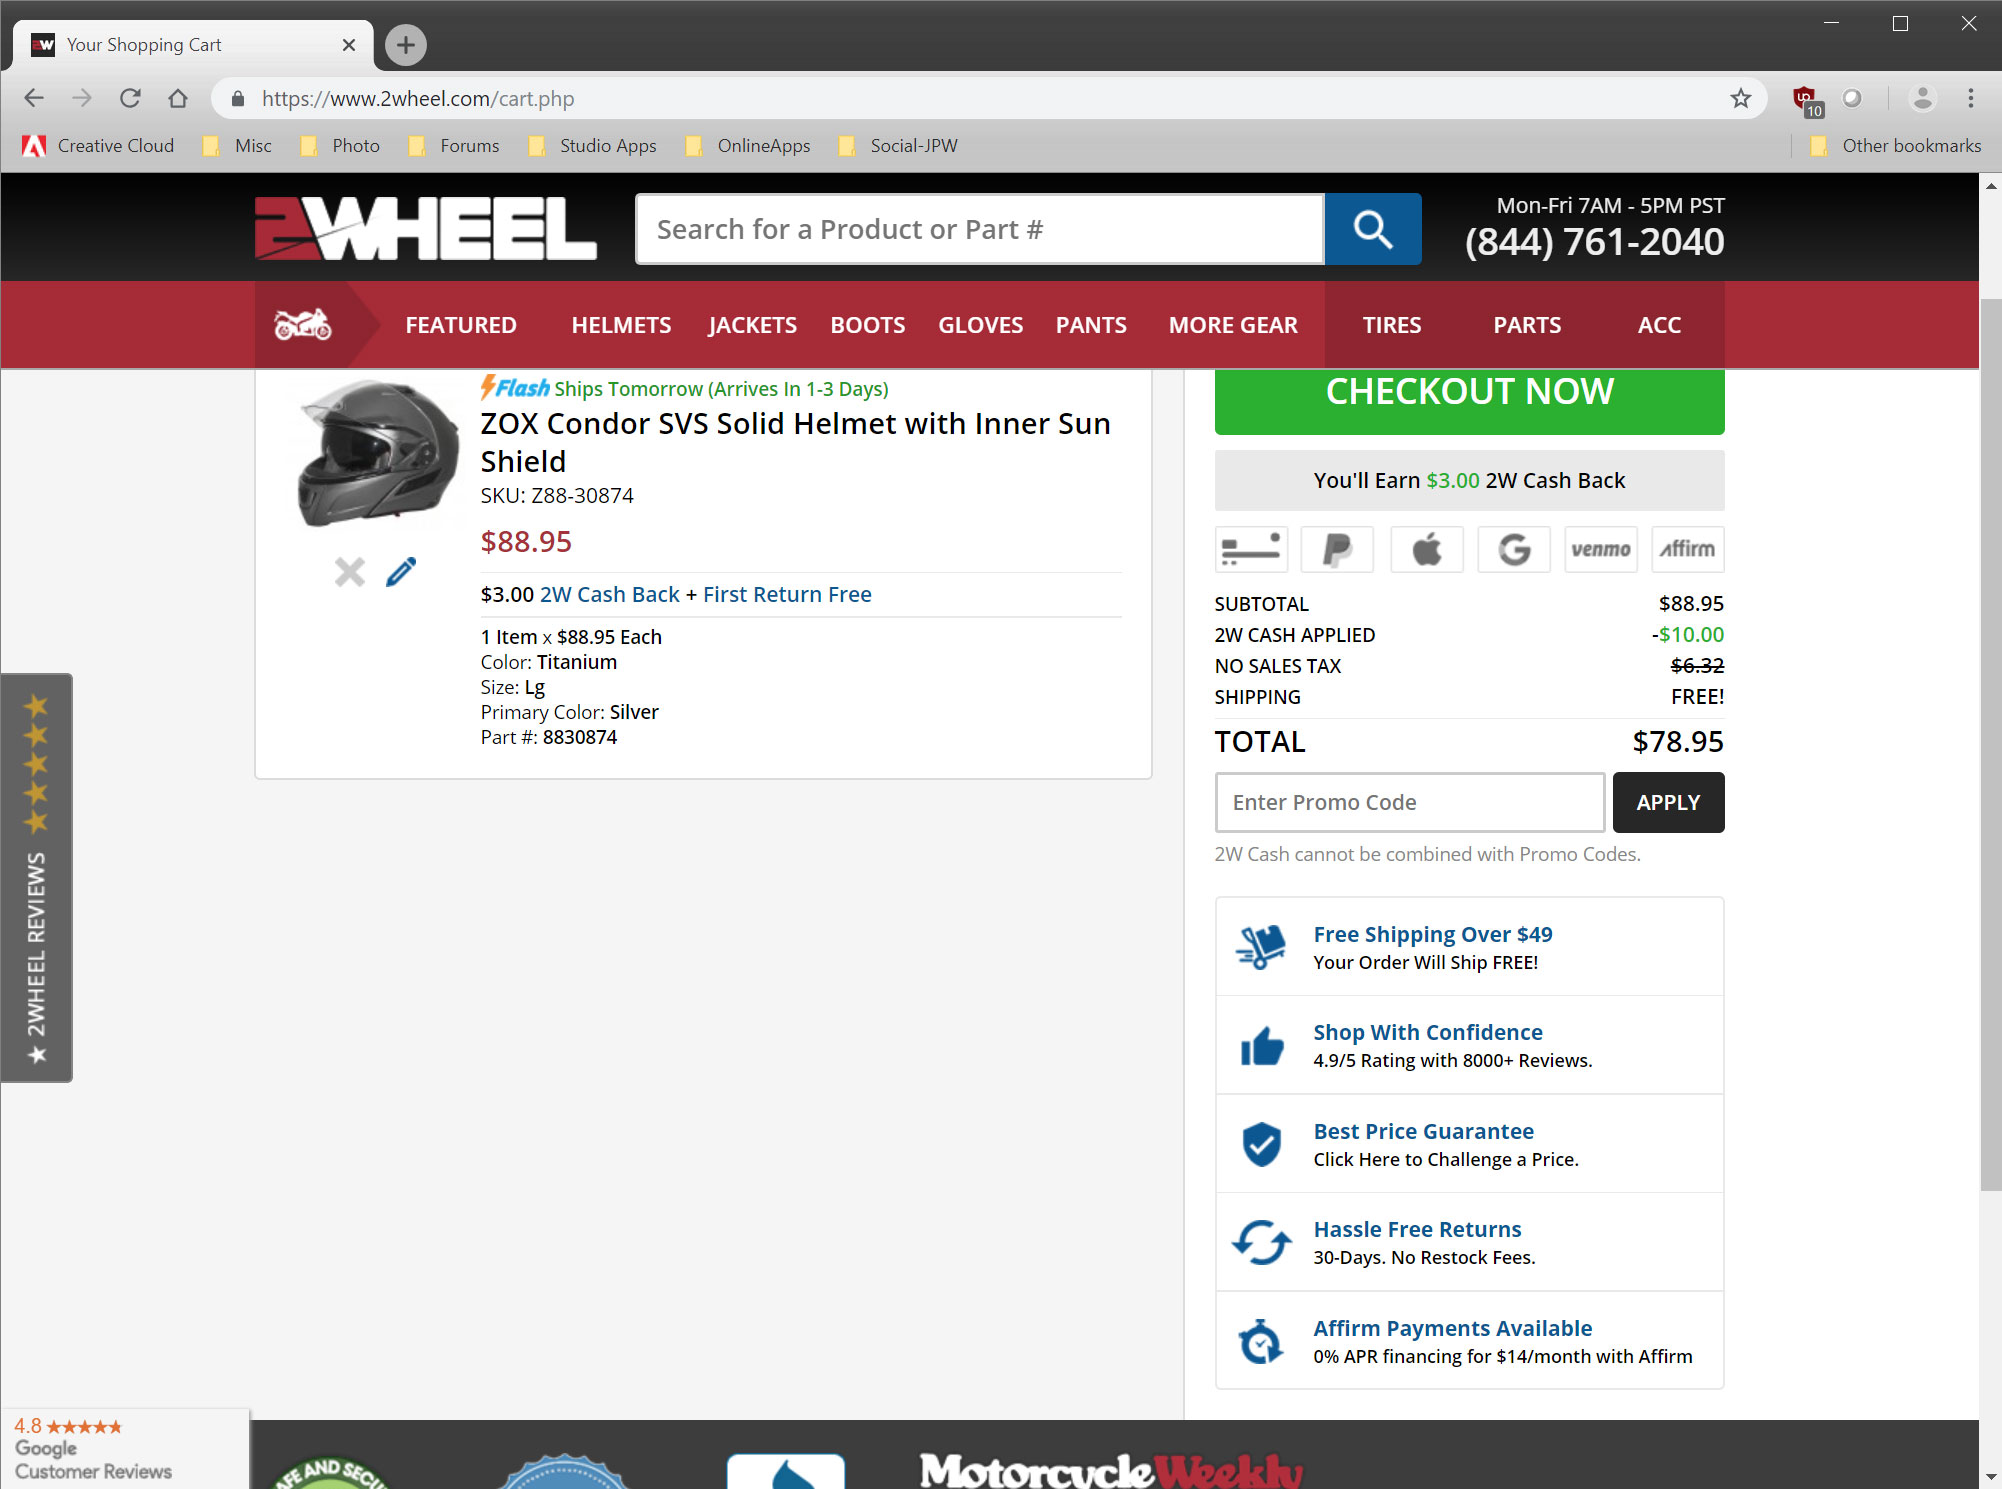
From there it was a pretty quick process to provide the usual information required for an online purchase and get to the payment portion of the transaction. I do have to say that whoever put this part of the site together did a good job with the interface because it stepped one through the input process smoothly and quickly. My concern about a cumbersome process was unfounded.

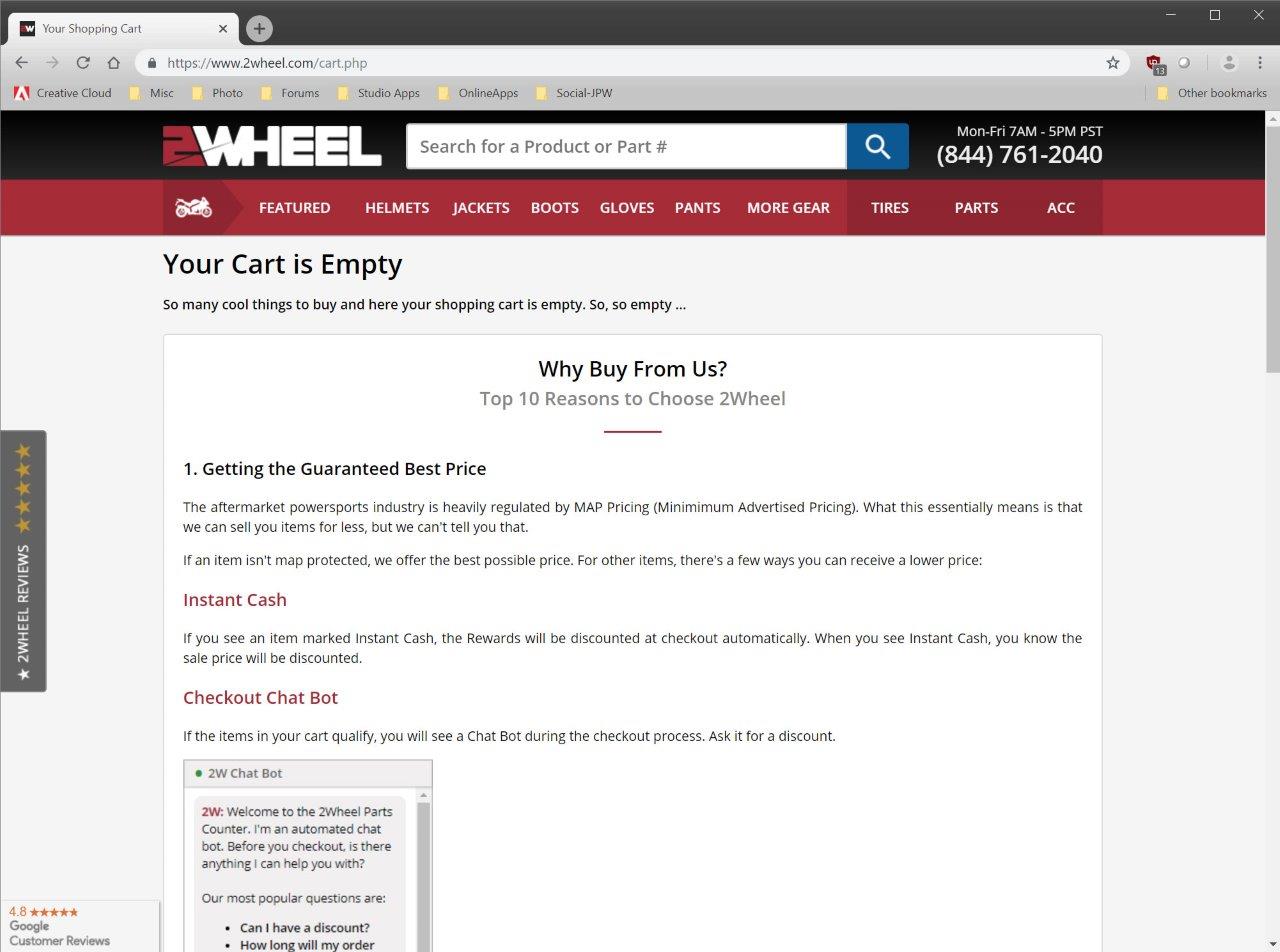
Back to the payment process, one is given several choices for payment beyond just credit cards including PayPal, Apple Pay, Google Pay and Affirm Payments. In addition there is an automated system (chat bot) that will appear if there are any potential discounts that may apply to your purchase.

I wasn’t fortunate enough to receive any such discounts but the item I purchased was at a pretty good price anyway as it was on closeout. From there I completed the process using a credit card and that was it.

2Wheel.com checkout process

Within the first minute after ordering I received an email confirmation of my order and a subsequent email minutes later informing me that the helmet was located and was in process. The next business day I received an email that the item was packaged and awaiting tracking info. That’s a lot of emails but I can’t fault them for giving me too much information regarding the status of my order.

I haven’t had cause to reach out to customer service but the contact options are easy to find. In addition, they provide a staggering amount of details surrounding their policies, discounts, terms, Someone spent some time trying to anticipate consumer questions and it shows.

Product Shipping & Packaging

All was looking pretty promising up to this point. The site works well enough and the prices are in line with other major online retailers being better in some areas, and not as good in others. Shipping seems to be where one should be careful about expectations.

Looking at the “About” section of the 2Wheel.com website they claim, “We provide fast 1-3 day shipping utilizing the closest location in a network of nearly 100 warehouses across the United States.” This doesn’t exactly meet up with the reality of how long it took to receive my specific order. Let’s go to the details.

First off, I want to say that I did choose the worst time to place an order. It was placed on the morning of Monday, December 24th (Christmas Eve). I doubted much would happen until Wednesday the 26th. I was surprised however to get two automated messages on the 24th saying that one, my order had been queued and then two, it had been processed and was awaiting packaging. Fair enough.

On the 26th around noon CST, I received another email from 2Wheel.com saying that my order had been packaged and that tracking information would soon follow. These emails are based on a template and I noticed a new sentence had been added to the current status of “Packaged” saying that “One or more of your items have longer lead times”.

2Wheel.com order confirmation process

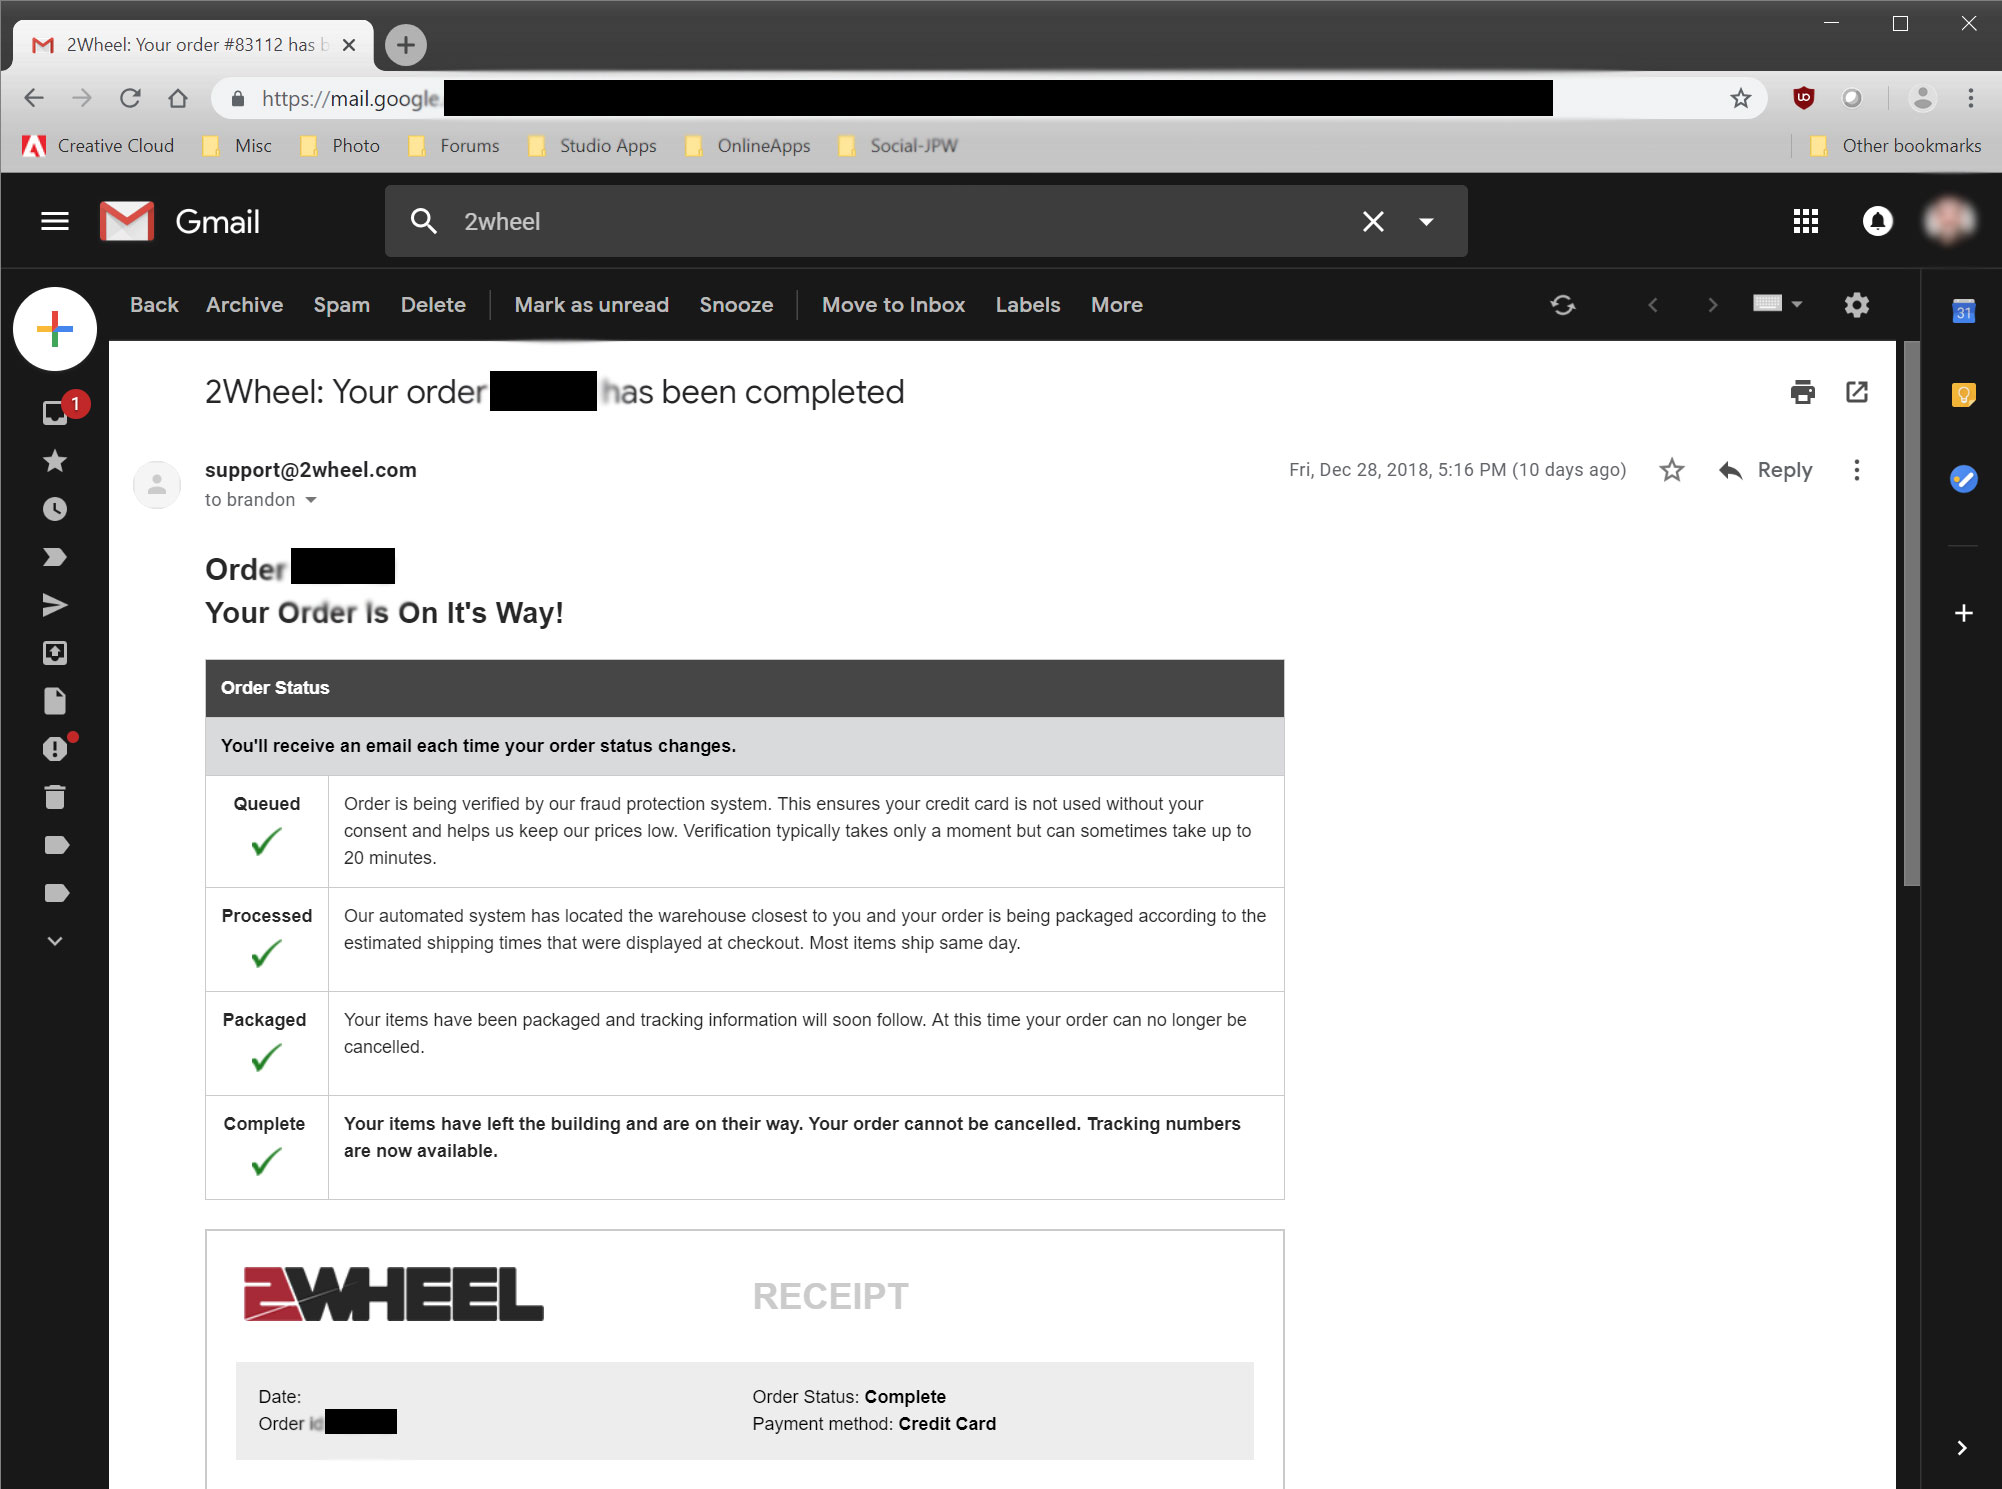
I didn’t see that new phrase until I went back through the emails to research for this review. This helped me understand why it took until Friday evening, December 28th, for me to receive notice from 2Wheel that the package had left the building. By the way, Los Angeles is pretty far from Nashville, TN so the “utilizing the closest location” mentioned earlier didn’t pan out in this case.

The box actually left LA in the wee hours of the morning on Saturday the 29th with an expected delivery date of Monday, January 7th. Even with the Holidays and Sundays removed that left 6 business days from the shipping date. That’s double the claimed 1-3 days time mentioned earlier plus two more business days from the date I placed the order for 8 business days required to get this helmet.

Is this typical? Since I have only purchased one item I would like to think this is an aberration but it does give me pause about ordering in the future. I can order from places in New York and Texas that will ship their items out the same day if I order before noon and they often arrive in two days. I may have saved some money in this case but I would rather have paid a little more and gotten the product in less time.

Packaging

The helmet I ordered arrived packed well in what I would consider standard helmet packaging. The helmet box itself was placed inside another box and arrived undamaged.

Unboxing the helmet revealed the unit in perfect new condition with all tags and sundry visor covers in place. At the very good discount closeout price, there’s always concern about getting a returned or open-boxed item but this was undoubtedly brand new. It even had that new helmet smell.

Conclusion

The overall process for ordering merchandise from 2Wheel.com was very smooth and despite the lag in the shipping, the helmet I received was exactly as it should have been. I do appreciate the status updates from their site on the order progress and even though I didn’t have to reach out to customer service the ease of finding contact information is appreciated.

Reason to buy from 2Wheel.com

At this point, I will give a solid “give them a try”. As I understand it, webBikeWorld.com will be getting some more items for product reviews from 2Wheel.com in the coming weeks. I intend to follow up with our team to find out how their own experiences are with shipping times.

If you, our reader, decide to give them a try I encourage you to let us know how your transactions go whether good or bad.

Pros

  • Site responsiveness is quick
  • Responsive design works well on desktop and mobile devices
  • Ordering process is very smooth
  • Super fast order verification and information emails

Cons

  • Pages are busy with offers and sales
  • Search results inconsistent
  • Shipping process slow in this transaction

Details

The post 2Wheel eCommerce Site Review appeared first on Web Bike World.

Categories
Gear Reviews Gear Tips Guide Other Motorcycle Blogs Rider tips Web Bike World

Gear Tips for the Mature Rider

It is no secret that as we get older, our bodies change. And in most cases, we do not get better with age. That only happens in the movies and with fine wine.

As motorcycle riders, we need to be aware that the changes that we are facing certainly do not mean that we need to give up our passion for riding, but as mature riders, we do need to understand these potential changes and address them in a manner which will keep us safe and on our bikes as long as possible. Taking a few extra precautions and add a few more key pieces of gear is a small price to pay to keep enjoying bikes and the freedom that they offer.

Low Light & Darkness

As described in the March 2006 issue of the Harvard Health Letter, your eyes slowly change as you age. To adapt to low light or darkness, your pupils widen to let in more light and improve your ability to see. But that adjustment is made by the tiny muscles in the colored part of your eye, the iris, which surrounds the pupil.

As anyone who is getting up there in years knows, older muscles just don’t respond as quickly or a well as they once did. So as we age, we just need to accept the fact that it can be more difficult to see in low light such as on a ride at dusk or in the early morning before sunrise.

Riding Visibility

One option is to limit the time of day that you choose to ride, but to me, that seems like giving in to old age and letting it control my ability to enjoy my bike. A better solution is to use an amber visor or shield in your helmet. This helps to intensify the minimal amount of light and provides a crisper, clearer view in low light. If you do not have the capability of dual visors in your helmet, then amber glasses are an option if you do not wear prescription glasses.

Decreasing Reaction Times & the Consequences

According to a study of 3,305 people ages 16 to 44 conducted by PBS for the show NewsHour, the human brain’s reaction time peaks at age 24. After 24 the decline in reaction time is slow but constant.

As mature motorcycle riders, we need to also embrace this bit of information and learn to extend our vision. This larger scope of vision is going to allow that short extra instant that we need to react to something around us. It could mean the difference between dodging a car backing out into traffic and high siding over a trunk and landing on hard asphalt.

And that brings me to the next fact that we, as older riders need to grasp. And that is the fact that we just don’t heal as quickly as we did in our 20’s or even our 40’s. Again, I am not advocating hanging up the helmet and gloves, I am just saying that mature riders need to take advantage of all of the amazing protective gear that is now available.

Time To Gear Up

Not too many years ago, a leather jacket was all the protection that you could get. But today’s jackets offer things like:

  • Integrated PE padding on the chest, torso, and back
  • Removable CE protectors in the chest, back, elbows and shoulders
  • Exterior friction protectors on the shoulders and elbows
  • Kevlar panels for abrasion protection
  • Mesh or perforated leather for ventilation and added comfort and safety in warm weather
  • Accordion stretch inserts and gussets to allow full range of motion and superior protection
  • Optional lumbar protection
  • Waist connection zipper to attach to riding pants to eliminate a back full of road rash

And that connection zipper is the perfect segue to the next piece of gear that has made some huge strides in providing protection. Riding pants used to be a very constricting, stiff leather garment that only belonged in MotoGP. But that is no longer the case.

Riders can select from textile, leather or even denim pants that offer almost as many safety options as today’s jackets such as:

  • Internal hips pads and knee pads
  • External knee pucks if you are really going to push some curves
  • Kevlar panels for abrasion protection
  • Mesh or perforated leather for ventilation and added comfort and safety in warm weather
  • Accordion stretch inserts and gussets to allow full range of motion and superior protection
  • Optional lumbar protection
  • Waist connection zipper to attach to a jacket to eliminate a back full of road rash

But if you are not ready to give up the gear that you already own to invest in a new jacket and pants with extra safety features, consider just adding some armor under your existing gear. There are several reputable companies who are selling back protectors that fit under a jacket or shirt, elbow and knee armor and even base layers with pockets for soft or rigid armor.

Rider Concerns

As an over 50 rider, I completely understand that many riders my age do not want to feel like they have just suited up in an Ironman costume to go out for a ride. I must confess, I was right there with you thinking that same thing until I tried out a few new pieces of gear thanks to the great folks at webBikeWorld and some awesome manufacturers who offered up some gear.

I had always ridden in jeans, some type of sneaker or gym shoe and a jacket. And in the heat of a Phoenix summer, I was not religious about the jacket on occasion. The only thing that I was a little bit smart about was wearing a helmet, but that was due to the endless supply of rock flying through the air out here.

First the Jacket

The jackets are the first piece of gear to really win me over. I have tried a lot of different brands including Joe Rocket, Icon, Motonation, Dainese and Alpinestars. And what I discovered is that as long as I get the correct size, most of the newer style jackets are very comfortable. Again, it will come down to personal preference and fit, but even with all of the added safety features and armor, these jackets are flexible and move with you rather than restricting your motion.

Anyone who had one of the older leather race jackets knows that you felt protected but only because it was like having a nutshell around you. Your movement and flexibility were severely limited. That is no longer the case.

Then the Pants

This year I also discovered that motorcycle specific pants are not as bad as I imagined them to be. In fact, they can be more comfortable than the jeans that I spent a lifetime wearing. As I mentioned before, I live in Phoenix and the summers can be pretty unbearable with temps hitting 115 and sometimes higher. So after a ride, my jeans looked like I had just gotten out of the pool and not off of my bike.

I tried out a pair of textile pants that offered some great ventilation and even better armor and padding. While wearing the pants this summer, I had a rather unfortunate incident on a corner with a gravel spill. Fortunately, the hip and knee protection did its job as did the textile. I escaped with no burns or cuts and just a little bruising.

But I would hate to imagine the outcome if my hip had hit the asphalt with nothing but a layer of denim to protect it. I consider myself fortunate to have discovered the importance of good riding gear without getting a ride in an ambulance to go along with my epiphany.

A Little Consolation

First of all, I hope that you are still with me here and did not see this as all doom and gloom and click away. My point is to provide mature riders, like myself, with some real information that we all need to hear and understand. Getting older is not all bad. I consider myself to be much smarter than the little smart ass I was in my 20’s and I plan to use that added insight to stay safe and stay on my bike for a few more decades.

The fact is that there were more motorcycle accidents in 2016 than there were in 2007 according to the National Highway Traffic Safety Administration, and it is not just because riders were getting older.

There are a lot of other factors that increase the potential for motorcycle accidents today including more vehicles on the road, more road rage incidents and maybe the worst of all is the number of distracted drivers. Cell phones, navigation systems and all of the other gadgets in today’s cars give drivers way too many things that can demand their attention when they need to be watching the road.

As an older and wiser rider, it only makes sense to take advantage of the safety gear that is out there to help avoid an injury that could make riding nothing more than a memory. There are a lot of great manufacturers and types of gear out there. Invest some time to research and even test fitting to find the best gear to give you the added protection you need to be safe and keep riding.

The post Gear Tips for the Mature Rider appeared first on Web Bike World.

Categories
Clymer Repair Manual Gear Reviews Guide Other Motorcycle Blogs Web Bike World

Clymer Repair Manual: 2014 to 2017 Harley Davidson XL Sportster

Wrenching Made Easy

Clymer Repair Manual 2014-2017 Harley-Davidson

First Impressions

Rider on Harley Davidson

I’ve been using Clymer motorcycle repair manuals on my own bikes for several years and know how good they are. Clear and concise with decent, black and white photos that have helped me keep my ride in tip-top shape.

I used to buy the much more expensive factory repair manuals but got wiser over time switching to Clymer. There’s no appreciable advantage in using the OEM books over Clymer. I find them maybe a little clearer when it comes to photos sometimes, but that’s it.

This review is of the brand new book and online service manual (M256) for late model Harley Davidson XL Sportsters from 2014 to 2017 model years. Harley brought in a CANbus electrical system in 2014 on these bikes so having a good manual is pretty crucial in DIY work as a result.

It covers a huge array of Sportsters and since they don’t change much are quite reverse compatible with older models other than the electrical system.

  • XL883L SuperLow (2014-2017)
  • XL883N Iron 883 (2014-2017)
  • XL883R Roadster (2014-2015)
  • XL1200C 1200 Custom (2014-2017)
  • XL1200CA Custom Limited A (2014-2016)
  • XL1200CB 1200 Custom Limited B (2014-2017)
  • XL1200CP 1200 Custom (factory custom) (2014-2016)
  • XL1200CX Roadster (2016-2017)
  • XL1200T SuperLow (2014-2017)
  • XL1200V Seventy-Two (2014-2016)
  • XL1200X Forty-Eight (2014-2017)

Clymer has also simultaneously released the same quality of book (M255) for 2012 to 2017 FXD/FLD Dynas because of the same “CANbus reason”.

Clymer Manual Maintenance - Troubleshooting - Repair

Content Chapters In The Book

The paperback is a massive 1.25” thick chunk of paper with 14 chapters of detailed and valuable information that’s set up as follows:

  1. General Information about tooling, safety practices and procedures used in repair
  2. Troubleshooting common problems a good general and specific section all at once
  3. Lubrication and Routine Maintenance guidelines, specifications and step by step
  4. Engine Top End overhaul
  5. Engine Bottom End overhaul
  6. Primary Drive, Clutch, and External Shift Mechanism
  7. Electrical System repairs and explanation of how it all works together
  8. Wheels, Tires and Drive Belt specifications and repair procedures
  9. Front Suspension and Steering
  10. Rear Suspension
  11. Brakes including ABS information (an especially handy and oft-used section for most people)
  12. Body
  13. Index of topics
  14. Color Wiring Diagrams. I enjoy using the online version of this section much more because I can zoom in on my smartphone or tablet to get a real close look.

End of Chapter Reference Page

At the end of each chapter is a quick reference page listing information like torque specs, capacities, clearances, etc that I’m always looking for quickly. I really appreciate that feature for times when I just want to know how tight to do up a rear axle nut for example.

Clymer Repair Manual Open Book

*No correlation is made between the Online Manual and the book for whatever reason. For example, Chapter 10 in the book isn’t about rear suspension online.

Let’s Dive Right In

Here are a few examples of what you’ll find in the book that I like. As I said there really isn’t anything not covered in this book but I’ve just chosen a few highlights from it to showcase.

Chapter Two: Starting Circuit Troubleshooting

Determining whether you need a new starter, relay or battery is something many people struggle with when the bike won’t start. This section has terrific diagrams on how to perform electrical testing to figure it out. They let you know what type of meter to use and where to place your leads.

Chapter 6: Clutch Assembly and Disassembly

Clymer Repair Manual Open Book Chapters

In this exploded view of the clutch assembly, you can see bevels and edges showing how everything goes together in case you take it apart and forget. The step by step photos is clear and easy to use even if they are in black and white.

There are good tips in the instructions too that many people forget. For example, they remind you to soak the clutch friction discs in transmission oil for a minimum 5 minutes before installing. Most people think they need to be soaked overnight, but that’s going overboard.

Chapter 9: Rebuilding Leaky Front Forks

Clymer Repair Manual Open Book Pages

Don’t bother paying someone to reseal and rebuild your front forks any more thanks to the exploded view of the fork assembly, tools and parts needed along with technique on how to get it done.

Chapter 3: Maintenance

You’ll wear this one out if you’re anything like I am. I can never seem to remember how much oil something holds or what kind. That’s probably why in my Harleys I just ran Amsoil 20W50 in all three compartments. Keep it simple.

Picture of performed maintenance with gloves

This section is what an owner’s manual should be in my opinion. I love the way torque specs are usually written in the assembly instructions too so I don’t have to go hunting around for them. Torque wrenches aren’t overrated and any time you can tighten a fastener correctly you should do it. Make sure to get your torque wrench calibrated once in a while.

Online Manual

 Clymer Online Manual on Mobile

Clymer Online Manual on Mobile

For $26.95 you can access the Online manual and download, print and save whatever you want out of the book. Drop the pages in oil or dirt? No problem, just print another. You have to renew each year but it only costs $14.99 for a renewal.

The Online manual is the stuff mechanics’ dreams are made of. Click and find exactly what you want and fast. I like it a lot, but feel like maybe Clymer hasn’t gone far enough yet.

This could be set up better if it included a 3D diagram of the bike that you rotate and click on the area you want to work on to bring up procedures, specs and parts diagrams featuring factory part numbers.

Clymer, are you hearing this? Link it up with the local dealership parts department (or even eBay) so the user can check inventory, price and how far away your desired part is. It could easily be set up to order the parts at that point as well and provide tracking. It’s 2018 after all!

I would enjoy some video links built into the website as well because photos are good, but the video is king of all for visual people like myself. I always end up looking on YouTube to see how to do something even after reading the Clymer manual, so let’s just make the Online Manual one-stop shopping. It makes sense.

Menus and Content

Clymer Chapter Menu Online Manual

There is a big menu that subdivides into topics beautifully right after you login to the website. Easier than an Index and you can save diagrams and photos from the page in your phone for quick reference later.

 Clymer Manual Online Service Precautions

Clymer Manual Online Diagram

You can see how the diagrams and photos are the same quality as in the book, but there is more color used on the site. Mainly it’s used to highlight warnings that are crucial to follow in order not to damage your bike, but some photos are in color too.

Clymer Manual Screen Shot of Manual

Spark Plugs

Plugs are an area many people always ask about how to tackle and it’s all set out really well in the Online Manual as you can see in the following photos.

Clymer Manual Online Instructions

Clymer Manual Online Instructions

Wiring Diagrams

The photos can be enlarged or zoomed on to see better what’s going on with the site pages. When it comes to the wiring diagrams this is the main reason to go digital since those little wires are tough to see along with the small print used on the ones in the back of the book.

Clymer Manual Online Wiring Diagram

Embrace the future! Go to the website, but keep the book around just in case the robots take over and shut down the internet or something.

The Final Word

Clymer Manual Online Wiring Diagram

Not only will this manual pay for itself the first time you use it and don’t pay labor to a repair shop, it will increase your self-confidence, help you keep your bike running better, longer and make you a smarter, more well-rounded individual if you let it.

There are times Clymer will show you how to avoid needlessly buying special factory tooling and present a way to build your own or get by without it. In the brake bleeding section, they mention the MityVac bleeding tool which allows a single person to bleed the brake lines but also mention how to do it with a friend without the tool.

Clymer Online Brake Bleeding Manual

Clymer Manual Online Service Precautions

Clymer has been putting out books like these since 1945. Fred Clymer’s manuals have been helping motorcyclists ever since then all over the world. Even if you have a bike from back in the 40s or 50s there’s a good chance you can get a Clymer manual for it and get your hands dirty while looking after it.

Rider in Camo on top Harley Davidson Motorcycle

Pros

  • Written in plain English for regular people instead of professional mechanics
  • Plenty of exploded parts diagrams, photos, and step by step instructions
  • Easy reference page at the end of each chapter with important information on it
  • Covers Harley Sportster models 2014 to 2017 when CANbus systems appeared
  • Includes full-color wiring schematics in the back of the manual
  • Explains basic maintenance all the way up to the most complex electrical troubleshooting
  • Provides safety tips, list of tooling needed for tasks and an Index of topics
  • Sportsters haven’t changed much over the years so this manual will even work on older bikes to an extent
  • Paper copy currently on sale for $41.95 with free US shipping
  • Online manual can be updated/corrected by Clymer when necessary
  • Online manual is slick, set up for quick reference and ease of use

Cons

  • Heavy and thick book (1.25 inches) to lug around
  • Photos are fairly small and mostly black and white in the book
  • Photos online are often color, clearer than the book at times, but many are still black and white and grainy/low resolution
  • Online manual is super easy to use and faster than the book to find what you’re after
  • Photos and diagrams can be saved to your portable device for reference later

Specs

  • Manufacturer: Clymer Haynes North America
  • Where to Buy: Clymer
  • Price (When Tested): $41.95 paperback or $26.95 online
  • Made In: USA
  • Alternative models & colors: Many models
  • Sizes: N/A
  • Review Date: May 28, 2018

The post Clymer Repair Manual: 2014 to 2017 Harley Davidson XL Sportster appeared first on Web Bike World.

Categories
Gear Reviews Guide Motorcycle Maintenance Other Motorcycle Blogs Web Bike World

Motorcycle Maintenance Items for Fuel-Injected Bikes

Get your Hands Dirty

Most everyone has one or two friends that are total gearheads. They can fix nearly anything and even better they can take something that runs well and make it run better for longer.

I’ve always admired people with that skill set. My Grandfather was a multi-talented tradesman. A tinsmith, machinist and aircraft mechanic who often wowed me with his abilities.

That admiration inspired me to become a heavy duty mechanic myself. One of my main goals in becoming a mechanic was to be able to save the money I would have given a shop to repair my motorcycles and instead spend it on nicer motorcycles, better parts, and gear.

You Can Do It Too

If you’re reading this chances are good you feel intimidated or unsure of how to go about maintaining your bike and are looking for some encouragement and instruction. I aim to do both in this piece by discussing some simple engine maintenance anyone can do with basic tooling and care.

Fuel-Injected Bikes

Specifically, I’ll be focusing on fuel injected engine maintenance, which really is 99% the same as maintenance for a carbureted motorcycle.

Even the most knowledgeable technicians weren’t born that way and started out learning the basics. You may never be at quite their level, but don’t need to be at the mercy of those who are pros. A little knowledge goes a long way in protecting yourself from being taken advantage of by unscrupulous repair shop owners.

Get A Service Manual

Most bikes come with a basic owner’s manual that outlines the checks everyone should be doing before every ride and most of the regular maintenance too. I was quite surprised at the amount of information and detailed step by step instructions in the manual for my 2014 KTM 1190 Adventure for example. I love it when they give nut and bolt torque specifications in the instructions.

Fuel-Injected Bikes

All the same, it’s better to have more information than you need and a service manual from Clymer or the equivalent is never a bad thing to invest in. The Clymer is usually easier to understand than the manufacturer’s manual in my experience but can be fairly pricey.

For my KTM I actually found a PDF copy to buy on eBay for about $8 that I downloaded and printed off. Lots of times you can even find them free to download with some persistent googling.

YouTube is a great resource for watching how to do maintenance as well. I find the Fail Army videos distracting at times and delay a simple job if I don’t stay focused.

Consider carefully the source of your chosen video to trust as there are plenty of people on there showing you the wrong way to do things.

When in doubt go to a reliable source like this one or Revzilla to get sound advice. Compare it to the service manual just to be sure it’s on the level. Typically I’ll read a procedure three times and watch two different videos before I tackle a bike repair or maintenance project.

Engine Air Filters

Replace or Clean?

Engine Air Filters

Engine Air Filters

Engine air filters are important to keep clean to ensure good power and fuel efficiency. I change/clean mine at least once per year depending on how much I’m riding and in what conditions. Dirty conditions = much more servicing.

Removal and Installation Notes

On certain bikes, it’s a surprisingly big job to get access to the engine air filter like on my KTM 1190 and you won’t want to tackle it at all or at least without a lot of time and planning. Most times it’s not that bad though so read up beforehand to see what you’re getting into.

Any time you remove an air filter take a damp cloth and wipe out the airbox to get rid of any dirt you may have knocked in. A shop vac helps for fine dirt and dust removal, too. When you reinstall the filter see that it seats correctly and seals completely around its rubber edge and the airbox.

Kinds of Filters

Air filters come in a wide variety of shapes and sizes, but generally just two kinds: Replaceable and Reusable.

Replaceable air filters for the engine intake have a filtering element made of paper which should always be replaced instead of cleaned. Some people choose to use a blowgun and compressed air to blast dirt buildup off the filtering element at their own risk. It’s not hard to unknowingly poke a hole in the paper with the air blast resulting in leakage of dirty air flow directly into the engine. It won’t take long to dust an engine this way and then need expensive overhauling to repair.

If you’re riding in extremely dirty conditions and not able to replace it you can gently tap it out to help clear the pleats out a bit before reinstalling, but for that environment, you really should switch to a different kind of reusable air filter.

Paper filters are usually white or yellow in color and feel like what they are: paper. It’s pretty tough on paper to wash it with water so don’t bother trying.

Sometimes there’s a removable foam pre-filter cover which can be washed using air filter cleaner or just dish soap. Rinse all the cleaner out thoroughly and allow to dry before installing again.

Reusable Filters

Several companies like K&N, Uni, Twin Air and BMC make reusable filters that can be washed using air filter cleaning kits.

The filter elements are made of cotton or synthetic cloth reinforced with wire mesh making it like a strong T-shirt you can clean the dirt out of. The cleaning kits have a solution to spray on the filter element to let sit for about 10 minutes then rinse out with cool water.

Let them air dry and then apply the filter oil that comes in the kit to help filter out dirt and debris. The oil usually is red in color, showing you whether there’s even coverage on the filter element when you apply it.

Let a newly oiled filter sit for about 30 minutes before running the engine to let the oil soak in first.

This video from K&N explains the procedure perfectly.

R2C Performance Products make very tight sealing, high flowing, reusable filters for extremely sandy conditions that don’t require oiling. Just vacuum them or blow compressed air through them to clean. Unfortunately, they mostly build filters for cars and side by side applications, not for too many motorcycles that I’m aware of. All the same, if you can find one of these to fit your bike you’ve really got it good.

High Performance

Besides being reusable the other advantage of using these synthetic cloth filters is that air flows through them much easier than paper ones. This makes them higher performance and can increase fuel efficiency as long as they’re kept clean.

Engine Oil and Filter

Keeping It On The Level

One of the most important services you can do on any engine is keeping the engine lubricant clean and at the correct level.

Engine Oil and Filter

Your bike might have a dipstick (often attached to the filler cap) to check the oil level or a sight glass on the side of the engine. Make sure you understand where the level should be maintained depending on whether the engine is hot or cold.

Generally, it should be maintained near the upper mark when cold but not right up to the top mark to allow for expansion when warm. Some bikes need it checked sitting upright or on the center stand while others are checked on the side stand. The Owner’s manual should have that information in it.

Engine Oils

Engine Oils

Engine oil formulas are so chemically advanced now that service intervals are being pushed out longer and longer by manufacturers. Not a bad idea considering the high cost of engine oil, especially synthetic ones.

The additive packages in modern engine oils absorb moisture, clean debris, and carbon off internal engine surfaces and help create effective barriers between metal parts better than ever before.

Be sure to follow what your specific bike maker recommends for oil viscosity or weight and maintenance schedule to keep your engine happy. This can vary from bike to bike and also depend on what sort of oil you’re using.

Full synthetic oils can run much longer between changes than mineral ones. Synthetics also protect better at low and higher running temperatures and are worth the extra cost in my opinion.

I’m a fan of using Amsoil in my bikes, especially air-cooled engines, but there are plenty of other good synthetic oils on the market.

Filters

Filters

Like air filters, there are a few different types of oil filters available: replaceable, cartridge and reusable.

The cartridge (or internal) ones are a little different in that they have an outer housing connected to your engine and it’s just the inside element you replace. Sometimes you’ll need a special socket to remove these cartridge filter housings. Check the service manual.

Reusable oil filters are in theory the last one you will need to buy because you can wash them out instead of replacing them. I haven’t tried these filters out personally, but they sound like they would work just fine. You may have to replace the rubber seals over time and possibly the filtering screen inside.

Filters

Don’t skimp on the filters you use on the engine. Some people run premium synthetic oil but not a matching filter. Synthetic oils need a filter that will allow higher flow and match their specific chemical makeup. The bike’s engine design may need other qualities in a filter that only OEM ones will provide: like an anti-drain-back valve for example.

When in doubt always go with the OEM brand of filter and oil.

Quality aftermarket oil filters have built-in anti-drain-back valves to keep them full of oil even when the engine isn’t running. I’ve had good success using K&N oil filters and would recommend them as they meet or exceed OEM specs. They even have a limited warranty against defects when installed correctly.

RECALL NOTICE For KN-204 Filters

One type of K&N motorcycle filter was found to be defective due to possible leakage and was recalled recently. Only filters manufactured between March 1, 2016, and September 30, 2016, were affected. Exact details available here.

Necessary Tools and Supplies

  • A socket set and ratchet are a must along with a set of wrenches. Some bikes need Allen sockets or even Torx so have a look before you start working on your bike to gauge things.
  • Nitrile gloves are good to have because dirty engine oil is a known carcinogen.
  • Paper towel or shop rags along with a catch pan that will hold about 10 quarts.

A couple of different styles of filter wrenches are nice to remove the filter. I prefer the socket type because it can be used to remove or install a filter easily with a ratchet and socket set. The downside to them is that they will only fit a specific size of the filter while a strap swivel type filter wrench has a range of filter diameters it will work on. I keep both handy just in case.

  • Finally, you’ll need a new filter, seal for the drain plug (if it uses one) and the recommended amount of replacement engine oil. I usually buy an extra quart just in case. Sometimes the manual might not have the right quantity listed.

General Procedure Guidelines

Every bike is a little bit different when it comes to how to change the oil, but here’s a general idea:

  • Warm up the engine to operating temperature and shut off the bike.
  • Remove the oil drain plug and allow oil to drain into a big enough pan to hold it.
  • Remove the filler cap from the engine oil or dipstick cap and the oil will drain faster. Do this only after you remove the drain plug so oil doesn’t rush out as quickly on your hand.
  • Remove the oil filter while waiting for oil to drain
  • Wipe off and inspect the drain plug for damage. Replace it if it’s stripped or the threads damaged and replace the sealing washer or O ring then reinstall the plug. Tighten it to the specified torque in your manual.
  • Wipe the mounting surface for the filter clean making sure the rubber seal from the old filter isn’t still attached. Smear clean engine oil on the rubber sealing surface of the new filter and install it on the engine. Thread the filter on until the rubber seal touches the engine and then further twist the filter on ¾ of an additional turn.
  • Add ¾ of what you think the recommended engine oil capacity is and check the level. I give myself this last chance to make sure I correctly know how much oil to add before I overfill it. If I check and the sight glass is already full or the dipstick measures oil level over the full line I stop and figure out what I’ve missed. If I don’t see any oil in the sight glass or starting to appear on the dipstick again, I stop and figure out what’s wrong.
  • Once the level is correct, start the bike and check for leaks. Finding none shut the bike off and let it sit for a minute. Recheck the level as described in your owner’s manual. The oil level may have dropped a bit at this point to fill the new filter so you may need to add a little more oil. Overfilling is not a good thing. Just keep the oil where it should be in the acceptable range shown on the dipstick or sight glass.

Revzilla’s Lemmy does a great job in this video showing how to change the oil on a 2012 Harley Davidson Street Glide. He talks about how to read your old oil before you drain it. I like his technique overall and his choice of oil, filter, and tools. He does things in the best order to be efficient and make the least mess (plastic bag trick!).

The only thing I would change is that Lemmy doesn’t use a torque wrench on the drain plug. If you’re experienced like him that’s fine to do, but if you’re new it’s best to trust your torque wrench.

Even with a torque wrench, you don’t want to get carried away as sometimes they aren’t calibrated correctly. Over torquing a drain plug can strip the threads or crack the engine crankcase. Neither predicament is any fun to experience.

Inspect Your Old Engine Oil

Obviously, you’re changing the oil because it’s dirty or surpassed the amount of time it should be used and it’s not going to look brand new. There’s a difference between dirty oil and contaminated oil.

Milky Oil

If it looks really light-colored or almost like milk that’s a sign that it’s been contaminated by water or coolant. If you have just ridden through a lot of puddles or streams while off road it’s maybe somewhat acceptable to see some milkiness and changing the oil and filter should suffice.

If you haven’t been in the water chances are good you’ve got an internal leak in your engine that needs addressing right away. Take your bike to a professional to troubleshoot and repair or you risk doing serious damage your engine.

Fuel System Maintenance

Fuel System Maintenance

Fuel injected bikes aren’t prone to the dreaded dirty carburetor nuisance like older bikes were, and are lower maintenance that way. There are other things you can and should do to keep the fuel injection system clean though.

Seafoam Additive

Seafoam is a cleaning and stabilizing additive for gasoline and diesel engines. It works in two strokes and four-stroke engines equally well. It’s not a harsh chemical mixture, but petroleum based and more of a lubricant and cleanser. It dissolves gum and varnish deposits in the fuel system within the injector passages, gas tank. and fuel lines.

When your fuel level is getting low in the tank it’s a good time to add Seafoam directly and take the bike for a spirited ride up the highway to “burn the gunk out”. The recommended mixture rate is 1 ounce of Seafoam per gallon of capacity the fuel tank holds. A 5-gallon tank gets 5 ounces poured in.

You can treat your gas as often as you like this way to keep your low idle smooth and engine starts easy.

If you really want to clean things up double the dosage to 2 ounces per gallon and in extreme cases, you can run a 50/50 mix of it with the gas.

Don’t be alarmed if you notice copious amounts of white smoke coming out of your exhaust while doing this treatment. It’ll go away as the Seafoam gets used up or you fill the tank full of gas again. I treat my bikes with it at least once or twice a season and add a heavy dose when I put the bikes to sleep during our Canadian winter to stabilize the fuel in the tank.

Add To The Engine Oil

Seafoam Motor Treatment can also be added to your engine oil directly and will help clean up deposits in the engine on piston control rings, in oil galleries and other small passages that get obstructed over time.

Pour 1 to 1.5 ounces per quart of oil in the crankcase into the oil filler opening when you’re 100 to 300 miles away from changing the engine oil and run the bike normally. This works out to half a bottle for a vehicle holding 5 quarts of oil. Only treat the oil once this way between oil changes.

You’ll notice the darkening color of your oil over the next while which is the Seafoam working. Once that happens, go ahead and change your oil and filter as it has dissolved the built-up oil residue in the engine and is ready to be replaced with new, clean oil.

The treatment is demonstrated on a truck in this video made by Seafoam on YouTube. Nothing to it.

Spark Plugs and Wires

Types of Spark Plugs

Standard or normal plugs have a flat center electrode that looks a bit like a black button while iridium plugs have a small and pointy one instead. They both work well and the main difference between the designs is the amount of voltage required to create an arc. It’s much lower with the iridium ones and that seems to be the way most engines are going these days for better efficiency and less demand on the electrical system.

Some plugs have more than one ground or negative electrode arm while others only have one. Again the design difference has to do with efficiency and electrical demand. More arms = less voltage necessary to spark effectively.

Which Type To Buy?

Keep it simple and trust the manufacturer by buying the spark plugs they recommend. It’s really that simple. Unless you’re a mechanical engineer and can calculate a better option, chances are good the company that designed the engine will know what plug is the best fit for your bike.
I tend to stick with NGK, Denso and Bosch brand names.

Access and Removal

This can be really challenging on some motorcycles depending on the design so again, don’t dive right in without doing some reading beforehand even if it seems obvious. Adventure bikes like my KTM 1190 can involve removing the gas tank and lots of panels just to gain access to the plugs. There are also two spark plugs per cylinder on many engines these days, doubling the cost and work.

Tools and Supplies Needed

  • Correct new spark plug(s)
  • Socket to fit your plugs, ratchet and possibly extensions and torque wrench
  • New plug wires. (Return them to the store if you don’t need them)
  • Spark plug gapping tool and or feeler gauges
  • Dielectric grease and high-temperature anti-seize lubricant
  • Blowgun and compressor

Wire Removal from the Plug Terminal End

Naked or bikes without fairings like Harleys make it a 15-minute job or less because gaining access only involves pulling the boot off and getting a socket on the plug. Some boots come off with a little wiggling back and forth while others are a real hand workout.

Keep track of which wire goes to which hole for when you put them back on at the end.

Tip for boot removal: avoid pulling on the plug wire attached to the boot when removing it. Grip only the boot to avoid damage. There are specially made pliers for gripping the boot better than your fingers can to make the job easier. I find I can get them by hand quite easily on bikes.

Sometimes the boot will separate from the wire when you pull on them because they get old and worn out. It is possible to replace the boot only, but best practice is to change out all the wires as a set if one breaks. A rough idle or hard starting can be caused by bad plugs and wires.

Changing them one at a time to keep them straight is wise. If you see cracks forming in the rubber or any other damage it’s time for a change too. Your maintenance schedule will also tell you when to do it.

Spark Plugs and Wires

Tech Tip for plug wires/boots: Put a small dab of dielectric grease in the opening of the boot before installing on the terminal end of the plug. It helps keep water and moisture out. Ditto for the other end of the plug wire that attaches to the coil housing.

Spark Plug Removal and Install

Once the boot is off of the plug take your blow gun and blast air into the hole to clear out anything that might be lurking in there. We don’t need anything falling into the engine once the plug comes out.

There are specialty sockets and long-handled ratchets with flexible heads made for removing plugs. They aren’t necessary but can make the job easier. The plugs often are down in a hole meaning you can’t get a wrench on them. The specialty plug socket has a rubber insert to grip and hold on to the plug once you push the socket on the terminal end firmly. The plug will come out with the socket and you can install the plug using the same method in reverse.

Plugs shouldn’t be in very tight so once you get the socket on you should be able to turn the ratchet with one hand and spin out the plug. Give the hole another blast of air with the blowgun in case you dislodged something getting the plug out.

Have a Look at Your Plug Electrodes

The condition of the business end of the spark plug can tell you something about what’s been going on inside your engine.

The chart below shows how what might appear to be bad might actually be ideal and vice versa. If you do have something less than ideal color going on it might be time to take it into a mechanic for further investigation. Keep the plug to show them what you found.

Check the Electrode Gap

The gap between the center and ground electrodes is important and has a specification set out in your manual. For the most part, I find the plugs are already banged on right out of the box, but it’s worth taking a moment to verify it with a gapping tool.

I really like the one shown below as it will measure almost any size of the gap with the blade style feeler gauge and has the adjusting tool as well. It’s simple really. Just find the desired thickness blade and slide it carefully into the gap. If it goes in with just ever so slight resistance it’s perfect. If not, you need to adjust it a bit with the tool.

YouTuber Driving 4 Answers has a great video on exactly how to do this. His description is perfect along with his technique for adjusting the gap.

Electrode Gap

High-Temperature Anti Seize Lubricant

Before installing the new plug in the hole apply some high-temperature anti-seize to the threads.

This is insurance for the next time you pull the plug out.

The high temp lube is silver while the regular stuff is copper colored. Either will work, but the high temp stuff is what I use because well, spark plugs get very hot.

Tech Tip on Plug Installs: Don’t forcefully cross thread the plug in the hole. Thread it in gently by hand before putting a ratchet or torque wrench on the socket to tighten it down.

If you don’t have a plug socket you can cut a small length of fuel line and stick that on the terminal end of the plug to reach down into the hole and carefully thread the plug in place. It should spin smoothly and easily by hand if you’re doing it right. If it doesn’t, back it out and try again until it does go in easy.

Your manual will give you the correct procedure for the final torque. Many people just run the plug in by hand until the sealing washer touches and then give it an additional quarter turn. That used to be a foolproof method, but things have changed as they always do.

When I replaced the spark plug on my 2004 Honda CRF250X the manual instructed me to use a different method for a brand new spark plug install than the way to reinstall an old plug. If I recall correctly it said to thread the plug in until the sealing washer touches then give it a half turn in.

Next, back the plug out and run it back in until the sealing washer touches and give it a final quarter turn.

Make sure to do it right to avoid leakage or the plug loosening up and causing damage to the threads. In extreme cases, a loose plug can even come flying right out.

I like this video from YouTuber oldBRATTrider on changing the plugs on his Triumph Bonneville. He does a good job and moves almost painfully slow in doing it, but that’s good for new backyard mechanics to learn from. His calm, southern drawl and laid back manner help remind us that speed isn’t important when you’re meeting the needs of your two-wheeled mistress.

Incidentally, I looked up the torque spec on the Triumph’s plugs and found the same 20 nM he used, despite some of the comments about how that’s too much.

Finish your installation by clicking the boot back on the plug or plugs in the correct position and start the bike up to make sure it starts easy and runs smoothly.

Exhaust System

Exhaust System

There isn’t a whole lot involved with exhaust system maintenance other than checking to see fasteners are all tight and there are no sooty deposits showing at joints indicating a leak.

Inspect the piping for cracks caused by heating and cooling repeatedly over time. You can have cracks welded by a good welder instead of replacing parts.

Typically on a dual sport or off road bike mufflers, there will be a serviceable spark arrestor that you can pull out and clean using a wire brush and compressed air. Obviously, don’t use any flammable liquids to clean it off.

BikerXGuy has a video on YouTube showing removal of the spark arrestor on his 2009 Yamaha YFZ450R quad you can reference if your manual doesn’t show it.

Cooling System

Cooling System

Finally comes some cooling system maintenance on a bike.

Typically you should drain and refill your coolant every two years or according to your bike manufacturer’s schedule. You may need to remove fairing or body panels to gain access to some parts of your cooling system for inspection before you get started.

If you’ve got an air-cooled engine count yourself lucky as this won’t apply to you. Carry on polishing chrome or get in some more riding time.

Drain the Coolant

Make sure the engine is cold and you have the following tools and supplies handy;

  • A pan that will hold more than the amount of coolant in your engine.
  • Enough new coolant to fill your system to capacity
  • The correct kind of coolant for your bike. There is Ethylene and Propylene Glycol to choose from. Check your manual to see what you need.
  • Some coolant comes as a concentrate so it needs to be mixed with 50% distilled water before adding to your bike. I prefer to buy premixed to avoid this.
  • Nitrile gloves to protect your hands. Some people’s skin reacts to coolant
  • A new sealing washer or o ring for the drain plug

Locate the water pump on your bike. It’ll be at the lowest point of the cylinder typically with a hose going into it from the radiator. The drain plug for the engine coolant should be on there.

Drain the Coolant

Loosen it until coolant starts to leak out, then remove your radiator cap and be ready for coolant to come rushing out and catch it in your pan.

Drain the Coolant

Inspect The Old Coolant

If you change the coolant regularly it should never look very murky or dirty, but if you buy a used bike and it doesn’t look brightly colored it’s definitely time to drain and refill.

If it is contaminated with oil, you’ve got a serious problem inside the engine and need professional assistance.

Fix Leaks and Replace Worn Out Hoses Now

Old Coolant

Take some time to inspect the rubber hoses in the cooling system and the clamps. If any of the hoses are hard instead of flexible or showing signs of cracking or rubbing now is the time to replace them with the system dry.

If anything else is leaking coolant externally now is the time to replace or repair it too. Like a water pump mounting gasket for example.

Radiator Fins

If your radiator fins are all bent over you can try and straighten them out to get airflow back how it should be again. If you have too many fins missing or lots of corrosion happening on your rad it may be time to bite the bullet and replace it. That can be a bigger job on some motorcycles but it can be done with some patience and time.

Refill the System and Bleed Air

Radiator Fins

Once the coolant has stopped draining, replace the sealing washer or o ring on the drain plug and tighten it according to what your manual advises. Easy there Hulk, it doesn’t need to be very tight.

Refill your coolant up to the top of the radiator just below the bottom of the filler neck and then fill the overflow tank up to the full mark.

Radiator Fins

Rock the bike back and forth to move any air in the system and squeeze the hoses a bit too. You might see bubbles in the rad cap opening while doing this indicating air coming out.

Start the engine and let it idle. You’ll probably see bubbles come up in the top of the rad. After it starts to warm up the coolant level will steadily rise up in the rad and threaten to overflow. At that point replace the cap and rev the engine for a bit to warm it up.

Shut off the bike and let it cool down completely before topping off the overflow tank.

Note: Some bikes have specific air bleeding procedures unique to them so be sure to read your manual beforehand as always.

To see the procedure done perfectly take a look at the YouTube video below from Motorcyclist Magazine. They go through all the steps clearly and make it look easy… because it is.

Wrap it Up!

There you go, a basic guide to engine maintenance for fuel injected specimens. There are many other things you can do to keep things running perfectly too, but master these simple jobs before you branch out into bigger and better things.

Safe riding out there my friends!


The post Motorcycle Maintenance Items for Fuel-Injected Bikes appeared first on Web Bike World.

Categories
Brake Checks & Maintenance Brake Fluid Brake Rotors and Drums Floating Rotors Gear Reviews Guide Other Motorcycle Blogs Pad Replacement Pads and Shoes Replace Brake Pads Tips & Advice Web Bike World

How-To: Brake Checks & Maintenance You Can Do At Home

I used to fear working on the brake systems of my vehicles because of how vital they are in avoiding becoming one with other cars on the road. If you don’t have knowledge on your side along with some mechanical aptitude and proper tooling, that fear is justified.

It’s not hard to arm yourself with those things if you decide to take the plunge, and this write up will help give you the knowledge portion.

Areas of Focus

For Inspection and Maintenance:

  • Pads and Shoes
  • Rotors (discs) and Drums
  • Brake Lines
  • Brake Fluid Level

Pads and Shoes

Pads and Shoes

Inspection and regular maintenance is paramount when it comes to catching problems early. The brake pads on the left in the photo above came off a dirt bike I purchased a few years ago. The pads on the right are brand new in comparison.

While test driving the bike, nothing seemed to hint that the front brake pads were in such poor condition because the braking power was normal. In fact, it braking was better than normal, which can sometimes be an indication of a problem.

Once all the friction material is worn away on brake pads the metal backing plate of the pad pressing on the disc grips quite well. This yields better stopping power temporarily, until the metal starts to suffer more heat damage and degrade to the point it fails spectacularly.
It also tends to destroy the disc or rotor because the pad’s backing material digs into them better than the pad’s friction material does.

Signs of Trouble To Look For On Brake Pads

Uneven Wear: Pads should wear fairly evenly if they aren’t hanging up on the slider pins. If they aren’t check to make sure the pins aren’t bent or damaged in any way.

Oil and Dirt Contamination: In the picture above you’ll notice how the material left on the pads is dark almost like it’s been burnt. It’s actually fork oil that had previously leaked out, ran down the chrome and wound up contaminating the brake pads.

  • You never want oil of any kind around your brakes for obvious reasons. This burnt fork oil helped break down the pads’ friction material and accelerate wear.
  • If you see this happening, first repair the fork seal leak and then replace the brake pads otherwise it’ll keep contaminating them.

Glazing: There are signs of glazing on the friction material left too. Glazed portions look shiny and smeared. It’s caused by high heat and makes braking less effective and squealing or grinding noise at times.

Signs of High Heat: When there’s glazing you’ll usually also find a rainbow or dark blue/purple condition cropping up on the pads and discs. This can be a sign of a seized brake pad on a pin or even caliper piston.

  • Another sign of high heat would be cracks developing in the friction material or large chunks missing.

When In Doubt: Replace Brake Pads

As a rule, I replace the brake pads on all used bikes I buy regardless of condition, so I can check them carefully and start fresh with the maintenance intervals. They’re not very expensive and peace of mind is priceless.

I’m glad I did in the case mentioned above especially because there were no warning signs anything was amiss. No squealing, pulsating or any other typical warning signs I watch for. I replaced the pads just in time before catastrophic damage was done to the rotor, thankfully.
Brake rotors are wickedly expensive so take the time to inspect the pads at least once a season or more if you’re riding extensively or off road.

Caution

Brake dust is hazardous to your health!

  • Whenever working around brakes use brake clean to wash away the dust and dirt.
  • Wear nitrile gloves and avoid breathing in anything you clean off friction surfaces.
  • Even though newer brake linings aren’t asbestos as they used to be, brake dust of any kind isn’t good.
  • If there’s an extreme amount of debris and dirt to remove use water and then brake clean to remove any moisture left behind.

Pad Replacement

YouTuber smallengineshop shows how this is done in this video on his Kawasaki KLR650. The procedure will be different from bike to bike and you should definitely buy a repair manual for your specific model to reference before starting to work on your motorcycle. There are many different designs of brake calipers in use today that come apart in totally different ways.

He mentions 0.040” as the minimum thickness for the pads on his bike and that’s a good standard number to gauge yours by. The other general guideline is that the friction material should be thicker than the backing plate. In the end it’s best just to follow your bike manufacturer’s specification.

Replacing the brake pads is easy when you have them out anyway for inspection.

Additional valuable tips:

  • Smooth/polish the pins that the pads slide on with fine steel wool, especially if there is any kind of buildup on them. Some people also put graphite dry lube on them, but just keeping them smooth and clean is best.
  • Put a slight chamfer on the leading and trailing edges of the pad backing plate where they slide on the caliper frame.
  • While the pads are out for inspection you can take some sandpaper to the friction material just to rough the surface up to help fight glazing and remove any unwanted debris embedded in it. Don’t get carried away and remove material, just scratch up the surface evenly
  • Follow manufacturer procedures for brake pad bedding. Usually this involves avoiding emergency applications for 300 miles depending on the kind of pads. EBC Brakes has a great write up on it here:
  • When you replace brake pads bleed some of the brake fluid out of the line(s). More on how to do that later.

These measures help ensure easy application and retraction of the brake pads yielding proper brake life on your motorcycle.

Drum Brakes

Drum Brakes

Photo YouTube’s Ichiban Moto

Becoming more rare (thankfully), but still around on many bikes – are drum brakes.

Drum brakes use cables or rods to activate them instead of hydraulics, and those need to be checked for stretch and damage according to manufacturer’s specifications. Poor braking power could be caused by stretched cables or rods.

The “pads” used in drum brakes are called shoes, not pads, if you want to use correct nomenclature.

The same inspection criteria applies to both brake shoes and drums, but the method differs.

  • Some have a small inspection plug on the cover to remove allowing inspection of the thickness of friction material remaining on the shoes.
  • Others have an external gauge to reference. The gauge is more convenient because all you do is hold down the pedal and make sure the arrow is still in the usable range.

Adjusting them is fairly straightforward. Turn in or out the adjuster nut on the rod coming from the brake pedal to set the brake activation point. Get the rear wheel off the ground and turn the adjuster nut in until the brake comes on fully when you push the pedal down.

Make sure the brake doesn’t drag when the pedal is released.

Replacing the shoes involves removing the rear wheel from the bike. Not rocket science either, but you’ll have to set the tension on the chain when you’re finished as well.

Importance of Proper Drum Maintenance

Here’s a video from YouTube’s Brandiland as she changes the brake shoes on her dirt bike drum brake.

It gives pretty good guidance of how it’s done, but I would stress how important it is to use Brake Clean instead of just a dry shop towel on the drum and hub assembly to avoid inhaling brake dust. Maybe she used it but didn’t include that footage in the video?

She says the dirt found inside is “regular” but it’s not. Her brake is contaminated with dirt or mud and needs to be cleaned out to avoid accelerated wear.

I also spotted some deep scratches on the friction material of the brake shoes caused by the dirt which she doesn’t mention. It’s good she chose to replace those shoes.

I would say the seal on the brake housing (if there is one) should also have been changed to stop more dirt from getting in. With dirt bikes, contamination is almost unavoidable due to the sheer amount of mud they ride in.

It’s also a good idea to put axle grease on the axle bolt when reinstalling it.

Brake Rotors and Drums

Solid Rotors

Solid Rotors

Photo via EBCBrakes

Solid rotors used on bikes are mostly maintenance free, but need to be inspected for damage and wear. You can also clean them with disc cleaner specific solution or isopropyl alcohol.

Some people take Scotch Brite pads on the wear surface to remove any embedded brake pad material too.

Photo from Quora.com

There is a minimum thickness specification for rotors (discs) in order to remain in service. Leaving them in service past this point runs the risk of them cracking and failing catastrophically.

Rotors, like brake pads can show signs of glazing, cracking, heat damage and deep grooves caused by contamination of the brake pads. Any of these will necessitate replacement of the rotors.

If you get grooves worn deeper than 0.5mm in either side of the rotor, replace it or them. You can have the rotors machined flat again but not if doing so thins it past the minimum thickness allowable.

Don’t replace individual pads or rotors from a set of multiples. If you need to replace a single component on one wheel (like one pad out of 4, or 1 rotor of 2) you should change all the same kind of neighbouring parts to maintain a balanced braking system.

Floating Rotors

Photo via EBCBrakes

The photo above shows a couple of types of floating rotors.

The identifying characteristic is the round rivets connecting the inner carrier and outer friction surface area (blade) where the pads grip. The rivets are the only bond holding the two halves together and you can see a small gap between them.

  • The rivets, aka buttons or bobbins, allow different types of metal to be used which helps deal with heat expansion and dissipation.
  • The inner metal carrier is usually aluminum and the outer blade steel.

This design compensates for some movement of the outer ring when braking occurs. That flexibility gives smoother and more efficient braking by keeping the pads in better contact with the disc. On semi floating discs this movement is less pronounced while on full floating ones there’s more movement or float.

Most manufacturers equip semi floating discs these days while full floating ones are generally only found on racing motorcycles.

Testing and Maintaining the Rotors

Over time those rivets can seize up due to buildup of debris and brake lining material which causes vibration to be felt by the rider. You’ll find tapping on the rotors with a rubber mallet will produce a buzzing sound from rotors that are still loose and doing their job. That will diminish as they seize up and conversely ring more solid.

There are many videos on youtube of people doing various things to free them up again involving brake clean and drills. Some even use penetrating oil – DO NOT use any oil around brakes.

If you want to clean out the rivets and service the rotor, remove the wheel from the bike and use compressed air and brake clean, disc cleaner or isopropyl alcohol to do it. While you’re at it take Scotch Brite pads to the blade surface to clean it up too.

This is a useful piece of maintenance to do, but really, if your rotors are causing vibration they’re most likely warped due to high heat and should just be replaced along with the pads.

Drums should be inspected for damage, cleaned with steel wool and brake clean then measured on the inner diameter to determine usability. You’ll have to check manufacturer’s specifications for the maximum allowable inner diameter, but if you find uneven wear just replace the drum.

Brake Lines

Brake Lines

Photo via JPCycles

Whether you have steel braided lines or rubber coated you should take time to inspect them for loose fittings, bulges, cuts and leaks at the crimps. Don’t take chances with them. Replace the lines if you find anything unusual.

Brake Fluid

If you replace a brake line you’re obliged to drain and replace the brake fluid too. The purpose of bleeding is to remove old fluid or air pockets in the reservoir, lines and calipers.

Be Aware

Some people check the level in the reservoir and then choose to overfill them thinking it should be full to the top. More is not better when it comes to brake fluid. There needs to be some room in the reservoir for expanding fluid to retreat to during heavy braking. Thermal expansion of the fluid can become a real concern in extreme cases.

If the expanding fluid can’t move up the lines into the space in the reservoir it will instead start to apply the brakes by pressing against the piston(s) in the calipers.

Getting it Done

Brake Fluid

Just as it says on this page from a Honda CBR600RR maintenance manual, maintain the fluid about halfway between the upper and lower marks. When you replace the fluid fill to the halfway point, bleed the lines and then top up to halfway again, and replace the cover.

You’ll need a partner to avoid a lot of mucking about when it comes to bleeding and flushing. You can do it by yourself if you buy a vacuum bleeder tool, but it’s not necessary if you have friends and family members to spend quality time with in the garage.

Brake fluid damages paint and clearcoat. Take care not to get it anywhere on your bike without immediately removing it.

This YouTube video from Sum4Seb shows how to drain, flush and fill the front brake circuit using a helper. It appears he recruited his daughter or wife to help out with the job. Bonding over brakes. Doesn’t that just tug at your heartstrings and bring a tear to your eye?

Use caution with the bleeder screw on calipers which don’t need to be hamfisted or closed super tight. They will easily sheer off if you use gorilla level strength on them.

If you have twin caliper brakes in the front you’ll need to flush and bleed each circuit separately.

Choosing the Correct Brake Fluid

Castrol

When replacing brake fluid it’s critical to use the correct type of brake fluid and follow the maintenance schedule. Typically this is done every two years and the correct DOT brake fluid type will be stamped in the reservoir cover.

Brake fluid absorbs moisture over time especially when left exposed to air. That moisture can lower the boiling point of the fluid which is a real concern when things heat up.

As mentioned in the video, brake fluid is nearly free of colour when in good condition. If yours appears dark or murky there’s a good chance it’s been contaminated or burnt because of heat and should be replaced.

Usually it’s DOT 4 or 5 in motorcycles. DO NOT mix any different fluid with silicone based DOT 5 fluid. They won’t mix well and you’ll have big issues. There are non-silicone based DOT 5 brake fluids produced now on the market just to complicate things.

The best idea is to pay close attention the the label and always use the same fluid.

Motul

Final Thoughts

Motorcycle brake maintenance is nothing to shy away from as it turns out. You may need to purchase some torx or allen sockets in order to do the work, but those aren’t exotic by any stretch.

Most important, read and follow the proper procedure in the service manual to do it correctly. YouTube is a great reference, but not completely reliable.

The personal satisfaction gained in doing your own work will put a smile on your face and grow your confidence to tackle bigger projects.

Saving some money never hurts either. Take the money saved on labour and invest it in higher performance parts instead!

The post How-To: Brake Checks & Maintenance You Can Do At Home appeared first on Web Bike World.